87
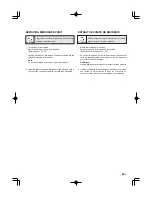
LE MOTIF DE BRODERIE EST MAL ALIGNÉ
La broderie continue
lorsque le fil est
emmêlé.
Aucun entoilage
n’est fixé quand vous
utilisez un tissu léger
ou extensible.
Fixez de l’entoilage
sur le tissu.
Reportez-vous aux
pages 72 - 75.
Le tissu n’est pas
bien tendu dans le
cerceau.
Serrez le tissu dans
les cadres de façon
qu’il produise un
bruit de tambour
lorsque vous donner
un petit coup à la
surface avec le
doigt.Reportez-vous
aux pages 70 - 71.
Le cerceau de
broderie n’est pas
bien fixé.
Fixez fermement le
cerceau sur le
support du cerceau à
l’aide des vis de
montage du erceau.
Reportez-vous aux
pages 78 - 79.
Si le fil reste emmêlé,
le tissu pourra être
plissé, ce qui abîmera
la finition de la
broderie.
Arrêtez la broderie,
retirez le cerceau et
démêlez le fil.
Reportez-vous à la
pages 92 - 93.
Ceci risque de plisser
le tissu et de causer
des irrégularités
d’entraînement; vous
devez donc diminuer
la tension du fil.
Reportez-vous aux
pages 32 - 33.
La pointe de l’aiguille
est épointée ou
l’aiguille est trop
grosse.
Choisissez une
aiguille correcte.
Reportez-vous aux
pages 30 - 31.
Si le fil est emmêlé
dans le porte-bobine
ou en un point du
passage du fil, la
tension du fil
augmentera et le tissu
sera plissé; vous devez
donc vérifier le fil.
Reportez-vous aux
pages 24 - 25.
Le fil est emmêlé en
un point du passage
du fil.
CÔTÉ MACHINE
CÔTÉ CERCEAU
Le fil supérieur est
trop tendu.
EMBROIDERY PATTERN IS MIS-ALIGNED
Embroidering is
continuing when
thread is tangled.
No stabilizer
attached when using
light or stretch
material.
Attach interfacing to
the material.
Refer to pages 72 -
75.
Material has not
been tightly fitted into
hoop.
Tighten the material
in the frames so that
it makes a sound like
a drum when the
tightened surface is
tapped with a finger.
Refer to pages 70 -
71.
Embroidery hoop is
not correctly
attached.
Attach the hoop
securely to the hoop
bracket with the hoop
mounting screws.
Refer to pages 78 -
79.
If the thread remains
tangled, the material
may pucker and spoil
the embroidery finish.
Stop embroidering,
remove the hoop and
untangle the thread.
Refer to pages 92 -
93.
This can cause the
material to pucker
and result in uneven
feeding, so reduce
the thread tension.
Refer to pages 32 -
33.
Needle tip is broken
or needle is too thick.
Select a correct
needle.
Refer to pages 30 -
31.
If the thread is tangled
on the spool pin or
somewhere along the
thread path, it will
increase the thread
tension and cause the
material to pucker, so
check the thread.
Refer to pages 24 -
25.
Thread is tangled
somewhere along the
thread path.
MACHINE SIDE
HOOP SIDE
Upper thread tension
is too tight.
Summary of Contents for FUTURA CE-200
Page 3: ...3 ...
Page 8: ...8 4 5 6 8 2 3 1 9 7 10 14 15 16 13 11 12 ...
Page 16: ...16 ...
Page 18: ...18 1 ...
Page 20: ...20 1 2 3 4 ...
Page 22: ...22 2 3 4 A B 5 6 1 ...
Page 24: ...24 1 3 5 6 4 2 Thread take up Releveur de fil Tria hilos Tab Languette Lengüeta ...
Page 26: ...26 1 2 3 ...
Page 28: ...28 1 2 3 4 ...
Page 38: ...38 F E A B C D I 2 3 4 1 G H 6 5 ...
Page 46: ...46 ...
Page 48: ...48 ...
Page 50: ...50 ...
Page 52: ...52 39 30 35 ...
Page 54: ...54 19 20 21 70 71 72 80 81 82 83 84 ...
Page 56: ...56 17 74 75 76 77 78 79 16 17 18 60 61 62 63 64 65 66 67 68 69 70 18 62 16 62 16 16 67 ...
Page 58: ...58 A B C C C C Buttonhole foot Pied boutonnière Tab A Butée A BTab B Butée B ...
Page 66: ...66 ...
Page 70: ...70 2 1 Hoop adjusting screw Vis de réglage de cerceau ...
Page 78: ...78 A 2 1 B B D C D Hoop mounting plate Plaque de montage de cerceau Carriage Chariot ...
Page 84: ...84 ...
Page 86: ...86 92 93 72 75 70 71 78 79 ...
Page 90: ...90 EM 01 EM 02 EM 03 EM 04 EM 05 EM 06 EM 07 EM 08 EM 09 SAFTY DEVICE ACTIVATED ...
Page 92: ...92 2 1 A B 2 3 4 3 5 4 1 ...
Page 96: ...96 ...
Page 98: ... Part No 77191 1 05 ENGLISH FRANÇAIS ...
Page 99: ...CE 200 INSTRUCTION MANUAL MANUEL D INSTRUCTION ...
Page 100: ......

