Siemens DCA Vantage Operator'S Manual Download Page 64

64

DCA Vantage Operator’s Guide

Ope

rat

ing the

 Sy

st

em

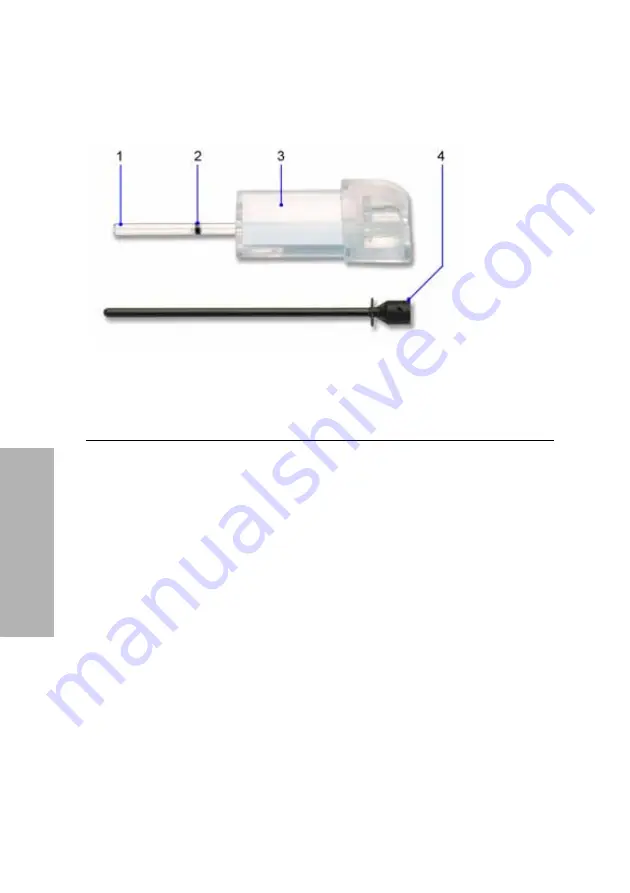
2. Remove a capillary holder and a plunger from the plastic bag.

3. Inspect the capillary holder for the presence of the parts. Refer to 

Figure 17.

Figure 17   Capillary Holder

If the capillary holder is missing any of the above parts or parts are damaged, 
discard the capillary holder; also discard it if the starch plug is at the bottom of 
the capillary tube.

1

Glass Capillary

2

Starch Plug

3

Absorbent Material

4

Plunger

Summary of Contents for DCA Vantage

Page 1: ...PN 06489264 Rev D Operator s Guide En A5 Wire O Front cover 148 x 210 mm 5 8 x 8 3 SIEMENS LOGO c100 m0 y40 k0 55 PMS 5425 and Black DCAVantage Analyzer Operator s Guide REF 06489264 Rev E 2012 08 ...

Page 2: ...nostics All other trademarks are the property of their respective owners The information in this manual was correct at the time of printing However Siemens Healthcare Diagnostics continues to improve products and reserves the right to change specifications equipment and maintenance procedures at any time without notice If the DCA Vantage analyzer is used in a manner differently than specified by S...

Page 3: ...nstallation Hardware Installation 25 Unpacking the System 25 Record the Warranty Information 27 Connect the System Power 28 Installing the Hardware and External Devices 29 Installing the External Barcode Reader 29 Installing Printers 29 Setting up the Onboard Printer 30 Setting up the External Printer 30 Setting up the Report Header 31 Setting up the Report Type 31 Resetting Printer to Default 31 ...

Page 4: ...ding an Operator 43 Editing an Operator 44 Displaying an Operator 44 Deleting an Operator 44 Performing Tests 45 Opening and Inspecting the Reagent Foil Package 45 Opening the Reagent Foil Package 45 Inspecting the Contents of the Foil Package 47 Hemoglobin A1c Test 48 Preparing Patient Samples and Controls for Hemoglobin A1c Test 48 Performing a DCA Hemoglobin A1c Test 48 Scanning the Reagent Car...

Page 5: ...ing the HbA1c Results in Graph Format 79 Viewing Patient Test Results 79 Editing Patient Data 80 Selecting a Printer 80 Configuring GFR for a Patient 81 Reports 81 Patient Test Reports 81 Report Components 81 Patient Trend Graph Report 82 Control Test Report 82 Calibration Data Report 82 Viewing and Printing System Settings Reports 82 4 Calibration Overview 83 Calibrating for Hemoglobin A1c 83 Cal...

Page 6: ...ming User System Tests 109 Calibrating the Touchscreen 110 User System Test Results 110 System Settings 110 Loading Paper on the Onboard Printer 111 Replacing the Fuse 115 Setting Maintenance Reminders 117 Viewing System Maintenance Status 118 System Maintenance Log 119 Viewing the Maintenance Log 119 7 Troubleshooting System Messages 121 Troubleshooting the System 124 Troubleshooting Reagent Mess...

Page 7: ...etting General Options 161 Setting the Language 161 Setting the Time Format and Time 161 Setting the Date Format and Current Date 162 Setting the Sequence Number Options 162 Volume and Display 163 Setting the Sound Volume 163 Setting the System Display 163 Viewing the Current System Settings 164 Viewing and Printing a Partial System Settings Report 164 Printing a Full System Settings Report 164 Cu...

Page 8: ...ibility EMC 182 Reporting Results Calculations 182 Percent HbA1c Calculation 182 Dual Reporting Calculations HbA1c and IFCC Units 183 Glomerular Filtration Rate Calculation 183 Printed Reports 183 Patient Test Report Contents 183 Patient Trend Graph Report Contents 185 Control Test Report 186 System Settings Report 188 Appendix F External Barcode Reader Specifications 193 Barcode Formats 193 Barco...

Page 9: ... Connections Using ASTM 200 Serial Connection 200 Architecture 201 Hardware Link 201 Character Format 201 Ethernet Connection 202 Displaying and Printing the MAC address 202 Automatically Sending Data to an LIS 202 Recovery from a Failed Ethernet Connection 204 Appendix H Glossary Hardware Terms 205 Software Terms 206 Acronyms 208 Index ...

Page 10: ...10 DCA Vantage Operator s Guide ...

Page 11: ... security enter Operator IDs and access codes and manage reference ranges Section 3 Operating the System learn about calibration and how to print the calibration status Section 4 Calibration process Quality Control samples Section 5 Quality Control perform maintenance activities Section 6 Maintenance investigate and correct system problems Section 7 Troubleshooting learn about managing data Sectio...

Page 12: ...that may cause product damage or loss of data NOTE Note statements alert you to important information that requires your attention Bold Bold type indicates text or icons on the user interface For example if the word save appears as Save it refers to the Save key on the user interface System icons are also indicated by words in bold type For example the words Next Screen refer to a system icon A co...

Page 13: ... laboratory Tests performed using the DCA Vantage system are intended for in vitro diagnostic use As with all diagnostic tests do not base a definitive diagnosis on the results of a single test A physician should make a diagnosis after all clinical and laboratory findings are evaluated The system is a spectrophotometer that analyzes the intensity of the light transmitted through the cartridge opti...

Page 14: ...re 1 DCA Vantage System Interaction with the DCA Vantage system is via an integrated touchscreen Messages options and requests for information display and responses are made by selecting the appropriate key symbol on the screen 1 Printer 2 Display Screen 3 Reagent Cartridge Compartment 4 Onboard Barcode Reader CAUTION Do not use anything hard or pointed on the touchscreen It can damage the touchsc...

Page 15: ... memory You can insert a Universal Serial Bus USB Flash memory drive into the system s USB port to save data and system settings You can then insert the USB memory drive into another DCA Vantage system and restore the data to the new system You can transfer patient data from one DCA Vantage system to another using the software backup and restore sequences in system settings See File Management pag...

Page 16: ...16 DCA Vantage Operator s Guide Overview Figure 2 Power and External Connections 1 External Interface Connections 2 Power Plug 3 Power Switch ...

Page 17: ...ent and control information as described in Appendix F External Barcode Reader NOTE The DCA Vantage system does not support the connection of an external computer keyboard or a mouse to enter data Refer to Appendix D Symbols for a complete list of key symbols used on the DCA Vantage system Power Save When the system is not in use for more than 30 minutes Power Save automatically turns on The syste...

Page 18: ...ication window displays at the Home screen when a maintenance task is due an error event occurs or a required or optional control test notification is posted 1 At the Home screen select Events The Events List screen displays the information about the notification 2 Use the up and down arrows to scroll through the notifications 3 To return to the Home screen select Back NOTE The Events Notification...

Page 19: ...r Last Name the field is blank You also can delete test results from this screen Date Range enter a Start and End Date to search patient results for a specific time period Comment 1 search by the first comment of the up to 8 available comments To perform a wildcard search use the percent sign at the end the entry Results Range Use the Set Lower Limit screen to set the HbA1c search filter value whe...

Page 20: ...ll search Date Range enter a Start and End Date to search patient results for a specific time period Comment 1 search by the first comment of the up to 8 available comments To perform a wildcard search use the percent sign at the end the entry Export copy data to a USB storage device Select to Control Tests see a read only status of required and optional Control tests Select Log to see up to 100 e...

Page 21: ...rrection adjust the slope and offset for the HbA1c values Albumin User Correction adjust the slope and offset for the Albumin values Creatinine User Correction adjust the slope and offset for the Creatinine values GFR Calculation turn the GFR Calculation on or off and select the unit of measurement to be used for plasma creatinine Patient Recall List Options set the search criteria and display for...

Page 22: ...restricted access to the Recall and System Settings features Test Lockout prevent a patient test from running when there is a control test failure for the current test type The remove patient test lock function locks out all patient testing and is enabled and disabled from a remote computer Settings Wizard activate the wizard to run the next time the system is powered on Storage Mode specify how p...

Page 23: ...t Type select whether to print a full report or a short partial report for faster printing Reset Printer Defaults return the printer settings to the factory settings External Barcode Reader disable or enable the external barcode reader and select the barcode symbology Connectivity select serial or Ethernet port choose data transmission protocol and configure port settings HbA1c Reporting Units spe...

Page 24: ...24 DCA Vantage Operator s Guide ...

Page 25: ...sides Unpacking the System Your DCA Vantage system is delivered in 1 shipping carton 1 Carefully remove the contents of the shipping carton 2 Inspect the carton and system for visible signs of damage 3 If damage to the system exists immediately file a complaint with the carrier 4 Make sure all items are included with your system and keep them for future use DCA Vantage system Cleaning Kit Optical ...

Page 26: ...5 Retain the shipping carton and packing for several weeks If you need to ship the system the shipping carton provides the best protection against damage 6 Place the system on a firm level work surface in the designated work area 7 Ensure that the system is level and that the back and sides of the system are at least 8 cm 3 inches from any adjacent wall ...

Page 27: ...rial number is on a label between the fan and the power connector To find the serial number from the user interface select Menu System Settings View Settings Figure 5 Serial Number Location Air Filter Removed 3 Write the installation date and serial number in the spaces provided in the Pre service Checklist and on the Warranty Information page 169 4 Contact your Siemens representative for your war...

Page 28: ...em Power 1 Ensure that the system power switch is in the Off position 2 Connect the power cord to the system and to an appropriate grounded AC electrical outlet Figure 6 External Connections and Power Connections 1 External Connections 2 Power Plug 3 Power Switch ...

Page 29: ... External Barcode Reader If you ordered an external barcode reader it is supplied in addition to the internal barcode reader Refer to Appendix F Installing the External Barcode Reader Installing Printers Use the Printers menu to perform the following tasks enable disable the onboard and external printer configure the onboard and external printer enter a customized report header that displays on pr...

Page 30: ...select the number of copies of the report you want to print 7 To save the onboard printer setting select Save Setting up the External Printer The DCA Vantage system supports only Printer Command Language PCL type printers for external printers Network printers are not supported 1 At the Home screen select System Settings 2 At the System Settings menu select Additional Settings 3 At the Additional ...

Page 31: ... paper for the onboard printer and reinstall the printer cover Refer to Loading Paper on the Onboard Printer page 111 The printer stops printing when it runs out of paper If no paper is available at the start of printing the printer does not attempt to print Software Setup After the system is properly installed start the DCA Vantage system by toggling the power button to the On position The system...

Page 32: ...xt time the system is turned on follow these procedures 1 At the Home screen select System Settings 2 At the System Settings menu select Additional Settings 3 At the Additional Settings menu select General 4 Select Settings Wizard 5 To run the wizard the next time you turn the system on select Run System Settings Wizard at Next Power on 6 To save this setting select Save Verifying that the DCA Van...

Page 33: ...disabled NOTE You must select Save on all of the screens to save your changes 1 At the Home screen select System Settings 2 At the System Settings menu select Additional Settings 3 At the Additional Settings menu select Connectivity 4 Select Serial ASTM automatically selects 5 Select Configure to continue setting Serial Port options The Serial Port options menu displays Setting Baud Rate 1 At the ...

Page 34: ...ial Port options to the factory default settings 1 At the Home screen select System Settings 2 At System Settings select Additional Settings The Additional Settings menu displays 3 At the Additional Settings menu select Connectivity 4 Select Serial ASTM automatically selects 5 Select Configure 6 Select Reset Defaults Setting up the Ethernet Port Use the Ethernet Port menu to access the system sett...

Page 35: ...ou can configure the system with either Automatic or Static IP settings If you select Automatic IP Setting IP Address Subnet Mask and Default Gateway selections are unavailable If you are using Static IP you must configure the following settings IP Address Subnet Mask Domain Name Server Default Gateway Remote Computer 1 At the Ethernet Port menu select Automatic IP Setting or Static IP Setting The...

Page 36: ...the Default Gateway Use the Default Gateway screen to enter the default gateway for the system 1 At the Ethernet Port menu select Default Gateway 2 Use the numeric keypad to enter the default gateway 3 To save the default gateway select Save Setting up the Remote Computer Use the Remote Computer screen to enter the IP address or host name for the remote computer After you enter the IP address or h...

Page 37: ...IS page 202 To enable Auto Send perform the following procedure 1 From the Home screen select Menu System Settings Additional Settings Connectivity 2 Select the type of connection Ethernet or Serial and the protocol ASTM or POCT1A 3 To enable Auto Send select the Automatically Send check box This selection is disabled by default To enable manually sending selected results clear this check box 4 Se...

Page 38: ...s the patient control and calibration data Before you upgrade the software print the patient test data and the control test data if needed Consider exporting the data to a USB device For details see Exporting Patient Data page 147 The system exports the data to a txt file You can view the data in a text file or worksheet Because of the number and complexity of changes in the software between Versi...

Page 39: ...sults screen select Full Report or Short Report and select Next b On the HbA1c Reporting Units screen select the primary and secondary reporting units and select Next c Continue to step 4 4 On the Set System Time screen select the format and time and select Next 5 On the Set System Date screen select the format and date and select Next A list of key software changes displays This list appears only...

Page 40: ...40 DCA Vantage Operator s Guide ...

Page 41: ...strator Levels 2 and 3 are more restrictive and are typically for an operator running daily tests and maintenance activities Refer to page 42 for system access and operator access levels When you assign the security access for the system and the level of access to an operator you can control the features that the operator can access When the system access is set to one of the protected modes the s...

Page 42: ...or Restricted Plus the operator enters his or her access code to continue The system auto populates the Operator ID data entry item according to the user s entered password Access Code or Support ID of the Day when the following conditions are true Patient or control test is being run System access is configured as Fully Restricted or Restricted Plus mode User has been authenticated after entering...

Page 43: ...The access code field is alphanumeric with the alpha characters entered as uppercase A Z and 0 9 The access code can be up to 13 characters 1 At the Home screen select Menu 2 Select System Settings from the Menu screen 3 At the System Settings menu select Additional Settings 4 Select General 5 Select System Access 6 Select the system access level Unrestricted Restricted Restricted Plus or Fully Re...

Page 44: ... Save Displaying an Operator 1 At the Home screen select Menu 2 Select System Settings from the Menu screen 3 At the System Settings menu select Additional Settings 4 At the Additional Settings menu select General 5 Select System Access 6 At the System Access menu select Operators A list of operators displays Deleting an Operator 1 At the Home screen select Menu 2 Select System Settings from the M...

Page 45: ... You can use DCA 2000 and DCA 2000 cartridges on the DCA Vantage system Opening and Inspecting the Reagent Foil Package Before running an HbA1c test or Microalbumin and Creatinine test open and inspect the contents of the Reagent Cartridge foil package Opening the Reagent Foil Package 1 Remove one foil package containing a reagent cartridge from storage For more information see Recommended Procedu...

Page 46: ...ckage as shown in Figure 7 Figure 7 Opening Reagent Cartridge Package 3 Remove the contents of the package CAUTION Do not use scissors to cut open the foil package Scissors can damage the reagent cartridge the flexible plastic pull tab on the cartridge or the desiccant bag ...

Page 47: ...conditions exist The cartridge is damaged The flexible pull tab is loose or missing The desiccant bag is missing or open Loose desiccant particles are found inside the foil package If the foil package is open for more than 60 minutes CAUTION When handling the reagent cartridge do not touch or otherwise contaminate the optical window as this may generate error codes during testing 1 Flexible Pull t...

Page 48: ...ing a DCA Hemoglobin A1c Test NOTE You can save unused capillary holders and use them with any lot of DCA Hemoglobin A1c reagent cartridges 1 Open and inspect the Reagent Cartridge Foil Package 2 Open the plastic wrap of the capillary holder by tearing the wrap at the serrated edge with the arrow 3 Inspect the capillary holder for the presence of the following parts absorbent pad glass capillary l...

Page 49: ... Vantage Operator s Guide 49 Operating the System Fill the capillary using blood from either a finger stick or venipuncture Figure 9 Capillary Holder 1 Glass Capillary 2 Absorbent Pad 3 Latching Mechanism ...

Page 50: ...n the capillary is filled with the sample analysis must begin within 5 minutes 1 Mix the sample well by inversion or use of a tube mixer to prevent separation of red blood cells and plasma 2 Remove stopper from blood collection tube in such a way that a small sample of blood remains on the stopper 3 Hold the capillary holder at an angle 4 Touch only the tip of the capillary to the blood sample on ...

Page 51: ...DCA Vantage Operator s Guide 51 Operating the System Figure 11 Filling Capillary with Blood from Venipuncture 1 Glass Capillary Tip 2 Blood Sample ...

Page 52: ...touch the open end of the glass capillary Contact with the open end of the capillary could result in loss of sample by wicking into the tissue If sample loss is obvious discard the capillary holder Repeat the procedure using a new capillary holder 6 Inspect the glass capillary for the presence of bubbles If bubbles are obvious discard the capillary holder and repeat the procedure using a new capil...

Page 53: ...rt the capillary holder into the reagent cartridge until the holder gently snaps into place Figure 13 Inserting Capillary Holder into a Reagent Cartridge CAUTION Avoid harsh insertion of the capillary holder into the cartridge Do not dislodge the sample from the glass capillary or erroneous results may occur 1 Glass Capillary 2 Reagent Cartridge ...

Page 54: ... information about the Reagent Cartridge Lot into the system This screen has a 10 second time out Refer to Running a Control Test page 90 for more information 1 Locate the dot on the system next to the barcode track 2 Locate the barcode on the reagent cartridge 3 Hold the reagent cartridge so that the barcode faces to the right 4 Insert the reagent cartridge above dot into the barcode track CAUTIO...

Page 55: ... Smoothly slide the reagent cartridge down A beep sounds to signal a successful scan NOTE If no beep sounds repeat procedure If a beep repeatedly fails to sound refer to Troubleshooting page 121 Figure 14 Scanning the Reagent Cartridge 1 Barcode track dot ...

Page 56: ...s designed to fit only one way into the system Do not force the cartridge into system Figure 15 Inserting the Reagent Cartridge into the Cartridge Compartment 4 Using a smooth slow continuous motion pull the flexible pull tab completely out of the reagent cartridge 5 Close the door and dispose of the flexible pull tab Five seconds after the door is closed a beep sounds and the assay begins NOTE If...

Page 57: ...ing the Touchscreen 1 Select Sample ID 2 Enter the Sample ID 3 Select Enter The Sample ID displays next to the Sample ID button 4 Select Patient ID 5 Enter the Patient ID 6 Select Enter The Patient ID displays next to the Patient ID button 7 Select Last Name 8 Select First Name 9 Select Comments 1 8 10 Select Operator ID The Operator ID is pre populated and read only if the system is in Restricted...

Page 58: ...m The Interleaved 2 of 5 I2of5 symbology requires an even number of characters If a scanned barcode has an odd number of characters the symbology adds a leading zero up to the maximum of 24 characters For example 1 becomes 01 Narrow Bar Width 0 15 0 51 mm 0 006 0 02 inches It is better to be closer to the upper limit 0 51 mm 0 02 inches as long as the entire barcode can be contained within the max...

Page 59: ... Last Name Operator ID Comments and scanning the barcodes to enter the information NOTE The Operator ID is pre populated and read only if the system is in Restricted Plus mode or Fully Restricted mode Cancelling a test You can cancel a test anytime While a test is running a display shows the time remaining and a Cancel button If a test in progress is cancelled you must discard the sample To cancel...

Page 60: ...tries in System Settings For more information see Setting Patient Data Entry page 151 Result Description System Serial Number The serial number of the DCA Vantage system Test Name The type of test either Microalbumin Creatinine test or HbA1c test Sample Sequence Number The sample sequence number Transmission Status The transmission status of the record Cartridge Lot Number The lot number of the ca...

Page 61: ... Reporting Range but below the Reference Range Similarly a value of 12 5 is displayed as 12 5 showing that it is within the Reporting Range but above the Reference Range A value of 5 2 is displayed as 5 2 because it is within both the Reference and Reporting Ranges Result Details Using Single or Dual Reporting Units You can display and print the HbA1c results in single or dual reporting units For ...

Page 62: ...Reporting Units page 153 NOTE You can print enter or edit the sample data while the results are displayed Removing the Reagent Cartridge When the tests are complete remove the reagent cartridge from the system 1 Open the cartridge compartment door 2 Locate the button on the right side of the cartridge compartment 3 Push and hold it down with your right hand 4 With your left hand gently push the ta...

Page 63: ...n preparing controls refer to Quality Control page 87 For information on calibrating refer to Calibrating for Microalbumin Creatinine page 85 Performing a DCA Microalbumin Creatinine Test You can save unused capillary holders and use them with any lot of DCA Systems Microalbumin Creatinine reagent cartridges 1 Open and inspect the contents of the Reagent Cartridge foil package Refer to Opening and...

Page 64: ...illary holder for the presence of the parts Refer to Figure 17 Figure 17 Capillary Holder If the capillary holder is missing any of the above parts or parts are damaged discard the capillary holder also discard it if the starch plug is at the bottom of the capillary tube 1 Glass Capillary 2 Starch Plug 3 Absorbent Material 4 Plunger ...

Page 65: ...2 Allow enough time for the urine sample to flow into the capillary tube and come in contact with the starch plug approximately 5 seconds Wetting the starch plug seals the capillary tube and keeps the urine within the tube 3 Remove the capillary tube from the urine sample If the urine flows back down the tube reimmerse the capillary tube in the urine sample again and allow enough time to ensure th...

Page 66: ... specimen to flow into the capillary tube and come in contact with the starch plug Wetting the starch plug seals the capillary tube and keeps the urine within the tube 4 Remove the capillary tube from the urine specimen If the urine flows back down the tube r immerse the capillary tube in the urine specimen again and allow enough time to ensure that the starch plug becomes saturated 5 Using a lint...

Page 67: ...e Operator s Guide 67 Operating the System 6 Inspect the glass capillary tube for the presence of bubbles If bubbles are obvious discard the capillary holder then repeat the procedure using a new capillary holder ...

Page 68: ...the capillary holder into the reagent cartridge until the holder gently snaps into place Figure 20 Inserting the Capillary Holder into Reagent Cartridge CAUTION Avoid harsh insertion of the capillary holder Do not dislodge the sample from the glass capillary or erroneous results may occur 1 Glass Capillary 2 Reagent Cartridge ...

Page 69: ...agent cartridge so that the barcode faces to the right 4 Insert the reagent cartridge above dot into the barcode track 5 Smoothly slide the reagent cartridge down NOTE After a 1 second pause a beep sounds to signal a successful scan If no beep sounds repeat the procedure If a beep repeatedly fails to sound refer to Troubleshooting page 121 Figure 21 Scanning the Reagent Cartridge 1 Barcode Track D...

Page 70: ...artment door 2 Hold the reagent cartridge so that the barcode faces to the right 3 Insert the reagent cartridge into the cartridge compartment until you hear a gentle snap NOTE The cartridge is designed to fit only one way into the system Do not force the cartridge into the system Figure 22 Inserting Reagent Cartridge into System ...

Page 71: ...he reagent cartridge 7 Close door and dispose of the flexible pull tab Five seconds after the door is closed a beep sounds and the assay begins NOTE If you accidentally close the door before you pull the flexible tab you have 5 seconds to reopen the door and pull the tab The test resumes once the door is closed Cancelling a test You can cancel a test anytime While a test is running a display shows...

Page 72: ...ot number of the cartridge Test Cartridge Scan Date and Time The date and time the test cartridge was scanned Patient ID The patient ID if you entered one into the system Patient Last Name The last name of the patient if you entered one into the system Patient First Name The first name of the patient if you entered one into the system Operator ID The Operator ID if you entered one into the system ...

Page 73: ...albumin or 15 mg dL for creatinine An albumin or creatinine value preceded by a greater than sign in the display indicates that the concentration is above the upper reporting limit of the test that is 300 mg L for albumin and 500 mg dL for creatinine An Albumin Creatinine ratio preceded by a less than sign or greater than sign or in the display indicates that either the albumin and or creatinine v...

Page 74: ...Creatinine ratio for Patient Tests Values above or below the Reference Range limits but within the Reporting are followed by the applicable plus or minus sign NOTE You can print enter or edit the sample data while the results are displayed For information about printing a report of patient microalbumin creatinine test results see Displaying Printing and Sending Results page 59 For a summary of the...

Page 75: ...ests and Calibration Data Use the Recall Menu to access patient tests control tests and calibration data You can restrict edit and delete functionality in the Recall menu in System Settings Refer to Customizing the System page 151 The Enter Access Code screen displays when you attempt to access the Recall Menu if system access is set to Fully Restricted in System Settings If System Access is set t...

Page 76: ...ew HbA1c patient test results select HbA1c To view microalbumin creatinine patient test results select Microalbumin Creatinine 4 Select View Last 10 The last 10 patient tests display You can delete patient tests at this screen by performing the following steps 1 While viewing the patient tests select a test The patient test is highlighted 2 Select Delete A message displays verifying that you want ...

Page 77: ...ying that you want to delete the patient test result c Select OK 8 Delete all of the patient tests if needed a Select Delete All A message displays verifying that you want to delete all the patient tests NOTE Only the tests that are recalled in the search are deleted b Select OK Searching for a Specific Comment Use the Comment 1 screen to search for a specific comment 1 At the Home screen select R...

Page 78: ...ws to select the Month Day and Year 6 Select Next The End Date screen displays 7 Use the up and down arrows to select the Month Day and Year 8 Select Next The search results display To delete a patient test from the date range results 1 Highlight the test 2 Select Delete A message displays verifying that you want to delete the patient tests 3 Select OK 4 To delete all the patient tests select Dele...

Page 79: ...lect HbA1c The HbA1c Patient test List screen displays 4 Select Graph 5 Use the keypad or external barcode reader to enter a Patient ID 6 Select Next All HbA1c results that match the patient ID are graphed 7 To change the graph date range select Change 8 To print the graph to an external printer select Print NOTE The internal printer does not support printing graphs Viewing Patient Test Results Us...

Page 80: ...he Edit button is available only if at least one patient demographic setting option is enabled including GFR NOTE If you are using the I2of5 barcode scan the provided I2of5 barcode before entering or editing any data 5 To enter new patient data in the recall mode select the desired patient data button 6 Edit the data using the keypad or scan data using the barcode The selected patient data field p...

Page 81: ...tween 18 and 70 b Select Next c Select the Gender of the patient d Select Next e Select the Race of the patient f Select Next g Select the Plasma Creatinine value h Select Next The GFR Calculation results screen displays the GFR value calculated from the information entered at the GFR calculation screen Reports Patient Test Reports Patient Test Reports contain the results of HbA1c and Microalbumin...

Page 82: ...he report prints the lot number date and time that the calibration cards were scanned The printed reports for a single cartridge scan are generated when you select print when you scan Calibration Data Reports for all the calibration data stored on the system print when a request is issued at Data Recall NOTE Select Print after scanning the calibration card to print the calibration data report View...

Page 83: ... and test name before you analyze the sample reagent cartridge barcode This allows access to the appropriate calibration parameter values and calibration curve for the particular lot of reagent in use NOTE If you do not scan the calibration curve into the system for the particular lot number of cartridges that are in use the system software prompts you to scan the calibration card Calibrating for ...

Page 84: ...ck and smoothly slide the card down A beep sounds to signal a successful scan NOTE If no beep sounds repeat the scanning procedure If you repeatedly fail to hear a beep refer to Troubleshooting page 121 Figure 25 Scanning Hemoglobin A1c calibration card 6 To return to the Home screen select OK 1 Barcode track dot ...

Page 85: ... side of the Calibration card 3 Hold the card so that the barcode faces to the right 4 Insert the calibration card into the top of the barcode track Figure 26 Scanning the Microalbumin Creatinine calibration card 5 Hold the calibration card gently against the right side of the track and smoothly slide the card down A beep sounds to signal a successful scan If no beep sounds repeat the scanning pro...

Page 86: ...ion Data Display 1 At the Home screen select Recall 2 At the Recall menu select Calibration Data 3 Select one of the following options a HbA1c The HbA1c calibration data displays b Microalbumin Creatinine The Microalbumin Creatinine calibration data displays 4 Highlight the calibration data that you want to display and select View 5 To print the calibration data select Print 6 To return to the Rec...

Page 87: ...esults are in doubt when training new operators All control results must be within the acceptable range before any patient sample is tested and the results are reported If a control result is out of range troubleshoot the system correct any problems identified and run the controls again When control results are within range you can test and report on patient samples For information about ordering ...

Page 88: ...solution off the sides of the glass capillary tube using a lint free tissue 10 Inspect the capillary holder for the presence of any bubbles NOTE If bubbles are obvious discard the capillary and repeat the collecting procedure CAUTION Prevent the control material from coming in contact with the plastic part of the capillary holder If control material comes in contact with the capillary holder disca...

Page 89: ...sert it into the reagent cartridge 2 Insert the capillary holder into the reagent cartridge until the holder gently snaps into place Figure 27 Figure 28 Inserting Capillary Holder into Reagent Cartridge CAUTION Avoid harsh insertion of capillary holder Do not dislodge the sample in the glass capillary because erroneous results may occur 1 Capillary holder 2 Reagent cartridge ...

Page 90: ...ontrol and the other side is for an abnormal control 3 Locate the dot on the system next to the barcode track 4 Locate the barcode on the Control card 5 Hold the card so that the barcode faces to the right 6 Insert the Control card into the top of the barcode track 7 Hold the Control card gently against the right side of the track and smoothly slide the card down Figure 29 Scanning the HbA1c Contr...

Page 91: ... stated in the package insert the following sources of error may have occurred 1 Barcode track dot Possible Cause Corrective Action Deterioration of the reagent cartridge test areas due to exposure to light ambient moisture or heat Use a new reagent cartridge to repeat the quality control procedure Use a fresh box of reagent cartridges or a new lot If the new reagent cartridge fails to give result...

Page 92: ... control tests HbA1c Normal HbA1c Abnormal A C Low A C High 6 To activate a QC reminder for the selected reagent test select the Enabled checkbox Do not check the Required checkbox Repeat step 6 for any additional tests as needed 7 Select Save 8 The next time you scan a cartridge to begin a patient test the following occurs If you activated a reminder the system checks to see if a QC test is neede...

Page 93: ...ts as needed 7 Select Save 8 The next time a patient test cartridge is scanned the following occurs The system checks to see if a record of the Required QC was run If a record is found the patient test is run If the system does not find a record a message displays requiring you to perform a QC and the patient test is stopped NOTE You cannot run the selected test until the required QC is performed ...

Page 94: ...ed number displays above the arrow keys The default value is 14 Both up and down arrow keys cycle continuously through the 7 to 60 number range For example if 7 displays pressing the down arrow key displays 60 Press the down arrow again to display 59 then 58 and so on 11 Press an arrow key until the number you want displays 12 Select Next 13 Select the time in hours and minutes using the arrow key...

Page 95: ...kly Cleaning the Onboard Barcode Reader Window Cleaning the Exterior Quarterly Removing and Cleaning the Cartridge Spring and Cartridge Area Changing the Air Filter Optical Test As Needed Cleaning the Exterior Changing the Air Filter Removing and Cleaning the Cartridge Spring and Cartridge Area Cleaning the Onboard Barcode Reader Window Optical Test Calibrating the Touchscreen Replacing the Fuse W...

Page 96: ...t until shutdown completes before turning the power switch to the off position Cleaning the Onboard Barcode Reader Window Materials Required lint free cloth water or ethanol 1 Clean the barcode window with a lint free cloth dampened with water or ethanol Figure 31 Cleaning the Onboard Barcode Reader Window 2 Connect the power cord after the barcode window is clean and dry WARNING Turn the power of...

Page 97: ...the power cord after the exterior is clean and dry NOTE If you want to disinfect the exterior of the system expose the surface to 0 5 sodium hypochlorite for 10 minutes Remove any liquid blood on the system before disinfection WARNING Turn the power off and disconnect the power cord before cleaning the exterior of the system CAUTION Do not allow liquid to drip into system If liquid drips into the ...

Page 98: ...s of the compartment using a lint free cloth dampened with water or ethanol 4 Dry the surface using a clean dry lint free cloth 5 Locate the cartridge return spring inside the cartridge holder WARNING Turn the power off and disconnect the power cord before cleaning the cartridge compartment CAUTION Do not allow liquid to drip into system If liquid drips into the system you can damage the optics BI...

Page 99: ... hole on the spring Figure 32 Return Spring in Cartridge Compartment 7 Gently pull the metal end towards the center of the cartridge compartment to release one side of the spring from the cartridge holder 8 Repeat step 6 to release the other side of the spring from the cartridge holder 1 Top Hole 2 Leaf Spring 3 Bottom Hole ...

Page 100: ...ng any of the following items warm solution of mild detergent and water lint free cloth dampened in water or ethanol NOTE Ensure the leaf springs are not bent or damaged while cleaning Damaged leaf springs do not function properly Figure 33 Return Spring 11 Dry the cartridge return spring with a clean lint free cloth 1 Spring Cut out 2 Leaf Springs ...

Page 101: ...th water or ethanol 15 Clean the cartridge holder rotating the cartridge holder as necessary 16 Locate the vertical grooves inside the cartridge compartment 17 Locate the front and back slots near the top of the compartment 18 Locate the leaf spring on one side of the cartridge return spring CAUTION Do not use a cotton swab Cotton fibers that are left on the surface can interfere with the system s...

Page 102: ...ert the edge into the slot e Repeat Step c to attach the opposite side of the cartridge return spring to the cartridge compartment Cleaning the Cartridge Compartment Optical Window 1 Remove the air filter from the back of the instrument 2 Rotate the cartridge holder with the compartment door partially closed to locate the optical window See Figure 34 Rotating the Cartridge Compartment page 101 3 W...

Page 103: ...blem persists contact the Siemens Technical Support Center or your local technical service provider Changing the Air Filter Materials Required air filter 1 Remove the filter holder from the back of the system a Pull the holder off from the top CAUTION When using compressed air hold the canister as vertically as possible tilting the instrument if necessary If you hold the canister at a sharp angle ...

Page 104: ...104 DCA Vantage Operator s Guide Maintenance Figure 36 Filter Location 1 Filter Cover ...

Page 105: ...g every patient and Quality Control sample measurement If any of the measurement criteria are out of specification the system displays an error code and no result is given for that measurement In addition to the automatic self checks performed during every sample and Quality Control measurement an optical test cartridge is available for you to run additional system performance checks before callin...

Page 106: ...n SD T Precision and drift If selected this test runs for an additional 5 minutes and measures the drift of the optics over 20 transmittance readings taken during that period The measured values are Drift T the average drift in transmittance and Drift Max the difference between the minimum and maximum transmittance of the 20 transmittance readings When the optical test completes the DCA Vantage sy...

Page 107: ...rtridge so that the barcode faces right 3 Insert the cartridge into the barcode track 4 Smoothly slide the cartridge down the barcode track A beep sounds to signal a successful scan Figure 38 Scanning the Optical Test Cartridge 5 Open the cartridge compartment door 6 Hold the optical test cartridge so that the barcode faces to the right ...

Page 108: ...or b Locate the button on the right side of the cartridge compartment c Push and hold down the button with your right hand d Gently push the plastic tab on the cartridge to the right with your left hand This releases the cartridge e Pull the cartridge out of the compartment System Tests You or your technical support provider can use the System Test menu screen to perform tests on the DCA Vantage s...

Page 109: ...require additional action If you select then Touchscreen Select each numbered key The key changes from a number to a check mark If a section fails the number remains NOTE The test times out if all the buttons are not selected within 60 seconds Sound 1 Listen for an alert sound 2 If you hear an alert sound select Yes 3 If you do not hear an alert sound select No Door Open and close the door to veri...

Page 110: ...t require user action are complete and while the automatic tests are running on the system NOTE You can cancel the tests while they are running System Settings Use the System Settings menu to set and review the following system settings change the sound volume adjust the contrast of the display access additional settings for the system view the current setting for the system NOTE You must restart ...

Page 111: ... the roll and the printer c Remove the core and remaining paper on the roll 7 Remove any paper remaining in the printer a Locate the printer paper release lever This lever is colored dark gray and is located on the right of the printer when looking at the front of the system CAUTION Do not touch the printer without observing precautions for handling electrostatic sensitive devices A risk of electr...

Page 112: ...the front of the lever to raise the paper guide c Carefully pull paper through the printer in its normal direction of travel Figure 40 Removing the Printer Paper 8 Obtain a new paper roll 9 Unroll sufficient paper to feed the printer 1 Printer Cover 2 Paper Feeder ...

Page 113: ...or s Guide 113 Maintenance 10 Hold the roll just above the printer with the paper unrolling from underneath 11 Push the paper gently under the roller at the back of the printer Figure 41 Inserting Paper into the Printer ...

Page 114: ... paper into the paper feeder Figure 42 Loading the Paper into the Feeder 13 Push the plastic tab to cover the paper 14 Pull the paper feeder down 15 Pinch and push down on the gray paper release lever to hold the paper in place 1 Printer Cover 2 Paper Feeder ...

Page 115: ...es below the fuse cover Place the screwdriver blade in the smaller groove to remove the cover Materials Required Flathead Screwdriver Fuse 250 V T 1 25 A 1 Locate the 2 grooves on the top of the fuse holder 2 Insert the blade of a small flat head screwdriver into the smallest groove CAUTION Set the power switch to Off Disconnect the power cord from the wall outlet Disconnect the power cord from th...

Page 116: ...age Operator s Guide Maintenance 3 Exert pressure to unsnap the top of the fuse holder Figure 44 Removing fuse holder 4 Repeat steps 2 3 for the bottom groove 5 Remove the fuse holder from the system 1 Small Groove ...

Page 117: ...is that none of the Maintenance Reminders are selected After you select the check box for a specific reminder Schedule becomes active 1 At the Home screen select Menu 2 At the Menu screen select System Settings 3 At System Settings select Additional Settings 4 At the Additional Settings menu select Maintenance 5 To set a maintenance reminder select the check box The maintenance reminder is set and...

Page 118: ...n screen displays 14 Select Save Viewing System Maintenance Status Use the System Maintenance Status screen to view the list of maintenance tasks and the status of each task After you have scheduled a task you can mark a task as completed at this screen then the task displays at the System Maintenance log screen NOTE The maintenance task must be scheduled before you can mark it as completed If the...

Page 119: ...g the Maintenance Log 1 At the Home screen select Menu 2 At the Menu screen select System Settings 3 At System Settings select Additional Settings 4 At the Additional Settings menu select Maintenance 5 Select Log 6 Use the up and down arrows to view all of the maintenance entries 7 To delete all maintenance log entries select Delete All 8 Select Yes All log entries are deleted ...

Page 120: ...120 DCA Vantage Operator s Guide ...

Page 121: ...remote computer Patient test locked until the control test is run A computer connected to the system is sending a request for a QC test You must wait to run the patient test until the control test completes A C Low control test failed You cannot perform A C patient tests The albumin and creatinine quality control test failed You must have a successful control test to perform patient tests A C Low ...

Page 122: ... delete some old tests Warning message to clear old tests Enabled ASTM ports are not ready to transmit data please check connections Check the Ethernet and serial connections to ensure cables are secure HbA1c Abnormal control test failed You cannot perform HbA1c patient tests The control test failed Rerun the control test with a new control cartridge HbA1c Abnormal control test requested by remote...

Page 123: ...ed within the time limit The access code entered is not valid or access is denied Please check with your supervisor The activation key entered does not match any feature The key code you entered is not correct The database was corrupt and recovered from the system backup Some data may be lost The Door is open to continue close the door The cartridge door was opened The system will not continue pro...

Page 124: ...rform HbA1c patient tests using this cartridge Lot Number Perform HbA1c Normal and Abnormal Control Tests for this cartridge Lot Number You cannot perform HbA1c patient tests using this cartridge Lot Perform an HbA1c Normal Control Test for this cartridge Lot Number You cannot perform A C patient tests using this cartridge Lot Number Perform an A C High Control Test for this cartridge Lot Number Y...

Page 125: ...l barcode reader Is the barcode symbology supported Refer to Barcode Symbols and Labels Specifications page 193 Are you scanning from an appropriate menu Is the cursor in a demographic field You must scan patient and QC information within a demographic field For example Patient ID Sample ID Is the barcode format correct Refer to Barcode Symbols and Labels Specifications page 193 Is the background ...

Page 126: ...l support provider Did you scan the same side of the Microalbumin or Creatinine card twice When calibrating Microalbumin or Creatinine after scanning side 1 the system prompts you to scan side 2 If you scan side 1 again the system ignores the scan Buffer Tab Hard to Pull If you pull the foil tab too fast it can tear the foil and impede the full buffer release Slowly pull the buffer tab while ancho...

Page 127: ...normal operating temperature perform the steps in Optical Test page 105 Door Open error Reagent compartment door is open Verify all compartment doors are closed Rerun the test Reagent compartment door sensor is defective If this problem continues after verifying doors are closed contact your local technical support provider Display is blank Is the power cord connected to the system and the electri...

Page 128: ...rnal printer is enabled Refer to Setting up the External Printer page 30 Is there paper in the printer Is it loaded correctly Is the printer door closed Check the printer area Graphical patient test data does not print to the onboard printer The internal printer does not support printing graphs An external printer is required Test Cancelled Test not started within 15 minutes of scanning the reagen...

Page 129: ...he end of the test The DCA Vantage system is not on a level work surface Verify that the system is properly installed on a level surface The filter in the capillary holder is not absorbent Contact your local technical support provider Thermal Dot has reacted HbA1c reagents only Product was not shipped or stored properly There are 2 indicators outside and inside The outer shipper has an over temper...

Page 130: ...error The Home Index sensor failed to detect light to dark or dark to light transitions during a motor homing operation Or The offset between the home position determined from the Home Index sensor and the position for the optimum optical signal is greater than 4 half steps 1 Discard the sample 2 Restart the system 3 Rerun the test E12 Motor position error The wrong number of Home Index sensor tra...

Page 131: ...6 readings at the Sample channel for Dark or Air reading is too large Possible causes low lamp intensity lamp alignment rotation lamp intensity variation 1 Discard the sample 2 Power off the system 3 Clean the cartridge area Refer to Removing and Cleaning the Cartridge Spring and Cartridge Area page 98 4 Check replace the air filter 5 Clean the cartridge holder with compressed air while rotating 6...

Page 132: ...p Drift The change in mean signal between successive Air readings is too large at either the Sample channel or the Reference channel Possible causes dust in the optical path lamp filament orientation 1 Discard the sample 2 Power off the system 3 Clean the cartridge area Refer to Removing and Cleaning the Cartridge Spring and Cartridge Area page 98 4 Restart the system E30 Thermal control system er...

Page 133: ...fective electrical circuit 1 Ensure the reagent cartridge was properly prepared for testing Reagents should be at room temperature for testing 2 Power off the system 3 Rerun the test E32 Cartridge temperature too low during measurement The temperature measured by one of the cartridge holder thermistors Possible causes cold cartridge defective heater plate defective thermistor assembly defective co...

Page 134: ...ge temperature very high The temperature measured by one of the cartridge holder thermistors Possible causes cold cartridge defective heater plate defective thermistor assembly defective connector defective electrical circuit 1 Ensure the reagent cartridge was properly prepared for testing Reagents should be at room temperature for testing 2 Power off the system 3 Rerun the test E35 Thermal contro...

Page 135: ...ctive heater driver other electronics 1 Restart the system 2 Rerun the test E37 Internal instrument temperature error low The temperature measured by the ambient temperature thermistor is 2º C Possible causes damaged ambient temperature thermistor circuit failure 1 Restart the system 2 Rerun the test E38 Internal instrument temperature error high The temperature measured by the ambient temperature...

Page 136: ... properly Rescan the barcode in a different direction Clean the barcode window Use another barcode label E50 Serial Port communication failure An attempt to communicate with an LIS or remote computer via the RS232 serial port failed 1 Verify the cables are connected securely 2 Verify the serial port is enabled in software Refer to Setting up the Serial Port Connection page 33 3 Restart the system ...

Page 137: ...rface are securely connected 2 Verify the DCA Vantage system has the correct configuration for the host device baud rate parity 3 Disable and enable the Ethernet port 4 Restart the system E60 Database Failure The database is not functioning properly The database may be corrupted or the system was not properly powered down 1 Turn off the instrument from the Home screen and wait until system shutdow...

Page 138: ...fer absorbance is too low The mean transmittance of the buffer readings is too high Possible causes No cartridge is present There is an optical alignment problem 1 Discard the sample 2 Acknowledge the error The system is ready 3 Repeat the test with a new cartridge 4 If the error still occurs contact your local technical support E102 HbA1c Cartridge Error buffer absorbance is too high The mean tra...

Page 139: ...of controls or use of non DCA controls Hemoglobin 7 g dL anemic patient Buffer tab is not removed 1 Discard the sample 2 Acknowledge the error The system is ready 3 Repeat the test with a new sample NOTE Wait no more than 5 minutes after filling the capillary to start the test 4 If the error still occurs contact your local technical support E105 HbA1c Sample Error high total hemoglobin The transmi...

Page 140: ...ittance of the hemoglobin readings is too low Possible causes excess blood on capillary irregularity in patient red blood cells rare hemoglobin 24 g dL patient has abnormally high hemoglobin 1 Discard the sample 2 Acknowledge the error The system is ready 3 Repeat the test with a new sample 4 Verify that the capillary has no excess blood on the capillary holder 5 If the error still occurs contact ...

Page 141: ...stored properly 4 If the error still occurs contact your local technical support E111 HbA1c Cartridge Error low glycated hemoglobin response The delta in absorbance between the first and the last agglutination readings is too low Possible cause cartridge exposed to excessive humidity or temperature 1 Discard the sample 2 Acknowledge the error The system is ready 3 Repeat the test with a new sample...

Page 142: ...xcessive humidity or temperature 1 Discard the sample 2 Acknowledge the error The system is ready 3 Repeat the test with a new sample NOTE Verify that the reagent kit was stored properly and that the foil package was opened just prior to use 4 If the error still occurs contact your local technical support E115 HbA1c Cartridge Error final hemoglobin reading is greater than the previous check point ...

Page 143: ... test 4 If the error still occurs contact your local technical support E302 Microalbumin Creatinine Cartridge Error buffer absorbance is too high The mean transmittance of the buffer readings is too low Possible causes condensation on the cartridge cartridge is not located in the proper position buffer tab is not removed optical window has a defect 1 Discard the sample 2 Acknowledge the error 3 Re...

Page 144: ...Cartridge Error high variability in transmittance of sample blank The CV of the low sample blank is too high Particulate contamination 1 Discard the sample 2 Acknowledge the error 3 Repeat the test 4 If the error still occurs contact your local technical support E307 Microalbumin Creatinine Cartridge Error Microalbumin absorbance is too low The mean of the Microalbumin transmittance readings is to...

Page 145: ...ical support E311 Microalbumin Creatinine Cartridge Error Creatinine absorbance is too high One of the 26 creatinine absorbance readings is too high Possible cause cartridge exposed to excessive temperature or humidity 1 Discard the sample 2 Acknowledge the error The system is ready 3 Repeat the test NOTE Verify that the reagent was stored properly and that the foil package was opened just prior t...

Page 146: ...error still occurs contact your local technical support E316 Microalbumin normalization out of range The Microalbumin Normalization Factor entered is outside of expected range Possible causes normalization cartridge is not in proper position normalization cartridge is dirty or defective 1 Acknowledge the error 2 Verify that the cartridge was inserted completely into the system 3 Repeat the test 4 ...

Page 147: ...t Tests 3 From the Patient Tests screen select Export 4 Insert the storage device into the USB port 5 To export the files select Next The files are exported 6 When the system directs you remove the storage device from the USB port NOTE When you export patient data the result is a tab delimited text file The patient data is stored as ExportedHbA1cPatient txt file for HbA1c and as ExportedMicroalbum...

Page 148: ...e device 1 At the Home screen select Menu 2 At the Menu screen select System Settings 3 At the System Settings menu select Additional Settings 4 At the Additional Settings menu select General 5 Select Save Data and Settings 6 Insert a storage device into the USB port then select Next The data and settings are saved 7 Remove the storage device from the USB port Restoring Settings The Restore Settin...

Page 149: ...lete some test results to free up space Use the Delete Data screen to delete all the patient information that associates the patient with the test result or both the patient information and test results 1 At the Home screen select Menu 2 At the Menu screen select System Settings 3 At the System Settings menu select Additional Settings 4 At the Additional Settings menu select General 5 Select Delet...

Page 150: ...150 DCA Vantage Operator s Guide File Management ...

Page 151: ... test and what data you enable only or require Only the data you select as enabled displays If you select required you must enter a value for that specific data before you can exit the screen 1 At the Home screen select Menu 2 Select System Settings from the Menu screen 3 At the System Settings menu select Additional Settings 4 At the Additional Settings menu select Patient Tests 5 Select Data Ent...

Page 152: ...nu select Patient Tests 5 Select Reference Range 6 Select Set Range 7 Use the up and down arrows to adjust the upper and lower limits NOTE To set the reference range to the default values select Reset Default Values This resets the Lower to 4 0 and the Upper to 6 0 To save the HbA1c reference range select Save HbA1c Testing and Results The DCA Vantage system is qualified for specific reportable ra...

Page 153: ... Enabled If you want to disable this feature after it has been enabled select Disabled Designating the Primary and Secondary HbA1c Reporting Units A supervisor that is a Level 1 operator can designate the required primary and optional secondary HbA1c Reporting Units for displaying and printing using the following procedure 1 At the Home screen select Menu 2 Select System Settings from the Menu scr...

Page 154: ...is set to On Table 6 HbA1c Reporting Units Settings Japanese Mode Off Table 7 HbA1c Reporting Units Settings Japanese Mode On NOTE When you select JDS the display and printout show the units of the results as HbA1c JDS If you select NGSP the display and printout show the units of the results as HbA1c NGSP Primary Secondary IFCC None IFCC NGSP IFCC mono S NGSP None NGSP IFCC NGSP mono S mono S None...

Page 155: ...User Correction Use the HbA1c User Correction screen to adjust the slope and the offset for HbA1c values 1 At the Home screen select Menu 2 Select System Settings from the Menu screen 3 At the System Settings menu select Additional Settings 4 Select Patient Tests from the Additional Settings menu 5 Select HbA1c User Correction 6 Change the slope if needed a Select Edit The HbA1c Slope screen displ...

Page 156: ...creen displays b Enter the slope c Select Enter The Albumin User Correction screen displays 7 Change the offset if needed a Select Edit The Albumin Offset screen displays b Enter the offset c Select Enter The Albumin User Correction Screen displays To reset the settings to the default values a Select Reset Default Values This resets the slope to 1 000 and the offset to 0 0 8 After completing the c...

Page 157: ...ting the GFR Calculation Use the GFR Calculation screen to turn the GFR Calculation on or off and to select the unit of measurement for plasma creatinine 1 At the Home screen select Menu 2 Select System Settings from the Menu screen 3 At the System Settings menu select Additional Settings 4 At the Additional Settings menu select Patient Tests 5 Select GFR Calculation 6 Select one of the following ...

Page 158: ...screen 3 At the System Settings menu select Additional Settings 4 At the Additional Settings menu select General 5 Select Storage Mode 6 To automatically delete patient and control test data on a first in first out basis select Automatic Deletion First In First Out 7 To manually delete patient and control test data select Manual Deletion 8 To save the storage mode select Save Setting Control Test ...

Page 159: ...Schedule becomes active You must perform required control tests when they are scheduled Patient test is disabled until the required control is performed and passed You can run a control test prior to the scheduled time however you are still reminded to run the test at the schedule time You can perform optional control tests when they are scheduled Patient tests are not disabled when an optional co...

Page 160: ...he lower limit or greater than the upper limit the instrument displays a warning message Depending on the primary reporting unit configured this message tells you when a reported value is less than or greater than the range for that unit The following table lists the control test limits for each algorithm type Setting a Test Lockout Use the Test Lockout screen to prevent a user from performing pat...

Page 161: ... settings include language time date and sequence number options Setting the Language Use the Language screen to change the language that displays on the system 1 At the Home screen select Menu 2 Select System Settings from the Menu screen 3 At the System Settings menu select Additional Settings 4 At the Additional Settings menu select General 5 Select Language 6 Select the language that you want ...

Page 162: ...tings from the Menu screen 3 At the System Settings menu select Additional Settings 4 At the Additional Settings menu select General 5 Select Date 6 Select a date format MM DD YYYY DD MM YYYY YYYY MM DD 7 Use the up and down arrows to select the Month Day and Year 8 To save the date format select Save Setting the Sequence Number Options Use the Sequence Number screen to specify whether the sequenc...

Page 163: ... Volume setting to set the volume of the audible alerts 1 At the Home screen select Menu 2 Select System Settings from the Menu screen 3 At the System menu select System Settings 4 Select Sound Volume 5 Select one of the following options High Medium Low Off 6 Select Save The sound volume is set Setting the System Display Use the System Display screen to set the contrast of the color display 1 At ...

Page 164: ...the following steps 1 At the Home screen select Menu 2 Select System Settings from the Menu screen 3 To view the partial Systems Settings Report select View Settings The View Settings screen displays the current system settings 4 To print the current system settings select Print Printing a Full System Settings Report To print a full System Settings Report perform the following steps 1 At the Home ...

Page 165: ...t headers are deleted Setting the Printed Patient Test Report Type Specify whether you want full long or short partial reports by performing the following steps For a summary of the contents of each report format see Patient Test Report Contents page 183 1 At the Home screen select System Settings 2 At the System Settings menu select Additional Settings 3 At the Additional Settings menu select Pri...

Page 166: ...166 DCA Vantage Operator s Guide ...

Page 167: ...hen handling potentially infectious agents needlesticks hand to mouth contact hand to eye contact direct contact with superficial cuts open wounds and other skin conditions that may permit absorption into subcutaneous skin layers splashes or aerosol contact with skin and eyes To prevent accidental contamination in a clinical laboratory strictly adhere to the following procedures Wear gloves while ...

Page 168: ...cal and Laboratory Standards Institute formerly NCCLS Protection of Laboratory Workers from Occupationally Acquired Infections Approved Guideline Third Edition Wayne PA Clinical and Laboratory Standards Institute 2005 CLSI Document M29 A3 ISBN 1 56238 567 4 3 Federal Occupational Safety and Health Administration Bloodborne Pathogens Standard 29 CFR 1910 1030 External Barcode Reader Beam Safety Nev...

Page 169: ...s Please record the following information and keep this sheet in your laboratory for future reference Manufacturer s Warranty For warranty information contact the local Siemens service provider Support Information Contact your local technical support provider for assistance if the error message continues to display after performing the steps described on the screen and in the Troubleshooting chapt...

Page 170: ...providers are available to help you Before calling please complete the Pre service Checklist page 171 Make a photocopy of the checklist first This information helps your local technical support provider to identify the probable cause of the problem Contact Information www siemens com diagnostics ...

Page 171: ...s the fan come on when the system is turned On If NO Is the system firmly connected to a live AC electrical outlet 2 Is the touchscreen operating properly If NO Have you performed the touchscreen test Have you calibrated the touchscreen 3 Does the system proceed properly while analyzing reagent cartridges 4 What is the lot number of the reagent cartridges you are using 5 Is the printer functioning...

Page 172: ...s the revision level of the system software To find this information select Help from the Home screen The system displays the current software revision level 9 Are any error messages or warnings being displayed If so list the error description and any numbers that display 10 Have you performed the appropriate steps suggested on the display for the error being displayed If an external device is bei...

Page 173: ...ystem are listed below SMN Number Part Number Description 10311134 5035C DCA Reagent Kit 10311161 5068A DCA Normal Abnormal Control Kit 10314620 860044 HbA1c Capillary Holder strip of 11 SMN Number Part Number Description 10311480 6011A DCA Reagent Kit 10325406 6012A DCA Low High Control Kit 10286099 877244 Microalbumin Creatinine Capillary Holder SNM Number Part Number Description 10219275 036 28...

Page 174: ... 10314709 011 501 95 Printer Paper pack of 5 10324219 063 527 80 Printer Paper Self Adhesive Stock pack of 5 10314620 860044 HbA1c Capillary holder pack of 11 10286099 877244 Microalbumin Creatinine Capillary holder 10282133 064 892 56 Multi language Documentation CD SNM Number Part Number Description ...

Page 175: ... use Symbol Description This symbol is used for both Warnings and Cautions A Warning indicates the risk of personal injury or loss of life if operating procedures and practices are not correctly followed A Caution indicates the possibility of loss of data or damage to or destruction of equipment if operating procedures and practices are not strictly observed This symbol identifies a hazardous area...

Page 176: ...ually discarded This symbol indicates that the main power supply is on This symbol indicates that the main power supply is off This symbol indicates that the product has a temperature limitation You need to store the product between 5 40 C This symbol indicates an in vitro diagnostic device or an in vitro diagnostic medical device This symbol indicates that you should consult instructions for use ...

Page 177: ... is type B equipment which provides a particular degree of protection against electric shock This symbol indicates to follow the appropriate procedures for disposal of electrical and electronic equipment This symbol indicates the number used for ordering a part or product This symbol indicates the serial number of a part or product This symbol indicates the revision letter of a part or product Thi...

Page 178: ...he product complies with the applicable directives of the European Union This symbol indicates that the instrument is safety tested by TUV SUD a national certification body for conformity to global markets including Canada US and EU This symbol indicates information about the fuse Home screen Select this key to access the Home screen System menu Select this key to access the System menu Calibratio...

Page 179: ...e any settings Page Up Select this key to display the previous page in descending order Page Down Select this key to display the next page in descending order No Cancel Select this key to cancel an action System Busy This symbol indicates that the system is busy RequiredData Entry This symbol indicates that the data is required Add Comments Select this key to add comments Shut down System Select t...

Page 180: ...180 DCA Vantage Operator s Guide Symbols Quality Control Solution Test This symbol indicates a Quality Control Solution test ...

Page 181: ... in the presence of a flammable anesthetic Dimension Value Depth 27 7 cm 10 5 inches Height 25 4 cm 9 0 inches Width 28 7 cm 11 5 inches Weight 3 88 kg 9 lb Specification Value Ambient Operating Temperature 15 to 32 C 61 to 88 F Hemoglobin A1c 18 to 30 C 64 to 86 F Microalbumin Creatinine Analyzer Operating temperature 5 to 40 C 41 to 104 F Relative Humidity 10 to 90 non condensing actively contro...

Page 182: ...n If this system does cause harmful interference to radio or television reception which can be determined by turning the equipment off and on try to correct the interference by one or more of the following measures reorient or relocate the receiving antenna increase the separation between the system and the receiver connect the system into an outlet on a different circuit from the receiver consult...

Page 183: ... select The Patient Test Report and the System Settings Report have both a long and a short format These tables show the contents of each Patient Test Report Contents page 183 Patient Trend Graph Report Contents page 185 Requires external printer Control Test Report page 186 System Settings Report page 188 Patient Test Report Contents When an HbA1c or Microalbumin Creatinine patient test completes...

Page 184: ... Form A C Short Form Max Field Length Number of Characters DCA Vantage Product Logo 4 4 4 4 Report Title 4 4 Custom Heading 1 2 O O O O 24 per line Print Date 4 4 Serial Number 4 4 4 4 Test Date 4 4 4 4 Sequence Number O O O O Cartridge Lot 4 4 HbA1c Primary Reporting Units 4 HbA1c Secondary Reporting Units O HbA1c User Slope O HbA1c User Offset O HbA1c Primary Result 4 4 HbA1c Secondary Result O ...

Page 185: ... patient trend graph report Creatinine User Slope O Creatinine User Offset O A C 4 4 Albumin 4 4 Creatinine 4 4 GFR O O Age O O Gender O O Race O O Plasma Creatinine O O Operator ID O O 16 Sample ID O O 13 Patient ID O O O O 24 Patient Last Name O O 15 Patient First Name O O 15 Comments 1 8 O O 24 Test Edited O O O O Test Imported SN O O O O End of report 4 4 4 4 Value HbA1c Full Form HbA1c Short ...

Page 186: ...plete and when you issue print request during a Data Recall operation The following table summarizes the contents of a Siemens HbA1c Control Test Report This table uses the following symbols 4 Always reported O Omitted if not specified Value Required DCA Vantage Product Logo 4 Report Title 4 Custom Heading 1 2 O Print Date 4 Serial Number 4 Patient ID O Patient Last Name O Patient First Name O Gra...

Page 187: ...O Cartridge Lot 4 4 Control Lot 4 4 HbA1c Primary Reporting Units 4 HbA1c Secondary Reporting Units O Level 4 4 Primary HbA1c Result 4 Secondary HbA1c Result O Albumin Result 4 Creatinine Result 4 Test Result Status Passed or Failed 4 4 HbA1c Lower Bound 4 HbA1c Upper Bound 4 Creatinine Lower Bound 4 Creatinine Upper Bound 4 Operator ID O O Comment 1 O O Comment 2 O O Comment 3 O O ...

Page 188: ...ported S N O O End of report 4 4 4 Always reported O Omitted if not specified Value Full Report Partial Report DCA Vantage Product Logo 4 4 Report Title Full or Partial 4 4 Custom Heading 1 2 O O Print Date 4 4 Serial Number 4 4 Software Version 4 4 Patient Test Data Entry 4 Control Data Entry 4 Sample ID 4 Patient ID 4 Last Name 4 First Name 4 Operator ID 4 Comments 1 8 4 Value HbA1c A C ...

Page 189: ...c User Offset 4 4 Albumin User Slope 4 4 Albumin User Offset 4 4 Creatinine User Slope 4 4 Creatinine User Offset 4 4 GFR Calculation 4 4 Patient Recall List Option 4 Microalbumin Norm Factor 4 Operator ID 4 Comments 1 3 4 HbA1c Normal 4 HbA1c Abnormal 4 A C Low 4 A C High 4 Control Test Reminders 4 4 New Lot Reminder 4 4 Other Controls 4 4 Maintenance Reminders 4 4 Change Air Filter 4 Value Full ...

Page 190: ... Access 4 4 Remote Lockdown 4 4 Test Lockout 4 4 Settings Wizard 4 Automatic Data Purging 4 4 Sound Volume 4 4 Onboard Printer 4 4 Onboard Printer Autoprint 4 4 External Printer 4 4 External Printer Autoprint 4 4 Patient Report 4 4 Custom Header 1 2 O External Barcode Reader 4 4 Symbology 4 Check Digit 4 Port 4 4 Protocol 4 O Serial Port 4 Value Full Report Partial Report ...

Page 191: ...te 4 Parity 4 Data Bits 4 Stop Bits 4 Ethernet Port 4 Host Name 4 IP Setting 4 4 IP Address 4 Port Number 4 Subnet Mask 4 DNS 4 Default Gateway 4 Remote Computer 4 MAC Address 4 4 End Date 4 End of report 4 4 Value Full Report Partial Report ...

Page 192: ...192 DCA Vantage Operator s Guide ...

Page 193: ...r Harbor Drive West Conshohocken PA 19428 2959 USA www astm org Barcode Symbols and Labels Specifications The DCA Vantage system supports the barcode entry for the following patient and control data Patient Data Use Control Data Field Length Characters Patient First Name Patient Tests Recall Edit 1 15 Patient Last Name Patient Tests Recall Search Recall Edit 1 15 Patient ID Patient Tests Recall Se...

Page 194: ...before activating the software to use the external barcode reader 1 Turn the system power off 2 Connect the interface cable to the opening at the bottom of the handheld reader 3 Connect the other end of the cable to the external barcode reader port at the back of the system Figure 46 External Barcode Reader Connection 4 Press in firmly until the connection is secure and you hear a gentle click 5 T...

Page 195: ...me screen select Menu 2 Select System Settings from the Menu screen 3 At the System Settings menu select Additional Settings 4 At the Additional Settings menu select External Barcode Reader 5 Select Disabled 6 To save the external barcode reader settings select Save Restoring the Barcode Reader default settings 1 Leave the barcode scanner connected to the DCA Vantage system 2 Turn the system off f...

Page 196: ...From the Menu screen select System Tests 3 Select User System Tests 4 Select External Barcode Reader 5 Select Start 6 Follow the prompts to scan a barcode to complete the test You can test the function of the barcode scanner for each supported symbology by scanning the following barcodes or by printing them on a high quality printer Code 39 Check Digit On Code 39 Check Digit Off I2of5 Check Digit ...

Page 197: ...lastic case using steps 1 and 2 Troubleshooting It is important that the labels be printed to the required specifications Reading errors may occur if any of the following conditions exist the narrow bar width is too small the barcode length too great the height too small CODA Bar CAUTION Do not submerge the reader in water The reader s housing is not water tight Do not use laboratory wipes such as...

Page 198: ...o consistently read your labels apply a test label of the format being used to a new specimen tube and perform the Barcode Test If the reader is able to read the test label the quality of your labels may be suspect If the test label cannot be read the reader itself is suspect If you have problems that cannot be resolved contact your local technical support provider ...

Page 199: ...m the DCA Vantage instrument to the host include HbA1c test result records Microalbumin Creatinine test result records Filter Test Cartridge result records Control Test result records Cartridge Lot number System serial number Messages transferred from the host to the DCA Vantage system include Force Control remote commands Remote Lockout remote commands List of Operators QC test request Ethernet C...

Page 200: ...ical connection for serial binary data bit transmission between system and computer system is described in the serial physical layer The DCA Vantage system implements and complies with the serial physical layer defined in the ASTM 1381 standard For more information about this standard refer to the standard Serial cable pin assignments and hardware handshaking are described in the following section...

Page 201: ...inal Equipment DTE The signal lines that are supported are listed below Character Format You can select the following character format options when you select the LIS communication parameters in setup at the DCA Vantage system The stop bits are set to 1 Signal Line Pin Number Type Data Carrier Detect not used DCD Pin 1 Control Received Data RD Pin 2 Data Transmitted Data TD Pin 3 Data Data Termina...

Page 202: ...n select Menu 2 Select System Settings 3 Select View Settings The View Settings screen displays the current settings which includes the MAC address To print the current settings select Print Automatically Sending Data to an LIS When you have enabled communications with an LIS you can configure the system to automatically send all patient and control test results to the LIS as soon as the test resu...

Page 203: ...o the LIS Sending Transmission is in process but the system has not received acknowledgement from the LIS The connection might have gone down either during or after the attempted transmission and the connection has not been restored For the Ethernet ASTM protocol the system tries again to transmit the results if the connection is restored within 72 hours of the most recent successful transmission ...

Page 204: ...ose patient or control test results that have a transmission status of Sending When the transmission succeeds the transmission status is updated accordingly If this is an ASTM connection a transmission is considered to be failed if 72 hours have passed since the most recent transmission after a good connection went down and the LIS did not receive the message on subsequent attempts to transmit it ...

Page 205: ...External Barcode Reader An optionalexternal barcode scanner that is connected to a port on the DCA product Used to enter data into the DCA Vantage system External Printer An optional printer that is connected to the USB connector port on the DCA product Used to print reports Onboard Barcode Reader The barcode scanner used to scan barcodes on DCA Reagent Cartridges and Cards Onboard Printer The int...

Page 206: ...m to draw the operators attention to the system Cancel To end a sequence or operation Cartridge The HbA1c Microalbumin Creatinine or Optical Test cartridges that are inserted into the system to perform a test Comment An operator entered notation associated with a test result Control Objects displayed on the software UI that the user can manipulate Buttons checkboxes and radio buttons are examples ...

Page 207: ...re UI screen operators encounter when the DCA system start up has completed All software UI navigation begins from the Home screen Icon An image used to label a control Import To copy data to a DCA system from a removable data storage device Maintenance The area of the software user interface where users can perform and or record DCA system maintenance tasks Menu Screen A software UI screen that d...

Page 208: ...h enables the operator to adjust or configure some aspect of the DCA Vantage system Sound Volume The software UI screen where the operator can adjust the volume level for the DCA Vantage system onboard sound which emits audio alerts Test Result Measured reportable values displayed to the operator at the end of a test sequence Test Sequence A series of software UI screens that guides the operator t...

Page 209: ...arcode IP Internet Protocol LIS Laboratory Information System MNF Microalbumin Normalization Factor Mean A Mean Average Mean T Mean Transmittance NGSP National Glycohemoglobin Standardization Program P Precision PD Precision Drift POCT1A Point of Care Testing 1A protocol for transferring messages between clinical laboratory instruments and computer systems QC Quality Control SN Serial Number SD St...

Page 210: ...210 DCA Vantage Operator s Guide Glossary ...

Page 211: ...lary filling from finger stick 50 filling from venipuncture 50 inserting 53 Cartridge Compartment cleaning 98 Changing the air filter 103 Cleaning barcode window 96 cartridge compartment 98 exterior 96 external barcode reader 197 general 95 Connections overview 15 Contact information 170 Control Test deleting 158 setting reminders 159 Controls running 90 Conventions text and symbol 12 Creatinine u...

Page 212: ...aper 31 power cord 28 system 25 unpacking 25 Interleaved 2 of 5 195 IP address 35 J Japanese Mode 154 L Laboratory Information System LIS connection 199 Language setting 161 LIS connection 199 RS 232 201 M MAC address 164 202 Maintenance log 119 reminders 117 status 117 Manually send results 37 203 Memory 15 Microalbumin Creatinine Test performing 63 preparing 63 results 72 sequences 63 N NGSP 61 ...

Page 213: ...ting 182 RS 232 201 S Screen Components 17 Secondary Reporting Units 61 Send test results automatically to LIS 37 202 Sequence Number RAPIDComm requirement 163 Sequence Number setting 162 Serial Connections installation 32 Serial number 164 locating 27 Serial Port 33 baud rate 33 parity 33 reset to default 34 stop bits 34 Set Albumin user correction 156 Creatinine user correction 156 date 162 GFR ...

Page 214: ...ernal 197 contacting customer support 169 preservice checklist 171 quality control 91 U Unpacking the system 25 Urine Creatinine Units setting 151 USB 15 User Corrections setting 155 User corrections Albumin 156 Creatinine 156 HbA1c 155 User interface symbols 175 User system test 109 110 W Warranty information to record 27 Warranty and support information 169 Wizard system settings 32 ...

Reviews: