background image

Operating 


7.2 Operator controls on key panels 


Panel PC 670 V2/870 V2, Control unit 

7-6


Operating Instructions, Edition 03/2004, CD Documentation and Drivers 

Procedure 

1.  Label the DIN A4 film with a laser printer with the printing templates from the options, for 

example. 

2.  Cut the labeling strips along the pre-printed lines. 


Note 
Do not insert handwritten labeling strips until the ink has dried. 

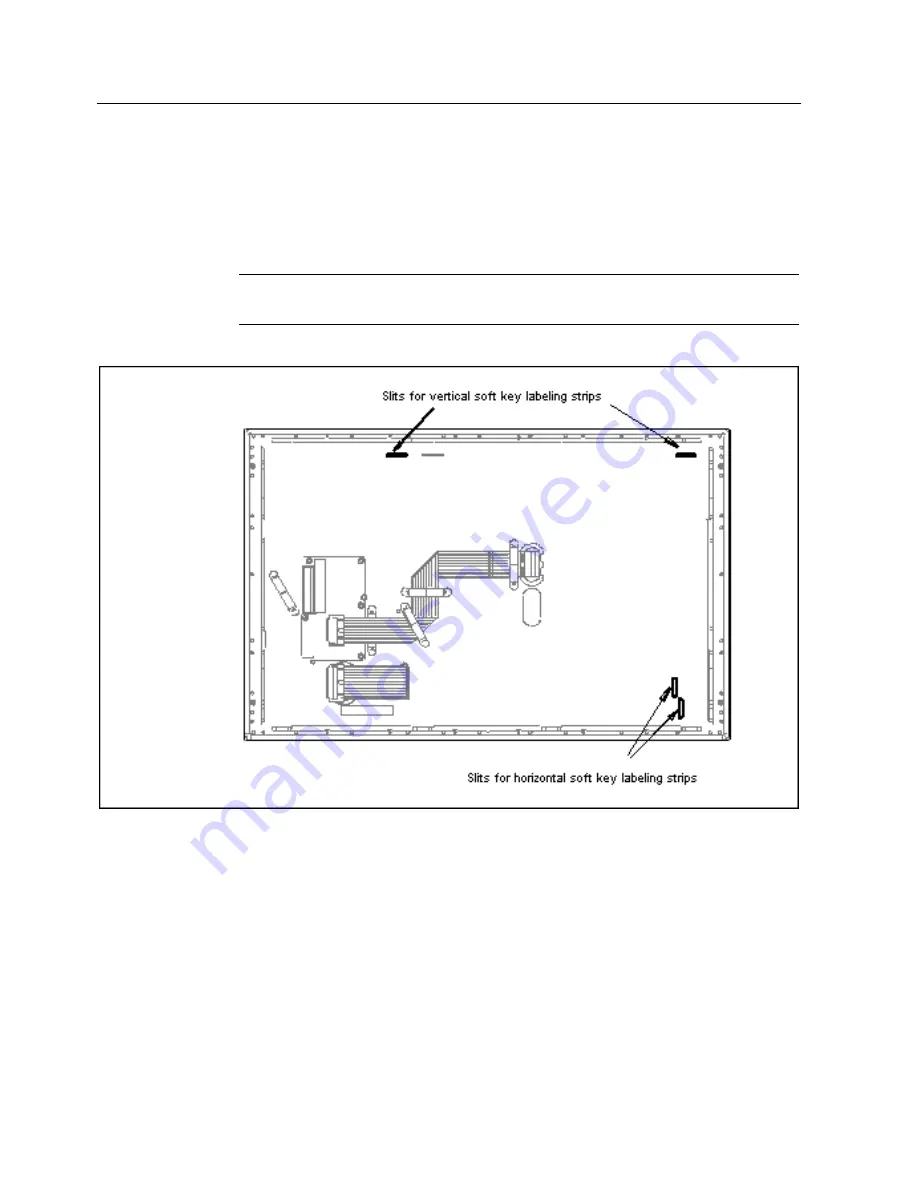
3.  Insert the labeling strips into the slots provided on the rear side of the control unit. 


Figure 7-7 

Rear side of the control unit with connectors and slots for the labeling strips 

7.2.4 

Integrated mouse 

The position on which you press the middle round button determines the direction in which 

the cursor moves. The amount of pressure determines the speed of the cursor.  
As an alternative, connect an external mouse at the USB 1.1 port. 

Summary of Contents for 670 V2

Page 1: ...2 Description 3 Usage planning 4 Installation 5 Connecting 6 Operating 7 Operating and parametrizing 8 Maintenance and Service 9 Technical specifications 10 Appendix 11 SIMATIC PC Panel PC 670 V2 870 V2 Control unit Operating Instructions Edition 03 2004 ...

Page 2: ...to earth and to tag circuits equipment and systems in accordance with established safety practices and standards Intended Use Please note the following Warning This device and its components may only be used for the applications described in the catalog or technical description and only in connection with devices or components from other manufacturers approved or recommended by Siemens This produc...

Page 3: ...ion 3 5 3 4 Available combinations 3 5 3 5 Options 3 5 4 Usage planning 4 1 4 1 Overview 4 1 4 2 Unpacking and checking the delivery unit 4 1 4 3 Make note of identification data 4 2 4 4 Guidelines for Handling Electrostatic Sensitive Devices EMC 4 4 4 5 Mounting postion and attachment 4 4 4 5 1 Installation guidelines 4 4 4 5 2 Approved installation positions 4 6 4 5 3 Method of attachment 4 7 4 ...

Page 4: ...on device 8 2 8 1 3 Setting up Microsoft Windows operating system 8 3 8 1 4 Installing applications and drivers 8 3 8 2 Normal operation 8 7 8 2 1 Turning on device 8 7 8 2 2 Turning off the device 8 8 8 3 Additional drivers and applications 8 9 8 3 1 Overview 8 9 8 3 2 Setting up touchware 8 9 8 3 3 Repeating calibration 8 11 8 3 4 KeyTools 8 13 8 3 5 KeyHook 8 14 8 3 6 Keypad 8 15 8 3 7 SIMATIC ...

Page 5: ...ntal conditions 10 3 10 1 4 Decentralized design technical data 10 4 10 2 Dimensional drawings 10 5 10 2 1 Overview 10 5 10 2 2 Panel PC 670 V2 dimensions for central design 10 5 10 2 3 Panel PC 870 V2 dimensions for central design 10 6 10 3 Interfaces 10 7 10 3 1 USB port 10 7 10 4 Keyboard table 10 7 11 Appendix 11 1 11 1 Certificates and guidelines 11 1 11 1 1 Approvals 11 1 11 1 2 ESD guidelin...

Page 6: ...Panel PC 670 V2 870 V2 Control unit Operating Instructions Edition 03 2004 CD Documentation and Drivers ...

Page 7: ...rvice technicians Maintenance technicians Please pay particular attention to the chapter Safety Information and General Information Required Basic Knowledge Thorough knowledge of personal computers and Microsoft operating systems is required General knowledge in the field of automation is recommended Where is this Manual valid This manual is valid for devices with the order numbers 6AV772 6AV773 6...

Page 8: ...h the following information Expansion possibilities Configuration Error diagnostics Hardware Referred to briefly as computer unit operating instructions hereafter The documentation is delivered with the PC panel electronically on the Documentation Drivers CD in PDF format QuickStart for the Panel PC 870 V2 is enclosed in printed form in addition The documentation is available in German English Fre...

Page 9: ...d key combinations In these operating instructions the standard term device replaces the terms Panel PC 670 870 V2 control unit and computer unit The concrete term is used only where necessary Note A reference is important information concerning the product the handling of the product or it points out a certain part of the documentation to which particular attention should be paid Trademarks All d...

Page 10: ...ng center or our central training center in 90327 Nuremberg Germany for details Telephone 49 911 895 3200 Internet http www sitrain com Service Support on the Internet Extensive additional information concerning the SIMATIC products is available to you through online services at http www siemens com automation service support The newsletter with continuously updated information about your products...

Page 11: ...s a day 365 days a year Telephone 49 911 895 7777 Fax 49 911 895 7001 GMT 1 00 Europe Africa Nuremberg Authorization Local time Mo Fr 7 00 am to 5 00 pm Telephone 49 911 895 7200 Fax 49 911 895 7201 E Mail adauthorisierung siemens com GMT 1 00 United States Johnson City Technical Support and Authorization Local time Mo Fr 8 00 am to 7 00 pm Telephone 1 423 461 2522 Fax 1 423 461 2289 E mail simati...

Page 12: ...Panel PC 670 V2 870 V2 Control unit Operating Instructions Edition 03 2004 CD Documentation and Drivers ...

Page 13: ...n e g from cell phones can cause unintentional operating situations under some circumstances For more details consult the technical data in the EMC Requirements chapter Handling and disposal of lithium batteries Warning Danger of explosion and the release of harmful substances Do not throw lithium batteries into fire do not solder onto the cell body do not open do not short circuit do not reverse ...

Page 14: ... is mounted Notice Adhere to these stipulations each time the device is transported otherwise the guarantee is void Caution Condensation When transporting the device in low temperatures ensure that no moisture gets on or in the device This also applies when the device is subjected to extreme changes in temperature Commissioning Allow the device to slowly adjust to room temperature before commissio...

Page 15: ...s of modern displays does not guarantee that all pixels of the display will be perfect A small number of faulty pixels in the display is therefore unavoidable This does not present a functional problem as long as the faulty pixels are not bunched in one location For additional information refer to the technical data TFT LC display A permanent picture with bright images can lead to a burn in effect...

Page 16: ...Panel PC 670 V2 870 V2 Control unit Operating Instructions Edition 03 2004 CD Documentation and Drivers ...

Page 17: ...nt designs Central design Computer unit and control unit form an entity Decentralized design Computer unit and control unit are in separate locations Principle In the central design the computer is screwed to the back of the control unit with two mounting rails The computer unit is connected to the control unit by screws Computing unit Operating unit Figure 3 1 Panel PC 670 V2 as a complete device...

Page 18: ...mouse LEDs for power supply temperature softkeys Shift and ACK keys Front mounted USB 1 1 port for connecting external I O modules Touch screen variants Color display with backlighting 12 1 TFT technology with 800 x 600 pixels resolution or 15 1 TFT technology with 1024 x 768 pixels resolution LEDs for power supply and temperature Front mounted USB 1 1 port for connecting external I O modules not ...

Page 19: ...control units which distinguish themselves by the size of the display and by the membrane keyboard or touch screen Keyboard variants Color display with backlighting 12 1 TFT technology with 800 x 600 pixels resolution or 15 1 TFT technology with 1024 x 768 pixels resolution Membrane keyboard with alphanumeric keys numeric keys cursor keys and control keys Function keys and softkeys Integrated mous...

Page 20: ...t mounted USB 1 1 port for connecting external I O modules not icluded in the order option control unit without front mounted USB port For additional information refer to the technical data 3 3 Distributed Structure 3 3 1 Overview In the decentralized design the control unit and computer unit are supplied as two separate devices The control unit and the computer unit are installed in separate loca...

Page 21: ...vailable cominations of control unit and computer unit are listed in the table Control unit computer unit 10 4 TFT 12 1 TFT 15 1 TFT 12 1 TFT touch screen 15 1 TFT touch screen PC 670 V2 central design X X X X X PC 670 V2 decentralized design X X X X PC 870 V2 central design X X X PC 870 V2 decentralized design X X X X X available Direct key module For more information refer to the start up instru...

Page 22: ...long green connecting cable Caution Do not open the plug of the connecting cable and do not undo the connecting cable Otherwise the HF properties of the connecting cable will become irreversibly altered Perfect functioning is then no longer guaranteed Figure 3 4 Cable for connecting control unit and computer unit Features Cable connector at the computer unit Cable connector at the control unit Con...

Page 23: ...ard PC platform for demanding tasks in the field of PC based automation The Panel PC is designed for on site use on the machine installed for example in Control cabinets and consoles 19 racks Swivel arms booms Note In the following the term control cabinet also refers to rack mounting rack switchboard operator panel and console The term device represents the Panel PC and its variants 4 2 Unpacking...

Page 24: ...nit is not installed nor put into operation 4 3 Make note of identification data Procedure 1 Write down the Microsoft Windows Product Key of the Certificate of Authenticity COA in the table at the end of this section The product key is located on the power supply cover of the computer unit You will need the product key during the reinstallation of the operating system 2 Write down the manufacturer...

Page 25: ...nit example 4 Write down the ethernet address of the device The ethernet address is located in the main menu of the BIOS setup Hardware Options Ethernet Address Identification Number 1 Microsoft Windows Product Key 2 SVP number 3 Order number of the computer unit 4 Power supply version 5 Approbation 6 Model designation 7 Serial number 8 Control unit order number 9 Device version 10 Ethernet addres...

Page 26: ...rding to EMC guidelines Principles of interference free operation Installing the controls according to EMC guidelines Using interference immune cable Note The instructions Guidelines for the assembly of interference immune programmable logic controllers with the article ID 1064706 and the manual PROFIBUS networks with the article ID 1971286 which also applies to the installation of the device is l...

Page 27: ...950 Therefore no additional fire protection is necessary for the installation Provide adequate volume in the switch cabinet for air circulation and heat transport Keep a distance of at least 10 cm circumference between the device and switch cabinet Do not allow the maximum air intake temperature to exceed 45 C Decisive is the temperature measured at a distance of 10 cm from an air intake The maxiu...

Page 28: ... overview certain installation positions are approved for the device Central design Figure 4 3 Approved installation positions for central design Vertical installation and deviations between 20 and 20 in the given directions is permitted Decentralized design Applies only to the control unit Figure 4 4 Approved installation positions for decentralized design Vertical installation and deviations bet...

Page 29: ...ralized designs The degree of protection depends on the method of attachment Protection Class IP65 This degree of protection is provided when the control unit is attached with clamps and the presence of an encircling seal IP54 degree of protection This degree of protection is provided when the control unit is attached with screws 4 6 Recessed mounting cut out 4 6 1 Selecting and completing recesse...

Page 30: ... installation position 3 On the basis of the dimension diagrams check whether the required screw and pressure points on the backside and the hatched sealing area are easily accessible after the completion of the recessed mounting cut out Otherwise the recessed mounting cut out is useless 4 Complete the recessed mounting cut out according to the dimension diagrams Take into account the mounting dep...

Page 31: ...dition 03 2004 CD Documentation and Drivers 4 9 4 6 2 Dimensions Central design The following illustrations depict the installation dimensions of the complete device in the central design Figure 4 5 Drill holes for the screws and pressure points for the clamp screws L4 L5 Drill holes with 6mm diameter each ...

Page 32: ... 4 6 Recessed mounting cut out Panel PC 670 V2 870 V2 Control unit 4 10 Operating Instructions Edition 03 2004 CD Documentation and Drivers Figure 4 6 Installation diemsnions of the control unit without CD ROM drive ...

Page 33: ...n 03 2004 CD Documentation and Drivers 4 11 Decentralized design The following illustration shows the dimensions of the control unit in the decentralized design The respective dimensions are dependent on the control unit Figure 4 7 Dimensions of the control unit with attached remote module and direct key module ...

Page 34: ...Panel PC 670 V2 870 V2 Control unit Operating Instructions Edition 03 2004 CD Documentation and Drivers ...

Page 35: ...ontents of delivery Figure 5 1 Clamp assembly Procedure 1 Please follow the installation guidelines 2 Insert the device or the control unit in the decentralized design into the recessed mounting cut out from the front 3 Secure the control unit in the recessed mounting cut out from behind with the clamp as shown in the installation cut out in the dimension diagrams Tighten the grub screw to a torqu...

Page 36: ... mounting cut out has been completed Procedure 1 Please follow the installation guidelines 2 Drill suitable holes at the prepared recessed mounting cut out in accordance with the specifications for L4 and L5 as shown in the installation cut out in the dimension diagrams 3 Carefully drill out the drill hole caps on the front of the control unit The drill hole caps are illustrated at the end of this...

Page 37: ...ng Instructions Edition 03 2004 CD Documentation and Drivers 5 3 6 Applies only to the decentralized design Install the computer unit at its planned installation location For additional information please refer to the computer unit operating instructions Figure 5 3 Drill hole covers ...

Page 38: ...r the USB port is removed in order to connect an USB component the degree of protection for the device is no longer guaranteed When using standard USB peripheral devices please bear in mind that their EMC immunity level is frequently designed for office applications only These devices are adequate for starting up and service purposes For use in industry however only devices suitable to industry ar...

Page 39: ...the computer unit operating instructions Back side On the back side of the computer unit are two flatband cables for connecting to the computer unit Figure 6 1 Other interfaces on the computer unit The I O USB cable K1 at X1 comprises not only the signals of the display interface but also the signals for the connection of control units The display cable K2 connects the display of the control unit ...

Page 40: ... heating device however Requirements The device has been installed in accordance with EMC guidelines The device has been installed in accordance with the specifications of these operating instructions Procedure 1 Connect equipotential bonding 2 Connect computer unit control unit connecting cable 3 Connect power supply 6 2 2 Decentralized design Principle In the decentralized design the control uni...

Page 41: ...o transmitter Receiver Mounting plate for receiver and direct key module Operating unit rear Fastening screw for mounting plate USB cable Direct key module optional Figure 6 2 Back side of the control unit with attached remote module and direct key module 6 2 3 Equipotential bonding Differences in potential Differences in potential arise between separated system parts which in some cases leads to ...

Page 42: ...ion current Equipotential bonding cables with a 16 mm diameter have proven themselves in practice 2 Use equipotential bonding cables made of copper or galvanized steel Connect the cables extensively with the ground or protective conductor Protect the ground or protective conductor from corrosion Lay the equipotential bonding cable in such a way that the area between the equipotential bonding cable...

Page 43: ...to the connector on the remote module of the control unit as illustrated in the section Connecting a decentralized design 2 Lock the jack plug 3 Screw on the cable strain relief 4 Plug the male connector of the connection cable into the connector on the host module of the computer unit as illustrated in the chapter Description Connecting a decentralized design 5 Screw on the cable strain relief 6 ...

Page 44: ...nel PC 670 V2 When the computer unit is supplied with electricity through the power supply connection the device is in operation and begins to boot 2 Lock the power plug with the supplied cable clips This prevents accidental removal of the power plug from the control unit 6 2 7 Block diagram The following block diagram applies to the decentralized design The connecting cable for the computer unit ...

Page 45: ...puter unit operating instructions 7 2 Operator controls on key panels 7 2 1 Overview The device has the following keypads 2 x 8 vertical keypads with softkey functions 2 x 10 horizontal keypads with function keys F1 F10 Optional 32 direct key functions The number of keys their labelling and function is the same on all key panels The various panel types differ only in the arrangement of the keys an...

Page 46: ...annot be excluded Activate function keys and softkeys only in sequence Use KeyTools as described in the chapter Additional Drivers and Applications Applies after the deactivation of the security features of Key Tools or after the deinstallation of KeyHook When the additional function keys F13 and S16 are used or when using your own key code table serious malfunctions of the user software can occur...

Page 47: ...s Function keys and softkeys Control keys Alphanumeric keys Numeric keys Cursor keys Function keys and softkeys The softkeys are arranged on the left and on the right and the function keys in a double row below the display Each key has an integrated LED Figure 7 2 Function keys and softkeys Control keys The control keys activate editing functions and control functions in different applications Fig...

Page 48: ...wercase and uppercase letters Enter the lower case letters using the pre defined assignment of the alphanumeric keys To enter an upper case letter proceed as follows 1 Hold down the Shift key 2 Activate the desired alphanumeric key at the same time The displayed upper case letter will be entered 3 To enter lower case letters release the Shift key Numeric keys Enter the numerals 0 to 9 and special ...

Page 49: ...ursor keys correspond to the usual keys of the PC keyboard Figure 7 6 Cursor keys External keyboards The keyboard layout has been set to English USA international If you use a keyboard with a layout other than the English USA international layout the key codes of the internal and external keyboards might no longer correspond 7 2 3 Labelling function keys and softkeys Area of validity This section ...

Page 50: ...ed lines Note Do not insert handwritten labeling strips until the ink has dried 3 Insert the labeling strips into the slots provided on the rear side of the control unit Figure 7 7 Rear side of the control unit with connectors and slots for the labeling strips 7 2 4 Integrated mouse The position on which you press the middle round button determines the direction in which the cursor moves The amoun...

Page 51: ...the touch screen panels 7 3 1 Overview The 12 variant and the 15 variant differ in their dimensions and the size of the display The 12 variant has no drill hole covers on the sides As an example the following illustration shows the front view of the 15 variant with the status displays the front sided USB 1 1 port and the display Figure 7 8 Example of a 15 control unit with touch screen panel ...

Page 52: ...ping the button with your finger the function assigned to the button is activated Caution Do not touch the screen in the following situations During the booting of the device until the beep tone When plugging or unplugging USB components When the warning Do not touch the screen appears Wait at least 1 second after the warning extinguishes The following exertions of pressure are permissible Using a...

Page 53: ... guidelines Caution Condensation When transporting the device at low temperatures prevent condensation from forming on or in the device The same applies when the device is subjected to extreme changes in temperature Wait 12 hours before switching the device on Before starting up the device allow it to adjust slowly to room temperature Do not subject it directly to heat radiation from a heating dev...

Page 54: ...y connector of the computer unit 3 Lock the power plug in place For Panel PC 670 only clamp the supplied ferrite core onto the power supply cable This step can also be performed later For additional information please refer to the chapter Connecting in the computer unit operating instructions 4 Plug the power supply cable of the computer unit into a socket with a grounded protective conductor 5 If...

Page 55: ...Windows 2000 and Windows XP only Perform the regional settings of the operating system 4 Enter the company names and user names 5 Enter the administrator password where necessary 6 When connecting a computer unit to a network only Enter the name of the computers for identification 7 When the dialog SetDisplay appears only Click on the button with the screen size and screen resolution which matches...

Page 56: ...ocedure 1 Change to the SetDisplay dialog The dialog will appear here only if it did not appear during the setup of the operating system 2 Click on the button with the screen size and screen resolution which matches your device Figure 8 1 Setdisplay 3 Change to the Panel PC selector dialog 4 Select the model of your device Figure 8 2 Panel PC selector ...

Page 57: ...system session and restart the computer unit Otherwise the Security features from KeyTools or KeyHook will not be activated Warning Use KeyTools as described in the chapter Additional Drivers and Applications Applies after the deactivation of the security features of Key Tools or after the deinstallation of KeyHook When the additional function keys F13 and S16 are used or when using your own key c...

Page 58: ...nit The installation of the drivers and applications is complete For more information please refer to the chapter Additional drivers and applications in the control unit operating instructions Notice After starting up your device find out more about the particulars of the operating system in the chapter Starting up in the computer unit operating instructions More information about the Microsoft Wi...

Page 59: ...the housing of the device This improves the electrical shielding Follow the guidelines in the Interfaces section of the chapter Connecting The operating system and the service packs have been installed and set up on the hard disk of the device For additional information please refer to the chapter Starting up in the computer unit operating instructions The pre installed drivers and applications ha...

Page 60: ... turn on the computer unit at the power switch In the central design not until now will the POWER LED illuminate The device is now in operation and booting Caution Danger of data loss Do not switch off the power supply when the device is in operation Do not disconnect the power suply until the device has shut down properly After switching on the power supply the device performs a self test During ...

Page 61: ...s and applications are contained in the supplied Documentation Drivers CD Caution Do not turn off the device during the installation of drivers and applications Otherwise parts of the software which are necessary for trouble free operation will be lost Note The supplied drivers and applications have been tested for the system and released for this device No warranty can be provided for other softw...

Page 62: ...are e g ProTool Pro will carry out the functions which happen to be behind it Caution Do not touch the screen in the following situations While the device is booting until the beep tone When plugging or unplugging USB components When the warning Do not touch the screen appears Wait at least 1 second after the warning extinguishes Start MicroTouch TouchWare symbol on the desktop Start menu Start co...

Page 63: ...button 4 Click on the Right click button The right click tool will be activated 8 3 3 Repeating calibration Introduction If the touch screen does not react as expected when touched repeat the calibration To do this first activate the 2 point calibration and then calibrate the touch screen Procedure 1 Start the touchware settings as described in the last section 2 Switch to the Touch settings tab c...

Page 64: ...n 03 2004 CD Documentation and Drivers Figure 8 7 Touch settings properties 3 Adjust the touchware as desired 4 Switch to the Tools tab control 5 Click on the Options button The MicroTouch Touchscreen Options dialog will appear 6 Click on the Advanced button The following dialog will appear Figure 8 8 Advanced touchscreen settings dialog ...

Page 65: ...tab control The following dialog will appear Figure 8 9 Calibrate tab control 11 Click on the Calibrate button The dialog for touch calibration will appear 12 Touch the cross hairs on the touch screen for at least 3 seconds and no longer than 10 seconds The Calibration complete dialog will appear Exit the calibration by clicking on the Done button 8 3 4 KeyTools Area of validity The following appl...

Page 66: ...urity purposes always implement Security features and never deactivate Security features If the user deactivates Security features nonetheless make sure that no malfunctions are triggered in the application program Serious malfunctions of the application program cannot be ruled out in external input devices or combinations of external input devices and control devices with key panels The Security ...

Page 67: ...unction keys F13 to F20 and S1 to S12 send key combinations For example pressing the key F13 represents the key combination Shift F1 and releasing it the key combination Shift F1 For certain software products e g SIMATIC WinCC another sequence of key combinations is required Using the KeyHook the key combination Shift F1 is changed to F1 Shift by releasing Figure 8 10 KeyHook 8 3 6 Keypad Area of ...

Page 68: ...s Edition 03 2004 CD Documentation and Drivers Start Depending on the key panel execute the following file Key panel File 10 c drivers keypad keypads10 exe 12 c drivers keypad keypads12 exe 15 c drivers keypad keypads15 exe Function Using Keypad the preset key assignments for the membrane keyboard can be changed Figure 8 11 Keypad ...

Page 69: ...TIC SOM is activated automatically after the device is started Function The open window displays information concerning for example the current temperature the internal temperature of the device and the I O modules Set limit values as needed Figure 8 12 SIMATIC SOM 8 3 8 TouchInputPC Start TouchInputPC symbol on the desktop Function TouchInputPC provides a screen keyboard On the screen keyboard th...

Page 70: ...nd Drivers Figure 8 13 TouchInputPC 8 3 9 Set brightness Start Set brightness symbol on the desktop Function The intensity of the backlighting is adjusted using Set brightness Figure 8 14 Set brightness 8 3 10 CheckLanguageID Area of validity The following applies to Windows 2000 Multi Language and Windows XP Multi Language Start c drivers checklang checklangid exe ...

Page 71: ...ngID User language UserDefaultUILangID User interface language Notice All three languages displayed should be assigned to the same ID 8 3 11 Installing user interface language Area of validity The following applies to Windows 2000 Multi Language and Windows XP Multi Language Start Multilanguage User Interface symbol on the desktop Function Install the required user interface languages using the Mu...

Page 72: ... the dialog with the OK button The changes become effective when the user logs off logs back on or initiates a restart 8 3 12 Changing user language Introduction The display of date time cash amount and decimal point are language specific Using the relevant standard language foreign text will be displayed in the respective native language if the application supports the standard language Applicati...

Page 73: ...e field command Properties Tab control Input Function In the regional settings tab control General set the standard language of applications e g MS Excel in the upper field Set the system language of applications e g Outlook in the lower field Notice When the standard language and the input language are not selected as described Asian characters for example will not be displayed correctly on the s...

Page 74: ...ard input language Input and output are the same in regard to foreign languages The keyboard layout is included only in the standard input language Many languages offer different keyboard layouts When editing an English text in which French words appear for example enter the accents with the French keyboard layout preferably Start Start menu Start command Settings Control panel Regional settings T...

Page 75: ... standard input language click on the Add button 4 Select the desired standard input language 5 Click OK to close all open dialogs Change to the desired standard input language by clicking on the Change language icon in the message field 8 3 14 DVD ROM CD RW The DVD ROM CD RW drive is installed as an option The drive supports the following methods of recording Disc at once Track at once Session at...

Page 76: ...y comparing these with the source To be on the safe side data should be verified after every burning session Restrictions under Microsoft Windows NT DVD ROM CD RW drive restrictions under Windows NT no DMA mode write at once is not possible with CD RW packet writing per instant drive 8 3 15 USB keyboard controller driver and USB stack Area of validity The following applies to Windows 98 Windows NT...

Page 77: ...ss Cleaning agent Use dish soap or foaming screen cleaner only as cleaning agents Caution Do not clean the device with agressive solvents or scrubbing agents or with pressurized air or steam cleaner Procedure 1 Turn off the device This prevents the accidental triggering of functions when the keys are touched 2 Dampen the cleaning cloth 3 Spray the cleaning agent on the cloth and not directly on th...

Page 78: ...s branch office The complete computer unit For additional information please refer to computer unit operating instructions In addition for the decentralized design the connecting cable 2 m 5 m 10 m 20 m For further information please refer to options in the chapter Description 6XV1440 7AH20 6XV1440 7AH50 6XV1440 7AN10 6XV1440 7AN20 Set of clamps 6FC5248 0AF06 0AA0 Rubber cover for the USB port 6FC...

Page 79: ...ol unit are now accessible 5 In order to dismount the computer unit remove the cable connectors K1 and K2 between the computer unit and the control unit 6 Two mounting rails whose ends are in the form of lugs are screwed to the control unit Lift the computer unit vertically out of these lugs 7 Put the computer unit down carefully 8 If necessary also remove the control unit depending on its design ...

Page 80: ...rnative dismount the device completely and separate the control unit and computer unit from one another in an uninstalled state Lay a pad under the computer unit as illustrated so that the computer does not fall out and bend the lugs Installing the device To reinstall the device follow the reverse procedure 9 3 2 Separating Panel PC 870 V2 Area of validity The section applies to the central design...

Page 81: ...mputer unit away The connectors on the rear of the control unit are now accessible 5 In order to dismount the computer unit remove the cable connectors K1 and K2 between the computer unit and the control unit 6 Two mounting rails whose ends are in the form of lugs are screwed to the control unit Lift the computer unit vertically out of these lugs 7 Put the computer unit down carefully 8 Where nece...

Page 82: ...e Figure 9 4 Deinstallation of the computer unit Figure 9 5 Rear of the control unit with the interface positions Separating the device in an uinstalled state As an alternative dismount the device completely and separate the control unit and computer unit from one another in an uninstalled state Lay a pad under the computer unit as illustrated so that the computer does not fall out and bend the lu...

Page 83: ... on DC 24 500 V 1 kV symmetrical 2 kV unsymmetrical with intermediate unit Dehnrail 24 FML order number 901 104 Immunity to discharges of static electricity ESD EN 61000 4 2 8 kV at air discharge 6 kV at contact discharge direct indirect interference criterion B Immunity to radiated narrow band electromagnetic fields EN 61000 4 3 EN 61000 4 3 80 1000 MHz 10 V m modulation 80 AM with 1 kHz interfer...

Page 84: ...inches 19 7 HE 483 x 310 19 0 x 12 2 19 8 HE 483 x 355 19 0 x 14 0 400 mm 7 HE 400 x 310 15 7 x 12 2 19 7 HE 483 x 310 19 0 x 12 2 Installation measurements PC 670 V2 2 B x H x T 3 in mm in inches 450 x 290 x 100 17 7 x 11 4 x 3 93 450 x 327 x 127 17 7 x 12 9 x 4 99 368 x 290 x 121 14 5 x 11 4 x 4 76 450 x 290 x 125 17 7 x 11 4 x 4 91 Installation measurements PC 870 V2 2 B x H x T3 in mm in inche...

Page 85: ...LUS 508 Power consumption typically 13 W maximum 21 W Period of warranty 24 months 1 USB 1 1 standard Not an order option of Control unit without front sided USB port see degree of protection variant b 2 Operate only in closed spaces 10 1 3 Ambient and environmental conditions Mechanical conditions Tested according to Vibration load during operation 10 to 58 Hz 0 075 mm 58 to 500 Hz 1 g IEC 60068 ...

Page 86: ...uchscreen 15 touchscreen Mounting dimensions B x H x T in mm in inch 450 x 290 x 69 17 7 x11 4 x 2 71 450 x 327 x 91 17 7 x12 9 x 3 58 368 x 290 x 85 14 5 x11 4 x 3 34 450 x 290 x 91 17 7 x11 4 x 3 58 Weight approx 8 4 kg depending on configuration Installation up to 70 vertical inclination Variant SIMATIC HMI Cu Link cable Plug at both ends 15 pin Sub D plug Diameter Bend radius Torsion Tensile s...

Page 87: ...ntain the dimensions for the central design The dimensions for the decentralized design are located in the Dimensions section of the chapter Recessed mounting cut out 10 2 2 Panel PC 670 V2 dimensions for central design If a CD ROM drive or a CD RW DVD drive is installed in the computer unit the installation depth must be enlarged by 21 mm Figure 10 1 Dimensions of the Panel PC 670 V2 in central d...

Page 88: ...tions Edition 03 2004 CD Documentation and Drivers 10 2 3 Panel PC 870 V2 dimensions for central design If a CD ROM drive or a CD RW DVD drive is installed in the computer unit the installation depth must be enlarged by 21 mm Figure 10 2 Dimensions of the Panel PC 870 V2 in central design without CD ROM drive ...

Page 89: ...aximum 100 mA connect external power supply for devices with higher power consumption 2 USB_D0M Bidirectional Data USB channel 0 3 USB_D0P Bidirectional Data USB channel 0 4 USB_GND Voltage Ground for external USB interface 10 4 Keyboard table Key codes The following table applies only to control units with key panels The table depicts the standard keyboard assignments and the allocated key codes ...

Page 90: ... a 8a1 26 s 9 42 F9 10 40 s F19 Shift F7 11 0f l 11a1 35 12 0e k 12a1 34 A 13 0d j 13a1 34 14 0c i 14a1 34 s 15 0b h 15a1 30 16 0a g 16a1 2f 17 41 F8 18 3f s F18 Shift F6 19 15 r 19a1 35 s 20 14 q 20a1 33 AS 21 13 P 21a1 31 s 22 12 o 22a1 31 23 11 n 23a1 30 s 24 10 m 24a1 2f s 25 40 F7 26 3e s F17 Shift F5 27 26 9 27a1 22 s 28 25 8 28a1 22 A Euro 29 24 7 29a1 21 s 30 18 u 30a1 33 s ...

Page 91: ... F16 Shift F4 35 23 6 35a1 23 s 36 22 5 36a1 37 s 37 21 4 37a1 36 s 38 1b x 39 1a W 40 19 v 41 3e F5 42 3c s F15 Shift F3 43 20 3 43a1 38 44 1f 2 44a1 25 s 45 1e 1 46 2c BLANK 46a1 2d s _ 47 1d z 48 1c y 48a1 1f s 49 3d F4 50 3b s F14 Shift F2 51 56 51a1 57 52 27 0 52a1 2e 53 37 56 2a Backspace 57 3c F3 58 3a s F13 Shift F1 61 52 CURSOR UP 62 4b PAGE UP 63 4e PAGE DOWN 64 49 INSERT 65 3b F2 66 45 ...

Page 92: ...10 91 44 s 3 S3 Shift F11 92 45 s 4 S4 Shift F12 93 3a c 5 S5 CONTROL F1 94 3b c 6 S6 CONTROL F2 95 3c c 7 S7 CONTROL F3 96 3d c 8 S8 CONTROL F4 97 3e c 9 S9 CONTROL F5 98 3f c 10 S10 CONTROL F6 99 40 c 11 S11 CONTROL F7 100 41 c 12 S12 CONTROL F8 101 42 c 13 S13 CONTROL F9 102 43 c 14 S14 CONTROL F10 103 44 c 15 S15 CONTROL F11 104 45 c 16 S16 CONTROL F12 Explanation of the values in the keyboard...

Page 93: ... No No No Yes for 15 touch screen panels Note The approval or approbation is located on the rating label The rating label is described in the chapter Planning use 11 1 2 ESD guideline What ESD means Almost all electronic modules are equipped with highly integrated components and elements in MOS technology Due to their their technology these electronic components are extremely sensitive to power su...

Page 94: ... the packaging are properly grounded Conduct the electrostaic charge away from your body by touching the mounting plate for the interfaces for example Handling modules susceptible to electrostatic discharge As a rule Only touch ESD components if unavoidable due to necessary tasks Only touch the components when the following holds true You are permanently grounded by means of an ESD armband You are...

Page 95: ...ded metallic component Solder only with grounded soldering irons Shipping modules susceptible to electrostatic discharge Always store or ship ESD components in conductive packaging e g metallized plastic boxes or metal cans Leave the components and parts in their packaging until installation If the packaging is not conductive wrap the ESD component in a conductive material e g rubber foam ESD bag ...

Page 96: ...otocol DNS Domain Name Service DP Distributed I Os DSN Data Source Name ESD Modules susceptible to ElectroStatic Discharge EMC ElectroMagnetic Compatibility H Height HF High frequency HMI Human Machine Interface IF Interface Interface LCD Liquid Crystal Display Liquid crystal display LED Light Emitting Diode Light emitting diode Mbps Megabits per second PC Personal Computer PG Programming device P...

Page 97: ... rate of 1 bps Module Modules are plug in units for PLCs programming devices or PCs Modules exist for example as central modules power ons or as mass storage Boot diskette A boot disk is a bootstrap loader diskette which has a boot sector which loads the operating system from the diskette Booting The starting or restarting of the computer During the boot sequence the operating system is loaded fro...

Page 98: ...etwork with Bus structure for data communication with a transmission speed of 10 100 baud F Formatting Basic partitioning of memory space on a magnetic data carrier into tracks and segments Formatting deletes all data on a data carrier All data carriers must be formatted prior to their first use D Gender Changer The Gender Changer 25 pin male 25 pin male is used to convert the COM1 V24 AG interfac...

Page 99: ...D is used to restore the system partition or the entire hard disk to factory state if the system has crashed The bootable CD contains all the necessary image files They create a start diskette which restores the factory state through the network drive ROM memory Read Only Memory The ROM memory is a read only memory in which every memory location can be addressed individually They contain factory s...

Page 100: ...Panel PC 670 V2 870 V2 Control unit Operating Instructions Edition 03 2004 CD Documentation and Drivers ...

Page 101: ...3 5 3 6 Cache 11 5 Calibrating 8 11 Repeating 8 11 Caring 9 1 Device 9 1 CD R CD RW Operating guidelines 8 23 Restrictions under Microsoft Windows NT 8 24 CD ROM drive 10 2 CD RW 8 23 Certification 10 4 Change 11 3 Changing ESD 11 3 CheckLanguageID 8 18 Checklist 8 1 Chipset 11 5 Clamps 5 1 Cleaning agent 9 1 Cold start 11 7 COM interface 11 5 Combination 3 5 Available combination 3 5 Commissionin...

Page 102: ...f 8 8 Turning on 8 7 Device number 4 2 Checking 4 2 Device version 4 2 Differences in potential 6 4 Dimension drawing 10 5 10 6 Dimensions 4 9 10 4 10 5 10 6 Distributed configuration 10 4 Panel PC 670 in the central design 10 5 Panel PC 870 in the central design 10 6 Direct key module 3 5 6 3 10 2 Display 2 3 3 2 3 3 3 4 TFT LC display 2 3 Documentation 1 2 Documentation Drivers CD 11 6 Drivers 1...

Page 103: ... 2 3 3 6 1 7 2 7 5 8 24 external keyboard 7 5 External keyboard 6 1 USB keyboard controller driver 8 24 USB stack 8 24 Keyboard table 10 7 Keyboard variant 3 2 3 3 KeyHook 8 14 Keypad 8 16 Knurl screw 9 3 9 5 L Labeling 7 5 Function key 7 5 Softkey 7 5 Labeling strips 3 2 3 3 7 5 7 6 10 2 Handwritten strips 7 6 Laser printer 7 5 LED 3 2 3 3 3 4 7 1 7 4 Operating Mode 3 2 3 3 3 4 POWER 7 1 TEMP 7 1...

Page 104: ...3 Resolution 10 2 Restore CD 11 7 ROM memory 11 7 S Safety 10 3 10 4 Safety Information 2 1 Safety requirement 10 3 Scope of service 9 1 Screw attachment 5 2 Screws 5 2 Scrolling 7 5 Securing 5 1 5 2 Securing with clamps 5 1 Securing with screws 5 2 Securing with clamps 5 1 Self test 8 2 8 8 Separating 9 2 9 4 9 6 Device 9 2 9 4 9 6 Serial number 4 2 Servicing 9 1 Set brightness 8 18 Setting up 8 ...

Page 105: ...re 8 9 8 10 Incorrect operation 8 10 Setting 8 9 Special features 8 10 Trademark 1 3 Transport 2 2 Turning off 8 8 Device 8 8 Turning on 8 7 Device 8 7 U Updates 2 2 Upper case letter 7 4 Toggling to lower case letter 7 4 USB 10 3 USB mouse 7 6 USB port 3 2 3 3 6 1 7 1 7 6 7 7 10 7 Front sided USB port 10 7 User interface language 8 19 8 20 Installing 8 19 Toggling 8 20 User language 8 20 Using 7 ...

Page 106: ...Index Panel PC 670 V2 870 V2 Control unit Index 6 Operating Instructions Edition 03 2004 CD Documentation and Drivers ...

Reviews: