49
Basic Operation
Adjusting the Computer Images (RGB menu only)
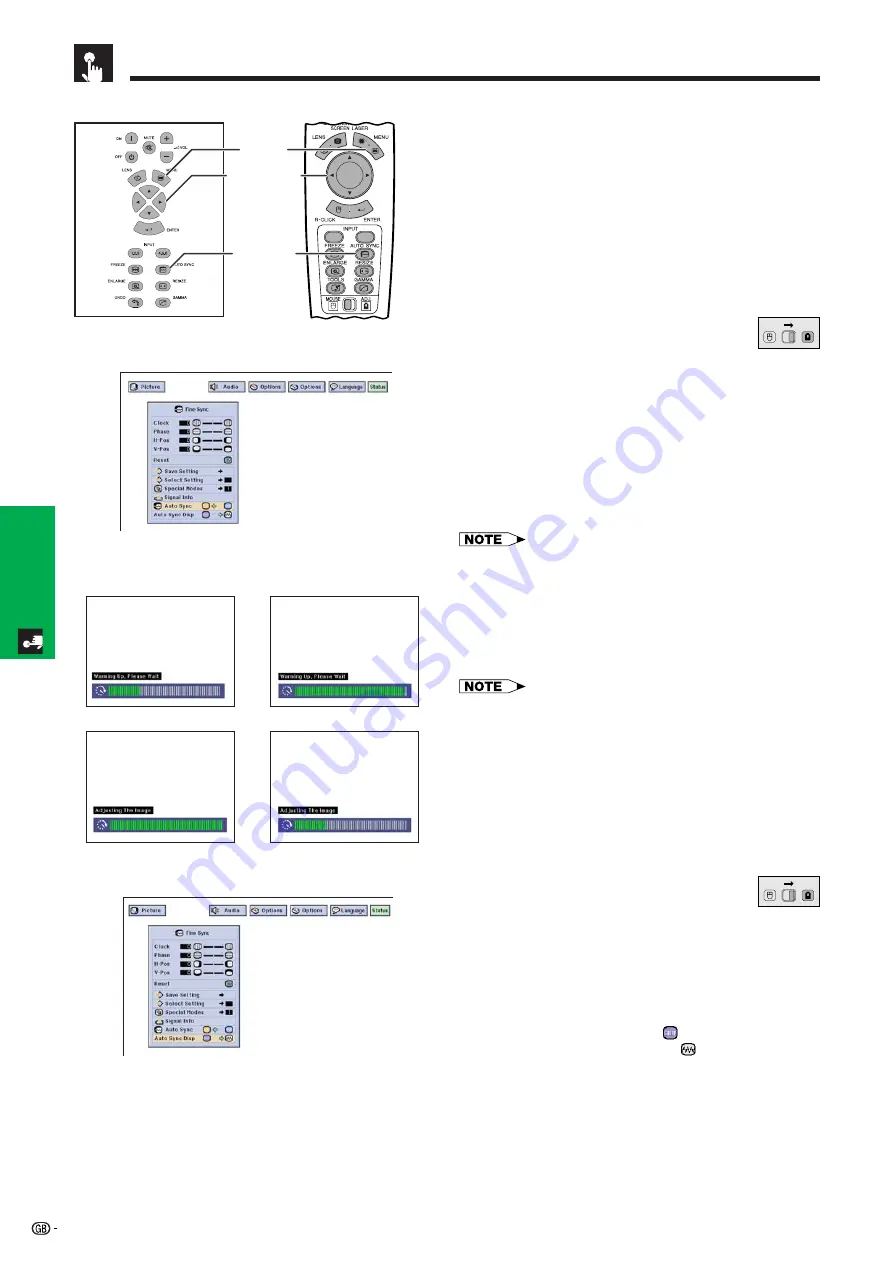
Auto Sync
Adjustment
• Used to automatically adjust a computer image.
• Auto Sync adjustment can be made manually by
pressing
AUTO SYNC
, or automatically by setting
“Auto Sync” to “ON” in the projector’s GUI menu.
When “Auto Sync” is set to “ON”:
• The sync adjustment is automatically made each time
the projector is turned on while connected to a com-
puter or the input selection is changed.
• The Auto Sync adjustment setting previously made is
cleared when the projector’s setting is changed.
(Slide the
MOUSE/ADJUSTMENT
switch
on the remote control to the ADJ. position.)
1
Press
MENU
.
2
Press
ß
/
©
to select “Fine Sync”.
3
Press
∂
/
ƒ
to select “Auto Sync”.
4
Press
ß
/
©
to select “ON”.
5
To exit from the GUI, press
MENU
.
• Automatic adjustments can be made by pressing
AUTO
SYNC
.
• When the optimum image cannot be achieved with Auto
Sync adjustment, use manual adjustments. (See page 46.)
During Auto Sync adjustment, the On-screen Display
changes as shown on the left.
• Auto Sync adjustment may take some time to complete,
depending on the image of the computer connected to the
projector.
(GUI) On-screen Display
Projector
g
s
f
On-screen Display
Auto Sync Display Function
Normally, an image is not superimposed during Auto
Sync adjustment. You can, however, choose to
superimpose a background image during Auto Sync
adjustment.
(Slide the
MOUSE/ADJUSTMENT
switch
on the remote control to the ADJ. position.)
1
Press
MENU
.
2
Press
ß
/
©
to select “Fine Sync”.
3
Press
∂
/
ƒ
to select “Auto Sync Disp”.
4
Press
ß
/
©
to select “
” to superimpose a
background image or “
” to remove the
background image during Auto Sync adjustment.
5
To exit from the GUI, press
MENU
.
MOUSE
ADJ.
(GUI) On-screen Display
Remote Control
1.2.3
4.5.6
2
,
3
,
4
1
,
5
AUTO SYNC
button
MOUSE
ADJ.
Summary of Contents for XG-V10XE
Page 92: ...89 Appendix SHARP CORPORATION ...


