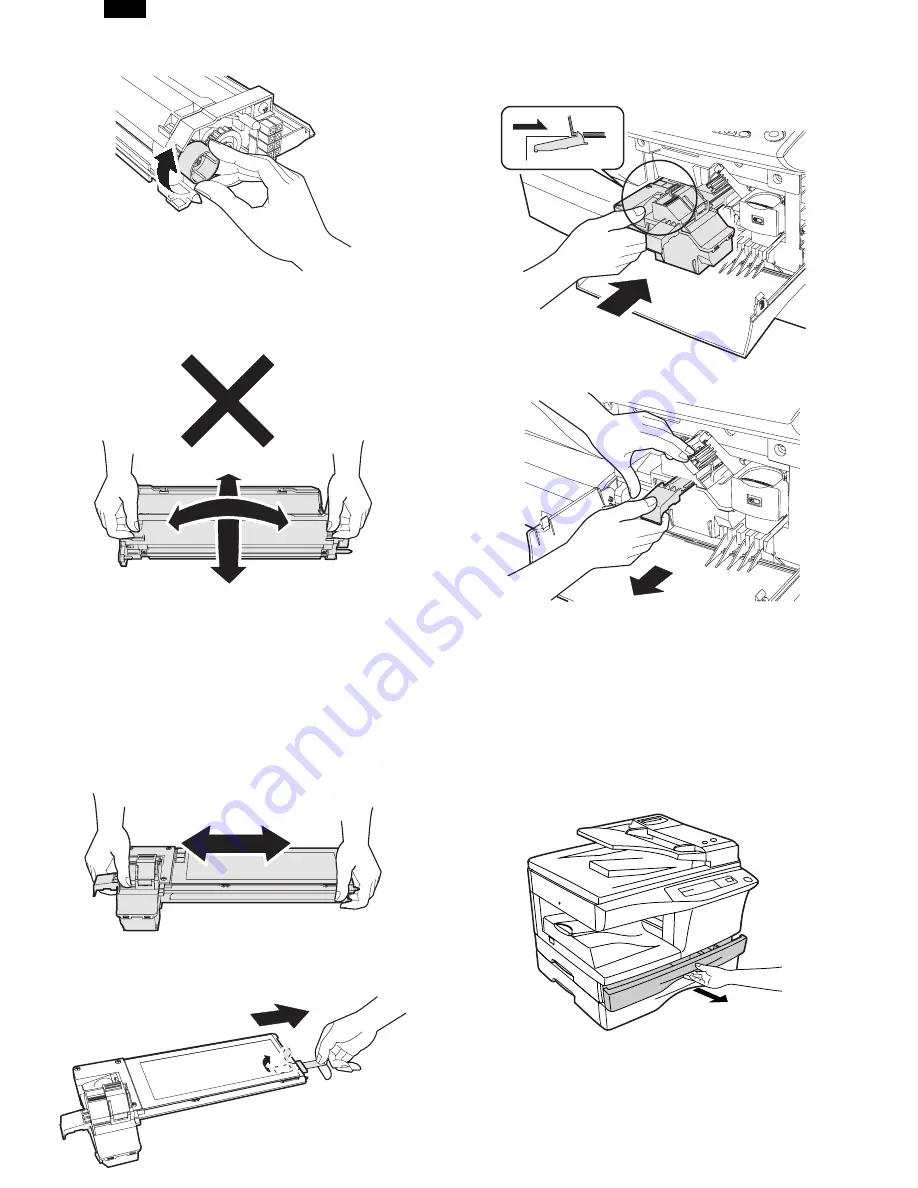
12) Rotate the MG roller gear to distribute developer evenly.
Note: Never rotate the gear in the reverse direction.
Note: When carrying Developer unit, do not tilt it extremely
as shown with the arrow in the figure below.
(Prevention of splash of developer)
13) Insert Developer unit carefully into the copier.
Note: Quick insertion may result in splash of developer. Be
sure to insert carefully.
14) Confirm that Developer unit is completely inserted to the
bottom of the machine, fix Developer unit and the machine
with a screw.
15) Completion of Developer unit installation
7. TONER CARTRIDGE INSTALLATION
1) To prevent against uneven distribution of toner, hold Toner
unit with both hands and shake it several times horizontally.
2) Hold the section of Toner unit shown in the figure below,
remove the packing tape, and remove the cushion.
3) Pull out the cushion in the arrow direction.
4) Insert Toner unit carefully into the copier.
5) Insert until the hook is engaged with the copier as shown in
the figure below.
6) Pull out the shutter in the arrow direction.
Note: Do not hold and carry the shutter. Otherwise the shut-
ter may drop and Toner unit may drop.
7) Completion of Toner unit installation
Close the front and side cabinets.
8. LOADING COPY PAPER
Note: This copier is equipped with two paper trays. Load copy
paper into the two paper trays.
1) Raise the handle of the paper tray and pull the paper tray
out until it stops.
2) Remove the pressure plate lock. Rotate the pressure plate
lock in the direction of the arrow to remove it while pressing
down the pressure plate of the paper tray.
AR-F152
5 – 3
Summary of Contents for AR-F152
Page 152: ...2 AR F152 13 9 ...
Page 153: ...AR F152 13 10 ...
Page 154: ...AR F152 13 11 ...
Page 155: ...AR F152 13 12 ...
Page 156: ...AR F152 13 13 ...
Page 157: ...AR F152 13 14 ...
Page 158: ...AR F152 13 15 ...
Page 159: ...AR F152 13 16 ...
Page 160: ...AR F152 13 17 ...
Page 161: ...AR F152 13 18 ...


