MX-7000 Installation and operation manual
P a g e
| 36
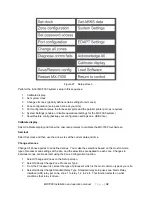
12. For EDAPT zones change the EDAPT count if desired and set separate tampers for processors
so configured. Silver Network devices do not have EDAPT capability.
13. Select Next Zone and continue until all zones have been reviewed and configured, as required.
Port configuration
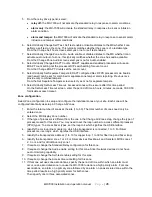
Use the Port configuration function to setup the MX-7000 serial ports and parallel printer port.
1. Select Port: and choose the port that you are configuring (COM1, COM2, COM3, LPT).
2.
Select Function: and specify the connected device (not used, host interface, weather, video
switcher, printer).
NOTE: The Baud rate, Parity, Data bits and Stop bits are fixed for MX-7000 communications.
3. Status messages: Off-no status messages, On-status messages sent when state changes, or
Automatic-a zone status message is sent every second.
4. Host Mode: Off-no host control, ON-host control only (no local operator control), Both-host and
local operator control.
5. Select Next port and continue to setup the MX-7000 communication ports.
System Settings
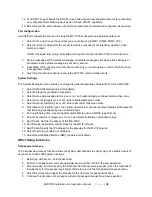
The System Settings function allows you to specify general operating characteristics for the MX-7000.
1. Select ARKS fail alert (enabled or disabled).
2. Select Categories (enabled or disabled).
3. Select Auto acknowledge alarms (yes or no). Auto acknowledge and reset alarms when clear.
4. Select Auto rst tampers (yes or no). Auto reset tampers when clear.
5. Select Auto rst comfails (yes or no). Auto reset comm fails when clear.
6. Select Manu rst testfails (yes or no). Allow operator to manually reset test failures. Otherwise the
test fail is only resettable by a successful re-test.
7. Auto reset delay: time in seconds after alarm before auto-ACK/RST is performed.
8. Select Test alarms to relays (yes or no). Test alarms activation of standard relays.
9. Set IP addr: Set the IP address of this MX-7000.
10. Set IP mask: Specify the subnet mask for the MX IP network.
11. Set IP gate: Specify the IP address for the gateway for the MX IP network.
12. Select Alert tone: (enabled or disabled).
13. Select Remote Map Interface (RMI): (enabled or disabled).
Other Setup functions
Set password access
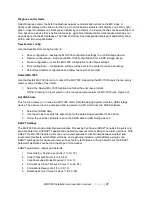
The Set password access function allows the system administrator to specify up to five distinct levels of
user access to MX-7000 system functions.
1. Beginning with Level 1, select Password:
2. Enter the old password, enter the new password, and then confirm the new password.
3. Select Access: and then specify the functions that this Level may access (touch the functions to
include them for this access level). Select Done to return to the Set password access menu.
4. Select Next level and repeat the process for the next level of password access.
5. Continue this process until all required levels of password access have been specified.

