


FP400 fusion splices
FP400 Product Guide
Page 55
11. Fit the top of the enclosure onto the bottom.
12. Close and latch the enclosure.
13. Use the supplied security screw to secure the latched enclosure (requires T-10 security bit).
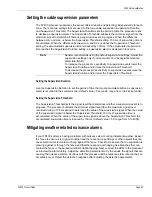
14. Attach the enclosure to the fence beside a post and form the service loops.
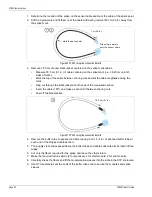
Figure 64 Dressing the fibers in the enclosure tray
Figure 65 Outdoor splice enclosure example (single end module)
Figure 66 Attaching the splice enclosure and service loops to the fence
fit the 2 halves of the enclosure together
clip the latches onto the enclosure
shut the enclosure and fasten the latches
security screw
(T-10 security bit)
secure the splice
tray with the 2
supplied screws
STP splice enclosure
with end module
splice point service loops
STP enclosure
lead-in cable
to processor