background image


User Guide 


29 


3-5-3 Single and Dual frequency fish finding                                                                                         

Sonar frequencies 

The unit has dual frequency, 200kHz and 
50kHz to detect various bottom conditions.   
 

To select the sonar frequency in sonar 
window: 

1 Press 

, select 

Frequency

2 Select 

frequency

 and press 

3 Press 

  to exit.   


High frequency (200kHz ) 

The higher ultrasonic signal, the better is the 
resolution. For this reason the 200 kHz 
frequency is ideal for detailed observation of 
fish schools.   

Low frequency (50kHz) 

The lower frequency signal is, the wider is 
the detection area. Therefore, the 50kHz 
frequency is useful for general detection and 
judging bottom condition.   

Mixed frequencies (200kHz / 50kHz) 

The Mixed frequency combines the 200 kHz 
and the 50 kHz in the Sonar window. The 
50kHz picture appears on the left and the 
200kHz picture on the right.


The display is useful for comparing the same 
picture with two different frequencies. 


High Frequency (200 kHz) 

 Low Frequency (50 kHz)


3-6-4 Range                                                                                                                                                       

Range is the depth of water displayed on the 
sonar window. The basic range may be 
chosen in Auto or manual mode.   

 
Auto: 

When the mode is set to 

Auto

, the 

unit adjusts the depth automatically for the 
best performance. This option is 
recommended for normal operation. 
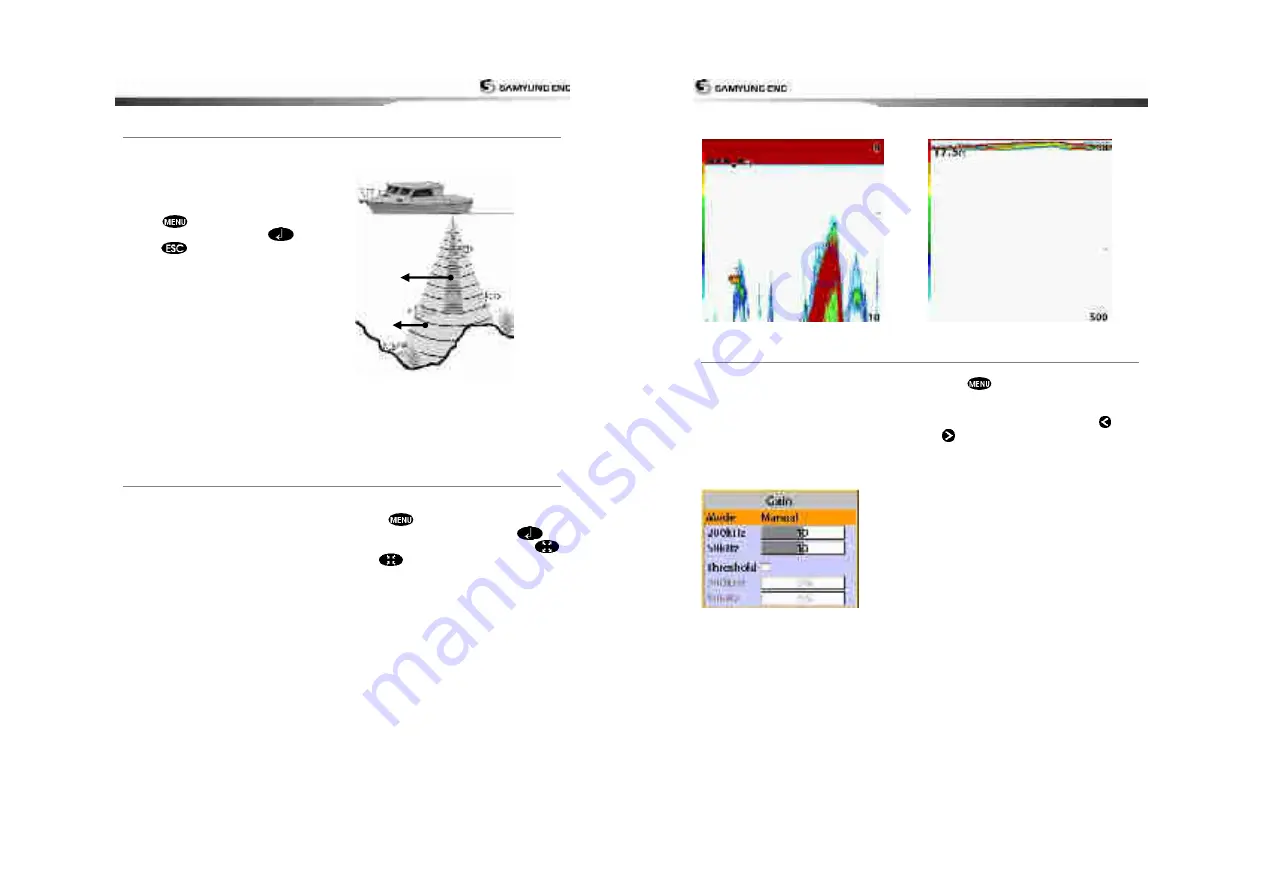
 

Manual:

 When the mode is set to 

Manual

the unit only displays the depth of water at a 
given range. That means the sea bottom 
might not be displayed in the sonar window 
or it might display half of display in white 
because range is more important than sea 
bottom depth. As shown in below images. 

To set the manual mode in the sonar 
window: 

1 Press 

, select 

Range

2 Select a mode you want and press

3 If you select the manual mode, press 


or 

  to change value of max displayed 

depth.   


User Guide 


30 


[When the set depth is too low] 


[When the set depth is too high] 


3-5-5 Gain                                                                                                                                                         

The gain menu 

The gain is a signal strength received from 
the transducer and the threshold is the level 
of ultrasonic that is ignored by a set value.   
When you use the manual mode and 
threshold, the values of gain and threshold 
need to be set very carefully.   
 
In the 

Gain

 window, you can set for a gain 

mode and threshold.   


To change a mode, 

1 Press 

, select 

Gain

2 Select a mode.   
3 If you select a 

Manual

 mode, adjust each 

frequency gain value by pressing 


or 

. Even though you select the 

Auto


mode, it will be changed to manual mode 
if you change the values of frequency.   


Summary of Contents for NF800

Page 1: ...User Guide 1 User Guide 2...

Page 2: ...UV rays may shorten the life of the liquid crystals used in you plotter This limitation is due to the current technology of the LCD display Avoid overheating which may cause loss of contrast and in ex...

Page 3: ...d Dual frequency fish finding 29 3 6 4 Range 29 3 5 5 Gain 30 3 5 6 Sonar window display 31 3 5 7 No split 31 3 5 8 Split zoom and Full Screen zoom 32 3 5 9 Split bottom 32 User Guide 6 3 5 10 Split 5...

Page 4: ...Load 53 4 6 3 Delete 53 4 6 4 Format 54 4 6 5 Screen Snap Shot 54 4 7 AIS Settings 54 4 7 1 Display Filter 55 4 7 2 Alarm Option 55 4 7 3 Display Option 55 4 7 4 Restore Default 55 4 8 Alarm Settings...

Page 5: ...Chart datums 216 Chart datums One user defined map shift Chart scale 0 2 to 500 nm for chart chart dependent down to 0 005 nm in plotter mode COMMUNICATIONS NMEA NMEA 0183 Port1 Port 4800 9600 38400 N...

Page 6: ...ket 2 Gently push the display unit into the groove of bracket 3 Turn the knob to clockwise to lock Removing the display unit 1 Turn the unit off 2 Turn the knob to counter clockwise and pull the displ...

Page 7: ...an select a map between NAVIONICS and S MAP A user can select a map as follow instruction Chart Selection 1 Press and hold 2 Select the system setting icon 3 Select Chart then a chart you prefer NAVIO...

Page 8: ...bar Large Small Tip If you select None for all data fields the data bar will disappear to save space for the chart Tip Even though you setup a data bar for specific window the data bar is not apply t...

Page 9: ...ve window among windows an orange border indicates the active window To change the active window to the next window press and hold It is important to notice which screen is on due to the multi screens...

Page 10: ...hten Press to return to the previous screen Night mode The chart plotter has preprogrammed settings allowing you to customize the look of the Chart window The default is daytime view To select Night M...

Page 11: ...iew 3 4 1 Chart window To go to the Chart window Press and select Chart icon by pressing A typical Chart window shows Data bar To turn the data off or on or to change what data is displayed Compass Ch...

Page 12: ...of D section to display the information To find port service 1 Press 2 Select Find then Port service 3 Select a service you want to find 4 After searching process select a nearest service area in the...

Page 13: ...ant to start navigating to 3 Press and select start 4 Select Forward or Reverse to decide which direction you want to navigate Create Route Option 1 Press and select the chart window 2 Select New rout...

Page 14: ...Depth Single fish Fish symbols with depth School of fish Depth line Bottom Hard bottoms such as rock and coral shown as wide bands Soft bottoms such as mud weed and sand show as narrow bands Range of...

Page 15: ...hen the mode is set to Auto the unit adjusts the depth automatically for the best performance This option is recommended for normal operation Manual When the mode is set to Manual the unit only displa...

Page 16: ...frequency is useful for general detection and judging bottom condition High Frequency 200 kHz The 200 kHz frequency is ideal provide a better resolution which means it is ideal for the observation of...

Page 17: ...when navigating to a destination point To go to the Highway window press and select Highway icon The Highway window shows Compass Data bar Destination waypoint Boat s plotted course to destination DTG...

Page 18: ...t To Edit a waypoint from the chart window 1 Move the cursor to the waypoint you want to edit If you move the cursor on the waypoint correctly waypoint information will be displayed at the bottom left...

Page 19: ...ypoint while creating a route 1 If you want to insert a waypoint between waypoints which will be just after the one you want to insert 2 Press and select Insert 3 Move the cursor to the new inserted w...

Page 20: ...m the chart window 1 In the Chart window press 2 Select Find and Tide station 3 Press or to move cursor and select a tide station 4 Press or to the position of selected tide station and press 5 Select...

Page 21: ...he bottom of window AIS equipped vessel Dangerous Vessel Projected Course AIS equipped vessel Data Box Range Rings 3 12 2 AIS Windows To display the AIS windows 1 Press display and select AIS icon 2 P...

Page 22: ...the waypoint you edit in option menu is a different waypoint from the distress waypoint Deleting a Distress Call 1 Highlight a received distress call you want to delete 2 Press and select Delete Dele...

Page 23: ...ating to the engine in real time If any reason causing a problem is solved then corresponding error or malfunction indication will disappear User Guide 46 The system menu mainly consists of settings w...

Page 24: ...he original paper chart These objects have been obtained from other sources and then merged to the electronic charts in order to provide more information useful for the navigation Lat Lon Grid Turns t...

Page 25: ...the map shift 1 In the Chart setup menu select Map shift 2 Press and select Clear 4 2 8 Restore default Returns every chat settings to default User Guide 50 4 3 Sonar settings Sonar feature requires a...

Page 26: ...nt to other marine electronics 4 4 7 Ship speed To have more precise boat speed and course you can select your boat speed Mid is highly recommended option for the most of common boat 4 4 8 Magnetic Va...

Page 27: ...nter the file name and press 3 If you select tracks for saving data enter the file name and press Waypoint Route 4 6 2 Load Select a data you want to road into the load list then press 4 6 3 Delete Se...

Page 28: ...4 8 Alarm Settings Press long then select Alarms A warning message with beep sound is displayed when an alarm condition is met by user setting Press to clear the alarm However the alarm will be displa...

Page 29: ...nd select a desired output data 4 9 6 Time Local offset The time information supplied by the GPS satellites is in UTC Universal Time Coordinates To read the correct time change the time of GPS chart p...

Page 30: ...Antenna If an external antenna is required install the antenna and fit the antenna cable back to the display unit Follow the instructions in the manual supplied with the antenna Fit an optional exten...

Page 31: ...art plotter to your requirements and to set up any optional sensors or instruments 5 At the satellite display check that it picks up GPS satellites Wait for the GPS receiver to start up and the GPS sa...

Page 32: ...User Guide 63 User Guide 64...

Page 33: ...User Guide 65...

Reviews: