


41
5. DISASSEMBLY AND REASSEMBLY
5-13) EVAPORATOR IN REFRIGERATOR
Part name
Evaporator In
Refrigerator
Descriptive Picture
How To Do
Evaporator is located in the bottom of
refrigerator.
1. Take off the ductwork in refrigerator.
2. Disconnect the wire connector. (Heater and
Thermistor)
3. Desolder the capillary tube and the suction line
from the evaporator.
4. Remove the evaporator.
5. With a file, score the capillary tube just
upstream of the soldered point. Break off the
soldered section to help prevent solder from
plugging the tube during soldering.
6. Place a new evaporator and braze the suction
and capillary tube to evaporator using silver
solder.
7. Install a replacement dryer.
8. Evacuate and recharge the system using
reasonable procedures.
Part name
Evaporator Fan
Motor
Descriptive Picture
How To Do
The evaporator fan is located in the middle rear
of the freezer. This fan circulates cold air in the
freezer.
1. Remove screws (4) located at the four corners of
the fan bracket.
2. Take the fan motor assembly off.
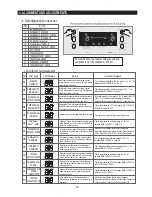
5-14) EVAPORATOR IN REFRIGERATOR
Thermistor
Suction Line
Capillary Tube
Thermal Fuse
Part name
Door Bin In
Freezer
Descriptive Picture
How To Do
The door bins allow storage of perishable
items.
1. Push the bin up and slide it out.
5-15) DOOR BIN IN FREEZER
Summary of Contents for RS265BBWP
Page 18: ...18 Refrigerator 2 PRODUCT SPECIFICATIONS 2 9 Cooling Air Circulation Freezer...
Page 68: ...7 EXPLODED VIEW PARTS LIST 7 3 Cabinet 7 1 69...
Page 78: ...79 8 BLOCK DIAGRAM...
Page 79: ...80 9 WIRING DIAGRAM 9 1 RS265BB RS267BB RS267LB RS269LB...
Page 80: ...81 9 WIRING DIAGRAM 9 2 RS263BB RS265LB...
Page 82: ...83 10 PCB DIAGRAM 10 2 CONNECTOR ARRANGEMENT Main Board...
Page 83: ...84 11 CIRCUIT DIAGRAM...


