


5-3) CONTROL PANEL
37
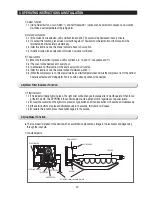
5. DISASSEMBLY AND REASSEMBLY
• After disassembling the freezer / refrigerator door, move it to the appropriate location. You must
reassemble it.
NOTE
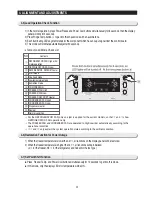
5-2) REFRIGERATOR DOOR
Part name
Door Fre
How To Do
Removing the Lower hinge.
1.Remove the door from the lower
hinge(
①
)by carefully lifting the
door.
2.Remove the lower hinge from the
bracket hinge(
②
)by lifting the lower
hinge in the direction of the arrow.
Descriptive Picture
①
①
②
②
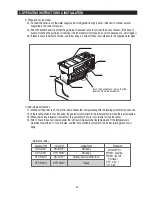
Part name
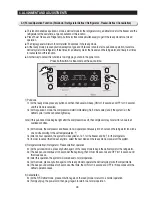
Control Panel
How To Do
Insert a flat -blade screwdriver on
the slot as shown,and unlock the
tabs.
Disconnect the wire connector in
the direction of the arrow.
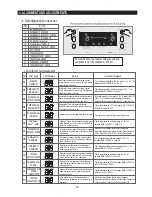
Part name
Door Ref
Descriptive Picture
How To Do
Removing the Upper hinge.
1.With the door colsed,remove the
upper hinge cover(
①
)using a
screwdriver.
2.Remove hinge screws(
①
)and
ground screw(
②
) counter-
clockwise and take off the upper
hinge(
③
)along the arrow.
Removing the Lower hinge.
1.Remove the door from the lower
hinge(
①
)by carefully lifting the
door.
2.Remove the lower hinge from
the bracket hinge(
②
)by lifting the
lower hinge in the direction of the
arrow.
Descriptive Picture
①
①
①
①
③
③
②
②
①
①
②
②
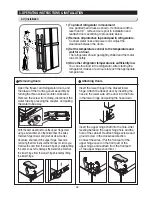
Be careful not to scratch
Caution
When diassembling, make
sure the unit turned off
Caution
Summary of Contents for RS265BBWP
Page 18: ...18 Refrigerator 2 PRODUCT SPECIFICATIONS 2 9 Cooling Air Circulation Freezer...
Page 68: ...7 EXPLODED VIEW PARTS LIST 7 3 Cabinet 7 1 69...
Page 78: ...79 8 BLOCK DIAGRAM...
Page 79: ...80 9 WIRING DIAGRAM 9 1 RS265BB RS267BB RS267LB RS269LB...
Page 80: ...81 9 WIRING DIAGRAM 9 2 RS263BB RS265LB...
Page 82: ...83 10 PCB DIAGRAM 10 2 CONNECTOR ARRANGEMENT Main Board...
Page 83: ...84 11 CIRCUIT DIAGRAM...


