INS
TALLA
TION
22
English
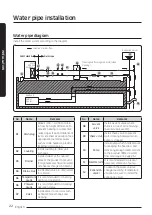
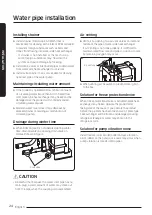
Water pipe diagram
Install the water system according to the diagram.
Direction of water flow
Expansion vessel
Cleaning and flushing pipe (Install when
cleaning)
Load unit
AHU or
Fan coil
DVM CHILLER
Field scope
Water
side heat
exchanger
03
07
04
10
11
09
12
08
01
04
06
05
02
08
No.
Name
Remarks
01
Drain plug
Make 1/100 ~ 1/200 for drain
to flow by height difference. To
prevent freezing in winter time,
make slope steep and distance of
level side short as possible. Take
appropriate countermeasures
such as drain heater to prevent
freezing in cold region.
02
Coupling
Install coupling to allow unit
exchange.
03
Strainer
Install strainer at the nearest
place of the product to prevent
foreign materials flow into water
side heat exchanger. (50 Mesh)
04
Drain valve
Install drain valve to drain water
for service.
05
Temperature
gauge
It is recommended for checking
ability and operation.
06
Pressure
gauge
It is recommended for checking
operation status.
07
Valve
Install valves for services such
as flowmeter exchange and
cleaning.
No.
Name
Remarks
08
Air vent
valve
Install air vent valve where
there is a risk of air remaining.
(Auto air valve usable)
09
Check valve
Install check valve to prevent
water flowing backward when
pump is stopped.
10
Pump
Install pump which holds amount
for keeping the head loss and
delivering enough water amount
to the product. (Refer to water
flow rate range on page 25.)
11
Flexible joint
It is recommended to prevent
noise and vibration of pump.
12
Expansion
vessel
To absorb the water volume
change caused by temperature
variation, be sure to install the
expansion vessel.
Water pipe installation
Summary of Contents for AG010KSV Series
Page 85: ...MAINTENANCE 85 English MEMO ...
Page 86: ......

