background image

INS

TALLA

TION

Safety information

4

English

Do not operate the product with power switch or 
circuit breaker.

ŷ

Potential risk of electric shock or fire.

ŷ

If automatic blackout restore is set, fan may spin 
suddenly and it may cause injury.

If fuse load switch is used, do not use incorrect 
fuse capacity/size.

ŷ

Usage of incorrect wire may result in product 
malfunction or fire. 

Do not use flammable gas (such as hair spray or 
insecticide) near the product.

ŷ

There are potential risks of electric shock or fire.

If there is any problem (such as burning smell), 
stop operation and shut off the circuit breaker.

ŷ

Otherwise, it may cause product malfunction, 
electric shock, or fire. Contact the service center.

Use chilled/heating water which is appropriate 
according to water maintenance standard.

ŷ

Deterioration of water may cause water leakage.

Contact the merchandise or service center to clean 
inside of the product.

ŷ

Error on selecting cleaner and cleaning the 
product may harm rubber part and cause water 
leakage.

ŷ

If the cleaner reaches to electric parts or motor, 
it may cause product malfunction, smoke, or fire.

  CAUTION

Do not use the product for preservation purposes.

ŷ

If you use this product for unintended purposes, 
such as preservation of machinery, food, art 
work or breeding animals or plants, it may cause 
damage to their performance, quality or life.

Do not use the holder which is worn out for 
longtime usage.

ŷ

It may cause injury due to falling down of the 
product.

Do not step onto the product or place any objects 
on the product.

ŷ

It may cause injury due to falling down of the 
product.

Do not operate the product with the cover of 
exterior or electric box opened.

ŷ

It may cause electric shock or fire. 

Do not place any objects that are not allowed to be 
wet.

ŷ

It may get wet by dripping water caused 
by product or refrigerant pipe freezing, 
contaminated air filter, blocked drain valve. 

Do not change settings for protection device.

ŷ

It may cause fire.

Do not use chilled/heating water for drinking.

ŷ

It is harmful for humans.

ŷ

For hot water supply, use indirect heat exchange.

Do not wash the product with water.

ŷ

It may cause electric shock.

Do not operate protection devices forcibly.

ŷ

This may result in fire or explosion.

Do not touch high temperature part such as 
compressor and refrigerant pipe.

ŷ

It may cause burns.

Do not touch inlet or aluminum plate.

ŷ

It may cause injury.

Summary of Contents for AG010KSV Series

Page 1: ...LLER Installation manual AG010KSV AG015KSV Series ŷ Thank you for purchasing this Samsung Product ŷ Before operating this unit please read this Installation manual carefully and retain it for future reference ...

Page 2: ...it breaker and power cable 27 Power and communication cable configuration 28 Connecting the power cable 29 Connecting the communication cable 30 External contact wiring work 30 Selecting solderless ring terminal 36 Connecting the power terminal 37 Fixing the power cable 39 Fixing the ground cable 39 Withdrawing the power cable 40 Installing the Solution device 40 Grounding work 40 Setting key func...

Page 3: ...t operation explain to the user how to use and maintain the product Also hand over this installation manual so that it can be stored by the user The manufacturer of DVM Chiller is not responsible for the incidents occurred by improper installation Installer is responsible for any installation related claims from the user occurred by neglecting warnings and cautions stated in this manual Generally ...

Page 4: ...n smoke or fire CAUTION Do not use the product for preservation purposes ŷ If you use this product for unintended purposes such as preservation of machinery food art work or breeding animals or plants it may cause damage to their performance quality or life Do not use the holder which is worn out for longtime usage ŷ It may cause injury due to falling down of the product Do not step onto the produ...

Page 5: ...ould be done by following the installation manual accurately ŷ When installation is not done properly it may cause water leakage electric shock or fire Do not install the field supply parts by users ŷ Do not use any other product other than the manufacturer recommended It may result in water leakage electric shock or fire if installation is not precise Contact the merchandise or service center Do ...

Page 6: ...on since the product uses inverter compressor ŷ If the auxiliary circuit breaker is not installed power will not be cutoff in case of overcurrent or current leakage and cause electric shock or fire ŷ Do not use damaged parts Otherwise a fire or electric shock may occur You must cut off the power before you work on or adjust any power supply part for product installation maintenance repair or any o...

Page 7: ...ct may disturb neighbors It may cause property loss ŷ A place full of mineral oil place where oil scatters or with oil vapors such as a kitchen Plastic parts may get damaged and cause water leakage or maybe even cause product to fall down The performance of the heat exchanger may decrease or cause product failure ŷ A place near exhaust pipes or ventilation outlet where corrosive gas such as ammoni...

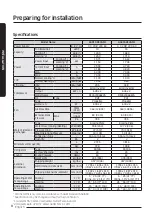
Page 8: ...g LPM GPM 90 8 24 0 127 2 33 6 Pressure Drop kPa psi 37 5 37 70 10 15 Max Operationg Pressure Mpa psi 1 0 145 1 0 145 Connection Type 50A Cut Groove 50A Cut Groove Quantity EA 2 2 Minimum water quantity L 272 5 381 6 gal 72 0 100 8 Refrigerant Type R410A R410A Factory Charging lbs 40 40 Sound Sound Pressure dB A 60 62 External Dimension Net Weight kg lbs 435 959 435 959 Shipping Weight kg lbs 457 ...

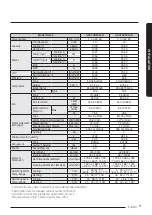
Page 9: ... 33 6 Pressure Drop kPa psi 37 5 37 70 10 15 Max Operationg Pressure Mpa psi 1 0 145 1 0 145 Connection Type 50A Cut Groove 50A Cut Groove Quantity EA 2 2 Minimum water quantity L 272 5 381 6 gal 72 0 100 8 Refrigerant Type R410A R410A Factory Charging lbs 40 40 Sound Sound Pressure dB A 60 62 External Dimension Net Weight kg lbs 435 959 435 959 Shipping Weight kg lbs 457 1008 457 1008 Net Dimensi...

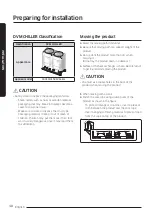
Page 10: ...ad them to suffocation Moving the product f Select the moving path in advance f Be sure that moving path can support weight of the product f Do not slant the product more than 30 when carrying it Do not lay the product down in sideways f Surface of the heat exchanger is sharp Be careful not to get injured while moving the product CAUTION ŷ You must use square holes in the base of the product when ...

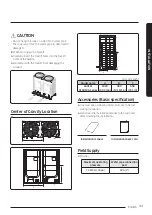
Page 11: ... damaging the product Center of Gravity Location A B A C B C Unit mm inch Model name A B C AG010 015KSVA Series 1020 40 3 16 380 14 15 16 590 23 1 4 Accessories Basic specification f You must keep following accessories not to be lost during installation f Hand over the installation manual to the customer after finishing the installation Installation manual Installation check card Field Supply f St...

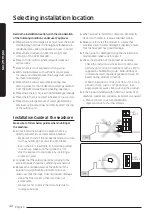
Page 12: ...see breeze Even when it is inevitable to install the product in seashore make sure that product is not directly exposed to sea breeze by installing a protection wall f Consider that the salinity particles clinging to the external panels should be sufficiently washed out f Because the residual water at the bottom of the outdoor unit significantly promotes corrosion make sure that the slope does not...

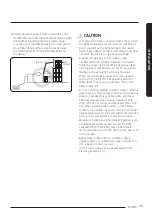
Page 13: ...entilation system is required ŷ When you install the product on a high location such as roof install fence or guardrail around it When there is no fence or guardrail the service person could fall ŷ Do not install the product in places where corrosive gases such as sulfur oxides ammonia and sulfurous gases are produced e g Toilet outlet ventilation opening sewage works dyeing complex cattle shed su...

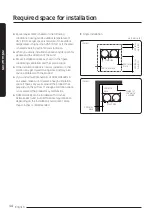
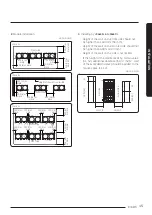
Page 14: ...narrow installer or other worker may get injured during work and may also cause a problem with the product f If you install multiple number of DVM CHILLERs in one space make sure to secure enough ventilation space if there s any walls around the product that may disturb the air flow If enough ventilation space is not secured the product may malfunction f DVM CHILLERs can be installed with 4 inches...

Page 15: ... 100 4 or more 100 4 or more 100 4 or more 500 20 or more 500 20 or more 600 24 or more Case 3 f Installing by Case 1 or Case 3 Height of the wall on the front side should not be higher than 1500 mm 59 inch Height of the wall on the air inlet side should not be higher than 500 mm 20 inch Height of the wall on the side is not limited If the height of the wall exceeds by certain value h1 h2 addition...

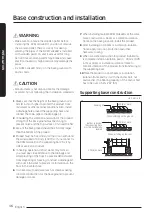
Page 16: ...e fix it by side or use extra structure 5 In heating operation defrost water may form so you must pay close attention to the drainage and waterproofing of the floor To prevent defrost water from stagnating or freezing construct a drainage pit with over 1 50 slant to prevent ice formation on the floor in the winter time 6 It is necessary to add wire mesh or steel bar during concrete construction fo...

Page 17: ... of draining work f Use concrete or steel bar for draining work to prevent any damage or cracks f For smooth draining of defrost water make sure to apply 1 50 slant f Construct a drainage ditch channel around the product to prevent the defrost water from the product from stagnating overflowing or freezing near the installation space f When the product is installed on the roof check the strength an...

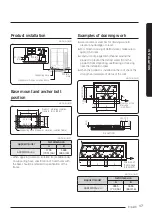
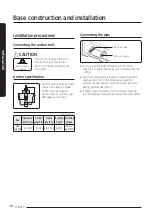
Page 18: ...n Unit mm inch Size Diameter of drill bit a Anchor length b Sleeve length c Insertion depth Fastening torque ø10 ø3 8 14 1 2 75 3 40 1 1 2 50 2 30 N m 22 1 lbf ft Connecting the pipe Water inlet pipe Water outlet pipe f If you install the DVM CHILLER on the rooftop check the strength and make sure to waterproof the rooftop f Construct draining pit around the supporting base and pay attention to th...

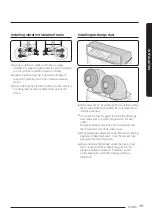
Page 19: ...ic pressure of the discharge duct should be within the standard specification 78 5 Pa 0 315 W G when installing the duct f If you remove the fan guard to install the discharge duct make sure to install a fan guard on the duct outlet Foreign substance may enter into the product and there could be a risk of personal injury f Wear protection equipment at all times when making galvanized sheet metal d...

Page 20: ...egions with lots of snowfall install a snow prevention duct as a sufficient countermeasure to prevent snow from accumulating on the product When the snow prevention duct is not installed properly frost may accumulate on the heat exchanger and heating operation may not work normally f Air outlet of the duct should not be directed to the enclosed space CAUTION Cautions regarding on installing the fr...

Page 21: ... 560 22 1 16 2300 90 9 16 1695 66 3 4 1150 45 1 4 180 71 16 980 38 9 16 Unit mm inch 1697 66 13 16 2915 114 3 4 593 23 3 8 612 24 1 8 1210 47 5 8 1318 51 7 8 127 5 Unit mm inch 871 34 5 16 550 215 8 765 30 1 8 668 26 5 16 532 20 15 16 2271 89 7 16 1134 44 5 8 965 38 180 71 16 CAUTION Cautions regarding on installing the frame and selecting the base ground ŷ The base ground must be solid and the pr...

Page 22: ...als flow into water side heat exchanger 50 Mesh 04 Drain valve Install drain valve to drain water for service 05 Temperature gauge It is recommended for checking ability and operation 06 Pressure gauge It is recommended for checking operation status 07 Valve Install valves for services such as flowmeter exchange and cleaning No Name Remarks 08 Air vent valve Install air vent valve where there is a...

Page 23: ...ply chilled heating water regularly to keep operation conditions stable f Install valves at inlet outlet of water pipes for services f Install temperature gauge and pressure gauge at inlet outlet of water pipes to check operation status f Insulate pipes to prevent thermal loss of water pipes and freezing of pipe surface f When insulation is not done thoroughly you will waste energy caused by therm...

Page 24: ...ter time f When DVM CHILLER is not operated during winter time drain all water by opening drain valves in CHILLER shown in figure Drain valve CAUTION ŷ Be careful that because the water inlet pipe has no drain plug a small amount of water may come out from the pipe when the coupling is disassembled Air venting f Vent air by opening two air vent valves on inlet and middle of the pipe of water side ...

Page 25: ...l storage is installed select a pump that can provide required water amount considering head loss pipe resistance CAUTION ŷ The product should be operated for 3 minutes after it has stopped to protect water side heat exchanger plate type heat exchanger from freezing NOTE ŷ Expansion vessel is to buffer expanded water and also to purge air in water pipes The capacity of expansion vessel should be 2...

Page 26: ...torage In case of variable flow system retain certain amount of water by bypass pipe system Unit L gal Model name Minimum water storage AG010KSV Series 272 5 72 AG015KSV Series 381 6 100 8 NOTE ŷ Total water storage in the system water storage within the water pipe water storage in DVM CHILLER water storage in AHU or fan coil ŷ Minimum capacity of buffer tank Minimum water storage Total water stor...

Page 27: ...er MCCB Molded Case Circuit Breaker ELB Earth Leakage fuse Breaker ŷ Do not operate the outdoor unit before completing the refrigerant pipe work ŷ Do not disconnect or change the cable inside the product It may cause damage to the product ŷ Specification of the power cable is selected based on following installation condition culvert installation ambient temperature 30 C 86 F single multi conducto...

Page 28: ...s embedded in concrete structure Class 1 flexible conduit Galvanized steel sheet When the protection tube is installed indoor but exposed to outside so there are risk of damage to the protection tube Class 1 PVC coated flexible conduit Galvanized steel sheet and Soft PVC compound When the protection tube is installed outdoor and exposed to outside so there are risk of damage to the protection tube...

Page 29: ...y display an error code the air conditioner may not turn on or core components may not work If the power cable of a pump integrated model is mistakenly connected or not connected the air conditioner may not operate a trip of the OCR may occur or backlash of the pump may occur Supplying 3 phase 3 wires 208 230V or 460V ELCB or MCCB ELB Inverter controller f Connect a power cable after checking that...

Page 30: ...2 V1 V2 F3 F4 Communication cable CHILLER UNIT 1 Module control UNIT 16 F1 F2 V1 V2 F3 F4 F1 F2 V1 V2 F3 F4 Communication cable UNIT 1 UNIT 16 f Communication cable between DVM CHILLERs has no polarity f Fix the cable with a cable tie f Maximum number of DVM CHILLER that can be controlled by a module control is 16 Unit N m lbf in Terminal block Tightening torque 6P T B M3 5 0 8 1 2 7 10 6 External...

Page 31: ... Pump signal OFF 15 16 Freeze protection display Display when freeze protection operates Pump ON for freeze protection Others 17 18 Disuse 19 20 Disuse ŷ Output written above is information about individual unit CAUTION ŷ You must turn off the power before working on external contact wiring ŷ Output contact can be connected neutral contact and Open Short only ŷ Be sure to install a buzzer alarm on...

Page 32: ...ain unit of group NOTE4 15 16 Hot water Cool storage mode Entering hot water cool storage mode by external control ŷ Cool ON Cool storage ŷ Heat ON Hot water Cool storage Hot water Cool Heat Usual input Main unit of group NOTE4 17 18 Hot water Cool storage control standard Control depending on set temperature when ON Control depending on external hot water cool storage thermostat when OFF Control ...

Page 33: ...ge 35 for example of installation 1 3 5 7 9 11 13 15 17 19 2 4 6 8 10 12 14 16 18 20 C T B No Name Signal Function Contact On Short Contact Off Open Signal recognition Setting unit C T B 1 2 Quiet function Zero voltage contact Operate quiet function in level set by main option or module control Note4 Quiet function Usual input Main unit of group Note8 3 4 Demand function Operate demand function cu...

Page 34: ...5 57 50 68 75 80 00 Temperature F 14 00 34 25 54 50 74 75 95 00 115 25 135 50 155 75 176 00 Note2 Room temperature C 6 25 x Current 75 Current mA 4 6 8 10 12 14 16 18 20 Temperature C 50 00 37 50 25 00 12 50 0 00 12 50 25 00 37 50 50 00 Temperature F 58 00 35 50 13 00 9 50 32 00 54 50 77 00 99 50 122 00 Note3 If operation pattern is not standard control control standard temperature depends on exte...

Page 35: ... according to the usage Room temperature sensor 4 mA 50 C 58 F 20mA 50 C 122 F External water outlet temperature sensor 4 20 mA 4 mA 30 C 22 F 20mA 70 C 158 F f Example of input contact installation External controller DDC Direct Digital Control Refer to the manual provided with the external controller for using Input signal Input terminal block DDC Field scope ...

Page 36: ...6 15 9 16 0 2 0 007 7 1 1 4 0 3 0 011 4 5 3 16 0 2 0 007 7 9 5 16 9 3 8 30 1 3 16 8 4 1 3 16 0 4 0 015 1 15 0 04 0 2 0 007 0 0 16 0 02 8 3 16 16 10 16 0 2 0 007 9 3 8 0 3 0 011 5 8 1 4 0 2 0 007 9 5 5 16 13 1 2 33 1 5 16 8 4 1 3 16 0 4 0 015 1 45 0 05 0 2 0 007 0 0 25 0 03 8 3 16 12 1 2 0 3 0 011 11 5 7 16 0 5 0 019 7 7 5 16 0 2 0 007 11 3 8 15 5 8 34 1 3 8 8 4 1 3 16 0 4 0 015 1 7 0 06 8 3 16 16 ...

Page 37: ...he power cable through the side f Close the cover Unit N m lbf in Screw Tightening torque M8 5 5 7 3 48 7 64 6 3 phase 380 415 V power cable M4 1 2 1 8 10 6 15 9 Single phase 220 240 V power cable NOTE ŷ When connecting two cables to one terminal separate the solderless terminal up and down to prevent it from getting loose Place the thin cable upward and the thick cable downward Solderless ring te...

Page 38: ...thickness of the power cable 2 Fix the power cable and tool by using the hook at the top side of the tool 3 Cut out the outer sheath of the power cable by revolving the tool in the direction of the arrow two or three times 4 At this moment cut out the outer sheath of the power cable by moving the tool toward the direction of the arrow as shown in the illustration 5 Slightly bend the wire and pull ...

Page 39: ...mpossible you should connect the protection tube for power cable to the power supply box ŷ After arranging the power cable into the power supply box tighten the cover 3 Phase 3 Wires 208 230V 3 Phase 3 Wires 460V ELCB or MCCB ELB Communication cable Connecting ring terminal of 3 phase cable 1 Cut the power cable to an appropriate length and connect it with the solderless terminal 2 After connectin...

Page 40: ...r cable according to the following table Installation place Power condition High humidity Average humidity Low humidity Voltage to ground is lower than 150 V Must perform the grounding work 3 Note 1 Must perform the grounding work 3 Note 2 Voltage to ground is over 150 V Must perform the grounding work 3 Note 1 Including the case where earth leakage breaker is installed Note 1 About grounding work...

Page 41: ...by referring to the specification of the electric cable for the product f When using the exclusive grounding terminal When the exclusive grounding terminal is already built in the house Exclusive grounding terminal f When using grounding terminal at the electrical panel Electrical panel ...

Page 42: ...he table f Cancelling view mode display Press and hold K3 for 3 seconds HYDRO UNIT_MODULE_CHILLER K1 K2 K3 K4 K5 K6 K1 K2 K3 K4 K5 K6 88 SEG DISPLAY TACT S W DIP S W Number of press KEY operation SEG1 SEG2 SEG3 SEG4 SEG5 SEG6 Remarks 1 time Water In 0 1 0 5 0 ex 5 C 2 times Water Out 0 2 1 1 0 ex 11 C 3 times Outdoor temperature 0 3 1 1 2 ex 11 2 C 4 times High pressure 0 4 2 9 3 ex 29 3 kgf cm2 G...

Page 43: ...e 1 5 1 1 2 ex 11 2 C 16 times Liquid Temperature 1 6 3 5 0 ex 35 C 17 times EVA In 1 temperature 1 7 3 5 0 ex 35 C 18 times EVA Out 1 temperature 1 8 5 0 0 ex 50 C 19 times EVA In 2 temperature 1 9 3 5 0 ex 35 C 20 times EVA Out 2 temperature 2 0 3 5 0 ex 35 C 21 times EVI In temperature 2 1 3 5 0 ex 35 C 22 times EVI Out temperature 2 2 3 5 0 ex 35 C 23 times IPM 1 temperature 2 3 8 0 0 ex 80 C ...

Page 44: ...0 ex 1007 step 100 Drop 10 34 times Main EEV 2 3 4 1 0 0 ex 1007 step 100 Drop 10 35 times EVI EEV 3 5 4 7 3 ex 473 step 36 times PHE inlet pressure 3 6 0 1 2 ex 1 2 kgf cm2 G 37 times PHE outlet pressure 3 7 0 0 4 ex 0 4 kgf cm2 G 38 times Capacity Cooling 3 8 0 7 0 ex 70 kW 39 times Exterior Room temperature 3 9 2 5 5 ex 25 5 C 40 times Exterior Water outlet temperature 4 0 1 1 0 ex 11 C 41 time...

Page 45: ...ing with all option values cancelled and keep the values as before entering the setting ŷ In option setting press K4 long to initialize all option values No Option item Option value Factory default Option Definition Setting unit Module control setting option Note1 1 Operation On Off input method 0 1 0 0 Module control DMS Main unit of group Note2 1 External contact 2 Temperature setting input meth...

Page 46: ... supply is stopped to the unit whose compressor does not work Main unit of module 1 Pump ON always when thermo OFF 10 Remote error reset input 0 1 0 0 Disuse Main unit of module 1 Use 11 Setting unit address ŷ Module address must be set Refer to installation manual of Module Control 0 15 Not set Setting unit address Each unit 12 Quiet function level 0 3 1 0 Default 100 Main unit of module O 1 Leve...

Page 47: ...andard 1 outdoor temperature for heating 23 AirHeat2 For water law 10 20 15 Standard 2 outdoor temperature for heating 24 RoomHeat1 For water law 15 24 20 Standard 1 room temperature for heating 25 RoomHeat2 For water law 25 35 30 Standard 2 room temperature for heating 26 Theat1 For water law 35 55 45 Standard 1 set temperature for heating 27 Theat2 For water law 35 55 35 Standard 2 set temperatu...

Page 48: ...k and unsecured flow rate ŷ Compressor will not operate until water flow is detected 14 Set when controlling water outlet temperature by installing extra water temperature gauge on water pipe header or tank ŷ External water outlet temperature sensor should be installed on main unit of group or module when group is not available ŷ Standard for water outlet temperature depends on external water outl...

Page 49: ...p below 5 C 41 F Water outlet set temp Outdoor temp Heat AirHeat2 AirHeat1 Theat2 Theat1 f Room temperature standard Water outlet set temp Room temp Cool RoomCool2 RoomCool1 Tcool2 Tcool1 ŷ If it is room temperature model water outlet set temperature set by water law does not drop below 5 C 41 F Water outlet set temp Room temp Heat RoomHeat2 RoomHeat1 Theat2 Theat1 NOTE ŷ Refer to page 46 for set ...

Page 50: ... H b 1 3 0 2 ex ver 130228 1302 Inverter controller Inverter 1 version I 1 1 3 0 2 ex ver 130228 1302 Inverter controller Inverter 2 version I 2 1 3 0 2 ex ver 130228 1302 Inverter controller Fan 1 version F 1 1 3 0 2 ex ver 130228 1302 Inverter controller Fan 2 version F 2 1 3 0 2 ex ver 130228 1302 Inverter controller EEP version E P 1 5 1 1 ex ver 151101 1511 Inverter controller Hydro version H...

Page 51: ...s Display SEG1 SEG2 SEG3 SEG4 At initial power supply Checking segment display 8 8 8 8 Setting communication Addressing A d 0 1 After communication setting usual occasion Transmit Reception address Hydro controller A Hydro controller 0 0 0 Setting inverter controller option switch K1 K2 K3 K4 K1 K2 K3 K4 ...

Page 52: ...etting for the selected option f Refer to the table for the Seg number of the function for each option Z 4 After selecting the function for options press and hold the K2 switch for 2 seconds Entire 7 segment will blink to begin tracking mode and value of the option will be saved If you do not end the setting mode properly option will not be saved Option item Input unit SEG1 SEG2 SEG3 SEG4 Function...

Page 53: ...sed option Main 1 5 0 0 Unused option Unused option Main 1 6 0 0 Unused option Unused option Main 1 7 0 0 Unused option Maximum cooling capacity restriction Note2 Main 1 8 0 0 Enabled 0 1 Disabled Note1 Forced fan function Operates fan periodically to prevent show compiling on the fan while the product is stopped Note2 Maximum cooling capacity restriction Limits operation capacity of compressor ac...

Page 54: ...e 7 times Vacuum 8 times Disuse 9 times Disuse 10 times Disuse 11 times Disuse 12 times End KEY operation K2 Number of press KEY operation Display on 7 Segment 1 time Refrigerant charging in Cooling mode 2 times Trial operation in Cooling mode 3 times Pump down all units in Cooling mode 4 times Auto trial operation 5 times Checking the amount of refrigerant X X Display of last two digits may diffe...

Page 55: ...splayed power element might be damaged so do not use the Discharge mode of DC link voltage K3 Number of press KEY operation Display on 7 Segment 1 time Initialize Reset operation Same as initial state K4 Number of press Display contents Display SEG1 SEG2 3 4 1 time Capacity depending on horsepower 1 AG010KSV 0 1 2 AG015KSV 0 1 8 2 times Order frequency Compressor 1 2 120 Hz 1 2 0 3 times Order fre...

Page 56: ...is selected as the main unit 0 0 1 29 times Snow accumulation sensor voltage T 1 80 V 1 8 0 30 times Total suction temperature U 42 C 4 2 K4 Number of press Press and hold the K4 for 3 seconds to enter the setting Display contents Display Page1 Page2 1 time Main version MAIN Version ex 1412 2 times Hub version HUB Version ex 1412 3 times Inverter compressor 1 check INV1 Version ex 1412 4 times Inv...

Page 57: ...CB is not turning on 4 Check the following after the installation is completed Installation work ŷ Have you checked the external surface and the inside of the product ŷ Is there any possibility of short circuit due to the heat generation of the product ŷ Is the place well ventilated and ensures service clearance ŷ Is the product fixed securely to withstand the external force Water pipe work ŷ Have...

Page 58: ...mp interlock circuit connected Only applied to non pump models f Is the strainer 50 Mesh properly installed at water inlet f Is water flowing in water system Make sure water in the water system flows properly before supplying the power Make sure if concentration of brine is maintained properly due to the usage temperature range when operating cool storage Be aware of supplying power and controllin...

Page 59: ...ld K4 and K6 for 3 seconds to start the calibration when operation of the product and the pump is off Seg1 Seg2 Seg3 Seg4 Seg5 Seg6 K C A L I f The operation will finish automatically within 30 seconds f The product and the pump cannot be operated while calibrating the pressure difference 4 Forced fan function removes accumulated snow on the fan Skip this step if snow is not accumulated f Press an...

Page 60: ...en main control is set Operation mode K1 K2 Operation ON Operation OFF 9 Press and hold K5 and K6 for 3 seconds to initialize hydro controller After checking the main control to use the remote control be sure to configure the following settings f Set the chiller address iin the hydro controller option f Set the modules for each chiller in service mode of the module control The group setting is opt...

Page 61: ... Water side heat exchanger Inverter controller control box Compressor Plate type heat exchanger Hydro Air vent valve Water inlet temperature sensor Water inlet pressure sensor Water inlet Water outlet pressure sensor Water outlet Drain valve Water middle coupler Drain valve Water outlet temperature sensor ...

Page 62: ...re change and offset the pressure of supply water at the highest place Do not install valves between the expansion vessel and the pipe f In case of air inside the pipe cannot be eliminated due to the pipe structure install automatic air valve at the highest place among pipes f When using expansion vessel or automatic air valve give 1 250 slant to horizontal pipes f Water or brine throughout the pr...

Page 63: ...Water storage must be used within the range 50 200 of rated water storage can be used but using rated water storage is recommended If water storage is low it may cause performance decrease due to scale accumulation thermo operation to prevent freezing and gas leakage due to holes created by corrosion If water storage is over it may cause corrosion f Do not let air flow into the circulating water s...

Page 64: ...d by following standard corrosion and scale accumulation may occur It may decrease not only the performance of heat exchange but also cause product malfunction due to heat exchanger damage by freezing Extra care is necessary and water should be maintained by expert to keep the water within the standard Item Chilled water system Heating water system Effect Low level medium temperature heating gauge...

Page 65: ...ion mgS2 l Not detected Not detected Not detected Not detected O Ammonium ion mgNH4 l Below 1 0 Below 0 1 Below 0 3 Below 0 1 O Chlorine residual mgCl l Below 0 3 Below 0 3 Below 0 25 Below 0 3 O Free carbon mgCO2 l Below 4 0 Below 4 0 Below 0 4 Below 4 0 O NOTE ŷ Circle O marks in the chart show the factor relevant to corrosion or water scale ŷ When the water temperature is over 40 C 104 F steels...

Page 66: ...furic acid or nitric acid since they are highly corrosive Check if there is valve on the inlet outlet of the plate type heat exchanger Connect an exclusive pipe for cleaning to the inlet outlet pipe of the plate type heat exchanger and fill the detergent at the temperature of 50 C 122 F 60 C 140 F and circulate the detergent for about 2 5 hours Cleaning time can be different depending on the tempe...

Page 67: ...t exchanger It may cause plate type heat exchanger to freeze and become damaged Drain water or exchange to anti freeze Stopping for a long time f Drain water in water pipe and water side heat exchanger Open drain valves on water pipe system and drain plug in DVM CHILLER when draining water Refer to page 62 for place of drain plug Product may get damage by water inside the water pipe and water side...

Page 68: ... concentration of the anti freeze being maintained Once a year before winter season Chilled water system device Have you set the make up water supply value properly Once a day Operation problem at the cooling tower or intensified water concentration Is there any excess or deficiency of the make up water Is the water level within the tank normal for operation Chilled Heating water flow rate range I...

Page 69: ...range For product protection compressor operation may be limited Unit C F Classification Range water outlet Water Brine Cooling 5 25 41 77 10 25 14 77 Heating 25 55 77 131 f When using in brine condition in cooling mode maintain concentration of brine properly Also the product should be set in low temperature usage Refer to page 42 for how to set hydro controller option f Apply freeze prevention s...

Page 70: ...ry since it is nontoxic f All the circulating water brine and additives corrosion inhibitor bacteria inhibitor foam inhibitors must be used after consulting with the business ordering party or supervisor for its impact on environment toxicity corrosiveness harmfulness to human and management plan f Contractor must take extra care regarding on handling packaging and transporting regulations and pro...

Page 71: ...ry year considering corrosion resistance decrease and water contamination f Do not use brine such as ethylene glycol for hot water supply or food f Check the concentration before the winter time to prevent freezing Type and specification of brine For low temperature CHILLER use glycol type brine such as ethylene glycol and propylene glycol If using other types of brine chloride type or alcohol typ...

Page 72: ...ne glycol 10 3 3 26 1 20 7 1 19 2 30 12 7 9 1 40 21 1 6 0 45 25 13 0 Performance correction factor according to brine concentration Anti freeze Description 10 20 30 40 50 Ethylene glycol Cooling capacity 0 996 0 991 0 987 0 983 0 979 Heating capacity 0 993 0 985 0 977 0 969 0 961 Pressure loss 1 024 1 068 1 124 1 188 1 263 Propylene glycol Cooling capacity 0 993 0 987 0 980 0 974 0 968 Heating cap...

Page 73: ...ntroller Display Description 202 Communication error between hydro controller and inverter controller When there is no response from indoor units after tracking is completed 203 Communication error of Main and sub MICOM of inverter controller 205 Communication error of inverter controller main PBA sub PBA Sub PBA communication all not received 206 Communication error of inverter controller main PB...

Page 74: ...t Sink error 378 Error due to overcurrent of Fan2 383 Error due to special overcurrent of Fan2 Display Description 385 INV2 input current error 386 Error due to over voltage low voltage of Fan2 387 Hall IC error of Fan2 389 Outdoor fan2 overload stop 391 Fan2 Date Flash error 393 Fan2 DC output sensor error 396 Fan2 DC Link voltage sensor error 399 Heat sink temperature sensor error of Fan2 400 IN...

Page 75: ...tdoor fan1 overload stop 491 Fan1 Data Flash error 493 Fan1 DC output sensor error 496 Fan1 DC Link voltage sensor error 499 Heat sink temperature sensor error of Fan1 500 INV1 IPM Overheat error 560 Switch option setting error 901 Hydro inlet temperature sensor Tw1 Short Open Display Description 902 Hydro outlet temperature sensor Tw2 Short Open 907 Frozen damage error 908 Error when freeze preve...

Page 76: ...ing port at pressure of 4 1 Mpa 594 6 psi ŷ Connect the manifold gauge to each charging port If you apply pressure at more than 4 1 Mpa 594 6 psi pipes may get damaged Apply pressure with pressure regulator and pay attention to the pressure of the nitrogen Keep it for minimum 24 hours to check if pressure drops ŷ After applying Nitrogen gas check there s any change of pressure using a pressure reg...

Page 77: ...stalled to prevent pump oil from flowing into the pipe While the pressure is less than 5 Torr on vacuum gage perform vacuuming for more than 1 hour and close the valve ŷ Vacuum pressure must be checked with the vacuum gauge After the vacuum pump stops check whether the pressure is maintained within 5 Torr for an hour Charging refrigerant No Yes Perform vacuum drying again Check leakage Vacuum dest...

Page 78: ...ion When there is frost on heat exchanger of the product Heating operation The surface temperature of heat exchanger drops due to evaporation heat as refrigerant inside the heat exchanger absorbs heat When noise occurs Continuous noise during cooling or defrost The sound might be caused by running gas refrigerant inside the product Noise when starting operation or defrost or after stopping the ope...

Page 79: ...let temperature is too high or too low On Check if water control valve is opened Open the water control valve Check if set temperature of water temperature controller is appropriate Set the setting of water temperature controller appropriately When compressor is stopped running and not restart automatically Off Check if water control valve is opened Open the water control valve Check if set temper...

Page 80: ...xchange or repair 5 years Water side heat exchanger Water maintenance standard Within standard value Refer to page 64 Every year Chemical cleaning etc 5 years Electronic expansion valve Check operation No malfunction and deformation Every year Exchange 20 000 hours High pressure switch Check operation Operate in set value Every year Exchange 25 000 hours Electronic valve Insulation Over 1 MΩ Every...

Page 81: ... system Visual check Strainer not blocked Every year Cleaning 1 year Brine concentration Should be below freezing point Every year Exchange 1 year NOTE ŷ Preventive maintenance is planned exchange overhaul modification checking etc to prevent breakdown beforehand and maintain the product usable ŷ Contact the merchandise or service center for periodic maintenance ŷ Preventive maintenance should be ...

Page 82: ...ing temperature or pressure difference If flow rate decreased stop the operation and restart after removing the cause Refer to page 68 for usage range f For pump integrated models daily and periodic check for pump is necessary If there is water leakage or noise from the product maintenance may be necessary Checking exterior and noise f Clean air side heat exchanger cross fin coil Performance may d...

Page 83: ... more water or extra heating appliance Hot water Cool storage mode f Hot water Cool storage temperature control This function is to control water temperature for Hot water mode differently from normal operation This function is available when using module control and external contact f Hot water Cool storage thermo control In Hot water Cool storage mode set temperature or external thermostat signa...

Page 84: ...ed while the product is not operating f This function is available when using main control f Refer to page 59 for trial operation for each unit Pump operation output f Electric switch for pump is field supply and not included in the product Install interlock circuit according to electrical wiring diagram when installing the switch Connecting module control Refer to page 30 for wiring of module con...

Page 85: ...MAINTENANCE 85 English MEMO ...

Page 86: ......

Reviews: