EB 8048-2/-3 EN
35
Servicing
Risk of contamination of the process medium
through the use of unsuitable lubricant and/
or contaminated tools and components.
−
Keep the valve and the tools used free from
solvents and grease.
−
Make sure that only suitable lubricants are
used (
u
The control valve was checked by SAMSON
before it left the factory.
−
Certain test results (seat leakage and leak
test) certified by SAMSON lose their validi
-
ty when the valve body or actuator hous
-
ing is opened.
−
The product warranty becomes void if
service or repair work not described in
these instructions is performed without
prior agreement by SAMSON's After‑sales
Service department.
−
Only use original spare parts by
SAMSON, which comply with the original
specifications.
Checking the extent of servicing
Î
Check wear at seat and plug. Replace
the damaged plug (see section 7.1.2 or
7.2.2).
Î
Check the diaphragm for damage (e.g.
cracks, milky coloring at the bends). Re-
place the damaged diaphragm (see sec-
tion 7.1.2 or 7.2.2).
Î
If the valve leaks even if the diaphragm
is intact, check the tightening torque of
the joint between plug and plug stem as
well as body and bonnet/flange.
Preparing the valve for servicing
1. Put the control valve out of operation (see
section 9.1).
2. Remove the valve from the pipeline (see
section 9.2).
7.1
Version with Type 3271 or
Type 3277 Actuator
7.1.1
Replacing the packing
1. Remove the actuator from the valve. See
associated actuator documentation.
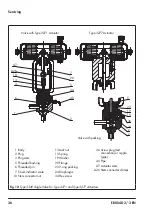
2. Undo the hex screws (34).
3. Lift the flange (20) together with the plug
stem (3), plug (2), and diaphragm (24)
off the body (1).
4. Unscrew the threaded bushing (5).
5. Pull the plug (2) together with plug stem
(3) and diaphragm (24) out of the flange
(20).
6. Pull all the packing parts out of the pack-
ing chamber using a suitable tool. Renew
the damaged parts and carefully clean
the packing chamber.
7. Push the plug (2) together with plug stem
(3) and diaphragm (24) into the flange
(20).
8. Carefully slide the packing parts over the
plug stem into the packing chamber us-
ing a suitable tool.
9. Tighten the threaded bushing (5).
NOTICE
!
Note

