background image

Chapter 9: Maintenance and Options

84

 Alpha 583cx  User’s Guide

If your cash register is unplugged or if there is a power outage, the 
batteries keep the information in the memory until you plug the cash 
register into a power source or the power is restored. 

To make sure the battery back-up protection is working, replace the 
batteries at least once a year. To help you remember, consider replacing 
the batteries on New Years Day. The cash register can be off or unplugged 
for as long as 700 hours (about 28 days) and the information in the 
memory is still there when you are ready to use the register again. 

If there was a power outage, replace the batteries as soon as there is power 
again. 

DO NOT

 remove or replace the batteries until you plug the cash 

register into a power source and you see messages on the display. 

If you will not use the cash register for an extended period of time, you 
can remove the batteries to prolong their life. However, all information in 
the cash register will be erased if you do this. 

Caution

You must plug the cash register in before installing or replacing the back-up 
batteries. All data is erased when you remove the batteries if the cash 
register is not plugged in before you remove the batteries. 

To install or replace the batteries

1

Before you start, make sure you have 4 new AA batteries. 

2

Plug the cash register in and turn the Mode key to the OFF position. 

3

Open the Journal Compartment cover. 
Unlock the compartment cover with the 
Cash Drawer/Journal Lock key #515. Grip 
the left side of the journal cover and gently 
pull upward. Remove the cover and put in 
aside. 

4

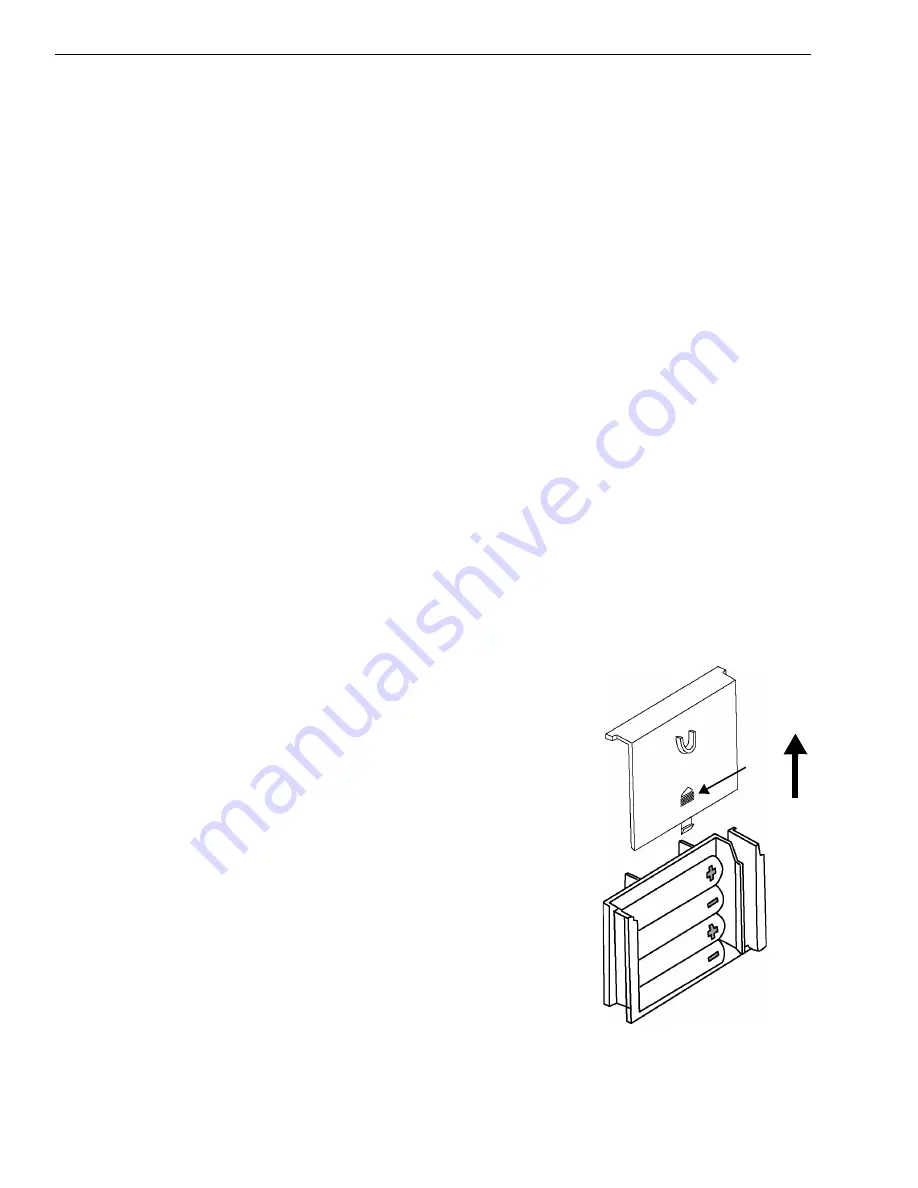
Remove the battery cover, located in the 
rear left section of the compartment. Press 
the indentation at the bottom of the cover 
and slide up. See the graphic to the right for 
details. 

5

Put the batteries in the slots. Make sure that 
the positive and negative ends are in the 
right place. The batteries have a little plus 
(positive) and minus (negative) sign on each 
end to help you. 

6

Replace the battery cover by sliding it back 
down into position. 

Press
here
and 
slide up

Summary of Contents for Alpha 583cx

Page 1: ...teries 3 Installing the Paper Roll 5 Installing the Barcode Reader 6 Setting the Date And Time 7 Programming the Sales Tax 8 Programming Department Keys 9 3 Getting To Know the Cash Register Opening and Closing the Customer Display 10 Using the Mode Key Area 12 Using the Keyboard 13 Using the Cash Drawer 14 Using the Accessory Drawer 15 ...

Page 2: ... Printing the Quick Start Program Confirmation Report 29 Before Going to Register Mode 30 Error Codes 31 Clearing an Error 31 5 Setting Up Your Cash Register Advanced Programming Department Keys 34 Setting Standard and Gallonage Mode 36 Programming Multiple and Single Items 36 Programming High Digit Lock out HDLO 36 Programming Tax Status 37 Programming Department Preset Price 38 Assigning Departm...

Page 3: ...p Sales and Using Training Mode Ringing up Sales 62 Ringing up Sales with the Barcode Reader 64 Using Training Mode 64 7 Programming Complex Tax Rates Setting the Tax Rates 67 8 Running Reports Running the Program Confirmation Report 70 Running the Department Confirmation Report 72 Running the PLU Confirmation Report 72 Running the Department Sales Report 73 Running Management Reports 73 About X R...

Page 4: ...ing the Drawer When There is no Power 88 Half System Clear 89 Full System Clear 89 If Nothing Helps 89 11 Examples Sample Receipt 92 Transaction Codes 93 Adding Tax to a Non Taxable Department 94 Cash Sale With Tendering Change 94 Cash Sale Without Tendering Change 95 Charge Sale 95 Coupon Discount Sale 96 Credit Return 97 Credit Sale 97 Dept Shift Key 97 Exempting Tax On An Item 98 Exempting Tax ...

Page 5: ...oiding a Department Preset with a Coupon Discount 108 Voiding a Department Preset with a Minus Percentage Discount 108 Voiding A Minus Percentage Discount Sale 109 Voiding a Multiplication of a Department Preset Price 109 Voiding A Multiplication Sale 110 Voiding a PLU Multiplication Sale 110 Voiding a PLU Sale 111 Voiding a PLU Sale with a Coupon Discount 111 Voiding a Plu Sale with a Minus Perce...

Page 6: ...a 583cx User s Guide B GST PST System for Canada 121 Canadian Tax Programming Example 121 C Product Information 124 Specifications and Safety 124 Safety Notice 125 Limited Warranty 126 Description Tables 127 Index 130 ...

Page 7: ... When you need to press a key you see a picture of the key you need to press and the name of the key is in another font For example 1 If you are prompted for a Manager Password type the password number and then press the Check key If you did not program a Manager Password go to the next step If you need to type something in the round Number keys area what you need to type is shown in a special fon...

Page 8: ...olt batteries for the memory back up system 1 set of keys consisting of 2 Cash Drawer Journal Lock keys 515 2 PRG Program keys 427 023 2 REG Register keys 427 024 2 Z keys 427 012 Important Phone Numbers If you need help or want to order additional supplies use the following contact information To order items see Ordering Accessories on page 85 Customer Service 1 800 272 6229 USA 1 888 266 9380 Ca...

Page 9: ... are done with this chapter see the chapter called Getting To Know the Cash Register starting on page 10 and the chapter called Setting Up Your Cash Register the Basics starting on page 16 for more information about your cash register Plugging in and Putting in the Batteries Make sure that you plug the cash register into the electrical outlet before you put in the batteries Caution If you put the ...

Page 10: ... not going to get tripped over or accidentally pulled from the electrical outlet Put the cash register on an electrical circuit with no other electrical device or appliance Other appliances can overload the circuit or cause electrical interference with the cash register It is best that you use a circuit without other appliances already on it 5 Install the memory backup batteries Open the Journal C...

Page 11: ...p the left side of the cover and gently pull upward Remove the Journal Compartment Cover and set aside 3 Remove the Journal Takeup spindle Place the paper roll in the little round area at the bottom of the compartment Make sure the paper feeds out from the bottom of the roll towards the front of the cash register 4 Grab the small handle on the right of the print roller Push the little handle towar...

Page 12: ...Make sure you get the paper in the little guides in the window Use the Cash Drawer Journal Lock key 515 to lock it Installing the Barcode Reader Your cash register optionally comes with a barcode reader It allows you to scan items with a UPC symbols instead of using the keyboard to type the PLU number If you want to order the barcode reader contact Royal The barcode reader plugs into the port on t...

Page 13: ...tting is to print in the 12 hour format which is normally used To change to the 24 hour format see Programming Flag Options on page 56 Reminder When you set the time you need to type the time in a 24 hour format To convert the current time to a 24 hour format add the number 12 to every hour after 12 noon For example 1 15 P M programs as 1315 8 20 A M programs as 0820 To set the date Example 1 To p...

Page 14: ...m a sales tax rate of 6 1 Find your sales tax rate You may need to contact your local government office 2 Put the PRG key in the Mode key slot and turn it to the PRG position 3 In the round Number keys area press 1 and then press the Tax 1 key 4 Press 6000 and press the Amount Tend Total key Your sales tax is programmed To program other tax rates in Step 4 press the following For more advanced tax...

Page 15: ...as taxable with no preset price and no description 1 Using the round Number keys press 00001 and press the Subtotal w Tax key 2 Using the round Number keys press 0 and press the Dept 1 key 3 Press the Amount Tend Total key The department information is saved in the cash register To program Department 2 as non taxable with no preset price and no description 1 Using the round Number keys press 00000...

Page 16: ...ustomers can see what is happening When you move the register or store it close the display so it doesn t get damaged Your cash register has 1 display line 1 line that shows letters and numbers Alphanumeric The Alphanumeric display shows 10 digits for character descriptions in both register and programming modes It also shows numbers To open and close the display 1 To open the rear customer displa...

Page 17: ...LERK ERR or CLERK E12 clerk numbers have been programmed and the clerk system is active When this appears the clerk number must be entered COUPON the CPN key is pressed DISCOUNT the RA key registers a percent discount amount ERROR an incorrect key is pressed Press the Clear key to clear NO SALE the ST NS key is pressed NON TAX the Non Tax key is pressed P you are in the middle of a programming ste...

Page 18: ...es see Ringing up Sales and Using Training Mode on page 62 For more information about running reports see Running Reports on page 70 Table 3 Mode key settings This setting Does this PRG Programs the cash register and sets the cash register to Training mode Use the key marked PRG OFF Turns the cash register off It also electronically locks the cash drawer All keys do this REG1 Prints just receipts ...

Page 19: ... and Department keys to ring up a sale For more information about ringing up sales see Ringing up Sales and Using Training Mode on page 62 To program the cash register put the key marked PRG in the Mode key slot and turn to PRG For more information about programming the cash register see Setting Up Your Cash Register the Basics on page 16 and Setting Up Your Cash Register Advanced on page 33 Round...

Page 20: ...it is electronically locked You can also use the 515 key to mechanically lock the cash drawer If you lock the cash drawer this way you must have the key to open it again Even the emergency open lever will not open the cash drawer when it is locked with the key Important If the cash drawer will not open see if the lock on the cash drawer is turned to the right If it is the drawer is locked with the...

Page 21: ...r you see a small lever 2 Push the lever in the only direction it will move The cash drawer opens If the cash drawer will not open make sure it is not locked with the 515 Drawer key Using the Accessory Drawer Your cash register has a small drawer above the cash drawer The Accessory drawer can be opened at any time by anyone It is a good place to put things like pens pencils and note pads Because a...

Page 22: ...es on the display and on receipts Setting clerk numbers Setting machine numbers Setting clerk and manager passwords Clearing error codes Using the Displays Your cash register includes two displays 1 for the clerk and 1 for the customer The displays feature large easy to read fluorescent digits for easy viewing CHAPTER 4 ...

Page 23: ...t are on the Alpha Keyboard You can use lower case letters See Alphanumeric Code Chart on page 18 The department keys are clearly labeled with all the letters needed to program these descriptions When you are programming alpha descriptions use the department keys to spell out the words you want To use the letters in the white part of the Department keys simply press the Department key To use the l...

Page 24: ...to help you find the ones you need Use this table for lower case letters and numbers Table 4 Letters and numbers Character Code Number Character Code Number Space 00 s 20 Wide Character 01 t 21 a 02 u 22 b 03 v 23 c 04 w 24 d 05 x 25 e 06 y 26 f 07 z 27 g 08 h 09 Numbers i 10 0 30 j 11 1 31 k 12 2 32 l 13 3 33 m 14 4 34 n 15 5 34 o 16 6 36 p 17 7 37 q 18 8 38 r 19 9 39 ...

Page 25: ...ctuation and foreign characters Table 5 Special Characters and Punctuation Character Code Number Character Code Number 80 28 81 29 á 82 40 é 83 67 í 84 68 ó 85 69 ú 86 70 Ä 93 71 Ü 94 72 Ö 95 comma 73 Ï 96 74 ü 97 75 Ñ 98 76 ñ 99 77 78 period 79 semi colon 87 88 apostrophe 89 90 91 92 ...

Page 26: ... see Programming PLU Descriptions on page 48 For programming Clerk names and numbers see Setting Clerk Numbers and Names on page 25 About Programming Numbers in Logo Messages If you need to print numbers you must enter the numbers using the Alphanumeric Code Chart For example for the telephone number 999 555 1212 the number 9 is programmed using the character code 39 the number 5 is programmed usi...

Page 27: ...idth or 12 characters in double width YOUR RECEIPT THANK YOU is the default printout for the header Make a copy of the blank Store Logo Worksheet below for future changes or revisions to your logo Store Logo Worksheet Use this worksheet to make your logo and message Make a copy of the blank worksheet before you start in case you make a mistake or change your mind Note If you enter the wrong charac...

Page 28: ...or example if you want Coffee to be double wide you need 12 spaces For more information about double wide characters see Using Double Wide Characters on page 20 You can also use characters other than those on the Department keys such as numbers punctuation and international letters See the Alphanumeric Code Chart on page 18 This is an example of a programmed Store Logo To make a space to separate ...

Page 29: ...ing Using the round Number keys area press 32 Press the Return key Logo line 2 appears on the display Enter the 2nd line of the logo up to 24 characters and then press the Check key 5 If you want a 3rd line do the following Using the round Number keys area press 33 Press the Return key Logo line 3 appears on the display Enter the 3rd line of the logo up to 24 characters and then press the Check ke...

Page 30: ...and delete that character and then continue To program your commercial message 1 Put the PRG key in the Mode key slot and turn it to the PRG position 2 If you are prompted for a Manager Password type the password number and then press the Check key If you did not program a Manager Password go to the next step 3 For the 1st line do the following Using the round Number keys area press 71 Press the R...

Page 31: ...mbers are used in the register modes REG1 and REG2 only To see the sales totals for each clerk a Clerk Report is available in both the X and Z modes You can spell names by using department keys For more information see Setting Alphanumeric Descriptions on page 17 Note When entering the clerk passwords they appear as asterisks on the displays for extra security After you specify Clerk Number and Na...

Page 32: ...llowing Press 121 and then press the Void key To program a clerk name Example 5 For Clerk 1 program name as Sally Smith 1 Put the PRG key in the Mode key slot and turn it to the PRG position 2 If you are prompted for a Manager Password type the password number and then press the Check key If you did not program a Manager Password go to the next step 3 Using the round Number keys press 1 for Clerk ...

Page 33: ...and then press the Check key Setting the Machine Number You can assign your cash register its own number This is useful if you have several cash registers and want to track which one creates which receipts and transactions The machine number prints on all receipts journal records and management reports The machine number can be up to 4 digits long After you are done programming the machine number ...

Page 34: ...ppears until you complete step 3 3 Using the round Number keys press 1212 and then press the Non Tax key Example 9 If the PRG Z password is 1313 1 Put the PRG key in the Mode key slot and turn it to the PRG position 2 Using the round Number keys press 111111 and press the Amount Tend Total key The PASS prompt and the letter P appears until you complete step 3 3 Using the round Number keys press 13...

Page 35: ...ick Start Program Confirmation Report Now that basic programming is complete check your results with a Quick Start Program Confirmation Report If you made a mistake during programming repeat only the step in question For example if only the tax rate is incorrect just re program the tax you do not need to re set the time date and so on To print the Quick Start Program Confirmation Report 1 Put the ...

Page 36: ...For more details of the symbols printed in the Program Confirmation Report see Running Reports on page 70 Before Going to Register Mode Your cash register offers many other features not covered in this chapter Other options are covered in the chapter called Setting Up Your Cash Register Advanced starting on page 33 We also provide examples to help you learn how to use your cash register For inform...

Page 37: ...Means this Register Beep The cash register makes a short beep each time a key is pressed This is normal and not a cause for concern Entry Error Beep When using your cash register you must perform all operations in the correct order If you press the wrong key at the wrong time an alarm beep sounds and you see a message on the display The keyboard also locks Press the Clear key to continue When a tr...

Page 38: ...ystem Clear If you pressed the Clear key and the error beep does not stop you can do a Half System Clear For more information about a Half System Clear see Half System Clear on page 89 Full System Clear If you did a Half System Clear and the error beep still does not stop as a last resort you can do a Full System Clear For more information about the Full System Clear see Full System Clear on page ...

Page 39: ...t Keys Programming PLU Descriptions Setting the Decimal Points Setting the Rounding Rates Programming Discounts Programming Flag Options When you are done programming your cash register you can run the Programming Report to see your results See Running the Program Confirmation Report on page 70 Note While you are programming the letter P often appears in the display CHAPTER 5 ...

Page 40: ...s listed below may apply to your specific needs but you must specify a value for each even if you do not plan to use that feature 1 Setting Standard and Gallonage Mode 2 Programming Multiple and Single Items 3 Programming High Digit Lock out HDLO 4 Programming Tax Status 5 Programming Department Preset Price 6 Programming Department Names For specific information about each of the items above see ...

Page 41: ...ter a description The department information is saved in the cash register To program Department 2 as non taxable with no preset price and no description 1 Put the PRG key in the Mode key slot and turn it to the PRG position 2 If you are prompted for a Manager Password type the password number and then press the Check key If you did not program a Manager Password go to the next step 00 to 15 and t...

Page 42: ... Standard Mode enters the price using the normal 2 decimal place setting Programming Multiple and Single Items Multiple Item Entry allows you to ring up two or more items into a department For example if you want to ring up 5 of the same items you can tell the cash register to multiply the one price by the number of items Single Item Entry allows you to ring up only one item in a department For ex...

Page 43: ...rates Tax 2 3 or 4 to a department key Table 9 High digit lock out HDLO values This number From this to this 0 01 99 999 99 Standard setting 1 01 09 2 01 99 3 01 9 99 4 01 99 99 5 01 999 99 6 01 9 999 99 Table 10 Tax status settings This tax status number Means this 00 Non Taxable use this if you do not want to charge tax 01 Taxable by TAX 1 Rate 02 Taxable by TAX 2 Rate 03 Taxable by TAX 3 Rate 0...

Page 44: ...tment description The Department number keys from 1 to 20 are easy to use You just press the Department number key you want For example to use Dept 2 press the Dept 2 key The Department keys from 21 to 40 are also easy to use Just press the Dept Shift key and then press the Department number key you want For example to use Dept 23 press the Dept 23 key To use the Department keys from 41 to 99 do t...

Page 45: ...ard You can also use lower case letters and numbers certain symbols and international characters See Alphanumeric Code Chart on page 40 The department keys are clearly labeled with all the letters you need to program these descriptions When you are programming alphanumeric descriptions use the department keys to spell out the words you want You can use the letters in the lower green area of the ke...

Page 46: ...e double width characters press 01 before each character For example to program Y E S type 01 Department Shift key Y 01 E 01 S For more information see Using Double Wide Characters on page 20 Table 11 Letters and numbers Character Code Number Character Code Number Space 00 s 20 Wide Character 01 t 21 a 02 u 22 b 03 v 23 c 04 w 24 d 05 x 25 e 06 y 26 f 07 z 27 g 08 h 09 Numbers i 10 0 30 j 11 1 31 ...

Page 47: ...ation and foreign characters Table 12 Special Characters and Punctuation Character Code Number Character Code Number 80 28 81 29 á 82 40 é 83 67 í 84 68 ó 85 69 ú 86 70 Ä 93 71 Ü 94 72 Ö 95 comma 73 Ï 96 74 ü 97 75 Ñ 98 76 ñ 99 77 78 period 79 semi colon 87 88 apostrophe 89 90 91 92 ...

Page 48: ... You can change these default messages using the following instructions Here are some samples of messages that can be programmed ASK ABOUT OUR DAILY SPECIALS WE DELIVER 10 DISCOUNT ON THURSDAYS FREE SODA WITH ANY SANDWICH ORDER STORE HOURS 9AM TO 10 PM Table 13 Scrolling messages Message Number Message Type This message shows 1 OFF message In the OFF position 2 MODE message During the idle state i...

Page 49: ... to backspace and delete that character Now you can continue 5 When you are done press the Check key You can program another message by starting with step 3 Programming Scrolling Message Display Times After you have programed your scrolling message you can set the length of time you want the message to run After you are done you can check your results See Running the Program Confirmation Report on...

Page 50: ...the PRG position 2 If you are prompted for a Manager Password type the password number and then press the Check key If you did not program a Manager Password go to the next step 3 Using the round Number keys press 3 press the number of seconds you want to delay as 2 digits and press the Charge key MODE message Number of seconds before the register turns into idle mode in PRG X Z modes and the mess...

Page 51: ...ys press 50 press the number of seconds you want to delay as 1 digit and press the Charge key To program the Idle message pattern 1 Put the PRG key in the Mode key slot and turn it to the PRG position 2 If you are prompted for a Manager Password type the password number and then press the Check key If you did not program a Manager Password go to the next step 3 Using the round Number keys press 60...

Page 52: ...chart below representing the number of seconds you want to delay and press the Charge key Programming the Credit Keys You can use 2 department keys as credit card only keys You can use one or both keys if you want For example you can set Department 19 to be a Visa card and Department 20 to be a MasterCard You can also program the cash register to print the name of the credit card on the receipt or...

Page 53: ... the receipt or journal tape press 51 for Department key 20 or press 52 for Department key 19 and then press the Return key If you do not program a card name it prints as CREDIT 1 or CREDIT 2 4 Type the name of the credit card just as you did when you programmed Department names You can type up to 12 characters and spaces For example to type VISA press the following keys For more information about...

Page 54: ...or example if PLU 1 is a taxable item you can link it to a Department key which is set up for tax If PLU 2 is not a taxable item you can link it to a Department key which is programmed for no tax Important You do not need to press the decimal point key when entering a price After you are done you can check your results See Running the PLU Confirmation Report on page 72 Programming PLUs without a B...

Page 55: ...ogram more PLUs repeat steps 4 through 7 8 When you are done programming PLUs press the Qty Date key Programming PLUs with the Barcode Reader You can use the optional barcode reader to scan items and automatically ring them up Using the barcode reader reduces errors caused by people ringing up items incorrectly For more information about getting a barcode reader contact Royal The barcode reader mu...

Page 56: ...the wrong character press the Void key to backspace and delete that character and then continue 7 Press the Check key The PLU information is saved in the cash register 8 Repeat steps 4 through 7 to program more PLUs 9 When you are done programming PLUs press the Qty Date key Setting the Decimal Points The decimal point is set by selecting from the following 4 options After you program the decimal ...

Page 57: ...he United States 1 Put the PRG key in the Mode key slot and turn it to the PRG position 2 If you are prompted for a Manager Password type the password number and then press the Check key If you did not program a Manager Password go to the next step 3 Using the round Number keys press 50 and then press the Charge key Programming Discounts Sometimes you want to have discounts assigned automatically ...

Page 58: ...key If you did not program a Manager Password go to the next step 3 Using the round Number keys press 1000 0 and then press the RA key You must always enter the percentage rate as a 4 digit number without the decimal point representing 00 00 through 99 99 Note See Minus Percentage Discount Sale on page 99 to ring up a Minus Percentage Discount sale Programming Coupon Discounts You can use the Coup...

Page 59: ...ounted amount of an item the amount after the coupon discount is deducted Note If you have no tax rate programmed in the cash register use 00 from the Tax Status Numbers table The following Tax Status numbers are used to link the Tax Status to the Coupon Discount key Table 15 High digit lockout number HDLO This number From this to this 0 01 99 999 99 Standard setting 1 01 09 2 01 99 3 01 9 99 4 01...

Page 60: ...d TAX 3 TAX 1 and TAX 3 rates on the discounted amount of an item 07 TAX 1 and TAX 4 TAX 1 and TAX 4 rates on the discounted amount of an item 08 TAX 2 and TAX 3 TAX 2 and TAX 3 rates on the discounted amount of an item 09 TAX 2 and TAX 4 TAX 2 and TAX 4 rates on the discounted amount of an item 10 TAX 3 and TAX 4 TAX 3 and TAX 4 rates on the discounted amount of an item 11 TAX 1 TAX 2 and TAX 3 T...

Page 61: ...s 001 and then press the Cpn key Note See page 96 to ring up a coupon sale programmed with Method 2 Programming Plus Percentage Add ons You may want to add an automatic amount to the total such as a fixed tip or other service charge Plus Percentage adds a fixed rate additional charge to an individual item You can program the rate or you can enter it by hand each time Regardless of how you specify ...

Page 62: ...ch Flag setting can be changed or updated at any time if needed Note All Flag action are factory preset at 0 except for Flags 15 18 27 28 30 33 and 34 which have a default setting of 1 Flag actions only need to be changed if you want to change any action from the default setting If you change the language after programming is complete descriptions like logo department and PLU names revert to their...

Page 63: ...ng 1 2 Subtotal prints on sales receipts when ST NS key is pressed 0 Subtotal does not print on sales receipts when ST NS key is pressed 1 3 Tendering of change is not required 0 Tendering of change is required 1 4 The Date prints as Month Day Year 0 The Date prints as Day Month Year 1 5 Z1 and Z2 Counter Numbers does not reset after a Z1 or Z2 reading 0 Z1 and Z2 Counter Numbers reset after a Z1 ...

Page 64: ...ve 0 Clerk System active 1 13 USA Tax System 0 Canadian Tax System 1 VAT Tax System 2 14 Z1 Z2 Counter prints 0 Z1 Z2 Counter does not print 1 15 Tax amount prints after the sales total on the sales receipt 0 Tax amount prints before the total amount on the sales receipt 1 16 Standard Department layout 0 Department 20 is Credit 1 1 Department 19 is Credit 2 2 Department 20 is Credit 1 and Departme...

Page 65: ...not required before each transaction 0 A Clerk Number is required before each transaction 1 21 Do not use Canadian tax system of tax on tax 0 Use Canadian tax system of tax on tax 1 22 Pertains only to the Canadian tax system Must be used with Flag 21 set to 1 Include GST in PST1 Include GST in PST2 Include GST in PST3 yes yes yes 0 no yes yes 1 yes no yes 2 no no yes 3 yes yes no 4 no yes no 5 ye...

Page 66: ...s after Z1 Report 0 Consecutive receipt number not reset after Z1 Report 1 27 0 price registration is allowed 0 0 price registration is not allowed 1 28 Europe Only Euro convert function is allowed 0 Euro convert function is not allowed 1 29 Tax rate does not print on financial report in VAT mode 0 Tax rate prints on financial report in VAT mode 1 30 Europe Only Print converted total at convert te...

Page 67: ...28 30 and 31 do not apply to the U S market 33 The Commercial message does not print 0 The Commercial logo message prints 1 34 Second receipt cannot be issued 0 Second receipt can be issued 1 Table 17 Flag options Continued This Flag number Sets these actions Set to ...

Page 68: ...show up on reports For example you can train a new person about using the department keys and completing sales Training mode lets someone use the cash register without actually recording the sales in the sales history When you stop Training mode the training sales information is deleted Ringing up Sales After you have the basics programmed in your cash register you are ready to ring up sales For m...

Page 69: ...and the receipt or journal prints 6 Make any change needed and place the money you are given in the cash drawer 7 Close the cash drawer 8 Give the customer the receipt if the cash register is set to print receipts You are ready to ring up another sale To ring up straight sales with a PLU number and not using the barcode reader 1 Put the REG key in the Mode key slot and turn it to the REG1 or REG2 ...

Page 70: ...can UPC symbols until you are done 5 When you are done press the Amount Tend Total key The cash drawer opens and the receipt or journal prints 6 Make any change needed and place the money you are given in the cash drawer 7 Close the cash drawer 8 Give the customer the receipt if you set the cash register to print receipts You are ready to ring up another sale Using Training Mode We provide example...

Page 71: ...he Check key If you did not program a Manager Password go to the next step 3 Using the round Number keys press 666666 and then press the Amount Tend Total key 4 Now you can move the Mode key to the REG1 or REG2 position so training can start To stop Training mode 1 Put the PRG key in the Mode key slot and turn it to the PRG position 2 If you are prompted for a Manager Password type the password nu...

Page 72: ...sh registers defaults to a base tax amount of 10 cents If your base tax amount is other than 10 cents see Calculating State Tax Table Codes on page 114 When you set up your cash register you programmed the cash register to use a simple sales tax appropriate for your area Chapter 2 explains how to program a simple sales tax Chapter 5 explains how to set up sales tax related to departments or PLUs N...

Page 73: ...em required in Canada VAT Value Added Tax means that the tax amount is included in the price of the item See the Royal website for the tax table codes for your particular state After you have the tax table codes for your state see Calculating State Tax Table Codes on page 114 for help or contact your local state government office for the current tax rates To program a basic tax rate see Programmin...

Page 74: ...y in the Mode key slot and turn it to the PRG position 2 If you are prompted for a Manager Password type the password number and then press the Check key If you did not program a Manager Password go to the next step 3 Using the round Number keys area press 2 and press the Tax 1 key 4 Using the round Number keys area press 101 and press the Tax 2 key 5 Using the round Number keys area press 190095 ...

Page 75: ...ger Password go to the next step 3 Using the round Number keys area press 1 press the Tax 1 key press 10000 then press the Tax 2 key To program a Second VAT tax rate Example 25 5 1 Put the PRG key in the Mode key slot and turn it to the PRG position 2 If you are prompted for a Manager Password type the password number and then press the Check key If you did not program a Manager Password go to the...

Page 76: ...rt allows you to check your programming results For more information about programming the cash register see Chapter 5 Setting Up Your Cash Register Advanced on page 33 To run a program confirmation report 1 Put the PRG key in the Mode key slot and turn it to the PRG position 2 If you are prompted for a Manager Password type the password number and then press the Check key If you did not program a...

Page 77: ...he specific information about the programming for your cash register Note Flags 28 30 and 31 do not apply to the U S market Table 18 This code Means this T1 Taxable status programmed with a single tax rate T2 Taxable status programmed with a second tax rate T3 Taxable status programmed with Tax 3 rate T4 Taxable status programmed with Tax 4 rate TX Taxable status programmed with more than 1 tax ra...

Page 78: ...er and then press the Check key If you did not program a Manager Password go to the next step 3 Using the round Number keys press 88 4 Using the round Number keys press the number of the first department you want to see For example 01 5 Using the round Number keys press the number of the last department you want to see For example 15 6 Press the Amount Tend Total key Running the PLU Confirmation R...

Page 79: ... the last department you want to see For example 15 5 Press the Amount Tend Total key The Department Sales report prints Running Management Reports The cash register maintains totals of all transaction information This information is saved in the memory of the cash register as long as the register is plugged in to an electrical outlet or if the cash register is unplugged the batteries are charged ...

Page 80: ...known as a mid day reading Use this position to print periodic readings of transaction totals during the course of the day This reading position does not reset to zero X2 Reading Commonly known as a mid week or mid month reading Use this position to print periodic readings of transaction totals during the course of several days This reading position does not reset to zero About Z Readings There ar...

Page 81: ...rtment Range Report Shows the sales information for the specified departments The different management reports available in the X and Z positions Running a Cash In Drawer Report This report shows how much cash is in the cash drawer To run a Cash In Drawer report 1 Put the Z key or the PRG key in the Mode key slot and turn it to the X position 2 If you are prompted for a Manager Password type the p...

Page 82: ...e Check key If you did not program a Manager Password go to the next step 3 Press the Clerk key The Clerk report prints Running a Financial Report The Financial report shows totals of departments tax net sales voids returns coupons refunds minus percentage plus percentage receipts on account paid out cash check and charge The running grand total appears only on Z reports You can run a copy of the ...

Page 83: ...and turn it to the X or Z position 2 If you are prompted for a Manager Password type the password number and then press the Check key If you did not program a Manager Password go to the next step 3 In the round Number keys area press 99 and the Amount Tend Total key The report prints Financial Report Example Totals are calculated for the Management Reports in the following way NET SALES TOTAL NET ...

Page 84: ...s like the following Your specific report looks different because of your unique cash register activity To reset the Z1 counter 1 Put the PRG key in the Mode key slot and turn it to the PRG position 2 If you are prompted for a Manager Password type the password number and then press the Check key If you did not program a Manager Password go to the next step 3 In the round Number keys area press 1 ...

Page 85: ...epartment Range report 1 Put the PRG key in the Mode key slot and turn it to the X position 2 If you are prompted for a Manager Password type the password number and then press the Check key If you did not program a Manager Password go to the next step 3 In the round Number keys area press the Starting Department number as 2 digits for example 01 Press the Ending Department number as 2 digits and ...

Page 86: ...u did not program a Manager Password go to the next step 3 Press the PLU key To print a PLU sales report according to an assigned Department number range 1 Put the Z key or the PRG key in the Mode key slot and turn it to the X position 2 If you are prompted for a Manager Password type the password number and then press the Check key If you did not program a Manager Password go to the next step 3 I...

Page 87: ...lectronic components Use the optional protective keytop cover to prevent damage to the cash register Keep the cash register away from dust dampness or extreme hot or cold temperatures To clean your cash register use a soft dry cloth Do not use harsh solutions containing alcohol or ammonia After storing your cash register in extreme temperatures below 32 degrees Fahrenheit or above 104 degrees Fahr...

Page 88: ...per Roll As you use the cash register you will need to replace the paper roll Your cash register has a thermal printer that prints receipts or a journal You can use 2 25 57 5 mm wide standard thermal register paper To put the paper in the paper roll 1 Insert the PRG key and turn it to either REG1 or REG2 If you need a customer receipt turn the Mode key to the REG1 position If you do not need a cus...

Page 89: ...ush the paper through one of the narrow openings in the center of the Journal Takeup spindle and turn the spindle several times to wind the paper securely Press the Feed key until the paper catches and begins to wind securely around the Journal Takeup spindle Replace the Journal Compartment Cover If you want to print receipts Put the customer receipt paper in the receipt window of the Journal Comp...

Page 90: ...ife However all information in the cash register will be erased if you do this Caution You must plug the cash register in before installing or replacing the back up batteries All data is erased when you remove the batteries if the cash register is not plugged in before you remove the batteries To install or replace the batteries 1 Before you start make sure you have 4 new AA batteries 2 Plug the c...

Page 91: ...ective Keytop Cover 013218 Replacement 4 Slot Bill Tray Drawer Coin Tray not included CD510002 Replacement 5 Coin Tray CD500002 Duplicate Cash Drawer Journal Lock Key Set 1 set of 2 keys 47300511 Duplicate Control Lock Key Set 6 keys PRG 427 023 REG 427 024 Z 427 012 2 each 47100324 Replacement Journal Paper Roll Spindle 16900010 Thermal Register Tape 3 roll package 2 57mm wide 2 50mm diameter 85 ...

Page 92: ...to fix them I Hear an Error Beep Some error beeps are normal See Error Codes on page 31 for more information about error codes 1 Press the Clear key 2 Turn the Mode key to the PRG REG X or Z position you were in before you got the error Table 20 The error message Do this P R I N T E R Paper jam or printer failure E R R O R Misoperation C L E R K Enter clerk number E R R O R Communication error CHA...

Page 93: ...r appears in PRG X OR Z modes This prompt means a Manager Password is programmed Enter the password number and press Check If Clerk E12 Displays In REG 1 or REG 2 Modes This prompt means clerk numbers are programmed 1 Enter the clerk number and press Clerk 2 Enter the password and press Charge PE Printer Error This prompt means there is a paper problem 1 Check if you are out of paper 2 Check for a...

Page 94: ...the cash register is plugged into a working electrical outlet and no other electrical device is using the same power source Another electrical motor on the same circuit can keep the cash register from working properly If error still persists perform a Half System Clear procedure See Half System Clear on page 89 As a last resort perform a Full System Clear procedure See Full System Clear on page 89...

Page 95: ...rform the following procedure To do a full system clear 1 Turn the Mode key to the OFF position 2 Remove one back up battery 3 Unplug the cash register from the power source and wait 5 minutes 4 Plug in the cash register 5 Replace the battery 6 Reprogram the cash register 7 Continue with normal operations If Nothing Helps If a problem still persists call our Customer Service Support Line toll free...

Page 96: ...Reminder If Clerk Numbers are programmed be sure to type the CLERK then press the CLERK key the password and the CHECK key if programmed before ringing up a sale To ring up a sale Put the REG key in the Mode key slot and turn it to the REG1 position You are ready to ring up sales Important You do not need to press the Decimal Point when ringing up a price CHAPTER 11 ...

Page 97: ...Sale Multiplying By A Fraction No Sale Function Overriding a PLU Sale Paid Out Sale PLU Sale PLU Sale With PLU Description Plus Percentage Sale Received On Account Sale Registering A Department Unit Price Registering A Reference Number Return Sale Split Tendering Sale Temporarily Overriding a PLU Price Use the Error Correct Void Key Voiding A Coupon Sale Voiding a Department Preset Price Voiding a...

Page 98: ...ral transaction information you see printed on a receipt Voiding a PLU Multiplication Sale Voiding a PLU Sale Voiding a PLU Sale with a Coupon Discount Voiding a Plu Sale with a Minus Percentage Discount Voiding a PLU Sale with a Plus Percentage Rate Voiding a Plus Percentage Sale Voiding A Sale ...

Page 99: ...o number 26 COUPON Coupon CREDIT Credit card transaction DEBIT Debit card transaction DISCOUNT Minus Percent Discount DUPLICATE RECEIPT After a transaction you can print a duplicate receipt by pressing the Subtotal w Tax key immediately after the original receipt has finished printing and before another transaction is started NO SALE No Sale Function or Open Cash Drawer PAID OUT Paid Out PRICE Ove...

Page 100: ...a non taxable department 1 Press the key 2 In the Number keys area press 100 and then press the key 3 Press the key Cash Sale With Tendering Change Example 27 Ring up a 1 00 item in Department 1 and compute change from 5 00 cash tendered To ring up a sale with tendering change 1 In the Number keys area press 100 and then press the key 2 Press the key T4 Tax 4 Rate Applied to a Sale TOTAL Total of ...

Page 101: ...ment 1 To ring up a sale without tendering change 1 In the Number keys area press 100 and then press the key 2 Press the key You do not need to press the Subtotal key if you do not want the subtotal of a sale to print 3 Press the key 4 Press the key Charge Sale Example 29 Ring up a 1 00 item in Department 1 and finalize the sale with the charge key To ring a charge sale 1 In the Number keys area p...

Page 102: ...on discount sale 1 In the Number keys area press 100 and then press the key 2 In the Number keys area press 20 and then press the key 3 Press the key Version 1b If you want to charge the tax rate on the original amount of an item before the coupon is deducted ring up a 1 00 item in Department 1 and then deduct the 20 coupon To ring a coupon discount sale 1 In the Number keys area press 100 and the...

Page 103: ...t 1 and 2 00 in Department 2 and finalize the sale with the CREDIT key To ring a credit sale 1 In the Number keys area press 100 and then press the key 2 In the Number keys area press 200 and then press the key 3 Press the key It is not necessary to enter any amount before pressing the Credit key Dept Shift Key Example 33 Ring up a 1 00 item in Department 1 taxable 2 00 in Department 21 non taxabl...

Page 104: ... Department 1 key is programmed as a taxable department Ring up a 1 00 item in Department 1 without charging tax To ring an item without charging tax 1 Press the key 2 In the Number keys area press 100 and then press the key 3 Press the key Exempting Tax on the Entire Sale Example 35 Assume the Department 1 key is programmed as a taxable department Ring up a 1 00 item and a 1 50 item in Department...

Page 105: ... Number keys area press 1149 then press the key 3 Press the key Minus Percentage Discount Sale Example 37 The following are two versions of Minus Percentage Discount Sales Version 1 Note If no tax is programmed in your cash register ring up a 1 00 item in Department 2 and apply a pre programmed discount rate of 10 To ring a minus percentage discount sale 1 In the Number keys area press 100 and the...

Page 106: ...te is NOT programmed type in the discount rate before pressing the key 3 Press the key Multiplication of a Department Unit Price Example 38 Assume the Department 1 key is pre programmed for 1 00 Ring up this price three times To multiply a department unit price 1 In the Number keys area press 3 and then press the key 2 Press the key 3 Press the key Note You can up to 32 prices by using the 32 Depa...

Page 107: ...but not in the dollar amount To multiply an item by a fraction 1 In the Number keys area press 1 25 and then press the key 2 In the Number keys area press 100 and then press the key 3 Press the key Note You can use from 01 to 999 99 when ringing up the quantity of an item No Sale Function Example 41 Used to open the drawer without ringing up a sale For example to give change To use the No Sale fun...

Page 108: ...mber and then press the key 3 Press the key The word PRICE appears above the description or PLU Paid Out Sale Example 43 Indicates money taken out of the cash drawer Ring up 10 00 to show money paid out of the cash drawer To record monies paid out In the Number keys area press 1000 then press the key PLU Sale Example 44 Assume the PLU is preset for the price of 1 99 in Department 1 Ring up the PLU...

Page 109: ...ammed in your cash register ring up a 1 00 item in Department 2 and apply a pre programmed Plus Percentage Rate of 10 To ring a PLU percentage sale 1 In the Number keys area press 100 and then press the key 2 Press the key Note If the Plus Percentage Rate is NOT pre programmed type in the PLUs percentage rate before pressing the key 3 Press the key Version 2 Note When ringing a taxable item with a...

Page 110: ...n press the key Registering A Department Unit Price Example 48 Assume Department 1 is pre programmed for 1 00 Ring up this price To register a department unit price 1 Press the key 2 Press the key Note You can up to 32 prices by using the total of the 32 Department keys for quick ring ups Registering A Reference Number Example 49 Used to print a number up to 10 digits to identify an invoice number...

Page 111: ...e key 2 In the Number keys area press 100 and then press the key 3 Press the key 4 In the Number keys area press 3 and then press the key 5 In the Number keys area press 150 and then press the key 6 Press the key Note The Return function can be performed in the middle of any sales transactions or by itself in a separate transaction Split Tendering Sale Example 51 Ring up a 15 00 item in Department...

Page 112: ...r To override a PLU price 1 In the Number keys area type the price you want press the key 2 In the Number keys area type the PLU number and then press the key The word PRICE appears above the PLU description to indicate the overriding of a PLU price Use the Error Correct Void Key Example 53 Corrects the last entry run up during a sale Ring up a 1 00 item in Department 1 then use the VOID key to ca...

Page 113: ...er keys area press 20 press the key and then press the key 2 Press the key Voiding a Department Preset Price Example 55 Assume Department 1 is programmed for the price of 1 00 and Department 2 is programmed for the price of 2 00 Ring up Department 1 and Department 2 prices then void the Department 1 entry To void a department preset price 1 Press the key 2 Press the key 3 Press the key 4 Press the...

Page 114: ...he key 4 In the Number keys area press 20 and then press the key 5 Press the key 6 Press the key and then press the key 7 In the Number keys area press 20 press the key and then press the key 8 Press the key Voiding a Department Preset with a Minus Percentage Discount Example 57 Assume Department 1 is programmed for 1 00 Department 2 is programmed for 2 00 and the RA key is pre programmed for 10 R...

Page 115: ...ale 1 In the Number keys area press 100 press the key and then press the key 2 Press the key Note If the Minus Percentage Discount Rate is NOT pre programmed type in the discount rate before pressing the RA key 3 Press the key Voiding a Multiplication of a Department Preset Price Example 59 Assume Department 1 is programmed for the price of 1 00 and Department 2 is programmed for the price of 2 00...

Page 116: ...Void a 1 00 item in Department 1 three times To void a multiplication sale 1 In the Number keys area press 3 and then press the key 2 In the Number keys area press 100 press the key and then press the key Voiding a PLU Multiplication Sale Example 61 Assume PLU 1 is preset for the price of 1 00 in Department 1 Void PLU 1 three times To void a PLU multiplication sale 1 In the Number keys area press ...

Page 117: ...ress 1 press the key and then press the key 2 Press the key Voiding a PLU Sale with a Coupon Discount Example 63 Assume PLU 1 is preset for the price of 1 00 in Department 1 and deduct a 20 coupon Void this entry To void a PLU sale with a coupon discount 1 In the Number keys area press 1 press the key and then press the key 2 In the Number keys area press 20 press the key and then press the key 3 ...

Page 118: ...Press the key If the Minus Percentage Discount is not pre programmed type the discount rate before pressing the key 3 Press the key Voiding a PLU Sale with a Plus Percentage Rate Example 65 Assume PLU 1 is preset for the price of 1 00 in Department 1 and the PO key is pre programmed for 10 Ring up PLU 1 add 10 then void this entry To void a PLU sale with a PLUs percentage rate 1 In the Number keys...

Page 119: ...Us percentage sale 1 In the Number keys area press 100 press the key and then press the key 2 Press the key Note If the Plus Percentage rate is NOT pre programmed type in the Plus Percentage Rate before pressing the PO key 3 Press the key Voiding A Sale Example 67 Void a 1 00 item in Department 1 To void a sale 1 In the Number keys area press 100 press the key and then press the key 2 Press the ke...

Page 120: ...le Tax Chart on page 118 Familiarize yourself with the method of determining the tax code Then using The Worksheet on page 119 duplicate the method of calculating your state tax code by the steps described in this section To do this you need to get a copy of your state s Retail Tax Chart from your local Tax Office After you are done write down the tax code and save the information for future refer...

Page 121: ...gular and Irregular patterns All tax tables repeat a pattern of irregular breakpoints that lead into a pattern of regular breakpoints To determine the breakpoint pattern continue calculating the breakpoints in Part B until you have found the Regular repeat breakpoint pattern From our example Breakpoints 13 19 23 27 27 29 are the Irregular breakpoint pattern Breakpoints 25 25 25 25 are the Regular ...

Page 122: ...24 The number 4 the percentage rate is multiplied by 24 to determine the number 96 which is the last two digits of the 6 digit number to be programmed 24 x 4 96 2 The first four digits of the 6 digit number 2400 are determined by multiplying the number 24 by 100 24 x 100 2400 The final resulting 6 digit number to be programmed is 240096 Using The Worksheet complete Step D 5 For the following see t...

Page 123: ...rogramming the State Tax Table Code combine Steps A through F and maintain for future reference Note Programming the State Tax Table Code is done with the Mode key in the PRG position 121 Tax 2 240096 Tax 2 13 Tax 2 19 Tax 2 23 Tax 2 23 Tax 2 27 Tax 2 27 Tax 2 1029 Tax 2 25 Tax 2 25 Tax 2 25 Tax 2 1025 Tax 2 Using The Worksheet complete Step G by using the method described 27 Tax 2 0 27 27 Tax 2 0...

Page 124: ... A Calculating State Tax Table Codes 118 Alpha 583cx User s Guide Example Tax Chart The following is an example of how a tax chart can look Note A total of 63 breakpoints can be programmed on this cash register ...

Page 125: ...Alpha 583cx User s Guide 119 Calculating Your Tax The Worksheet Write down your results as you go ...

Page 126: ...Note If you make a mistake or you hear an error beep while you are programming the sales tax press Clear and start over with Step 3 To program a single fixed tax rate using a base tax amount Example 68 If the Base Tax Amount is 10 cents and the Tax Rate is 6 1 Put the PRG key in the Mode key slot and turn it to the PRG position 2 If you are prompted for a Manager Password type the password number ...

Page 127: ...r Password go to the next step 3 In the round Number keys area press 131 and then press the Void key Canadian Tax Programming Example The non taxable limit is used in certain areas where tax is exempted below a certain amount For example any amount below 4 00 is exempted from tax If there is no non taxable limit simply skip the step in brackets in the procedure Example 69 GST Tax 7 PST Tax 8 GST P...

Page 128: ...he Department keys For more information about using the Department keys to type letters see Setting Alphanumeric Descriptions on page 17 When you are done press the Check key 9 Link both Tax 1 GST and Tax 2 PST to a Department key Press 00005 ST W TAX 0 Dept Key Example 70 GST Tax 7 PST Tax 8 GST PST Tax Both 7 and 8 as tax on tax piggyback calculation Note Where you see an asterisk in the followi...

Page 129: ...ons on page 17 When you are done press the Check key 8 Link both Tax 1 7 GST and Tax 2 8 PST to the desired Department key Press 00005 ST W TAX 0 Dept Key 9 Type the name of the Department using the Department keys For more information about using the Department keys to type letters see Setting Alphanumeric Descriptions on page 17 When you are done press the Check key 10 Program for piggyback tax ...

Page 130: ...and 10 digit readout Printer Thermal printer Ink Source Thermal alphanumeric printer no ribbon needed Paper Supply Standard thermal paper Royal Reorder 013127 Memory Battery Protection Roughly 28 days after power interruption Technology CMOS RAM Power Consumption Standby 0 8W Operating 30W Operating Temperature 0 40 Degrees Centigrade 32 104 Degrees Fahrenheit Dimensions 13 W x 16 D x 11 H Weight ...

Page 131: ...e used for long periods of time FCC Warning This equipment generates uses and can radiate radio frequency energy and if not installed and used in accordance with the instructions manual may cause interference to radio communications It has been tested and found to comply with the limits for a Class A computing device pursuant to Subpart J of Part 15 of FCC Rules which are designed to provide reaso...

Page 132: ...IES EXCEPT AS STATED HEREIN AFTER THE PERIOD OF EXPRESSED WARRANTY SET FORTH HEREIN THERE ARE NO EXPRESSED OR IMPLIED WARRANTIES AND THOSE EXCLUDED INCLUDE THOSE OF MERCHANTABILITY AND FITNESS FOR A PARTICULAR PURPOSE Royal shall NOT be liable for CONSEQUENTIAL DAMAGES resulting from any failure defect or malfunction of this cash register Some states do not allow limitations on how long an implied...

Page 133: ...T AMOUNT CANTIDAD MONTANT BETRAG SALES RECEIPT CHECK CHEQUE CHEQUE SCHECK SALES RECEIPT T1 T1 T1 S1 SALES RECEIPT T2 T2 T2 S2 SALES RECEIPT T3 T3 T3 S3 SALES RECEIPT T4 T4 T4 S4 SALES RECEIPT REFUND REEMBOLSO RETOUR RUCKZAHLUNG SALES RECEIPT TOTAL TOTAL TOTAL GESAMT SALES RECEIPT PAID OUT SALIDAS SORTIE AUSZAHLUNG SALES RECEIPT RECD ACCT CUENTA ENTREE EINZAHLUNG SALES RECEIPT NO SALE NO VENTA NON ...

Page 134: ...MANAGEMENT REPORT NO SALE NO VENTA TL NON VTE NULL BON MANAGEMENT REPORT CHECK CHEQUE TL CHEQUE SCHECK MANAGEMENT REPORT DEPTTL TOTAL DPTO TL DEPART WG TOTAL MANAGEMENT REPORT REFUND REEMBOLSO TL RETOUR RUCKZAHLNG MANAGEMENT REPORT TAX 1 T1 TL TVA1 T1 MANAGEMENT REPORT TAX 2 T2 TL TVA2 T2 MANAGEMENT REPORT TAX 3 T3 TL TVA3 T3 MANAGEMENT REPORT TAX 4 T4 TL TVA4 T4 MANAGEMENT REPORT NET NETO TL NET ...

Page 135: ...TO TL BRUT BRUTTO MONTHLY REPORT T1 T1 TL TVA1 T1 MONTHLY REPORT T2 T2 TL TVA2 T2 MONTHLY REPORT T3 T3 TL TVA3 T3 MONTHLY REPORT T4 T4 TL TVA4 T4 MONTHLY REPORT MC MC CR NO MC MACHINE NUMBER YOUR RECEPIT SU RECIDO VOUS REMERCIE IHRE RECHNUNG STORE HEADER THANK YOU GRACIAS DE VOTRE CONFIANCE VIELEN DANK STORE HEADER DEPT DPTO DEPT WARENGRP DEPT RECEIPT CLERK DEPENDIENTE VENDEUR KASSIERER CLERK NAME...

Page 136: ...ing 14 changing tax rates 67 character chart programming 18 chart alphanumeric codes 40 clearing errors 31 clerk names setting 25 clerk numbers setting 25 using 26 clerk system 25 using 26 closing cash drawer 14 customer display 10 code chart alphanumeric 18 40 codes transaction 93 commercial messages programming 21 setting 24 complex tax rates 67 confirming your settings 29 contacting Royal 2 cou...

Page 137: ...lit tendering sale 105 using error correct void key 106 voiding a coupon sale 107 voiding a department preset price 107 voiding a department preset with a coupon discount 108 voiding a department preset with a minus percentage discount 108 voiding a minus percentage discount sale 109 voiding a multiplication of a department preset price 109 voiding a multiplication sale 110 voiding a PLU multiplic...

Page 138: ...on report printing 29 R receipt messages setting 21 24 register mode before going to 30 register tape installing 5 replacing batteries 83 reports about 75 cash in drawer 75 clerk reports 76 confirmation 72 department confirmation 73 example 77 financial 76 full 76 hourly 79 management 73 PLU 80 program confirmation 70 quick start program confirmation 29 X 73 Z 73 ringing up sales 62 barcode reader...

Page 139: ... 121 123 PST 121 123 setting 67 VAT 67 tax status programming 37 tax worksheet 119 Training mode using 64 transaction codes 93 troubleshooting 86 Clerk E12 87 error beeps 86 error codes 86 full system clear 89 half system clear 89 register does not work 88 Sec error 87 U using cash drawer 14 clerk system 26 27 department number keys 38 displays 16 double wide characters 20 keyboard 13 Mode key are...

Reviews: