background image

10

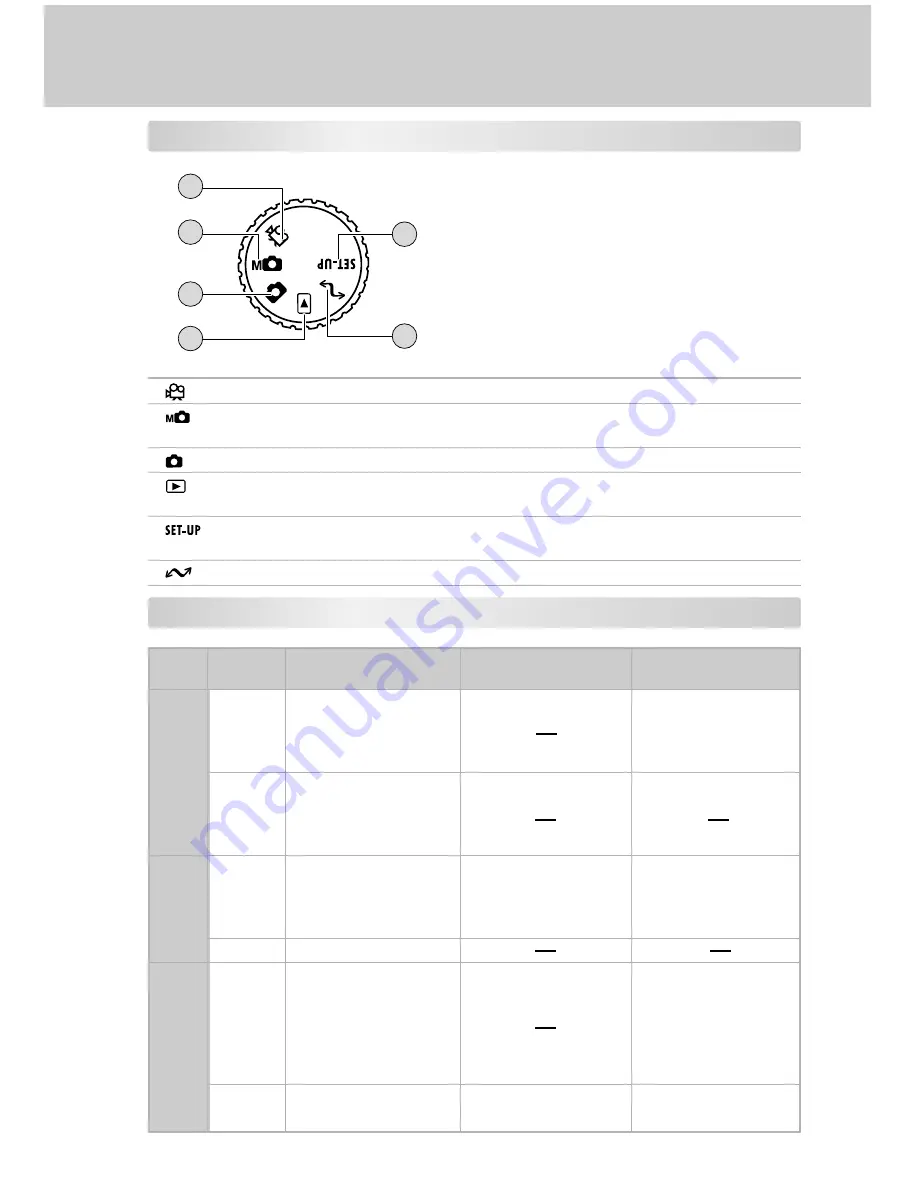
Mode Dial

Mode

Description

1

Movie Mode

Select this mode to record video (movie) clips.

2

Manual Record Mode Select this mode to take still images by manually

adjustments.

3

Record Mode

Select this mode to take still images.

4

Playback Mode

Select this mode to play back your captured images and video
clips.

5

Setup Mode

Select this mode to choose your preferences for the camera’s
settings.

6

PC Mode

Select this mode for loading images to the PC.

LED Indicators

State

On

Flashing

On

Flashing

On

Flashing

During photography

Auto focusing
successful
(without unsteady hold
warning)

Auto focusing
successful
(with unsteady hold
warning)

During SD card
accessing

Auto focusing failure

During photographic
processing
F l a s h   c h a r g i n g   i n
progress
Zoom initialization in
progress

No battery power left
Camera malfunction

During playback

During SD card
accessing
D u r i n g   c r e a t i o n   o f
DPOF file

No battery power left

During connection
to a PC

While the camera is
connected to a PC

During SD card
accessing

Not recognized by the
PC or other status

No battery power left

Color

Green

Red

Orange

1

2

6

5

3

4

Summary of Contents for dp3210

Page 1: ...ations However there is no guarantee that interference will not occur in a particular installation If this equipment does cause harmful interference to radio or television reception which can be determined by turning the equipment off and on the user is encouraged to try to correct the interference by one or more of the following measures Reorient or relocate the receiving antenna Increase the sep...

Page 2: ...ide for the product 2 The product and accessories that come with your camera may be different from those described in this manual This is due to the fact that different retailers often specify slightly different product inclusions and accessories to suit their market requirements customer demographics and geographical preferences Products very often vary between retailers especially with accessori...

Page 3: ... fire or an electrical shock Do not touch the power plug during a thunderstorm if you are using the AC power adapter This may cause an electrical shock Do not use the camera if any foreign objects have entered the camera Turn the camera off remove the batteries and disconnect the power source if you are using an AC power adapter Unplug the adapter from the AC power outlet after you have disconnect...

Page 4: ...ectrical shock When leaving the camera unused for long periods such as during a vacation always unplug the camera from the power source batteries or AC power adapter for safety If you are using the AC power adapter unplug the adapter from the AC power outlet after you have disconnected the camera Failure to do so could result in a fire Do not use batteries other than those specified for use with t...

Page 5: ...P 27 Selecting the White Balance 29 Selecting the Photometry Mode 30 Selecting the Exposure Compensation 31 Selecting the Capture Mode 32 MOVIE MODE 33 Recording Video Clips 33 Viewing Video Clips 33 PLAYBACK MODE 34 Viewing Captured Images 34 Displaying Image Information 35 Displaying Thumbnail Images 36 Zoom Playback 36 Slide Show Display 37 Protecting Images Video Clips 38 Protecting one image ...

Page 6: ... CREATE FOLDER 51 PICTURE 51 DISPLAY SETTINGS 51 LCD BRIGHTNESS 51 Playback Menu 52 PROTECT 52 DPOF 52 SLIDE SHOW 52 RESIZE 52 DISPLAY SETTINGS 53 LCD BRIGHTNESS 53 Movie Menu 54 ISO 54 DIGITAL ZOOM 54 QUALITY SETTING 54 CREATE FOLDER 54 PICTURE 54 DISPLAY SETTINGS 54 LCD BRIGHTNESS 54 Setup Menu 55 SOUND 55 AUTO POWER OFF 56 CUSTOMIZE 56 LANGUAGE 56 VIDEO OUT 56 TIME DATE 56 SYSTEM 56 CONNECTING ...

Page 7: ...whether the flash should be used This feature helps ensure that your images turn out right In addition to still images you can also record short videos by using the movie function Images you have taken can be downloaded to your computer using the USB cable USB driver is required only for Win 98 and Mac OS 8 6 You can enhance and retouch your images on your computer by using the provided editing so...

Page 8: ... button 4 Remote control sensor 5 Flash adjustment sensor 6 Front LED 7 Lens 8 Flash 9 Flash open button 10 Speaker 11 Microphone 12 Terminal cover 13 MIC terminal 14 Digital terminal 15 A V OUT Audio Video out terminal 16 DC IN 5V terminal 1 2 3 4 5 6 7 8 9 10 11 12 13 14 15 16 ...

Page 9: ...iewfinder 4 Viewfinder LED 5 LCD monitor 6 Menu button 7 Delete button 8 Tripot socket 9 Display button 10 Flash button 11 W Wide angle button 12 T Telephoto button 13 Strap eyelet 14 SD card cover 15 OK button 16 Arrow buttons 17 Battery cover 1 2 3 4 5 6 7 8 9 10 11 12 13 14 15 16 17 ...

Page 10: ...D Indicators State On Flashing On Flashing On Flashing During photography Auto focusing successful without unsteady hold warning Auto focusing successful with unsteady hold warning During SD card accessing Auto focusing failure During photographic processing F l a s h c h a r g i n g i n progress Zoom initialization in progress No battery power left Camera malfunction During playback During SD car...

Page 11: ... x 1200 1280 x 960 1024 x 768 640 x 480 8 Flash mode Auto Red eye reduction Forced flash Suppressed flash Slow sync 9 Photography tab menu 10 Shooting date and time 11 Battery level Full battery power Fairly consumed Nearly exhausted Virtually no battery power 12 Zoom state 13 Focus area 2 1 3 4 5 6 7 8 9 10 11 12 13 2003 10 25 14 38 2003 10 25 14 38 00012 00012 T T SCENE SCENE FOCUS FOCUS FOCUS A...

Page 12: ... Flash mode Auto Red eye reduction Forced flash Suppressed flash Slow sync 9 Photography tab menu 10 Shooting date and time 11 Battery level Full battery power Fairly consumed Nearly exhausted Virtually no battery power 12 Zoom state 13 Exposure compensation 14 Aperture 15 Shutter speed 16 Histogram 17 Focus area 2 1 3 4 5 6 7 8 9 10 11 12 13 14 15 16 17 2003 10 25 14 38 2003 10 25 14 38 00012 000...

Page 13: ...mage size 2048 x 1536 1600 x 1200 1280 x 960 1024 x 768 640 x 480 4 File number 5 Protect icon when playing back protected images 6 Battery level Full battery power Fairly consumed Nearly exhausted Virtually no battery power 7 Shooting date and time 2003 10 25 14 38 2003 10 25 14 38 0027 0027 100 100 100 2 1 3 4 5 7 6 ...

Page 14: ...rmal Basic 4 Image size 320 x 240 5 Photography tab menu 2003 10 25 14 38 2003 10 25 14 38 0 00 12 0 00 12 T T FOCUS FOCUS W W 2 1 3 4 5 6 7 8 9 10 6 Shooting date and time 7 Battery level Full battery power Fairly consumed Nearly exhausted Virtually no battery power 8 Sound input level meter 9 Recording mark 10 Zoom state ...

Page 15: ...con 3 Quality Fine Normal Basic 4 Image size 320 x 240 2 1 3 4 5 6 7 8 9 2003 10 25 14 38 2003 10 25 14 38 0 00 12 0 02 21 0 00 12 0 02 21 T T W W 5 Battery level Full battery power Fairly consumed Nearly exhausted Virtually no battery power 6 Volume 7 Movie status bar 8 Movie guide 9 Shooting date and time ...

Page 16: ... from the camera to prevent leakage or corrosion Never use manganese batteries Never use batteries of different type together or mix old and new batteries Avoid using batteries in extremely cold environments as low temperatures can shorten the battery life and reduce camera performance Such damage is not covered under the warranty Using the AC Power Adapter optional accessory 1 Make sure the camer...

Page 17: ...ory card 1 Make sure the camera is turned off 2 Open the SD card cover 3 Press lightly on the edge of the memory card and it will eject To prevent valuable data from being accidentally erased from an SD card you can slide the write protect tab on the side of the SD memory card to LOCK To save edit or erase data on an SD memory card you must unlock the card Attaching the Camera Strap To prevent acc...

Page 18: ...button Seconds cannot be set 2 Press OK after all options are set When the mode dial is set to the viewfinder display is active and when the mode dial is set to the LCD monitor display is active To switch between these displays press the button About the Remote Controller The remote controller allows you to capture or play back images away from the camera Be extremely cautious not to drop violentl...

Page 19: ... the viewfinder 4 Press the shutter button down halfway and then fully down After the image is taken the viewfinder LED stays lit for the time that the captured images can be recorded to the SD card When the viewfinder LED is lit red be sure not open the battery cover or the card cover or remove the batteries or the SD memory card Open the flash to take pictures with the according flash mode When ...

Page 20: ...background details are out of focus Flash mode is fixed at Auto with Red eye Reduction LANDSCAPE Select this mode to enhance color saturation shown in mountains forests and other landscape scenery or to take portraits that feature a landmark in the background Flash mode cannot be set SPORTS Select this mode to capture the fast moving subjects Flash mode cannot be set PORTRAIT LANDSCAPE Select this...

Page 21: ...to 50cm wide zoom off 90cm to 120cm tele optical zoom 10X of the camera INFINITY Select this mode when you want to take photographs of subjects about 5m or more from the camera 1m FIXED AT 1M Select this mode when you want to take photographs of subjects about 1m from the camera 3m FIXED AT 3M Select this mode when you want to take photographs of subjects about 3m from the camera 2 0 0 3 1 0 2 5 1...

Page 22: ...s set to AUTO Flash settings may be limited depending on the scene mode 2 Press the flash open button to open the flash 3 Press the flash button to set the desired mode while viewing on screen When scene mode is set to AUTO in record mode The modes appear cyclically Auto Red eye Reduction Forced Flash Suppressed Flash Slow Sync When scene mode is set to manual reocrd mode The modes appear cyclical...

Page 23: ...lash will always fire regardless of the surrounding brightness Select this mode for recording images with high contrast backlighting fluorescent lighting etc and deep shadows Suppressed Flash The flash will not fire Select this mode when taking images in a place where flash photography is prohibited or when the distance to the subject is beyond the effective range of the flash Slow Sync The flash ...

Page 24: ...te controller is set photographs can be taken using the remote controller 3 Compose your image press the shutter button down halfway and then fully down The front LED then blinks and the photograph is taken after the preset time 2 or 10 seconds has elapsed The countdown displays on the screen To cancel the self timer midway press the button After one shot is taken the self timer mode is turned to ...

Page 25: ...movie mode 2 Compose the image with the T telephoto button or W wide angle button to set the zoom The position of the lens moves depending on the T W button setting 3 Compose your image press the shutter button down halfway and then fully down You can turn the digital zoom ON or OFF on the photography menu The T W button setting is automatically canceled by turning the power OFF or by activation o...

Page 26: ...roller 3 Compose the picture point the remote controller at the remote control sensor on the camera and press the record button In the record mode or manual record mode the photograph is taken and the image is recorded to the SD memory card In the movie mode the camera starts to record the movie To stop recording the video clip press the record button again The remote setting is held until you pre...

Page 27: ... setting The shutter speed is automatically set according to the aperture 1 Rotate the mode dial to manual record mode and press the OK button 2 Select EXP with the button and press the button A list of exposure mode icons is displayed 3 Select Av with the button and press the OK button 4 Press the OK button again and the camera is ready to take the next shot 5 Set the aperture with the button 1 0...

Page 28: ...phs 1 Rotate the mode dial to manual record mode and press the OK button 2 Select EXP with the button and press the button A list of exposure mode icons is displayed 3 Select M with the button and press the OK button 4 Press the OK button again and the camera is ready to take the next shot 5 Adjust aperture with the button and the shutter speed with the button If the histogram frame turns red this...

Page 29: ...button and press the button 4 Press the OK button again and the camera is ready to take the next shot WB icons Description AW AUTO Automatic adjustment SUNLIGHT Photography under sunlight CLOUD Photography under cloudy skies FLUORESCENT LIGHT1 Photography under daylight fluorescent lamp bluish glow fluorescent lamp FLUORESCENT LIGHT2 Photography under daylight fluorescent lamp reddish glow fluores...

Page 30: ... the button CENTER PRIORITY PHOTOMETRY The exposure is set by giving precedence to the center of the image when metering the entire image SPOT PHOTMETRY The exposure is set by giving precedence to an extremely narrow area in the center of the image 4 Press the OK button again and the camera is ready to take the next shot 1 0 1 0 F8 0 F8 0 1 1000 1 1000 EXP PRG PRG AE S C WB FOCUS 2 0 0 3 1 0 2 5 1...

Page 31: ...fective Subjects and Set Values Positive Compensation Copying of printed text black characters on white paper Backlit portraits Very bright scenes such as snowfields and highly reflective subjects Shots made up predominantly of sky Negative Compensation Spot lighted subjects particularly against dark backgrounds Imaging of printed text white characters on black paper Scenes with low reflectivity s...

Page 32: ...ls However the number of frames varies according to the photographic conditions subject recording medium etc AEB 3 Frame Shooting The shutter operates three times and photographs are taken with the exposure changed in three stages 0 3 0 and 0 3 AEB 5 Frame Shooting The shutter operates five times and photographs are taken with the exposure changed in five stages 0 7 0 3 0 0 3 and 0 7 4 Press the O...

Page 33: ...ces Flash photography is not possible in the movie mode Viewing Video Clips Play back video clips recorded on the camera Voice is also played back 1 Rotate the mode dial to playback mode The last image appears on the screen Adjust the brightness if the LCD monitor is too light or too dark 2 Select the preferred video clip with the button You can also select the desired movie from the thumbnail dis...

Page 34: ...e POWER switch 2 Rotate the mode dial to playback mode 3 View and select your recorded images by using the button When using the remote controller press the button on the remote controller to feed forward or reverse Pressing the buttons during image playback displays rotated the image 900 at a time Pressing the button displays rotated the image clockwise while pressing the button displays rotated ...

Page 35: ...d display Displays detailed information of the image Histogram Displays a graph indicating the distribution of brightness in the image The vertical axis indicates the number of pixels and the horizontal axis indicates brightness 2003 10 25 14 38 2003 10 25 14 38 0027 0027 0027 100 100 2003 10 25 14 38 2003 10 25 14 38 0027 0027 0027 100 100 2003 10 25 14 38 2003 10 25 14 38 0027 0027 0027 100 100 ...

Page 36: ... OK button Displaying Thumbnail Images This function allows you to view nine thumbnail images on the LCD monitor simultaneously so that you can quickly scan for a particular image 1 Rotate the mode dial to playback mode 2 Press the OK button or W wide angle Nine thumbnail images appear on the LCD monitor assuming there are nine or more recorded images in the memory 3 Use the or button to move the ...

Page 37: ...he button then press the button 5 Select the ANIMATION with the button then press the button 6 Select the item with the button then press the OK button This sets the slide show settings 7 Select the SLIDE SHOW with the button The slide show starts To stop the slide show press the button again Slide show is repeated until you press the button again You can pause slide show by pressing the button Pr...

Page 38: ...and press the OK button All of the images in a folder can be selected by press the button if multiple folders exit To display the image full on screen for confirmation press the T telphoto button To return the original screen press the W wide angle button Removing protection from one image video clip 1 Select PROTECT with the button from the playback menu and press the button 2 Select the desired ...

Page 39: ...ting images repeat steps above Even if you take photographs after deleting an image files are assigned serial numbers from the next number from the very last number assigned after the image was deleted Images can also be deleted in the thumbnail display After the image is deleted the screen returns to the thumbnail display To delete all images video clips at once 1 Rotate the mode dial to one of p...

Page 40: ...ayed 4 Select YES with the button and press the OK button The message SURE is displayed To not format select NO and press the OK button 5 Select YES with the OK button This formats the SD memory card After formatting completed the message RESET FILE NUMBER is displayed 6 Select YES with the button and press the OK button This resets the file No and the camera returns to the mode selected on the mo...

Page 41: ...ton The DPOF setting screen appears 4 Select SELECT IMAGE with the button and press the button 5 Select SELECT or ALL with the button and press the button 6 Select the preferred image with the button and set the number of prints with the button You can set up to 99 prints for each captured image 7 Press the OK button 8 Select YES with the button and press the OK button To not print the date on the...

Page 42: ...Select CLEAR ALL with the button in the DPOF setting screen and press the button The message ALL SETTINGS WILL BE RESET appears 2 Select EXECUTE with the button and press the OK button The message RELEASE ALL PROTECT appears 3 Select EXECUTE with the button and press the OK button The screen returns to the DPOF setting screen 4 Press the button The screen returns to the playback menu DPOF SELECT I...

Page 43: ...USB driver only for Windows 98 Step 2 Connecting the camera to your computer Step 3 Downloading images video clips CPU OS Memory Free Space on Hard Disk Required Devices Color Monitor System Requirements Windows Pentium 166 MHz processor or higher Windows 98 98SE Me 2000 XP 32MB 64MB RAM recommended 128 MB hard disk space A CD ROM Drive An Available USB Port Color Monitor 800x600 24 bit or higher ...

Page 44: ...to complete the installation After the USB driver installation is complete restart your computer Installing the USB Driver on Macintosh Computers Mac OS 8 6 users must install a USB driver For Mac OS 9 0 or higher version the computer will automatically recognize the camera and load its own USB drivers 1 Insert the CD ROM packaged with the camera into your CD ROM drive 2 Select and double click Di...

Page 45: ...emovable disk untitled disk on a Macintosh to your computer hard driver For Computers Running Windows Open the removable disk by double clicking on it Double click on the folder that contains your recorded images video clips Select the images video clips that you prefer and then choose Copy from the Edit menu After that open the destination location and choose Paste from the Edit menu For Computer...

Page 46: ...ng program To Install PhotoSuite 1 Insert the CD ROM packaged with the camera into the CD ROM drive The welcome screen appears 2 Click Install PhotoSuite Follow the on screen instructions to complete the installation For information on how to use PhotoSuite to edit and retouch your recorded images please refer to its online help For Windows 2000 XP users make sure to install and use the PhotoSuite...

Page 47: ... to create spectacular 3600 panoramic images please refer to its online help For Windows 2000 XP users make sure to install and use the PhotoVista while logged in as a user with an Administrator account For Windows XP users which OS version does not include Service Pack 1 or higher be sure to link to http java sun com getjava download html first and download the Java Virtual Machine installation F...

Page 48: ...hen a photograph is taken The higher the ISO sensitivity value the greater sensitivity but the greater the noise With a higher sensitivity selected bright photographs can be taken with less light AUTO 200 ISO70 to ISO200 Automatic AUTO 400 ISO70 to ISO400 Automatic ISO70 Equivalent to ISO70 ISO100 Equivalent to ISO100 ISO200 High sensitive photography equivalent to ISO200 ISO400 High sensitive pho...

Page 49: ...nd press the button 2 Select one of COLOR CONTRAST or SHARPNESS with the button and press the button 3 Select the setting item with the button and press the button COLOR NORMAL Color VIVID Bright colors MONOCHROME Black and white SEPIA Sepia CONTRAST NORMAL Automatic HARD Increases the contrast SOFT Decreases the contrast SHARPNESS NORMAL Leaves the image detail as captured HARD Sharpens the edges...

Page 50: ...nd press the button 2 Select PREVIEW DISPLAY SETTINGS with the button and press the button 3 Select the item with the button and press the button PREVIEW ON Displays images OFF Does no display images DISPLAY SETTINGS AUTO Set the simple display ON Displays the photography tab menu LCD BRIGHTNESS This option adjusts the brightness of the LCD monitor button Darkens the display button Lightens the di...

Page 51: ...ing is completed and the screen returns to the manual record menu 5 To exit the manual record menu press the menu button ISO Refer to ISO in Record menu DIGITAL ZOOM Refer to DIGITAL ZOOM in Record menu QUALITY SETTING Refer to QUALITY SETTING in Record menu CREATE FOLDER Refer to CREATE FOLDER in Record menu PICTURE Refer to PICTURE in Record menu DISPLAY SETTINGS Refer to DISPLAY SETTINGS in Rec...

Page 52: ...manual titled DPOF Settings for further detail SLIDE SHOW Your camera can display your images sequentially as a slide show Refer to section in this manual titled Slide Show Display for further detail RESIZE Change the size of image to 320x 240 pixels or 160x120 pixels to create a different image 1 Select RESIZE with the button from the playback menu and press the button 2 Select the image with the...

Page 53: ...53 DISPLAY SETTINGS Refer to DISPLAY SETTINGS in Record menu LCD BRIGHTNESS Refer to LCD BRIGHTNESS in Record menu ...

Page 54: ...is completed and the screen returns to the movie menu 5 To exit the movie menu press the menu button ISO Refer to ISO in Record menu DIGITAL ZOOM Refer to DIGITAL ZOOM in Record menu QUALITY SETTING Refer to QUALITY SETTING in Record menu CREATE FOLDER Refer to CREATE FOLDER in Record menu PICTURE Refer to PICTURE in Record menu DISPLAY SETTINGS Refer to DISPLAY SETTINGS in Record menu LCD BRIGHTN...

Page 55: ...elect OFF or SELECT in the tab menu with the button and press the OK button OFF The beep is disabled in any operation SELECT The beep is enabled in any operation If you selected SELECT proceed to step 3 If you selected OFF press the button to return to the setup menu 3 Select the item with the button and press the button OPERATION Sets the beep when some kind of operation has been performed SHUTTE...

Page 56: ...vided languages are ENGLISH Français Deutsch Español VIDEO OUT Set the video output format for displaying recorded images on a television NTSC Select this standard when located in the U S A Canada Japan Korea Taiwan Central America or Mexico PAL Select this standard when located in Australia Belgium China Denmark Finland Germany Great Britain Holland Italy Kuwait Malaysia New Zealand Singapore Spa...

Page 57: ...57 CONNECTING YOUR CAMERA TO OTHER DEVICES USB Cable Notebook Computer TV PCMCIA Adapter SD Card Reader SD Card Reader VIDEO Cable SD Memory Card Printer ...

Page 58: ...light Cloud Fluorescent light 1 Fluorescent light 2 Incandescent Lamp Preset 1 Preset 2 Sensitivity Automatic setting ISO70 100 200 400 70 to 200 70 to 400 Manual setting ISO70 100 200 400 Compressed format JPEG Standards JPEG EXIF 2 2 DPOF 1 0 DCF1 1 AVI Interface AV terminal USB connector VIDEO OUT jack NTSC or PAL MIC external microphone IN terminal compatible mike ø3 5 mini plug monophonic out...

Reviews: