background image

Replacing Consumable Parts

3

Maintenance

85

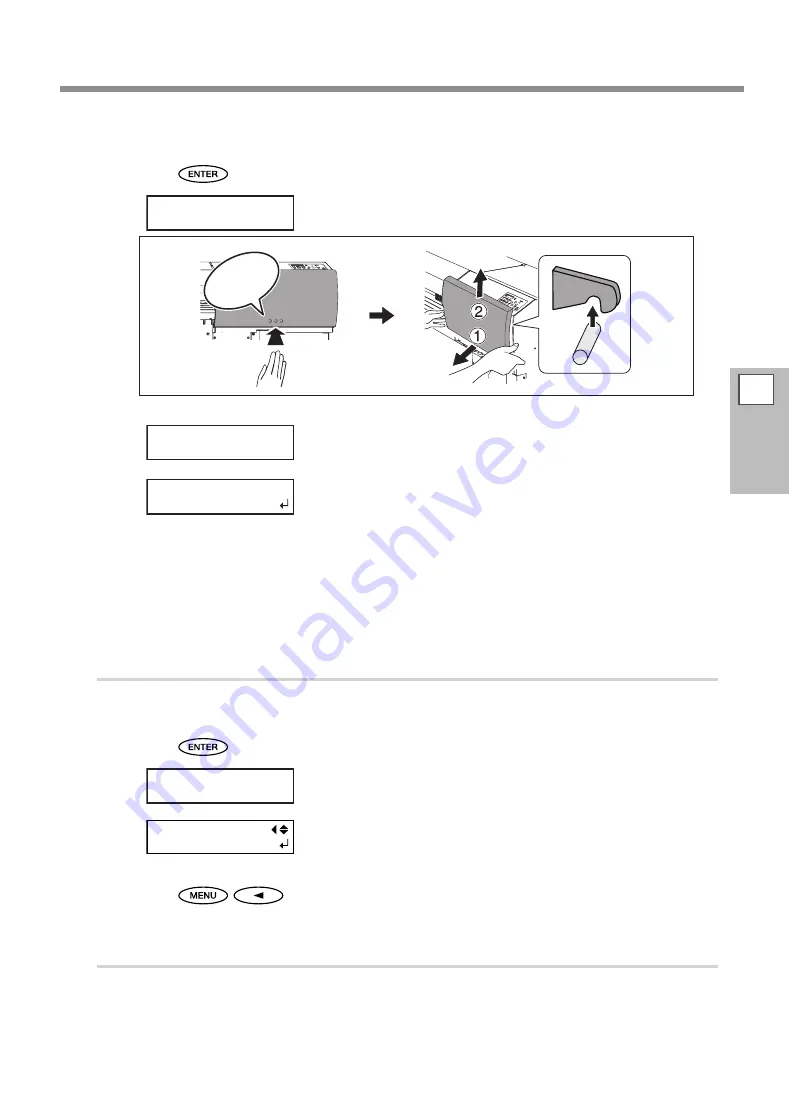
Close the front cover.

Press 

.

Close the cover R.

Open the cover R.

Preparations are complete when this screen appears.

Open the front cover.

Clean the second felt wiper.

The replacement procedure is same as the one for the first felt wiper. Refer to the illustration shown in 

step 

.

3.

Quit the [REPLACE FELT] menu.

Close the front cover.

Press 

.

Close the cover R.

After the process to quit the wiper replacement menu, the screen 
shown in the figure appears.

Press 

in this order to go back to the original screen.

4.

Perform a printing test to verify the results of the procedure.

Perform a printing test to check the result.

 P. 53, "Printing Tests and Normal Cleaning"

CLOSE  COVER  R

Clic

k!

OPEN  COVER  R

FINISHED?

CLOSE  COVER  R

MAINTENANCE

REPLACE  WIPER

Summary of Contents for soljet pro4 xf 640

Page 1: ...and the specifications of this product are subject to change without notice The documentation and the product have been prepared and tested as much as possible If you find any misprint or error please inform us Roland DG Corp assumes no responsibility for any direct or indirect loss or damage which may occur through use of this product regardless of any failure to perform on the part of this produ...

Page 2: ...re You have the right to acquire modify and distribute the source code for this GPL LGPL software You can obtain the GPL LGPL source code used in this product by downloading it from the following website URL http www rolanddg com gpl Roland DG Corp has licensed the MMP technology from the TPL Group ...

Page 3: ...ection of the equipment grounding conductor can result in a risk of electric shock The conductor with in sulation having an outer surface that is green with or without yellow stripes is the equipment grounding conductor If re pair or replacement of the electric cord or plug is necessary do not connect the equipment grounding conductor to a live terminal Check with a qualified electrician or servic...

Page 4: ...40 Performing the Initial Adjustment Correcting for Misalignment in Bidirectional Printing More Precisely 44 Setup of Media 46 About Media Setting menu 46 Setup of Media Media Setting menu 46 Outputting 52 Setting the Output start Location 52 Printing Tests and Normal Cleaning 53 Getting Ready to Receive Data from a Computer 55 Starting Output 57 Pausing and Canceling Output 58 Cutting Off the Med...

Page 5: ... Saved Preset 93 Automatic Loading of a Saved Preset When Media is Loaded 94 Fully Utilize the Media Heating System 95 What Is the Media Heating System 95 Making the Temperature Setting for the Media Heating System 96 Control of Media Heating System during Preheating 97 Drying the Trailing Edge of the Printing Area on the Dryer 98 Setting the Drying Time after Printing 99 Using an Optional Dryer 9...

Page 6: ...nit Doesn t Run 122 The Media Heating System Doesn t Warm Up 123 Cannot Cut Off The Media 124 Attractive Printing is Impossible 125 Printed Results Are Coarse or Contain Horizontal Stripes 125 Colors Are Unstable or Uneven 126 The Media Becomes Soiled When Printed 127 Media Jam Occurs 128 The Media Jams 128 Media Feed is Not Smooth 129 Media Wrinkles or Shrinks 129 Media Feed Is Not Straight 130 M...

Page 7: ...art Names and Functions 6 Printer Unit 6 Operation Panel 8 Menu List 9 Main Menu 9 Language and Unit Menu 12 Cleaning Menu 12 Heater Configuration Menu 12 To Ensure Safe Use 13 Pour utiliser en toute sécurité 20 Important Notes on Handling and Use 28 5 ...

Page 8: ...This flashes yellow while data is being received from the network Loading lever front You operate this when you load media Loading lever rear You operate this when you load media Drain bottle Shaft Media holder Cover L You remove this when you perform maintenance Cover R You remove this whenyouperform maintenance Front cover Keep this closed except when necessary during when loading media Ink cart...

Page 9: ...ront of the machine Platen This is the path over which the me dia passes A suction fan that keeps the media from coming loose and print heater that helps fix the ink are built in Apron This has a built in dry er to speed up drying of the ink Knife guide Theseparatingknifepass es through this when you perform media cutoff Pinch rollers These clamp the media when the loading lever is pulled down ...

Page 10: ...uring warm up then re mains steadily lighted when the preset temperature is reached SHEET CUT key Holding this down for one second or longer cuts off media PAUSE key This pauses printing operation This lights up when operation is paused SETUP key You press this when you load media This lights up when media is loaded and the machine is ready to perform output BASE POINT key You use this when you wa...

Page 11: ...SABLE DISABLE MENU ADJUST BI DIR ADJUST BI DIR SIMPLE SETTING ADJUST BI DIR DETAIL SETTING ADJUST BI DIR TEST PRINT SIMPLE SETTING 2 1 DETAIL SETTING SETTING NO 1 DETAIL SETTING TEST PRINT To DETAIL SETTING To TEST PRINT To SETTING NO 8 To TEST PRINT MENU CALIBRATION CALIBRATION SETTING CALIBRATION TEST PRINT SETTING 0 10 0 10 To SETTING To TEST PRINT DETAIL SETTING SETTING NO 4 H2 H1 0 0 H2 H1 0 ...

Page 12: ... SET SCAN INTERVAL OFF 1 0 sec SUB MENU MEDIA RELEASE MEDIA RELEASE DISABLE ENABLE SUB MENU SLEEP SUB MENU SYSTEM REPORT SLEEP INTERVAL SUB MENU FACTORY DEFAULT INTERVAL 15 min 15 min SUB MENU INK CONTROL INK CONTROL EMPTY MODE INK CONTROL PUMP UP INK CONTROL HEAD WASH INK CONTROL INK RENEWAL INK CONTROL LIGHT CHOKE CL SHEET TYPE OPAQUE OPAQUE SHEET TYPE 1625mm 1625mm SHEET POS SAVE SHEET POS CANC...

Page 13: ...DDR 255 255 255 255 NETWORK GATEWAY ADDR MAC ADDRESS 000086148C5F NETWORK MAC ADDRESS IP ADDRESS 255 255 255 255 IP ADDRESS 255 255 255 255 To MAC ADDRESS To IP ADDRESS NETWORK IP ADDRESS To NETWORK HEATER MENU FEED FOR DRY HEATER MENU OPTION DRYER HEATER MENU BLOWER FAN MENU HEATER MENU HEATER MENU PREHEATING To DRYING TIME FEED FOR DRY DISABLE ENABLE PREHEATING 30 C MENU HEATER MENU DRYING TIME ...

Page 14: ...ly Language and Unit Menu Cleaning Menu Heater Configuration Menu MENU LANGUAGE ENGLISH LENGTH UNIT mm INCH TEMP UNIT C F Hold down and switch on the sub power CLEANING NORMAL CL CLEANING MEDIUM CL To POWERFUL CL To NORMAL CL CLEANING POWERFUL CL Press NORMAL CL A B _ MEDIUM CL A B _ PRE 40 PRINT 40 DRY 50 Press PRE 40 40 40 PRINT 40 40 40 DRYER 50 50 50 ...

Page 15: ...used with respect to the home and all its furnishings as well to domestic animals or pets About the Symbols The symbol alerts the user to important instructions or warnings The specific meaning of the symbol is determined by the design contained within the triangle The symbol at left means danger of electrocution The symbol alerts the user to items that must never be carried out are forbidden The ...

Page 16: ...nte nance or attachment or detachment of optional items disconnect the power cord Attempting such operations while the machine is connected to a power source may result in injury or electrical shock CAUTION Exercise caution to avoid being pinched or becoming caught Inadvertent contact with certain areas may cause the hand or fingers to be pinched or become caught Use care when performing operation...

Page 17: ...ire Ratings WARNING Handle the power cord plug and electri cal outlet correctly and with care Never use any article that is damaged Using a damaged article may result in fire or electrical shock When using an extension cord or power strip use one that adequately satisfies the machine s ratings for voltage fre quency and current Use of multiple electrical loads on a single electrical outlet or of a...

Page 18: ...otes About The Power Cord Plug and Electrical Outlet Never place any object on top or subject to damage Never bend or twist with undue force Never pull with undue force Never bundle bind or roll up Never allow to get wet Never make hot Dust may cause fire ...

Page 19: ...ately seek treatment by a physi cian Forcibly inducing vomiting may lead to danger of choking If odor leads to physical distress move to a well ventilated location and rest quietly If dizzi ness or nausea persists seek treatment by a physician WARNING Keep open flame away from the work area Ink and discharged fluid are flammable Never store ink cleaning liquid or dis charged fluid in any of the fo...

Page 20: ...g crushing of the appendages or the body When storing roll media implement adequate safety measures to ensure that the stored media will not roll fall or topple over Danger exists of becoming pinned under the media and suffering serious injury Handling roll media is an operation that must be performed by two persons or more and care must be taken to prevent falls Attempting to lift heavy media in ...

Page 21: ...over move at high speed and pose a hazard Never insert the hand or fingers into the gap Caution Pinching Hazard Be careful not to allow the fingers to become pinched when closing covers Ink Is Toxic Ink and discharged fluid are toxic Avoid contact with the body Use only in a well ventilated area Flammable Ink and discharged fluid are flammable Keep away from open flame Caution High Temperature The...

Page 22: ...u tout autre effet indésirable sur la maison tous les meubles et même les animaux domestiques À propos des symboles Le symbole attire l attention de l utilisateur sur les instructions importantes ou les avertissements Le sens précis du symbole est déterminé par le dessin à l intérieur du triangle Le symbole à gauche signifie danger d électrocution Le symbole avertit l utilisateur de ce qu il ne do...

Page 23: ... blessures ou un incendie Utiliser uniquement des accessoires d origine accessoires en option articles consommables câble d alimentation et autres articles semblables compatibles avec l appareil Les articles incompatibles risquent de causer des accidents PRUDENCE Faire preuve de prudence pour éviter l écrasement ou le coincement La main ou les doigts peuvent être écrasés ou coincés s ils entrent e...

Page 24: ...des pièces de monnaie ou des allumettes ou le déverse ment de liquides dans les orifices de ventila tion peuvent causer un incendie ou un choc électrique Si un objet ou du liquide s infiltre dans l appareil débrancher immédiatement le câble d alimentation et communiquer avec le représentant Roland DG Corp autorisé Caractéristiques PRUDENCE Utiliser l appareil dans un endroit propre et bien éclairé...

Page 25: ...s électriques sur une prise unique ou une longue rallonge peut causer un incendie Mise à la terre La mise à la terre peut prévenir un incendie ou un choc électrique dus à une fuite de courant en cas de défaillance Placer l appareil de façon à ce que la fiche soit facile d accès en tout temps Ainsi l appareil pourra être débranché rap idement en cas d urgence Installer l appareil près d une prise é...

Page 26: ... le câble sur la fiche ou sur la prise car cela risque de les endommager Ne jamais plier ni tordre le câble avec une force excessive Ne jamais tirer sur le câble ou la fiche avec une force excessive Ne jamais plier ni enrouler le câble Ne jamais laisser l eau toucher le câble la fiche ou la prise Ne jamais chauffer le câble la fiche ou la prise La poussière peut causer un incendie ...

Page 27: ...nt l aide d un médecin Provoquer le vomissement peut créer un risque de suffocation Si l odeur cause un trouble physique amener la personne dans un endroit bien aéré et la faire se reposer Si l étourdissement ou la nausée persistent consulter un médecin ATTENTION Ne pas approcher une flamme nue de l espace de travail L encre et les liquides usés sont inflam mables Ne jamais entreposer d encre de l...

Page 28: ...dre les mesures de sécurité adé quates pour l entreposage des rouleaux de support pour s assurer qu ils ne rouleront pas ne tomberont pas et ne se renverseront pas Il y a risque d être écrasé par le support et de subir des blessures graves La manutention du support en rouleau doit être faite par deux personnes ou plus et il faut prendre des précautions pour éviter les chutes Tenter de soulever des...

Page 29: ...esse et représentent un danger Ne jamais insérer la main ou les doigts dans l ouverture Attention Risque de pincement Faire attention de ne pas coincer les doigts pendant le chargement du support ou lors de la fermeture du couvercle L encre est toxique L encre et les liquides usés sont toxiques Éviter tout contact avec le corps Utiliser uniquement dans un endroit bien aéré Inflammable L encre et l...

Page 30: ...use damage The print heads may be damaged if allowed to dry out The machine prevents desiccation automatically but improper operation may render this feature inoperative Operate properly as specified in this manual Never allow the machine to stand with an ink cartridge removed Remaining ink in the printer may harden and clog the print heads The print heads are components that wear out Periodic rep...

Page 31: ...d cause the ink to leak Never attempt to disassemble Never attempt to refill the ink If ink gets on your hands or clothing wash it off as soon as possible Removal may become difficult if allowed to stand Storage ECO SOL MAX 2 Store unopened in a well ventilated location at a temperature of 20 to 40 C 4 to 104 F ECO SOL MAX 3 Store ink cartridges with their seals intact and in a well ventilated loc...

Page 32: ...30 ...

Page 33: ...ia 40 Performing the Initial Adjustment Correcting for Misalignment in Bidirectional Printing More Precisely 44 Setup of Media 46 About Media Setting menu 46 Setup of Media Media Setting menu 46 Outputting 52 Setting the Output start Location 52 Printing Tests and Normal Cleaning 53 Getting Ready to Receive Data from a Computer 55 Starting Output 57 Pausing and Canceling Output 58 Cutting Off the ...

Page 34: ...tory printing quality is obtained Size Width For both roll media and sheet media 259 to 1 625 mm 10 2 to 64 inches Maximum media including backing paper thickness For both roll media and sheet media 1 0 mm 39 mil Roll outer diameter 210 mm 8 2 inches Paper tube core inner diameter 76 2 mm 3 inches or 50 8 mm 2 inches Note To use 2 inches media the optional media flanges are required For informatio...

Page 35: ...ine is provided with a power saving feature that switches to a low power sleep mode when a fixed interval passes with no operation The factory default for the time after which the machine switches to the sleep mode is 30 minutes When the machine is in the sleep mode the sub power switch flashes slowly Using the operation panel or performing operations such as sending output data from the computer ...

Page 36: ...he weight and tip over or cause the media to fall 1 Install the media to the media holder Note The media holder of this machine is exclusive use for the media of paper tube core inner diameter 3 inches To use 2 inches media the optional media flanges are required For information about optional items contact your authorized Roland DG Corp dealer Open the front cover Loosen the retaining screws of t...

Page 37: ...ent the media from easy loose Media holder Left End cap End cap Insert the clip Pull out the clip If it is difficult to pull out use a pair of pliers or other such tool Media flanges for paper tube inner diameter 2 inches Line up the ridg es and grooves Media holder Right How to use the media flanges for the paper tube inner diameter 2 inches Themediaflangesforthepapertubeinnerdiameter2inchesareop...

Page 38: ...the one specified The media may fall from the media holder resulting in injury Secure the media holder by tightening the securing screws slightly The retaining screw may get damaged if tightened excessively Decide the left and right side positions of the media finally at this step After this procedure is completed if the left and right side positions do not fit the proper position when securing th...

Page 39: ...d secure the media Pass the leading edge of the media between the pinch rollers and the grit rollers Down the loading lever rear The media is held in place While lightly pressing down the media raise the loading lever front The media is released Grit roller Pinch roller Media ...

Page 40: ... out being sure to keep it straight and all areas of the media to be taut Confirm that the right edge of the media is aligned with the guideline If you want to readjust the media position at this step go back to the procedure 1 and redo the procedure 1 Printing quality is affected due to skew media feed if you hold the media only to readjust the position forcibly Guideline Platen ...

Page 41: ...he print head carriage moves and detects the width of media This operation is called initialization When initialization ends remains steadily lighted and the printable width is displayed on the display screen This completes loading of the media Remove roll media when not in use If roll media is allowed to stand unused in a loaded state for an extended period the media may sag This can cause poor p...

Page 42: ...ove the media holders to the left and right Move them to a location where they don t disturb the media when the media is hung down from the rear of the machine If they disturb the media remove them with the shafts For information on how to remove refer to Setup Guide Loosen Front cover Loosen ...

Page 43: ...eading edge of the media between the pinch rollers and the grit rollers Down the loading lever rear The media is held in place While lightly pressing down the media raise the loading lever front The media is released Grit roller Pinch roller Media ...

Page 44: ...the right edge of the media with the guide line and align the front edge with the location shown in the figure If the front edge of the media is cut at an angle load the media so that its right edge is lined up straight with the guide line Down the loading lever front The media is held in place Align here Guide line ...

Page 45: ...ns taking care not to let the left and right clamps get mixed up Close the front cover Press The print head carriage moves and detects the width of media This operation is called initialization When initialization ends remains steadily lighted and the printable width is displayed on the display screen This completes loading of the media Align the cen ters of the holes with the both edges of the me...

Page 46: ... is performed for misalignment in bidirectional printing P 101 Correcting for Misalignment in Bidirectional Printing 1 Print a test pattern Press Press several times to display the screen shown on the left Press and then Press Press A test pattern is printed When printing ends then press 2 Read the correction values from the test pattern Choose the value that produces the least misalignment of 2 l...

Page 47: ...r H1 Press to select the correction value Select the values that you read at the step 2 for correction values When correction value settings end press This completes SETTING NO 1 Subsequently press and set the correction values for SETTING NO 2 to SETTING NO 4 in the same manner Press in this order to go back to the original screen DETAIL SETTING SETTING NO 1 ...

Page 48: ...asic settings as the preset you can do fine adjustment according to need The items set through the Media Setting menu can be also set individually Setup of Media Media Setting menu Note If any setting is not needed for each setting item you can go to the next menu by selecting NEXT 1 Starting the Media Setting menu Load media Check that no sagging is found on the media If any sagging exists the fo...

Page 49: ...ection the buzzer sounds twice and to the Low direction the buzzer sounds once Close the front cover For the individual setting method of this setting item and the description refer to P 103 Adjusting the Print Head Height to Match Media Thickness DRYER 40 50 C C To cancel the setting Procedure Press during the setting Press to select YES Press The screen returns to the screen shown at the left By...

Page 50: ...ress to enable the setting For the individual setting method of this setting item and the description refer to P 102 Alleviating Hori zontal Bands feed correction function Feed direction means the feed direction of the media Perform the correction suitable for the media in advance because horizontal strips are more likely to occur during printing when the moving distance of the media varies slight...

Page 51: ...setting item and the description refer to P 101 Correcting for Misalignment in Bidirectional Printing This machine prints by the bidirectional mode in which the print heads perform printing during both their outbound pass and return pass This printing method is called Bidirectional Printing This method offers the advantage of being able to shorten output times but subtle misalignment occurs during...

Page 52: ...gain or switch off the main power of this machine FEED FOR DRY DISABLE ENABLE Drying method after printing Set whether the media should be fed until the trailing edge of the printed area is put on the dryer after the 1st page is printed To make sure to dry the entire printed area select ENABLE If DISABLE is selected the trailing edge of the printing area is not fed to the dryer unless you continue...

Page 53: ...aracters Press to move the next character Select the following characters in the same way You can enter up to 15 characters Press to enable the setting For the individual setting method of this setting item and the description refer to P 92 Fully Utilizing Preset Function This completes the operation of the Media Setting menu SAVE NAME1 SET NAME COMPLETED ...

Page 54: ...rt location in the vertical feed direction by moving the media with the press of Set the output start location in the horizontal scan direction by moving the print heads with the press of When a cursor key is pressed preparations for moving the print heads are started When the preparations are finished move the print heads Note however that the left and right positions are not restored to their de...

Page 55: ...l Cleaning Before you carry out actual printing we recommend performing a printing test to ensure no dot drop out occurs If dot drop out occurs perform cleaning of the print heads Normal Cleaning How to Perform a Printing Test Procedure Setting the Output start Location P 52 Setting the Output start Location W1100mm B Horizontal scan direction start location Vertical feed direction start location ...

Page 56: ...choose the group of print heads that is not to be cleaned Press to get rid of the group display Repeat this procedure to display the groups of only the print heads that require cleaning Only groups that is either A or B is displayed are objective for cleaning CLEANING NORMAL CL NORMAL CL A B _ If the printing test results are difficult to interpret Examine the results from different angles in a we...

Page 57: ...erentmethod P 68 When Normal Cleaning Is Not Effective When You Want to Clean All Print Heads Simultaneously Hold down for one second or longer Cleaning for all print heads starts automatically Getting Ready to Receive Data from a Computer When P 34 Loading Media and P 55 Getting Ready to Receive Data from a Computer are completed get ready to receive the data from a computer CAUTION Never touch t...

Page 58: ...does not operate Never open a cover front L R while output is in progress Doing so will interrupt printing Data from the computer is not accepted when is dark Printing does not start until lights up If the print heater and dryer are set to OFF printing is possible even if is not lit Data from the computer is not accepted when you are not at the top menu Top menu Steadily lighted Flashing Steadily ...

Page 59: ... to set the media clamps during printing Otherwise the edges of the media may warp and catch on the print heads During output never touch the media that s already been discharged Doing so may obstruct media feed or cause the media to rub against the print heads which may result in a paper jam or damage to the print heads Keep the loading lever raised when the machine is not in use If ink runs out ...

Page 60: ...ng When the screen shown in the figure appears hold down for one second or longer This cancels printing operation Stop sending the output data from the computer Cutting Off the Media Procedure Close the front cover Make sure lights up Hold down for one second or longer The media is cut off When the media clamps are attached the screen shown in the figure appears Open the front cover remove the rig...

Page 61: ...ps are present on the machine when the setting to execute automatic cutoff of the media is made on the computer the media clamps are detected and no cutoff operation is performed Before you re performing cutoff never use to pull the media back Unless the end of the media has been pulled out to a location to the front of the platen cutoff may not be performed smoothly Give attention to media compos...

Page 62: ... if the power is not turned off Leave the main power switched on at all times Neverswitchoffthemainpower Byswitchingonthemainpower theautomaticmaintenancefunction is carried out periodically If the automatic maintenance is not carried out it may result in breakdown of this machine such as breakdown of the print heads Never switch off the main power or unplug the power cord suddenly while operation...

Page 63: ...ht Choke Cleaning 70 Manual Cleaning of Print Heads 71 When Manual Cleaning Becomes Necessary 71 Manual Cleaning 72 When Problems Such As Dot Drop out are Not Cleared Up 78 When Problems Such As Dot Drop out are Not Cleared Up 78 Replacing Consumable Parts 80 Replacing the Wipers 80 Replacing the Felt Wipers 83 Replacing the Separating Knife 86 When Not in Use for a Prolonged Period 88 Keep Perfor...

Page 64: ... indicates the amount of ink remaining When there are more the amount of ink remaining is larger NOTE The display shows an approximate guide to the amount of remaining ink It may differ somewhat from the actual amount remaining Press in this order to go back to the original screen MENU INK REMAINING 1 2 3 4 5 6 7 8 The number of cartridge slots Amount of ink remaining Much Little ...

Page 65: ...e a health hazard 1 2 3 4 5 Important notes on replacing cartridges Insert and remove slowly one at a time Be sure to replace with an item of identical type Never use an ink cartridge which has already been used in other machines even if it is of the identical type Never mix items of different types Never allow the machine to stand with an ink cartridge removed The print heads may become clogged N...

Page 66: ... appears press Press Press several times until the screen shown on the left appears Press and then Press and then Press When the screen shown on the left appears detach the bottle discard the discharged fluid to empty it CAUTION Before you detach the drain bottle be sure to wait for the screen to display EMPTY DRAIN BOTTLE Failing to follow this procedure may cause discharged fluid to flow out of ...

Page 67: ... or in a durable sealed container such as a metal can or polyethylene tank and cap tightly Any spillage or vapor leakage make cause fire odor or physical distress Dispose discharged fluid properly in accordance with the laws in effect in your local Discharged fluid is flammable and contains toxic ingredients Never attempt to incinerate discharged fluid or discard it with ordinary trash Also do not...

Page 68: ...likely to get a buildup of grime Clean by wiping with a cloth moistened by neutral detergent diluted with water then wrung dry Thismachineisaprecisiondevice andissensitivetodustanddirt Performcleaningonadailybasis Never attempt to oil or lubricate the machine Roller of the separating knife Paper dust is likely to deposit on this roller Wipe the roller regularly Failure to clean properly may result...

Page 69: ...ing ECO SOL MAX 3 Ink Cleaning timing Cleaning method Page Remarks Before the start of operations Normal cleaning P 53 Carry out a printing test If dot drop out occurs perform cleaning If the message TIME FOR MAINTENANCE is displayed ap proximately once per week Manual cleaning P 72 TIME FOR MAINTENANCE is displayed approximately once per week but it may be displayed more frequently depend ing on ...

Page 70: ...ing dot drop out are cleaned Press to choose the group of the print heads that is not to be cleaned Press to get rid of the group display Repeat this procedure to display the groups of only the print heads that require cleaning OnlygroupsthatiseitherAorBisdisplayedareobjectiveforcleaning Note however that the medium and powerful cleaning consumes more ink than normal cleaning and too frequent use ...

Page 71: ...e medium cleaning Powerful Cleaning Procedure Press Press to display the left figure Press The screen shown in the figure appears and cleaning starts When it finishes the screen shown in the figure appears again Press in this order to go back to the original screen When powerful cleaning is not effective When the problems such as dot drop out are not cleared up even by performing powerful cleaning...

Page 72: ...ck to the original screen If the output color is still unstable after the light choke cleaning contact your authorized Roland DG Corp dealer Light choke cleaning consumes ink as much as powerful cleaning does Performing light choke cleaning frequently may damage the print heads themselves Avoid using it more than necessary MENU SUB MENU SUB MENU INK CONTROL INK CONTROL LIGHT CHOKE CL INK CONTROL L...

Page 73: ...aning functions such as the normal cleaning For your information replacement of the wiper or felt wiper is also effective to improve the symptoms P 80 Replacing the Wipers P 83 Replacing the Felt Wipers Dot drop out Ink drips Dragging dirt Flaws in the dot pattern are caused by dust on the print heads Ink that has adhered to dirty or dusty print heads drips onto the media When dirt or dust accumu ...

Page 74: ...abs or other lintpro ducing items may damage the print heads If you use up the cleaning stick purchase a new one from your authorized Roland DG Corp dealer Use one cleaning stick per cleaning session then discard the stick after use Reusing cleaning sticks may reduce printing quality Do not put the cleaning stick used for cleaning into the cleaning liquid It will deteriorate the liquid Never rub t...

Page 75: ...Clean the wipers using the cleaning stick NOTE Clean the two wipers one by one Touch the location shown in the figure to discharge any static electricity Moisten the cleaning stick with the clean ing liquid Clean the first wiper When cleaning is finished press OPEN COVER R Click FINISHED Be sure to clean using one of the included cleaning sticks Area to clean ...

Page 76: ...cover R When the screen shown on the left appears open the cover R Preparations are complete when this screen appears Clean the second wiper When cleaning is finished press Close the Cover R OPEN COVER R Click OPEN COVER R FINISHED CLOSE COVER R Area to clean ...

Page 77: ...he print heads with the cleaning stick Open the cover L Remove the cut rail Press Close the cover L Open the cover L Open the cover R Preparations are complete when this screen appears OPEN COVER L Click REMOVE CUT RAIL CLOSE COVER L Click OPEN COVER L OPEN COVER R FINISHED ...

Page 78: ...clean off by applying cleaning liquid to the cleaning locations and then wiping these locations off with the cleaning stick Only moisten the part indicated with diagonal lines in location A with cleaning liquid on the cleaning stick When cleaning is finished press A Be sure to clean using one of the included cleaning sticks Area to clean While working with the cleaning swab be careful not to touch...

Page 79: ...g starts When it finishes the screen shown in the figure appears again Press in this order to go back to the original screen 5 Perform a printing test to verify the results of the procedure Perform a printing test to check the results Perform cleaning using the machine s cleaning feature several times when necessary P 53 Printing Tests and Normal Cleaning CLOSE COVER L CLOSE COVER R OPEN COVER L R...

Page 80: ...harged fluid might overflows from the drain bottle during the subsequent process Press Press several times until the screen shown on the left appears Press Press twice Press Press several times until the screen shown on the left appears Press Check that the drain bottle is empty and press The screen shown in the figure appears When it finishes the screen shown in the figure appears again Press in ...

Page 81: ...icate mechanism make sure to perform the operation carefully and deliberately Note that this operation is an emergency measure It may damage defect free parts depending on the symptom deteriorating it If you have any questions contact your authorized Roland DG Corp dealer Procedure Moisten the cleaning stick with the cleaning liquid Softly press the cleaning stick to the surface of the print heads...

Page 82: ...AUTION Be sure to perform operations as specified by the following instructions and never touch any area not specified in the instructions Sudden movement of the machine may cause injury 1 Display the REPLACE WIPER menu When the message shown in the figure appears press Remove any media Press Press several times until the screen shown on the left appears Press and then Press and then Press The scr...

Page 83: ...FINISHED Shine a flashlight on the area if it is too dark to see Detaching old wiper Attaching new wiper Tweezers included part Pull up and out Hook Place the inclined end on the back side If the wiper is placed in versely the proper cleaning becomes impossible Detach the hook Hitching the tweezers to the hole on the wiper makes the removal easier Attach the hook Make sure to attach the hook Other...

Page 84: ...wninstep 3 Quit the REPLACE WIPER menu Press Close the cover R After the process to quit the wiper replacement menu the screen shown in the figure appears Press in this order to go back to the original screen 4 Perform a printing test to verify the results of the procedure Perform a printing test to check the result P 53 Printing Tests and Normal Cleaning CLOSE COVER R Click OPEN COVER R FINISHED ...

Page 85: ...p dealer CAUTION Be sure to perform operations as specified by these instructions and never touch any area not specified in the instructions Sudden movement of the machine may cause injury 1 Display the REPLACE FELT menu When the message shown in the figure appears press Remove any media Press Press several times until the screen shown on the left appears Press and then Press Press twice Press The...

Page 86: ...electricity Open the front cover Clean the first felt wiper Click FINISHED Detaching old felt wiper Attaching new felt wiper Tweezers included part Pull up and out Hook Detach the hook Hitching the tweezers to the hole on the wiper makes the removal easier Attach the hook Make sure to attach the hook Otherwise it cases dot drop out or else Hook Shine a flashlight on the area if it is too dark to s...

Page 87: ...to the illustration shown in step 3 Quit the REPLACE FELT menu Close the front cover Press Close the cover R After the process to quit the wiper replacement menu the screen shown in the figure appears Press in this order to go back to the original screen 4 Perform a printing test to verify the results of the procedure Perform a printing test to check the result P 53 Printing Tests and Normal Clean...

Page 88: ...e any media Press Press several times to display the screen shown on the left Press and then Press Press several times to display the screen shown on the left Press The cutting carriage moves to a location where knife replacement possible and then the screen shown in the figure appears Open the front cover Preparations are complete when this screen appears 2 Replace the separating knife Remove the...

Page 89: ...n place by the magnet Slowly insert it into the groove Tighten the screw Take care to ensure that the knife does not slip out of position at this time 3 Quit the REPLACE KNIFE menu Close the front cover Press Press in this order to go back to the original screen Positioning groove Magnet ...

Page 90: ...use the ink to freeze and damage the print heads Alarm Feature This feature is to remind you to switch on the sub power once a month When the machine remains unused for about one month this screen appears and a warning beep sounds If this screen appears switch on the sub power When maintenance operations finish switch off the sub power This feature operates when the printer s main power is turned ...

Page 91: ...ch the emptied drain bottle to the machine once more Press Press Press to go back to the original screen WARNING Never place discharged fluid or ink near an open flame Doing so may cause a fire CAUTION To store discharged fluid temporarily place it in the included drain bottle or in a durable sealed container such as a metal can or polyethylene tank and cap the container tightly Any spillage or va...

Page 92: ...ashing the sub power is automatically switched off You do not need to carry this out as part of your daily maintenance activities Draining Ink Remaining Inside the Machine Procedure Press Press several times until the screen shown on the left appears Press Press twice Press and then Press to enable the setting Description This removes ink inside the printer as a preliminary procedure for performin...

Page 93: ... Unit 100 Fully Utilizing the Correction Function 101 Correcting for Misalignment in Bidirectional Printing 101 Correcting for Misalignment in Bidirectional Printing More Precisely 101 Alleviating Horizontal Bands feed correction function 102 Accommodating to the Types and Condition of Media 103 Adjusting the Print Head Height to Match Media Thickness 103 Using Transparent Media 104 Printing Hard ...

Page 94: ...o enable the setting Press in this order to go back to the original screen Description Usingthe PRESET menuletsyoueasilychangeawidevarietyofsettingstooptimizethemforthemedia Upto eight types of presets can be saved You can assign a name to each one Using media names for these may aid recognition and clarity Making changes for each menu item every time you change the media can be trouble some That ...

Page 95: ...onal Printing More Precisely CALIBRATION P 102 Alleviating Horizontal Bands feed cor rection function SHEET TYPE SHEET WIDTH SHEET POS P 104 Using Transparent Media SCAN INTERVAL P 106 Printing Hard to dry Media VACUUM POWER P 106 Using the Media Easy to be Winkled Hard to be Fed FULL WIDTH S P 107 Speeding Up Output for Narrow Media SIDE MARGIN P 108 Expanding the Printing Area by Reduc ing the M...

Page 96: ... Press in this order to go back to the original screen Description Once ENABLE is selected the screen for loading a preset is always displayed when the media is loaded Follow the procedure given below to use the loaded preset How to Use The Loaded Preset When you press at the end of the media loading process the screen shown in the figure appears When you press the preset displayed in the screen i...

Page 97: ...c gases WARNING Never use media that cannot withstand the heat Doing so may result in fire or the release of toxic gases or may degrade the media WARNING Never use the platen or dryer for any purpose for which they are not intended such as to dry clothing Doing so may cause overheating resulting in fire or accident Use at an ambient temperature of 20 to 32 C 68 to 90 F If the machine is used at an...

Page 98: ...udges raise the temperature Note however that a temperature that is too high may degrade the media or cause it to wrinkle Dryer Wheninkdryingispoor raisethetemperature Note however thatatemperature that is too high may degrade the media or cause it to wrinkle The relationship b e t w e e n t h e print mode and temperature The optimal temperature for the media heating system varies according to suc...

Page 99: ...egiven usethesuggestedsettings Description By default setting simply switching on the power does not make the media heating system warm up to the preset temperature The temperature rises until preset temperature when the media is loaded correctly and lights up You can also make this setting on the software RIP When you have made the setting on the software RIP the software RIP s setting is used NO...

Page 100: ... Press Press to select ENABLE Press to enable the setting Press in this order to go back to the original screen Description ENABLE mediafeedisperformeduntilthetrailingedgeoftheprintingareaispositionedonthedryer The margin between the print end position and the next print start position is set to a value of 125 millimeters When you set the margin bigger than the value above on the software RIP the ...

Page 101: ...ressing while is lighting the interval is finished and the next operation is started When holding on while is lighting output is canceled You can also make this setting on the software RIP When you have made the setting on the software RIP the software RIP s setting is used Default Setting DRYING TIME 0 min Using an Optional Dryer Procedure Hold down and press Press Press several times to display ...

Page 102: ...n Unit Procedure Hold down and press Press Press several times to display the screen shown on the left Press Press to select ENABLE Press to enable the setting Press in this order to go back to the original screen Description This switches the optional blower fan unit ENABLE or DISABLE When using an blower fan unit select ENABLE And you can speed up drying of the ink more Contact your authorized R...

Page 103: ...alignment occurs during the outbound and return passes The procedure to correct this and eliminate misalignment is Bidirectional Correction This misalignment varies according to the print head height and the thickness of the media so we recommend performing correction to match the media you re using Correcting for Misalignment in Bidirectional Printing More Precisely Whenfurthercorrectionisrequire...

Page 104: ...e movement distance becomes discrepant horizontal stripes are more likely to occur during printing We recommend performing correction to match the media you re using and the media heating system Repeat the process of printing a test pattern and entering a correction value several times to find the optimal value You can also make this setting on the software RIP computer by for example choosing the...

Page 105: ...gure appears Press in this order to go back to the original screen Description Depending on the media media may wrinkle or come loose from the platen during printing increasing the chance of contact with the print heads When you are using such media adjust the HEAD HEIGHT to HIGH Printing quality when the HEAD HEIGHT is set to HIGH may be coarser or otherwise lower than when set to LOW If this hap...

Page 106: ...edia width Press to enable the setting Press in this order to go back to the original screen 3 Load transparent media to the printer Refer to P 34 Loading Media 4 Make the setting for the location of the right edge of the media Press Press several times to display the screen shown on the left Press Press twice Press The print heads are moved to the specified position and the screen shown on the le...

Page 107: ... in progress If media runs out while printing is in progress immediately press to quit printing Otherwise there is a chancethattheplatenorthelikemaybecomesoiledbyinkorthatinkmaygetinsideanddamagethemachine Default Setting SHEET TYPE OPAQUE SHEET WIDTH 1625 mm BA SE PO INT BASE POINT If a fixed period of time passes while the setting is in process the menu is forcefully terminated If a fixed period...

Page 108: ...rder to go back to the original screen Description You use this when ink dries poorly even when the media heating system is used You can also make this setting on the software RIP When you have made the setting on the software RIP the software RIP s setting is used and the printer s setting is ignored Default Setting SCAN INTERVAL OFF Using the Media Easy to be Winkled Hard to be Fed Procedure Pre...

Page 109: ...ng on the software RIP When you have made the setting on the software RIP the RIP s setting is used and the printer s setting is ignored Default Setting VACUUM POWER AUTO Speeding Up Output for Narrow Media Procedure Press Press several times to display the screen shown on the left Press Press several times to display the screen shown on the left Press Press to select an item Press to enable the s...

Page 110: ...the left Press Press several times to display the screen shown on the left Press Press to select 5mm Press to enable the setting Press in this order to go back to the original screen Description This makes the setting for distance from the left or right media clamp to the corresponding left or right edge of the printing area You can select either 5 mm 10 mm or 25 mm Setting this to 5 mm lets you e...

Page 111: ...nt starts INTERVAL TIME Automatic cleaning is performed when the cumulative printing time reaches the value you set here Colors may be uneven because printing is paused if the cumulative printing time reaches the value you set during printing Press in this order to go back to the original screen Description In the following cases ink tends to collect on the surface of the print heads Under some co...

Page 112: ...dia may tend to stick to the platen Starting printing with the media sticking to the platen may make normal media feed impossible and cause the media to jam When you re using such media set the MEDIA RELEASE menu item to ENABLE This peels off the media if sticking before starting printing Note however that media feed may be unstable when printing is performed after executing this operation Leave t...

Page 113: ...ks For information on how to make the set ting refer to the documentation for the software RIP you re using The crop marks are printed as shown in the figure Alignment marks and symbols drawn using a graphics program cannot be used as crop marks Crop Mark Align point 3 Crop Mark Align point 1 Crop Mark Base point Crop Mark Align point 2 ...

Page 114: ...e up System Using Media Take up System Note The media take up system hereinafter called take up system is optional part Note For information on how to assemble and install the take up system refer to the user s manual of the take up system ...

Page 115: ...to Verify the Setting for the Amount Remaining Every Time the Media Is Changed 116 Printing the Amount of Remaining Media 117 System Management of Printer 118 Setting for the Menu Language and the Units of Measurement 118 Setting the Interval untilActivation of the Sleep Mode Power Saving Function 118 Viewing Information about the System of This Machine 119 Returning All Settings to Their Initial ...

Page 116: ...Ink Runs Out This lets you change according to your purpose the operation that takes place when an ink cartridge is empty Procedure Press Press several times to display the screen shown on the left Press Press twice Press twice Press to select Press to enable the setting STOP Printing pauses immediately when a cartridge becomes empty CONT continue Printingdoesnotstopwhenacartridgebecomesempty When...

Page 117: ...rrent amount of media remaining Press to enable the setting Press in this order to go back to the original screen Description If you cancel the setup such as by removing the media or raising the loading lever the amount remaining at that time flashes on the screen Because the amount of media remaining is not updated automatically when youchangethemedia redothesettingwheneveryouchangethemedia Youca...

Page 118: ...e setting Ifyousetto ENABLE youmustsetthe SHEETTYPE menuto OPAQUE P 104 Using Transparent Media Press in this order to go back to the original screen Description Setting this menu to ENABLE can keep you from forgetting to redo the setting when you change the media Be sure however also to set the SHEET TYPE menu refer to P 104 Using Transparent Media to OPAQUE When SHEET TYPE is set to CLEAR SHEET ...

Page 119: ...rd of the remaining length of the media now in use Printing the amount of media remaining before you change the media enables you to refer to the printed record and use the value to make the setting for the remaining amount the next time you use the media Note however that continuing by performing the next output starts the output on top of the portion where the amount of remaining media is printe...

Page 120: ...lect to the measurement unit for temperature Press to enable the setting Default Setting MENU LANGUAGE ENGLISH LENGTH UNIT mm TEMP UNIT C Setting the Interval until Activation of the Sleep Mode Power Saving Function Procedure Press Press several times to display the screen shown on the left Press Press several times to display the screen shown on the left Press twice Use to make the setting Press ...

Page 121: ...rsion NETWORK Network setting such as IP address MENU SYSTEM INFO SYSTEM INFO MODEL SYSTEM INFO INK SYSTEM INFO FIRMWARE MENU SYSTEM INFO MODEL xx xxx SYSTEM INFO SERIAL NO SERIAL NO xxxxxxx INK xxxx xxx xxx FIRMWARE Ver x xx To MODEL SYSTEM INFO NETWORK SUBNET MASK xxx xxx xxx xxx SUBNET MASK xxx xxx xxx xxx NETWORK SUBNET MASK GATEWAY ADDR xxx xxx xxx xxx GATEWAY ADDR xxx xxx xxx xxx NETWORK GAT...

Page 122: ...e same as their factory defaults However the settings for MENU LAN GUAGE LENGTH UNIT and TEMP UNIT are not returned to the factory defaults Procedure Press Press several times to display the screen shown on the left Press Press several times to display the screen shown on the left Press to execute MENU SUB MENU SUB MENU FACTORY DEFAULT ...

Page 123: ...rinted Results Are Coarse or Contain Horizontal Stripes 125 Colors Are Unstable or Uneven 126 The Media Becomes Soiled When Printed 127 Media Jam Occurs 128 The Media Jams 128 Media Feed is Not Smooth 129 Media Wrinkles or Shrinks 129 Media Feed Is Not Straight 130 Media Feed Is Not Smooth 130 Print Heads Stop Moving Why 131 What to Do First 131 If the Print Heads Still Do Not Move 131 A Message A...

Page 124: ...isplayed Top menu If the top menu isn t displayed output doesn t start even when data is sent from the computer To go to the top menu press then press P 55 Getting Ready to Receive Data from a Computer Is illuminated When lights up operation is paused To resume press goes dark and output ting resumes P 58 Pausing and Canceling Output Has ink run out When printing data is sent while the screen show...

Page 125: ...mputer must be appropriate Redo the settings checking to ensure that the IP address doesn t conflict with the IP address for another device on the network that the port setting for the software RIP specifies the IP address set on the machine that the settings have no typing errors and for other such problems Setup Guide P 119 Viewing Information about the System of This Machine Did the software RI...

Page 126: ...ng Knife Are the cut rail mounted If the cut rail is not mounted you cannot cut off the media Remove the cut rail before performing the manual cleaning If the cut rail is not installed remove the cover L and then install the cut rail by following the step in P 77 Reattach cover L cover R and quit the manual cleaning menu After installing the cut rail be sure to install the cover L again ...

Page 127: ...ry depending mainly on the thickness of the media Set or select an adjustment value that is suited to the media When further correction is required such as when adjustment made using SIMPLE SETTING does not enhance printing use DETAIL SETTING to make correction P 101 Correcting for Misalignment in Bidirectional Printing P 101 Correcting for Misalignment in Bidirectional Printing More Precisely Is ...

Page 128: ...ly before you install them Is the media wrinkled If the media is wrinkled and comes loose from the platen colors may be uneven or printing quality may suffer P 130 Media Feed Is Not Smooth Was printing paused partway through When printing is paused the coloring at the seam may be altered when printing resumes Avoid pausing print ing By default printing pauses when ink remaining inside the machine ...

Page 129: ...tion The Media Becomes Soiled When Printed Do the print heads contact the media The print head height may be too low Also if the media is not loaded and set up correctly it may wrinkle or come loose and strike the print heads P 103 Adjusting the Print Head Height to Match Media Thickness P 129 Media Feed is Not Smooth Are the print heads dirty The following may cause ink to drip on the media durin...

Page 130: ...R TURN POWER OFF Is the media warped or wrinkled Many factors can cause warping or wrinkling Refer to the following and correct the problem P 130 Media Feed Is Not Smooth Is the print head height too low Try raising the print heads Media may inevitably warp or wrinkle slightly so adjust the print head height to take this into account P 103 Adjusting the Print Head Height to Match Media Thickness ...

Page 131: ... temperature of the media to rise suddenly which may cause the media to shrink or wrinkle during printing Before loading media switch off the sub power and allow the platen to cool P 95 Fully Utilize the Media Heating System Is the temperature of the media heating system too high Set the temperature to suitable values for the type of media P 95 Fully Utilize the Media Heating System Is the tempera...

Page 132: ...media or the shafts strike some other object Make sure the media and the shafts do not touch anything else This may affect output even when feed ap pears to be smooth P 46 Setup of Media Media Setting menu Is the media too thick Media that is too thick may not only cause unstable feed but may scrape the print heads resulting in malfunc tion Never use such media Are the grit rollers dirty Check to ...

Page 133: ...age move to the stand by position inside the cover R it means the operation has ended successfully If the print heads still do not move Try switching off the main power then again switching on the main power followed by the sub power If the Print Heads Still Do Not Move If the print heads still do not move carry out the following emergency response measure then contact your authorized Roland DG Co...

Page 134: ...toppingattheplacewheretheaudibleclickisheard locks the print heads in place Gently apply pressure from the right side to make sure the print heads don t move to the left If the print heads move to the left again move them slowly by applying pressure from the left side and make sure they lock in place ...

Page 135: ...was loaded END OF THE SHEET The trailing edge of the media was detected during operation Press any button on the operation panel to clear the message Load new media CHECK DRAIN BOTTLE This appears when a certain amount of discharged fluid collects in the drain bottle To clear the message press Ifthisscreenappears gotothe DRAINBOTTLE menuanddiscardthedischargedfluidinthebottle P 64 Disposing of Dis...

Page 136: ...aning manually After verifying press If this message is displayed be sure to perform manual cleaning P 72 Manual Cleaning TIME FOR WIPER FELT REPLACE It is time to replace the wiper or felt wiper After verifying press P 80 Replacing the Wipers P 83 Replacing the Felt Wipers ...

Page 137: ...a at least 65 mm 2 6 in To continue performing output without correcting this press At this time the data is output without printing the crop marks To stop output stop sending data from the computer then raise the loading lever Change the size of the data then send the data again There is no limitation in the size of the data in the media feed direction TEMPERATURE IS TOO HIGH C The temperature of...

Page 138: ...d because a problem was found in the data received Operation cannot be continued Check for a problem with the connector cable or the computer and redo the operation from the step of loading the media PINCHROLL ERROR LOWER PINCHROLL was pressed without first lowering the pinch rollers Press any key to clear the error Down the loading lever then press The pinch rollers were raised while was illumina...

Page 139: ...witch on the sub power If the machine is allowed to stand with the error uncorrected the print heads may dry out and become damaged This error may be caused by such factors as a mistake in loading the media a media jam or an operation that pulls the media with excessive force The media has jammed Carefully remove the jammed media The print heads may also be damaged Perform cleaning of the print he...

Page 140: ...138 ...

Page 141: ...ons Printing Area 140 Maximum Area and Margins 140 Maximum Area When Using Crop Marks 141 The Media cutoff Location During Continuous Printing 141 Locations of the Power Rating and Serial Number Labels 142 Specifications 143 139 ...

Page 142: ... amount of margin without change When media has been loaded without installing the media clamps Whenthe SHEET TYPE menuitemissetto CLEAR regardlessofwhetherthemediaclampsarepresent 2 The amount of right margin can be changed by making the setting of base point print start position P 52 Setting the Output start Location Max 24 998 mm Printing coordinates Printing area Front edge of the media 110 mm...

Page 143: ...l to the crop marks The Media cutoff Location During Continuous Printing When a media cutoff command is sent from the computer the cutoff location on the media is as shown in the figure below 12 5 mm 10 mm 12 5 mm 12 5 mm 10 mm 10 mm 12 5 mm 10 mm Maximum area Location where separated Second page 75 mm Margin setting on the computer First page Crop mark Printing area ...

Page 144: ...nd Serial Number Labels Serial Number This is required when you seek mainte nance servicing or support Never peel off the label or let it get dirty Power Rating Use an electrical outlet that meets the requirements for voltage frequency and amperage given here ...

Page 145: ...uring operation 62 dB A or less During standby 45 dB A or less Dimensions with stand 2 750 W x 800 D x 1 295 H mm 108 W x 31 D x 50 H in Weight with stand 177 kg 390 lb Environment Power on 5 Temperature 15 to 32 C 59 to 90 F 20 C 68 F or more recommended humidity 35 to 80 RH non condensing Power off Temperature 5 to 40 C 41 to 104 F humidity 20 to 80 RH non condensing Accessories Exclusive stands...

Page 146: ...Specifications 7 Main Specifications 144 5 Operating environment Use in an operating environment with this range ...

Page 147: ... la raccolta differenziata non buttare nel cestino dei rifiuti casalinghi Este producto debe devolverse al centro de reciclaje más cercano a su domicilio para su correcta eliminación No lo tire a la basura Deite fora separadamente este produto no seu centro de reciclagem local Não o deite fora no seu caixote do lixo Lever dit product in bij een lokaal afvalverzamelpunt NIET met normaal huishoudeli...

Page 148: ......

Page 149: ......

Page 150: ...R4 160524 ...

Reviews: