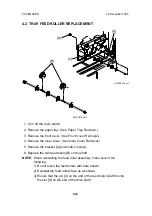
7. Remove the by-pass feed roller [A], as shown.
8. Remove the spring [B].
9. Push the friction pad [C] down and then pull it out.
NOTE: Don’t touch the feed roller with bare hands.
- To reinstall -
1. Reinstall the friction pad, the spring, and the by-pass feed roller.
2. Reinstall the sensor ass’y.
CAUTION: 1) Handle the registration sensor with care.
2) Be sure to reconnect the harnesses.
3. Reinstall the paper end cover.
4. Reinstall the by-pass feed table.
[A]
[B]
[C]
A219R542.wmf
Replacement
Adju
stment
20 December 1996
PAPER FEED
6-33
Summary of Contents for FT 4015
Page 2: ...SECTION 1 OVERALL MACHINE INFORMATION...
Page 14: ...SECTION 2 DETAILED DESCRIPTIONS...
Page 71: ...SECTION 3 INSTALLATION...
Page 90: ...SECTION 4 SERVICE TABLES...
Page 118: ...SECTION 5 PREVENTIVE MAINTENANCE...
Page 126: ...SECTION 6 REPLACEMENT AND ADJUSTMENT...
Page 190: ...SECTION 7 TROUBLESHOOTING...
Page 222: ...SECTION 8 OPTIONS...
Page 223: ...SECTION 9 APPENDIX TIMING CHART...
Page 225: ...COPIER A219 ELECTRICAL COMPONENT LAYOUT 4 2 3 1 5 6 A219S500 wmf...
Page 226: ...10 15 14 13 12 11 9 8 7 18 17 16 A219S501 wmf...
Page 227: ...24 40 23 28 27 26 25 19 20 21 22 29 39 31 32 33 34 35 36 38 37 30 A219S502 wmf...


