background image

4.4 BY-PASS FEED ROLLER AND FRICTION PAD

REPLACEMENT


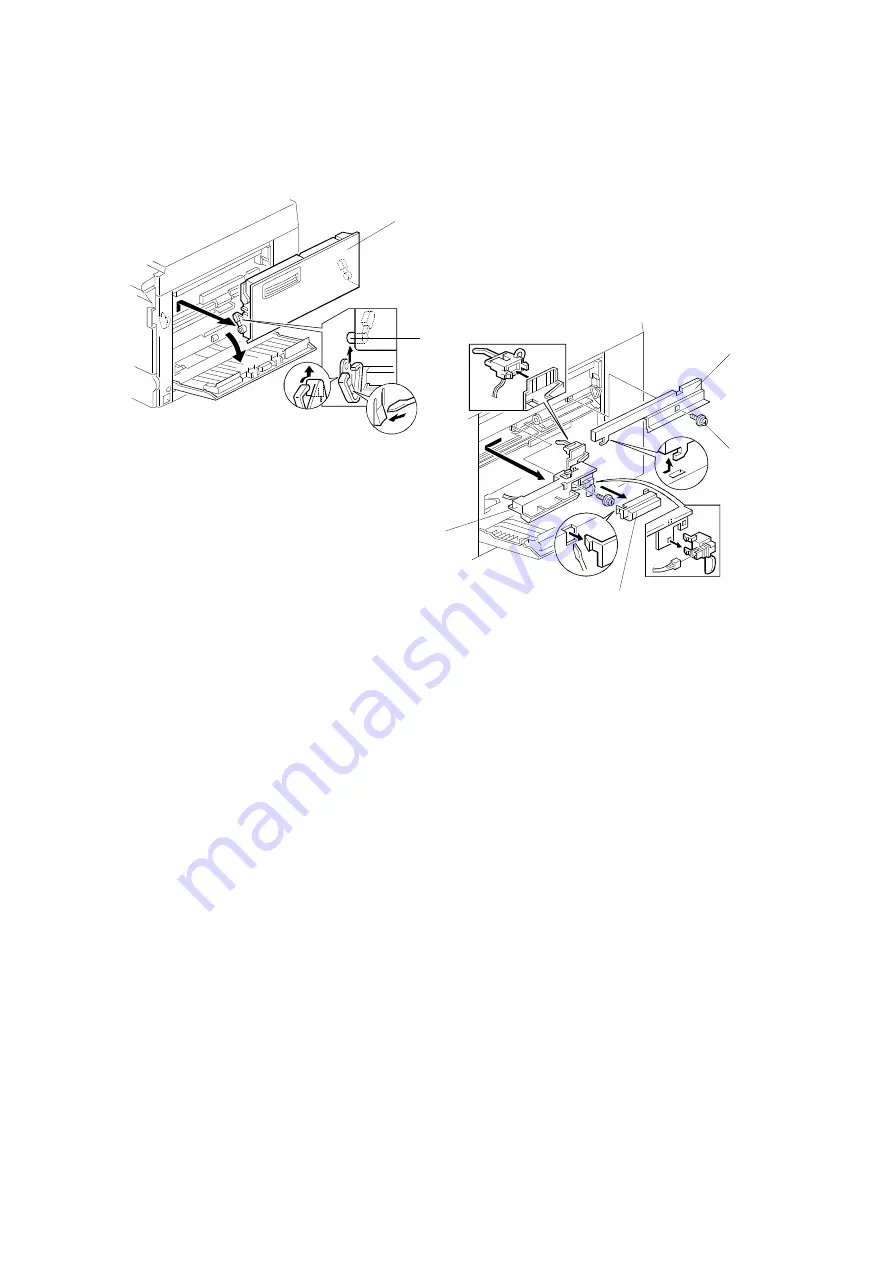
  1. Turn off the main switch and unplug the power supply cord.

  2. Remove the by-pass feed table.

1) Open the by-pass feed table.

2) Slide out the left shaft [A] and the right shaft of the by-pass feed table,

as shown.

3) Remove the by-pass feed table [B].

  3. Remove the screw [C].

  4. Slide the feed roller shaft cover [D] to the right, and remove it (1 screw).

  5. Remove the paper end sensor cover [E] (1 tab).

  6. Remove the sensor ass’y [F] (1 screw and 2 connectors).

NOTE: 1) Be careful not to damage the feeler when removing the sensor

ass’y.

2) When reinstalling the ass’y, ensure that the harness is not

caught on the upper guide.

[A]

[B]

A219R514.wmf

[C]

[D]

[E]

[F]

A219R515.wmf

PAPER FEED

20 December 1996

6-32

Summary of Contents for FT 4015

Page 1: ...r is operating Be careful to avoid touching those components with your bare hands HEALTH SAFETY CONDITIONS 1 Toner and developer are non toxic but if you get either of them in your eyes by accident it...

Page 2: ...SECTION 1 OVERALL MACHINE INFORMATION...

Page 3: ...o 42 lb Reproduction Ratios Zoom From 50 to 200 in 1 steps Copying Speed 15 copies minute A4 8 5 x 11 sideways 9 copies minute A3 11 x 17 Warm up Time 120 V machines Less than 30 seconds at 23 C 230 V...

Page 4: ...More than 15 A for Middle East Power Consumption Dimensions Copier only Full system Maximum 1 4 kW 120 V machines 1 5 kW 120 V machines 0 9 kW 230 V machines 1 0 kW 230 V machines Copy cycle 0 71 kW...

Page 5: ...heater Tray heater Specifications are subject to change without notice Copier only Full system Copying Less than 57 dB Less than 61 dB Full system Copier with document feeder and 10 bin sorter Copier...

Page 6: ...2 COPY PROCESS AROUND THE DRUM 2 6 5 4 7 8 1 3 A219V503 wmf COPY PROCESS AROUND THE DRUM 20 December 1996 1 4...

Page 7: ...riboelectric charge is caused by friction between the carrier and toner particles 5 IMAGE TRANSFER Paper is fed to the drum surface at the proper time so as to align the copy paper and the developed i...

Page 8: ...orona Unit 8 6th Mirror 9 Erase Lamp 10 4th Mirror 11 5th Mirror 12 Toner Bottle Holder 13 By pass Feed Roller 14 By pass Feed Table 15 Relay Rollers 16 Tray Paper Feed Rollers 17 Registration Rollers...

Page 9: ...e Gear 5 Tray Paper Feed Clutch Gear 6 Relay Roller Clutch Gear 7 By pass Paper Feed Clutch 8 Registration Clutch Gear 9 Toner Supply Motor 10 4th 5th Mirror Motor 11 Scanner Drive Motor 1 2 9 8 7 6 5...

Page 10: ...5 PAPER PATH 1 2 3 A219V502 wmf 1 By pass Feed 2 Paper Tray Feed 3 Copy Tray PAPER PATH 20 December 1996 1 8...

Page 11: ...sing unit and blows the ozone built up around the charge corona unit towards the ozone filter 7 Clutches CL1 Tray Paper Feed Clutch Transfers main motor drive to the paper feed roller 14 CL2 By pass P...

Page 12: ...scharge plate 2 PCB3 AC Drive DC Power Supply Board Drives the exposure lamp fusing lamp and main motor Rectifies 30 Vac and 8 Vac input and outputs 5 Vdc and 24 Vdc 3 PCB4 Operation Panel Board Infor...

Page 13: ...mistor Monitors the temperature around the exposure lamp for overheat protection 35 TH2 Optics Thermistor Monitors the temperature around the exposure lamp for overheat protection 19 TR Transformer St...

Page 14: ...SECTION 2 DETAILED DESCRIPTIONS...

Page 15: ...o light Exposure to light greatly increases the conductivity of a photoconductor 3 The amount of charge dissipated is in direct proportion to the intensity of the light That is where stronger light is...

Page 16: ...ransmitted to the drum B through a series of gears a timing belt C and the drum drive shaft D When the imaging unit is installed in the copier the drum drive shaft engages inside the drum s flange E a...

Page 17: ...st the corona unit The exhaust fan C causes a flow of air above and through the charge corona section This prevents an uneven build up of negative ions that can cause uneven image density An ozone fil...

Page 18: ...from the home position The pads move away from the wire when the wire cleaner knob is fully inserted and the pad bracket is pushed back to the home position After copier installation the key operator...

Page 19: ...e charge does not fluctuate and that an even charge is applied to the entire drum surface The grid plate is connected to ground through a zener diode in the high voltage supply unit The grid plate dra...

Page 20: ...ge reduce the image across the page Changes in reproduction ratio down the page are achieved by changing the scanner speed The CPU monitors the temperature around the optics through a thermistor which...

Page 21: ...the scanner is supported by a rod and guide rail Therefore the scanners should be moved by moving the timing belt and never by moving the scanners directly The pulley G drives both the first and seco...

Page 22: ...al distance between the lens and the drum surface The rotation of the lens drive pulley moves the lens back and forth in discrete steps The home position of the lens is detected by a home position sen...

Page 23: ...ith the selected reproduction ratio to provide the proper optical distance between the lens and drum surface The home position of the 4th 5th mirror assembly is detected by a home position sensor D Th...

Page 24: ...Every original in ADS mode the photosensor circuit converts the light intensity to a voltage The detected voltage is amplified and sent to the main board If less light is reflected from the original t...

Page 25: ...ensity Adjustment Factor SP34 Manual Image Density Setting Factor VL Correction 1 Factor SP62 VL Correction 2 Factor Reproduction Ratio Correction Factor NOTE SP34 Image Density Adjustment Factor is a...

Page 26: ...hines or 1 0 V 230 V machines 3 Manual Image Density Setting Factor Depending on the manual image density setting on the operation panel the exposure lamp voltage is changed as shown in the table belo...

Page 27: ...ensates for dust on the lens and mirrors 1 to 3 but is independent of the drum condition The ADS sensor receives the light reflected through the 1st 2nd and 3rd mirrors from the white plate located un...

Page 28: ...o in order to compensate for the change in concentration of light on the drum Magnification Ratio Reproduction Ratio Correction Factor 50 to 61 2 steps 62 to 119 0 120 to 139 2 steps 140 to 159 4 step...

Page 29: ...ions leading edge erase side erase and trail edge erase Trail edge erase begins after the trailing edge of the copy paper therefore the trailing edge of the copy will not be erased In side erase mode...

Page 30: ...e erase combination is changed between platen mode and DF mode in DF mode more of the image is erased at the sides The setting of SP24 must be 0 Blocks On Paper Size Reproduction Ratio None 99 to 200...

Page 31: ...on when the drum has turned 9 mm at the end of scanning about 100 ms The LEDs stay on to erase the leading edge of the latent image in the next copy cycle After the final copy the erase lamps turn of...

Page 32: ...oper to the desired thickness The development roller sleeve continues to turn carrying the developer to the drum E When the developer brush contacts the drum surface the negatively charged areas of th...

Page 33: ...e is transmitted to the development drive shaft B through gears and a timing belt The rotation of the development roller gear is transmitted to the agitator gears C through other gears A B C A219D515...

Page 34: ...toner supplied from the cutout in the toner cartridge holder is mixed with the developer by the 1st agitator The 2nd agitator B rotates to move the developer back from right to left In this way the de...

Page 35: ...ter the copy becomes lighter The method of control depends on whether the image density is manually selected or auto image density is used The development bias voltage applied to the development rolle...

Page 36: ...00 200 200 200 200 240 240 V0 Depends on the setting of SP48 When manual ID level 6 or 7 is selected 40 V is added to the base bias voltage Using SP33 Image Bias Adjustment the base bias voltage can b...

Page 37: ...ensity ADS voltage ratio and the base bias voltage ADS Voltage Ratio Bias Voltage 80 to 100 light 200 V 75 to 79 240 V 70 to 74 280 V 60 to 69 320 V 29 to 59 360 V 0 to 28 dark 380 V ADS Voltage Ratio...

Page 38: ...oltage supply board which applies a high negative voltage to the development roller The development bias is applied whenever the drum is rotating DC DC Converter CN102 7 Drum B Zener Diode Protection...

Page 39: ...from the machine by the curved rail behind the toner bottle holder lever and this pulls out the cap I into the chuck J where it is held The toner end detection system determines when to drive the ton...

Page 40: ...he toner to the opening D then the toner falls down into the development unit There is a notch E on the toner bottle and a roller F located under the toner bottle They both shake the toner bottle to p...

Page 41: ...lity of the developer This in turn is converted to a corresponding voltage The CPU monitors the voltage to control the toner supply mechanism When new developer is installed and SP66 TD Sensor Initial...

Page 42: ...the average is used as the TD sensor value for that detection period The related amount of toner is added by the toner supply motor as described in Toner Supply Amount The TD sensor is monitored for t...

Page 43: ...d with SP30 Detect Supply mode is used If 4 is selected Fixed Supply mode is used Note that when 2 3 or 4 is selected the machine will not perform the toner near end end detection Normally SP30 should...

Page 44: ...l 6 Setting Toner Density Toner Density Adjustment Factor 0 0 Normal 0 1 1 Darker S x 1 2 2 2 Lighter S x 1 2 3 Darkest S 4 Lightest S S TD Sensor Sensitivity SP36 Default Normal The sensor sensitivit...

Page 45: ...r End Level VT VTS 4S 5 10 seconds 7 Toner End Level VT VTS S 10 seconds The toner supply time unit t can be changed using SP31 t SP31 setting x 0 1 second Default 4 0 4 second S TD Sensor Sensitivity...

Page 46: ...y supply is abnormal The CPU changes from the detect supply mode to the fixed supply mode At the same time either the Auto ID indicator or the selected manual ID level starts blinking and the machine...

Page 47: ...anged using SP35 Also the toner supply motor stays on continuously between pages of a multi copy job If a toner sensor voltage lower than VTS 4S 5 is detected twice consecutively while the toner suppl...

Page 48: ...ermittently energized If the TD sensor voltage does not recover from level 7 within 40 seconds the machine stops keeping the toner end condition If the TD sensor voltage becomes lower than VTS 3S 5 in...

Page 49: ...py paper This negative charge forces the paper against the drum and attracts the positively charged toner onto the paper A high positive voltage approximately 2 2 kV is applied to the discharge plate...

Page 50: ...ositive voltage 2 2 kV is applied to the discharge plate DC DC Converter CN102 7 Drum B Zener Diode Protection Circuit DC DC Converter DC DC Converter DC DC Converter GND CN102 6 CN102 4 CN102 3 CN102...

Page 51: ...drum cleaning The cleaning blade A scrapes off any toner remaining on the drum after the image is transferred to the paper The removed toner is transported into the developer to be recycled A A219D528...

Page 52: ...smitted to the toner collection coil drive gear As the coil rotates the toner moves from rear to front until it reaches the toner recycling belt B The paddles of the belt which is driven by the toner...

Page 53: ...the quenching lamp QL A which is installed in the upper unit neutralizes any charge remaining on the drum LEDs are used for quenching and the lamp is turned on whenever the main motor rotates A A219D5...

Page 54: ...r separators which allow only one sheet to feed They also hold the paper stack When the paper tray is drawn out of the machine the spring pressure is released and the tray bottom plate drops In additi...

Page 55: ...the wider the paper the more tension is applied To apply spring tension for wider paper projection F stops against the end of rail G When this happens lever H swings out in the direction shown above w...

Page 56: ...plete rotation to feed the top sheet of paper which is enough for the leading edge of the paper to be caught by the relay rollers F The feed rollers stop when the stopper drops back into the notch at...

Page 57: ...ass feed while the by pass feed table is closed or if there is no paper on the by pass feed table After the key is pressed the cpu energizes the by pass feed clutch and the by pass feed roller starts...

Page 58: ...ers Before placing paper on the by pass feed table the user must lower the by pass feed table by using the lever E This is to ensure that the paper is placed between the friction pad and the feed roll...

Page 59: ...after the leading edge of the paper actuates the registration sensor The CPU then turns off the relay roller clutch This delay allows time for the paper to press against the registration rollers and...

Page 60: ...he weight of the paper leaning against it As a result skewing or paper jams may occur To prevent this a side fence stopper mechanism has been added to the rear side fence The release levers A each hav...

Page 61: ...tivates the paper end sensor D The paper end actuator is in contact with the lever E When the tray is drawn out the lever turns as shown by the arrow in the diagram Then the lever pushes up the actuat...

Page 62: ...s whether the exit sensor is actuated within 4 97 seconds after the key is pressed 3 Checks whether the copy paper has passed through the registration sensor 7 45 seconds after the key is pressed 4 Ch...

Page 63: ...size actuator is at the mark the paper tray can be set up to accommodate one of a wider range of paper sizes The setting for this mode is performed with SP74 Paper length will be taken from this sett...

Page 64: ...stor C which is in contact with the hot roller surface A thermofuse D prevents the fusing unit from overheating The hot roller strippers E separate the copy paper from the hot roller and direct it to...

Page 65: ...cally disengages the fusing drive gear C when the front cover D is opened This allows the fusing unit drive gear to rotate freely so that misfed paper can be easily removed When the front cover is ope...

Page 66: ...30 V machines After the main switch is turned on until one minute has passed since the fusing temperature reached the Ready condition 190 C After the fusing temperature reaches the ready temperature t...

Page 67: ...ready temperature the machine starts copying immediately If the temperature is lower the fusing lamp is turned on and the start indicator turns red and blinks Copying starts after the fusing temperat...

Page 68: ...the ac waveform However through SP29 fusing power can be set to phase control mode Phase control is used only if the customer has a problem with electrical noise or interference CN113 1 CN113 2 5 V CN...

Page 69: ...s the fusing lamp trigger pulse LOW active to the ac drive dc power supply board which provides ac power to the fusing lamp at the falling edge of each trigger pulse The trigger pulse goes HIGH when t...

Page 70: ...the main motor on condition the resistance of the thermistor between CN113 1 and CN113 2 becomes too low If the main board detects this condition E 53 lights on the operation panel and power to the f...

Page 71: ...SECTION 3 INSTALLATION...

Page 72: ...be subjected to sudden temperature changes 2 Where it will not be directly exposed to cool air from an air conditioner 3 Where it will not be directly exposed to heat from a heater 7 Do not place the...

Page 73: ...firmly inserted in the outlet 2 Avoid multi wiring 3 Do not set anything on the power cord 1 Input voltage level 110 127 V 60 Hz More than 15 A 220 240 V 50 60 Hz More than 8 A 2 Permissible voltage f...

Page 74: ...nes 2 Symbol Explanation Decal Multi language 3 Installation Procedure Multi language 10 15 22 26 machines 4 Operation Instructions English 10 15 17 19 22 26 29 machines 5 NECR English 17 machines 6 N...

Page 75: ...e 1 Remove all strips of tape shown above 2 Pull out the paper tray A and remove the cardboard B 3 Open the front cover and raise the toner bottle holder lever C Then pull down the securing lever D an...

Page 76: ...ar G for one or two turns to distribute the developer as shown NOTE When installing new developer or manually rotating the development roller always make sure to turn the gear in the direction shown a...

Page 77: ...e 11 Unscrew the bottle cap and insert the toner bottle into the holder so that the rib D rides the rail E NOTE Do not open the inner bottle cap F 12 Reposition the holder by making sure that the secu...

Page 78: ...keys 3 Hold down the key for more than 3 seconds 16 Perform the TD sensor initial setting as follows 1 Enter 66 using the numeric keys 2 Press the Auto Image Density key NOTE The machine will automat...

Page 79: ...12 2 3 Stud Screw M3 2 4 Installation Procedure English 1 5 NECR Multi language 1 6 Interface Unit for A219 copier 1 7 Accessory Kit for A203 copier 1 Interface Unit Bracket 1 Stud Screw M4 2 Harness...

Page 80: ...from the DF CAUTION The next step step 4 must be done only in 240 volt areas 4 Perform the conversion from 220 230 V to 240 V as follows 1 Remove the main board cover C 2 screws 2 Disconnect the conne...

Page 81: ...y the portion E with cutting pliers as shown 8 Locate the 4P connector F and connect it to the ADF interface board G then secure the DF interface unit H to the copier 1 screw 9 Plug the connector I 3P...

Page 82: ...k that the rubber pad D is in contact with the top of the operation panel cover If it is not remove the DF grip E 2 screws then adjust the position of the magnet catch F so that the rubber pad is in c...

Page 83: ...essories against the following list Description Q ty 1 Holder Bracket 1 2 Magnet Catch 1 3 Tapping Screw M4 x 6 6 4 Grounding Screw M4 x 8 1 5 Snap Ring 1 6 NECR Multi language 1 7 Installation Proced...

Page 84: ...er to avoid any transport damage 3 Do not grasp the sorter by the top cover and stay as shown by A Hold both sides of the sorter as shown by B This is to prevent damage to the anti static brush C CAUT...

Page 85: ...cutting pliers as shown 4 Remove the rear cover B 2 screws 5 Mount the sorter holder bracket C on the copier frame 3 tapping screws 6 Mount the magnetic catch D near the exit cover 2 tapping screws B...

Page 86: ...1 M4 x 8 screw 9 Secure the bracket G 1 tapping screw 10 Reinstall the rear cover 11 Plug in the copier power cord and turn on the main switch 12 Enter SP mode as follows 1 Press the key 2 Enter 107...

Page 87: ...e part See the parts catalog CAUTION Unplug the copier power cord before starting the following procedure 1 Remove the rear cover See Replacement and Adjustment Exterior Cover Removal 2 Remove the exp...

Page 88: ...r to the heater s connector B red 6 Make sure that scanner drive belt and mirrors do not touch the heater harness while they are functioning NOTE Tell the customer that even when the copier main switc...

Page 89: ...B Then mount the heater on the heater bracket C as shown 1 screw 3 Mount the heater bracket on the bottom of the copier main frame while passing the connector D through the opening E in the copier ma...

Page 90: ...SECTION 4 SERVICE TABLES...

Page 91: ...not to scratch the drum from under the unit as there is no cover to protect it Cover the imaging unit with sheets of paper to prevent the drum from being exposed to light Do not turn the imaging unit...

Page 92: ...and developer are cleaned from inside the imaging unit 14 After installing NEW developer reinstall the machine and perform SP66 TD Sensor Initial Setting 1 3 OPTICS 1 Clean the exposure glass with gl...

Page 93: ...factory to ensure proper image transfer onto the copy paper 1 5 FUSING UNIT 1 Be careful not to damage the edges of the hot roller strippers or their tension springs 2 Do not touch the fusing lamp wit...

Page 94: ...if the customer changes the paper size in the paper tray frequently If not inform the customer that the side guides can be fixed with a screw to achieve better paper feed quality use tapping screw M3...

Page 95: ...AC Drive DC Power Supply Board High Voltage Supply Board C G B T S 6 If the optional tray and anti condensation heaters have been installed keep the copier power cord plugged in even when the copier m...

Page 96: ...er and perform the procedure needed for that function It is possible to move on to the next required mode without exiting each time To exit these modes turn the main switch off on 3 Display The Copy C...

Page 97: ...keys enter the required program number At this point the Copy Counter will be blinking and the dot will be lit 2 When the Auto Image Density key is pressed the number which is currently blinking in th...

Page 98: ...e Market Only 53 TD Sensor Target Control Voltage Adjustment 19 ADS Priority 54 TD Sensor Gain Adjustment 22 SADF Shut Off Time 55 TD Sensor Output Display Data 24 Horizontal Edge Margin Width Adjustm...

Page 99: ...r Feed Tray Copy Counter Display 83 Factory Potential Adjustment 106 DF Original Counter Display 88 Total Copy Counter Display 130 Total Service Calls 90 Factory Data and Counter Clear 131 Total Misfe...

Page 100: ...rmed without exposure Press the key to start the free run Press the key to stop the free run This mode is performed with the selected paper size and magnification ratio without the paper feed clutch o...

Page 101: ...etected 9 Power Supply Board Signal 120 V 230 V 10 Right Vertical Guide Switch Cover Closed Cover Open 12 Scanner HP Sensor Sensor Not Actuated Sensor Actuated HP 13 4th 5th Mirror HP Sensor Sensor No...

Page 102: ...seconds To turn off the indicators press the key Component No Electrical Component Note 1 Main Motor Quenching Lamp Exhaust Fan Motor High Speed 2 Charge Corona 3 Transfer Corona 4 Discharge Plate 5 D...

Page 103: ...ally shifts to the paper feed station holding the same size of paper when paper runs out 19 ADS Priority Specifies whether the copier defaults to ADS or Manual mode when the main switch is turned on 0...

Page 104: ...example if the user normally makes copies of A4 originals that are about 7 black select the 7 setting for best results 0 7 Default 0 See Detailed Descriptions Toner Supply Control for more details SP...

Page 105: ...posure lamp voltage Vo in SP48 1 step of the lamp voltage equals 0 5 V for 120 V NA and 1 0 V for 230 V EU machines 0 Normal 1 Light 2 Dark 3 Lighter 4 Darker See Detailed Descriptions Development for...

Page 106: ...e lead edge erase margin 0 15 Default 8 2 5 mm from leading edge 0 5 mm per step 4 0 mm to 3 5 mm See Replacement and Adjustment Copy Quality Adjustment for details 42 Registration Adjustment Adjusts...

Page 107: ...0 1 mm per step This mode must be done after vertical and horizontal magnification adjustments SP43 and SP44 See Replacement and Adjustment Copy Quality for details on how to do this adjustment 48 Li...

Page 108: ...of SP30 Toner Supply Mode Selection is 1 or 3 this value is used for the TD sensor target voltage 1 200 Default 97 0 02 V per step Normally this value should not be changed 54 TD Sensor Gain Adjustmen...

Page 109: ...s when the key is pressed and stops automatically after the selected time Use this mode to achieve standard image density when copy quality problems indicate low toner 64 VR Correction Value Sets the...

Page 110: ...k 28 16 k Sideways 29 16 k Lengthwise The mark on the paper size dial must be selected to use this special feature When the paper feed tray is selected the appropriate paper size or the mark will be...

Page 111: ...1 then press the key and the key at the same time 0 No 1 Yes Normally not needed in the field as this is handled by SP48 95 VL Correction Reset Resets the exposure lamp data and counter for the VL co...

Page 112: ...1 Paper Feed Tray Copy Counter Display Displays the total electrical copy counter for the paper feed tray Since the copy counter for displaying the current SP mode number has only 2 digits the manual...

Page 113: ...DF Since the copy counter for displaying the current SP mode number has only 2 digits the manual image density indicator is used to display the first digit The first three digits are displayed in the...

Page 114: ...y when the key and the key are pressed at the same time 4 Turn the main switch off and on Recovering the machine after a memory reset CAUTION If SP99 is performed all the software counters for process...

Page 115: ...ustment SP43 Vertical Magnification Adjustment SP44 Horizontal Magnification Adjustment SP47 Focus Adjustment SP48 Light Intensity Adjustment 5 Perform SP66 TD Sensor Initial Setting NOTE The machine...

Page 116: ...Sensor Initial Setting 2 SP93 VR Correction Reset 3 SP48 Light Intensity Adjustment 4 SP56 ADS Reference Voltage Adjustment NOTE 1 Before performing SP48 Light Intensity Adjustment always check to se...

Page 117: ...ction VR101 Main Control Board Changes the ADS voltage 2 5 0 1 V VR1 VRC High Voltage Supply Board C G B T S Changes the charge corona voltage VR51 VRT High Voltage Supply Board C G B T S Changes the...

Page 118: ...SECTION 5 PREVENTIVE MAINTENANCE...

Page 119: ...ry cloth Silicone Grease G501 4th 5th Mirror Guide Rod C L C L C L C L Dry cloth Silicone Grease G501 4th 5th Mirror Guide Rail C L C L C L C L Dry cloth Silicone Grease G501 Blue Filter C C C C Soft...

Page 120: ...dampened with water By pass Bottom Plate Pad C C C C C Soft cloth dampened with water Registration Roller C C C C C Soft cloth dampened with water Paper Feed Guide C C C C Soft cloth dampened with wa...

Page 121: ...p Roller C C C Soft cloth dampened with water Feed Roller C C C Soft cloth dampened with water EM Notes SORTER A657 Bin Guide Wheel L Silicone Grease G501 If movement is not smooth Bushings L Launa oi...

Page 122: ...th Grease CPL501 6 Remove the oil on the scanner guide rail 4th 5th mirror guide rail and 4th 5th mirror guide rod Then lubricate them all with Silicone Grease G501 7 Clean the blue filter with a sili...

Page 123: ...he new cleaning blade 8 Clean the erase lamp and the quenching lamp with a blower brush or dry cloth 9 Replace the charge corona wire and charge corona cleaning pad 10 Replace the discharge plate 6 Pa...

Page 124: ...JFE55 2 6 Inspect the pressure roller bearings 8 Others every 45 k 1 Replace the ozone filter 2 Inspect the bearings and the drive belts 1 Inspect the exit and registration sensors 9 Copy Quality 1 Op...

Page 125: ...5420 9516 Test Chart OS A3 10 pcs set 1 5442 9103 Launa Oil 1 5203 9501 Silicone Grease G 501 1 5420 9507 Digital Multimeter 1 5442 9101 Setting Powder 1 A028 9300 Grease Kok Barrierta JFE 55 2 1 A19...

Page 126: ...SECTION 6 REPLACEMENT AND ADJUSTMENT...

Page 127: ...2 Remove the front cover A 2 locking pins B 1 1 2 Front Right Cover 1 Remove the front right cover C 2 screws 1 1 3 Rear Right Cover 1 Open the by pass feed table D 2 Remove the rear right cover E 2 s...

Page 128: ...Left Cover 1 Remove the lower left cover B 2 screws 1 1 6 Upper Left Cover 1 Remove the lower left cover B 2 screws 2 Remove the upper left cover C 2 screws 1 1 7 Rear Cover 1 Remove the rear cover D...

Page 129: ...the left side scale A 2 screws 4 Remove the exposure glass B See Exposure Glass Removal 5 Remove the operation panel C from the upper cover 2 screws and 2 connectors 6 Remove the upper cover D with th...

Page 130: ...cover A See Front Cover Removal 2 Pull up the toner supply unit lever B 3 Remove the registration knob C and the fusing unit knob D 1 screw each 4 Remove the inner cover E 4 screws B C A D E A219R501...

Page 131: ...at the upper left corner This side is smoother and generates less static electricity when in DF mode 2 When reinstalling the exposure glass ensure the left edge of the glass is flush with the tabs C...

Page 132: ...cover See Upper Cover Removal 5 Remove the rear cover See Rear Cover Removal 6 Move the 1st scanner 150 mm from the left scale as shown by A CAUTION To move the 1st scanner pull the scanner belt Do no...

Page 133: ...t the two scanner locking pins I NOTE Scanner positioning pins are available as a service part P N A184 9501 See the Parts Catalog 4 Connect the two connectors and secure the harness to the clamps 5 T...

Page 134: ...ee Upper Cover Removal 5 Remove the rear cover See Rear Cover Removal 6 Loosen the two screws A securing the wire tension brackets as shown 7 Remove the two springs B 8 Remove the 1st scanner and the...

Page 135: ...o connect the two scanners 5 Move the lens to the rightmost position 6 Insert two positioning pins B in the holes to secure the 1st and 2nd scanners NOTE To move the scanners pull the scanner belt Do...

Page 136: ...VE MOTOR REMOVAL 1 Turn off the main switch and unplug the power supply cord 2 Remove the upper cover See Upper Cover Removal 3 Remove the motor A 2 screws and 1 connector A A219R503 wmf OPTICS 20 Dec...

Page 137: ...moval 4 Remove the upper left cover See Upper Left Cover Removal 5 Move the 1st scanner away from the left scale as shown by A CAUTION To move the 1st scanner pull the scanner belt Do not apply force...

Page 138: ...ply cord 2 Remove the inner cover See Inner Cover Removal 3 Remove the toner supply unit 4 Remove the imaging unit See Imaging Unit Removal 5 Move the 4th 5th mirror unit A to the rightmost position 6...

Page 139: ...mirror C toward the front of the machine to remove the rear spring plate D 7 Remove the 2nd mirror 8 Reassemble To reinstall 1 Place the 2nd mirror in the front and rear side plate cutouts NOTE Make...

Page 140: ...belt Do not apply force to the scanner directly 4 Remove the bracket A 1 screw 5 Remove the 2nd scanner B as shown 4 screws 1 connector CAUTION 1 When removing the 2nd scanner do not bend the bracket...

Page 141: ...e the lens cover A NOTE When replacing the lens cover be sure to Position the light shield B so that it is not caught by the cover as shown Insert the tabs C into the slots D Position the harness E al...

Page 142: ...acket A 2 Remove the 4th 5th mirror unit B as shown 5 Replace the 4th and 5th mirrors C D in the same way as the 2nd mirror NOTE Make sure that the reflecting surface E faces the lens B A A219R531 wmf...

Page 143: ...e exposure glass See Exposure Lamp Removal 3 Remove the ADS sensor A and cover B as an ass y 1 screw and 1 connector 4 Replace the ADS sensor A 1 screw 5 Reassemble 6 Perform the ADS reference voltage...

Page 144: ...oner bottle holder C 4 Turn the B1 lever D counterclockwise to lower the transfer corona unit 5 Remove the transfer corona unit or cover it with a clean sheet of paper 6 Remove the knob screw E and pl...

Page 145: ...he groove of the front endblock F as shown 2 Do not handle the new corona wire with bare hands Oil on the wire may cause uneven charge on the drum 3 Do not rub the corona wire with rough material sand...

Page 146: ...development case B 1 screw and 1 snap C from the imaging unit 4 Remove the cleaning blade D 2 screws NOTE 1 When removing the cleaning blade be careful not to scratch the drum surface 2 When installi...

Page 147: ...drum in the imaging unit without removing the protective sheet NOTE When setting the drum do not bend the entrance seal 9 Reinstall the outer gear and rear side plate 2 screws 10 Reinstall the front s...

Page 148: ...he toner collection coil F NOTE When removing the toner collection coil do not lose the rear gear G 8 Replace the toner recycling belt and toner collection coil NOTE When installing a new toner recycl...

Page 149: ...ns in the toner recycle 6 Pour the developer D evenly into the imaging unit Then rotate the outer gear E for one or two turns to distribute the developer as shown NOTE When installing new developer or...

Page 150: ...veloper on to the paper See developer replacement 4 Remove the TD sensor A 2 screws and 1 connector from the imaging unit 5 Replacement the TD sensor 6 Pour in the new developer evenly into the imagin...

Page 151: ...ning blade and drum from the imaging unit See cleaning blade and drum removal procedures 7 Remove the toner recycling cover from the imaging unit See Toner Recycling Belt Removal 8 Remove the upper ca...

Page 152: ...ear Cover Removal 5 Remove the high voltage supply board 4 screws and 6 connectors 6 Remove the 2 screws A and 1 connector B from the rear 7 Remove the toner supply motor ass y C 8 Replace the toner s...

Page 153: ...Rear Cover Removal 4 Remove the high voltage supply board 4 screws and 6 connectors 5 Remove the optics cooling fan motor A 2 screws and 1 connector 6 Remove the erase lamp B 1 screw and 1 connector f...

Page 154: ...Unit Removal 3 Open the rear cover See Rear Cover Removal 4 Remove the erase lamp See Erase Lamp Replacement 5 Remove the inner cover See Inner Cover Removal 6 Remove the quenching lamp A 1 screw and...

Page 155: ...4 PAPER FEED 4 1 PAPER TRAY REMOVAL 1 Pull the paper tray out 2 Remove the paper tray A 4 screws A A219R551 wmf Replacement Adjustment 20 December 1996 PAPER FEED 6 29...

Page 156: ...racket A and shaft 1 screw 6 Replace the two feed rollers B on the shaft NOTE When reinstalling the feed roller assembly make sure of the following 1 Do not touch the feed rollers with bare hands 2 Re...

Page 157: ...ee Tray Feed Roller Replacement 2 For A sizes move the feed rollers A B to position a 3 For B sizes move the feed rollers A B to position c NOTE 1 Position b is the default setting 2 In North America...

Page 158: ...3 Remove the by pass feed table B 3 Remove the screw C 4 Slide the feed roller shaft cover D to the right and remove it 1 screw 5 Remove the paper end sensor cover E 1 tab 6 Remove the sensor ass y F...

Page 159: ...th bare hands To reinstall 1 Reinstall the friction pad the spring and the by pass feed roller 2 Reinstall the sensor ass y CAUTION 1 Handle the registration sensor with care 2 Be sure to reconnect th...

Page 160: ...move the bracket B 3 screws 5 Remove the bearing C 6 Remove the spring D 7 Replace the by pass paper feed clutch E NOTE When reinstalling a new clutch engage the notch F with the stopper G as shown 8...

Page 161: ...the main switch and unplug the power supply cord 2 Remove the rear cover See Rear Cover Removal 3 Remove the switch bracket A 2 screws and 1 connector 4 Replace the switch B 2 screws B A A219R547 wmf...

Page 162: ...e the paper feed clutch ass y B 2 screws 5 Replace the relay roller clutch C 1 E ring and 1 connector NOTE When reinstalling a new clutch engage the notch D with the stopper E 6 Remove the paper feed...

Page 163: ...t Cover Removal 3 Remove the size switch bracket A 1 screw 4 Remove the size switch ass y B 2 screws and 1 connector 5 Remove the size switch C 2 tabs NOTE When reinstalling the size switch ass y B ma...

Page 164: ...feed roller shaft cover B to the right and remove it 1 screw 5 Remove the paper end sensor cover C 1 tab 6 Remove the sensor ass y D 1 screw and 2 connectors 7 Replace the by pass paper end sensor E...

Page 165: ...ned off and the power supply cord is unplugged 2 Open the front cover 3 Remove the inner cover See Inner Cover Removal 4 Open the exit unit A 5 Remove the fusing unit 1 screw B and 3 connectors C A B...

Page 166: ...L and M and gear N Then replace the hot roller O NOTE 1 When reinstalling the thermistor make sure that harness is positioned correctly P as shown 2 The shape of the front C ring is different from th...

Page 167: ...5 3 PRESSURE ROLLER REPLACEMENT 1 Remove the hot roller See Hot Roller Replacement 2 Remove the pressure roller A A A219R539 wmf Replacement Adjustment 20 December 1996 FUSING 6 41...

Page 168: ...5 4 HOT ROLLER STRIPPER REPLACEMENT 1 Open the exit unit A 2 Remove the bracket B 2 screws 3 Replace the hot roller strippers C 1 spring each A B C A219R537 wmf FUSING 20 December 1996 6 42...

Page 169: ...5 5 FUSING ENTRANCE GUIDE ADJUSTMENT If there is paper creasing after fusing move the guide plate A to the upper position as shown A A219R536 wmf Replacement Adjustment 20 December 1996 FUSING 6 43...

Page 170: ...ing pressure can be set at three different levels Adjust the pressure spring position to A if poor fusing occurs or to C if copy paper becomes creased For removal and installation see the pressure rol...

Page 171: ...NT 1 Turn off the main switch 2 Open the front cover 3 Remove the transfer corona unit A 4 Remove the 2 sheets of mylar B 5 Replace the transfer corona wire C A A219R554 wmf C B A219R555 wmf Replaceme...

Page 172: ...REPLACEMENT 1 Turn off the main switch 2 Open the front cover 3 Remove the transfer corona unit 4 Remove the discharge plate by squeezing the knobs A on both sides A A219R556 wmf TRANSFER SEPARATION 2...

Page 173: ...TER REPLACEMENT 1 Turn off the main switch 2 Remove the rear cover See Rear Cover Removal 3 Remove the ozone filter cover A 4 Replace the ozone filter B B A A219R552 wmf Replacement Adjustment 20 Dece...

Page 174: ...d unplug the power supply cord 2 Remove the rear cover See Rear Cover Removal 3 Remove the main control board A 4 screws and all connectors 4 Remove the EEPROM B from the old main board and install it...

Page 175: ...y the customer the overall image density can be changed by changing the toner density SP38 UP6 Normally this should be kept at the normal position factory setting The grid voltage and charge corona cu...

Page 176: ...casings Blower blush 3 QL Erase Lamp Dry cloth and blower blush 3 Open SP33 and return the setting to the normal value if it has been changed 4 Place the OS A3 test chart on the exposure glass and mak...

Page 177: ...ing 0 1 2 3 4 Bias Voltage Change V 0 40 40 40 40 Exposure Lamp Change 0 0 0 4 steps 4 steps Image Density Normal Lighter Darker Lightest Darkest 1 step 0 5 V 120 V machines or 1 0 V 230 V machines SP...

Page 178: ...gh voltage is applied from the high voltage supply unit terminals Pay extreme attention when adjusting the bias voltage Make sure that the machine is unplugged before connecting the multimeter 1 Remov...

Page 179: ...he image area on the drum is being developed NOTE SP34 can be changed by customers SP33 Image Bias Adjustment Manual ID Mode Setting 0 1 2 3 4 Bias Voltage Change V 0 40 20 20 40 Image Density Normal...

Page 180: ...hold NOTE SP38 can be changed by customers 8 4 TONER SUPPLY RATIO SELECTION When The factory setting for the toner supply amount is not appropriate for the type of original in use Purpose To adjust th...

Page 181: ...the high voltage supply unit terminals Pay extreme attention when adjusting the grid voltage Make sure that the machine is unplugged before connecting the multimeter 1 Remove the rear cover See Rear C...

Page 182: ...machine is unplugged before connecting the multimeter 1 Remove the rear cover See Rear Cover Removal 2 Disconnect the connector from the T corona current terminal A Then connect the ground terminal o...

Page 183: ...nplugged before connecting the multimeter 1 Remove the rear cover See Rear Cover Removal 2 Disconnect the connector from the CT corona current terminal A Then connect the ground terminal of the multim...

Page 184: ...using SP44 Make three copies to check the magnification NOTE If the copy image is out of focus as making copies after this adjustment adjust the focus See Focus Adjustment 8 9 VERTICAL MAGNIFICATION A...

Page 185: ...erase margin Adjustment Standard 2 5 2 0 mm 0 1 0 08 How to Adjust SP41 0 5 mm step 16 steps How it works Changes the erase lamp on period 1 Place a 150 mm scale perpendicular to the left scale on th...

Page 186: ...rform this adjustment until you have positively verified that the source of the skewing is optical and not in the paper path 1 Turn off the main switch and remove the exposure glass See Exposure Glass...

Page 187: ...rence Voltage 2 5 0 1 volts How to Adjust SP56 How it works Changes the main board ADS output voltage The voltage reading is displayed on the operation panel 1 Place five sheets of clean white A4 8 5...

Page 188: ...th the paper tray and the by pass feed table adjust the lens position Check the adjustment by making a copy from the by pass feed table Then make a copy from the paper tray and adjust the side fence p...

Page 189: ...the exposure glass See Exposure Glass Removal 3 Remove the lens cover 2 screws 4 Loosen 2 screws A and shift the lens by trial and error to adjust the side to side registration A A219R565 wmf Replace...

Page 190: ...SECTION 7 TROUBLESHOOTING...

Page 191: ...e corona wire 2 Copy image is not transferred to the paper High voltage supply board transfer failure Poor transfer corona unit contact Broken transfer corona wire Leak in the insulator or endblocks 3...

Page 192: ...urring in the endblocks or receptacles No Yes Replace the defective parts Are the imaging unit drive gears worn or broken No Yes Replace the drive gears Check CN102 4 and 102 5 Charge Transfer trigger...

Page 193: ...r 3 The exposure lamp is not bright enough This may be caused by deterioration of the exposure lamp or low lamp voltage 4 In ADS mode light reflected from the original is too intense 5 The ADS optical...

Page 194: ...lace the cleaning blade Are the erase lamp and or quenching lamp dirty No Yes Clean the erase lamp and quenching lamp as required If toner scattering occurs see Toner Density Too High If dirty backgro...

Page 195: ...the optics section dirty No Yes Clean the optics and perform the necessary SP modes in order see Section 4 Service Remarks for details The cutout position of the 1st scanner reflectors should not be c...

Page 196: ...the black bands shift when a reduction copy is made No Yes Check and clean the optics section After cleaning the optics perform the necessary SP modes in order see Section 4 Service Remarks for detai...

Page 197: ...irrors After cleaning the optics perform the necessary SP modes in order see Section 4 Service Remarks for details Is the edge of the cleaning blade scratched No Yes Replace the cleaning blade Is the...

Page 198: ...Dirty or deformed grid plate 3 Damp or deformed inlet seal on the development unit Action Are the charge corona wires or grid plate dirty No Yes Clean the charge corona wires or grid plate Is the grid...

Page 199: ...ller Action Remove the cleaning blade Clean and inspect the edge of the blade Is the edge of the cleaning blade deformed No Yes Replace the cleaning blade Make a copy and stop the machine when the pap...

Page 200: ...hot roller or toner build up 2 Toner adheres to the drum surface Due to insufficient cleaning foreign matter may accumulate on the blade causing toner to stick to the drum surface when the drum stops...

Page 201: ...s and drum pulleys No Good Reinstall them correctly or replace the defective parts Are the scanner drive belts correctly installed Yes No Reinstall them correctly or replace the defective parts Does t...

Page 202: ...ply board C G B T S defective Action Is there good electrical contact between the charge corona casing and the grid plate Yes No Repair the poor contact or replace the charge corona unit if needed Che...

Page 203: ...s 1 The 4th 5th mirror assembly is not parallel with the 1st and 2nd scanners 2 The mirrors are in the wrong position Action Is each mirror positioned correctly on its scanner and on the 4th 5th mirro...

Page 204: ...low 5 Some SP or UP modes have been changed that would lead to this problem 6 TD sensor defective Action Has an abnormal TD sensor condition occurred No Yes See the Abnormal Condition in Toner Densit...

Page 205: ...0 Is the grid voltage correct Yes No Readjust the grid voltage Clean the optics section and around the imaging unit Perform the necessary SP modes in order see Section 4 Service Remarks for details C...

Page 206: ...rd is defective 4 The charge corona current is too high 5 Some SP or UP modes have been changed that would lead to this problem 6 TD sensor defective Action Has an abnormal TD sensor condition occur N...

Page 207: ...value to the default setting 0 Go to A Is the grid voltage correct Yes No Readjust the grid voltage A Check the related SP mode settings SP30 31 32 33 34 35 36 38 48 53 54 and 62 Change the settings t...

Page 208: ...fusing temperature is too low 3 The thermistor is malfunctioning Action Adjust the position of the pressure springs to increase the fusing pressure No good Increase the fusing temperature using SP49...

Page 209: ...er is installed in humid environment Action Decrease the fusing temperature using SP49 No good Is the fusing thermistor working properly Yes No Check the thermistor If the thermistor is malfunctioning...

Page 210: ...tive sensor If no sensors are defective replace the main board Action 2 Misfeed during copy cycle If the Check Paper Path indicator turns on after the key is pressed check whether the paper tray has r...

Page 211: ...unit and the main copier Action Check the continuity between the TD sensor harness and CN124 on the main control board Are they properly connected Yes No Connect the connector firmly Is the TD sensor...

Page 212: ...Yes No Change or clean the defective parts Replace the main control board COPY QUALITY 20 December 1996 7 22...

Page 213: ...itch off and on CODE 11 EXPOSURE LAMP ERROR 1 Definition The feedback signal becomes higher than 4 2 volts rms for 1 0 second when the exposure lamp is on The feedback signal becomes higher than 1 0 v...

Page 214: ...ains LOW de actuated after the scanner returns during the copy process Possible Causes Defective home position sensor Defective scanner drive motor Defective main control board Defective ac drive dc p...

Page 215: ...HIGH for 10 seconds after driving the 4th 5th mirror motor Possible Causes Defective 4th 5th mirror home position sensor Defective 4th 5th mirror motor Defective 4th 5th mirror drive mechanism F2 on t...

Page 216: ...DE 40 OPTICS THERMISTOR ERROR Definition The optics thermistor is open Possible Cause Defective optics thermistor Defective main control board CN121 on the main control board is not correctly connecte...

Page 217: ...rectly connected CODE 53 FUSING ERROR 2 Definition The temperature detected by the thermistor becomes higher than 255 C To clear this error refer to note 3 at the beginning of this chapter Possible Ca...

Page 218: ...the thermistor is more than 20 C within any one second after the 16 NA or 20 EU seconds warm up time after the main switch is turned on To clear this error refer to note 3 at the beginning of this cha...

Page 219: ...5 4 The Load Paper indicator lights even if paper is placed on the by pass feed table Stays LOW CN125 4 The Load Paper indicator does not light even if there is no paper on the by pass feed table Exit...

Page 220: ...nit is opened Tray Paper Size Switch SW3 OPEN The copier detects the paper tray open condition even if the paper tray unit is closed SHORT The copier detects the paper tray closed condition even if th...

Page 221: ...ponse F2 8 A 125 V T6 3 A 250 V E2B is displayed F3 3 15 A 125 V T3 15 A 250 V No response F4 5 A 125 V T3 15 A 250 V No response 5 USER CODES U code Contents U1 Right vertical guide opened U2 Key cou...

Page 222: ...SECTION 8 OPTIONS...

Page 223: ...SECTION 9 APPENDIX TIMING CHART...

Page 224: ...Copy paper size A4 4 Number of copies 3 Second 2 43 5 34 4 64 8 91 4 91 10 41 13 34 12 91 4 64 4 64 8 64 8 64 12 64 2 30 6 30 10 30 2 43 6 43 10 43 2 05 6 05 10 05 8 64 12 64 0 5 10 15 1 90 4 74 5 90...

Page 225: ...COPIER A219 ELECTRICAL COMPONENT LAYOUT 4 2 3 1 5 6 A219S500 wmf...

Page 226: ...10 15 14 13 12 11 9 8 7 18 17 16 A219S501 wmf...

Page 227: ...24 40 23 28 27 26 25 19 20 21 22 29 39 31 32 33 34 35 36 38 37 30 A219S502 wmf...

Page 228: ...M6 17 E8 Lens Motor M3 18 D8 Optics Thermistor TH2 19 G5 Exposure Lamp L3 20 B5 Exposure Lamp Thermofuse TF1 21 B4 Lens Home Position Sensor S8 22 G7 Exit Sensor S6 23 G6 ADS Sensor S2 24 G3 Fusing L...

Page 229: ...CK UP SOL SOL1 FEED CL CL1 W CN115 1 W CN115 2 C CN116 1 C CN116 2 R CN113 1 W CN113 2 W CN113 3 R CN114 1 T CN114 2 PULSE GENERATOR SENSOR S1 SADF INDICATOR LED1 S CN114 3 W CN114 4 INSERT ORIGINAL I...

Reviews: