background image

P

AGE

 4-21

1117539, V

ER

. 07

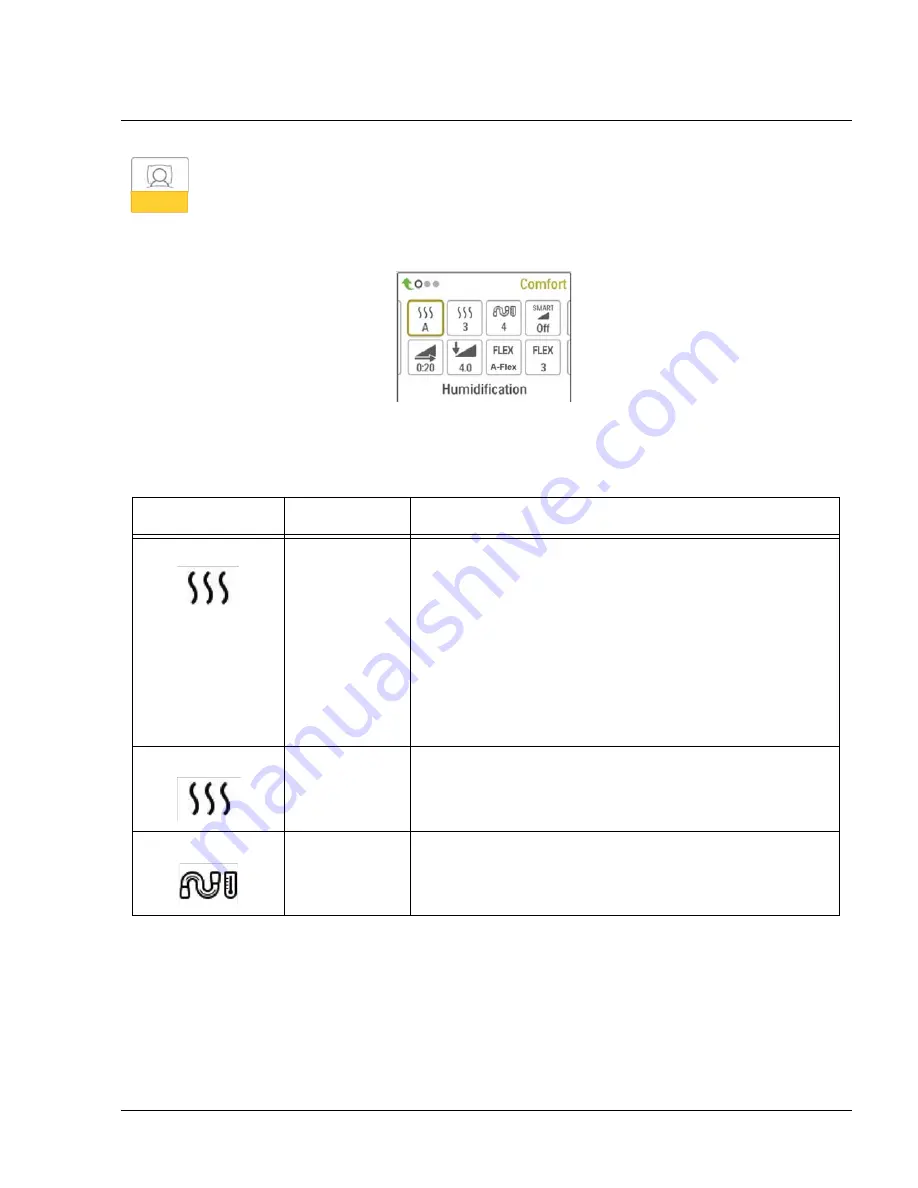
Comfort Settings:

Choosing this screen will take you to a sub-menu where you can adjust the humidification and pressure
comfort settings. These settings are described here.

F

IGURE

 4-22: S

AMPLE

 C

OMFORT

 S

UB

-M

ENU

Note: 

Not all settings shown here will display on the device. The display will vary based on therapy device

model and device settings.

I

CON

T

EXT

D

ESCRIPTION

Humidification

This setting allows you to select the Humidification Mode
being used. You can choose between Fixed or Adaptive (A)
Humidification. If a heated tube is attached to the device, then
the device will automatically switch to Heated Tube
Humidification Mode. 
Fixed mode applies a constant heat on the humidifier heater
plate. Under certain conditions and settings, this mode can
allow condensation to occur in the tube.
Adaptive mode adapts the heater plate temperature to the
ambient conditions in the room, and is designed to not allow
condensation to occur in the tube.

Humidifier

This setting allows you to choose the desired humidity setting
for the humidifier: 0, 1, 2, 3, 4 or 5.

Tube
Temperature

This setting allows you to choose the desired temperature for
the heated tube: 0, 1, 2, 3, 4 or 5.


Summary of Contents for DreamStation

Page 1: ...DreamStation Service Technical Reference Manual ...

Page 2: ...UMIDIFIER 4 5 4 5 DISCONNECTING THE TUBING 4 6 4 6 DISCONNECTING THE DEVICES 4 6 4 7 CHECKING THE HUMIDIFIER LID SEAL 4 7 4 8 INSTALLING REPLACING THE AIR FILTERS 4 8 4 9 STARTING THE DEVICE 4 9 4 10 NAVIGATING THE DEVICE SCREENS 4 10 4 10 1 User Menu Navigation Therapy On and Optional Humidification Settings 4 11 4 10 2 User Menu Navigation Therapy Off 4 12 4 10 3 Accessing Provider Mode Screens ...

Page 3: ...T PART RP KITS 6 2 6 1 REPLACEMENT INSTRUCTIONS 6 4 6 1 1 Replacing the Accessory Module and SD Flip Doors 6 4 6 1 2 Replacing the SD Card 6 5 6 1 3 Replacing the Upper Enclosure Keypad 6 5 6 1 4 Replacing the UI Panel 6 7 6 1 5 Replacing the PCA 6 9 6 1 6 Replacing the Flow and Pressure Sensor Seals 6 11 6 1 7 Replacing the Blower Upper Cap 6 12 6 1 8 Replacing the Blower Blower Box Assembly and ...

Page 4: ... 7 1 6 Replacing the Flip Lid Latch 7 9 7 1 7 Replacing the Lifting Tray 7 10 7 1 8 Replacing the Bottom Cover 7 13 7 1 9 Replacing the Heat Shield 7 14 7 1 10 Replacing the Heater Plate O Ring 7 15 7 1 11 Replacing the Bottom Flip Lid Assembly 7 16 7 2 CLEANING THE WATER TANK 7 21 7 3 CLEANING THE HUMIDIFIER BASE 7 21 7 4 CLEANING THE HEATED TUBING 7 22 7 5 HOSPITAL AND INSTITUTION DISINFECTION W...

Page 5: ...1117539 VER 07 This page intentionally blank ...

Page 6: ...PAGE 1 1 1117539 VER 07 2016 Koninklijke Philips N V All rights reserved ...

Page 7: ... DESCRIPTION MODEL NUMBER SERIES DreamStation CPAP yyX200Szz DreamStation CPAP w Humidifier and Standard Tube yyX200Hzz DreamStation CPAP w Humidifier and Heated Tube yyX200Tzz DreamStation CPAP Pro yyX400Szz DreamStation CPAP Pro w Humidifier and Standard Tube yyX400Hzz DreamStation CPAP Pro w Humidifier and Heated Tube yyX400Tzz DreamStation Auto CPAP yyX500Szz DreamStation Auto CPAP w Humidifie...

Page 8: ... pressure when they are trying to fall asleep The air pressure will gradually increase until their prescription pressure is reached Also the Flex comfort feature provides the user with pressure relief when they exhale during therapy Several accessories are also available for use with the devices FIGURE 1 1 DEVICE OVERVIEW AS DESCRIBED IN THE BELOW TABLE ...

Page 9: ...ication Humidification is controlled by adjusting the temperature of the heater plate The heater plate is then used to heat water found in the water tank This manual includes instructions that explain how to set up and take care of the heated humidifier For instructions on how to adjust the heated humidifier settings refer to the instructions for use that accompanied the therapy device Water Tank ...

Page 10: ... service location in your area to schedule training 1 3 SERVICE TRAINING Philips Respironics offers service training for the devices Training includes complete disassembly of the device troubleshooting sub assemblies and components and necessary safety testing For more information log onto my respironics com and download the Service Training Schedule brochure from the Service Software and Document...

Page 11: ...PAGE 1 6 1117539 VER 07 This page intentionally blank ...

Page 12: ...r to the devices User and Provider Manuals for warnings cautions and notes WARNING Warnings indicate the possibility of injury to people CAUTION Cautions indicate the possibility of damage to equipment NOTE Notes are used to emphasize a characteristic or important consideration TABLE 2 1 USER PROVIDER MANUALS DESCRIPTION PART NUMBER DreamStation CPAP User Manual EN INTL CE 1121981 DreamStation BiP...

Page 13: ...PAGE 2 2 1117539 VER 07 This page intentionally blank ...

Page 14: ...der Manuals for specifications and classifications TABLE 3 1 USER PROVIDER MANUALS DESCRIPTION PART NUMBER DreamStation CPAP User Manual EN INTL CE 1121981 DreamStation BiPAP User Manual EN INTL CE 1121982 DreamStation Humid User Manual EN INTL CE 1121984 DreamStation Provider Guide EN INTL CE 1121983 ...

Page 15: ...PAGE 3 2 1117539 VER 07 This page intentionally blank ...

Page 16: ...e sure to route the power cord to the outlet in a way that will prevent the cord from being tripped over or interfered with by chairs or other furniture This device is activated when the power cord is connected CAUTION If the device has been exposed to either very hot or very cold temperatures allow it to adjust to room temperature approximately two hours before beginning setup Do not use extensio...

Page 17: ...rolled by a wall switch FIGURE 4 1 CONNECTING THE AC POWER CORD AND POWER SUPPLY 3 Plug the power supply cord s connector into the power inlet on the side of the device FIGURE 4 2 SUPPLYING POWER TO THE DEVICE 4 Verify that the plug at the side of the device at the power supply and at the electrical outlet are fully inserted This will help to ensure that a secure reliable electrical connection has...

Page 18: ...ed tube to the top of the air outlet port on the back of the device FIGURE 4 3 CONNECTING THE TUBING TO THE PAP DEVICE 2 Press the tubing into place over the air outlet port until the tabs on the side of the tube click into place in the slots on the sides of the outlet port FIGURE 4 4 TUBING CONNECTED TO THE PAP DEVICE NOTE If you are using a standard tube not shown instead of a heated tube simply...

Page 19: ...ntil they snap into place FIGURE 4 5 CONNECTING THE HUMIDIFIER 5 Make sure that the therapy device and the humidifier are completely seated against each other FIGURE 4 6 HUMIDIFIER CONNECTED WARNINGS Do not pull or stretch the tubing This could result in circuit leaks Inspect the tubing for damage or wear Discard and replace the tubing as necessary If the device is used by multiple persons such as...

Page 20: ...n the humidifier FIGURE 4 7 CONNECTING THE TUBING TO THE HUMIDIFIER 2 Press the tubing into place over the air outlet port until the tabs on the side of the tube click into place in the slots on the sides of the outlet port FIGURE 4 8 TUBING CONNECTED TO THE HUMIDIFIER 3 If you are using a standard tube not shown instead of a heated tube simply slide the tubing over the air outlet port on the heat...

Page 21: ... pull the tubing away from the outlet port 4 6 DISCONNECTING THE DEVICES 1 Disconnect power to the therapy device 2 Pick up the system 3 Place one hand on the therapy device and the other on the humidifier 4 Press the humidifier release button 1 and pull apart to separate FIGURE 4 10 DISCONNECTING THE DEVICES CAUTION To avoid spilling do not disconnect the humidifier from the therapy device with w...

Page 22: ...umidifier lid Position the seal 1 against the inside of the lid so the seal s center hole aligns with the humidifier outlet port Confirm that the seal is positioned so the wire channel 2 in the seal is below the humidifier outlet port 3 FIGURE 4 11 CHECKING THE HUMIDIFIER LID SEAL With the seal loosely in place start at the bottom 1 and gently press the edges of the seal into the channel in the li...

Page 23: ...d with the device A disposable light blue ultra fine filter may also be included If your filter is not already installed when you receive your device you must at least install the reusable filter before using the device This device has an automatic air filter reminder Every 30 days the device will display a message reminding you to check your filters and replace them as directed 1 Lift up on the f...

Page 24: ...e The first screen to display will be the Philips Respironics logo followed by the device model screen and then the Home screen FIGURE 4 16 HOME SCREEN The first time the device is powered on a pop up will prompt you to set the time on the device The default setting is Greenwich Mean Time but you may adjust the time in 30 minute increments to match your local time zone If you choose to skip this i...

Page 25: ...that setting 3 Rotate the control dial to change the setting 4 Press the control dial again to save the change NOTE During therapy it there is a mains interruption i e power loss the device will return to the Home screen once power is restored You may resume therapy as needed NOTE The display is not a touch screen You must use the control dial to navigate the device menu NOTES The rotate dial icon...

Page 26: ...duces the air pressure when you are trying to fall asleep and then gradually increases ramps the pressure until your prescription setting is reached allowing you to fall asleep more comfortably If ramp is enabled on your device after you turn on the airflow press the Ramp button on the top of the device You can use the Ramp button as often as you wish during the night When you click the ramp butto...

Page 27: ...hen you select My Info you will be able to view the following screens You cannot change settings in the Info menu These screens are only for reference ICON TEXT DESCRIPTION Therapy Hours This screen displays the amount of time the user is actually receiving therapy on the device for the most recent 1 day time frame It also displays the average amount of time the patient is actually receiving thera...

Page 28: ...eak is the percentage of time that the mask leak was so high that it is no longer possible for the device to identify respiratory events with statistical accuracy Displays the value for the most recent 1 day as well as the values over last 7 days and 30 days This screen only displays if your home care provider has enabled it Only available on CPAP Pro and Auto CPAP devices Periodic Breathing Perio...

Page 29: ...al days number of selected trial days Available on the Pro Auto BiPAP Pro and BiPAP Auto models 90 Pressure 90 Pressure This screen displays the nightly value of 90 Pressure for the most recent 1 day time frame It also displays the average of these individual nightly values of 90 Pressure over a 7 day and a 30 day time frame Available on the Auto model IPAP 90 Pressure IPAP 90 Pressure Displays th...

Page 30: ... exhale during therapy Your home care provider can enable or disable this feature When your provider enables Flex a level will already be set for you on the device You can increase or decrease the setting from 1 to 3 The setting of 1 provides a small amount of pressure relief with higher numbers providing additional relief Note If a lock icon is displayed on this screen it indicates that your prov...

Page 31: ... or 15H Note If a lock icon is displayed on this screen it indicates that your provider has locked this setting and you cannot change it Language This feature allows you to choose which language to display on the interface You can also turn off 0 text mode which means the device will display the Icon Mode on the interface Check Mask Fit This feature allows you to check the fit of your mask prior t...

Page 32: ...ain functional and deliver therapy FIGURE 4 20 CHECK MASK FIT SCREEN Sleep Progress The device provides summary information about therapy use each time the therapy is turned off The first screen displays Three Night Summary It shows nightly usage for the last 3 sleep sessions measured in 24 hour periods ending at noon each day The most recent session is displayed in the right hand bar labeled with...

Page 33: ...nce the device is powered press and hold both the control dial and the Ramp button on the device for at least 5 seconds 3 You are now in provider mode You can choose between the following Provider mode screens 4 10 4 NAVIGATING THE PROVIDER MODE SCREENS The following sections will describe the options available from the Provider screens Therapy Settings Choosing this screen will take you to a sub ...

Page 34: ...The initial pressure will be half of the prescription pressure but no lower than 5 cm H2O After each day of successful use the session was greater than 4 hours the therapy pressure will increase by 1 cm H2O until the prescription pressure is reached From that point forward the therapy device would operate in normal CPAP or CPAP Check mode If the patient has not reached their prescription pressure ...

Page 35: ...ou to modify the Maximum IPAP setting The setting you specify here will be the maximum level of pressure applied during the inspiratory breath phase You may adjust the setting from the Minimum EPAP setting to 25 cm H2O This screen only displays if Auto Bi level mode is enabled EPAP Max This screen allows you to modify the Minimum EPAP setting The setting specified here will be the minimum level of...

Page 36: ...tween Fixed or Adaptive A Humidification If a heated tube is attached to the device then the device will automatically switch to Heated Tube Humidification Mode Fixed mode applies a constant heat on the humidifier heater plate Under certain conditions and settings this mode can allow condensation to occur in the tube Adaptive mode adapts the heater plate temperature to the ambient conditions in th...

Page 37: ...applied The IPAP Maximum pressure during ramp is the EPAP or EPAP Minimum under normal BiPAP or Auto BiPAP mode The SmartRamp period will terminate in either of two ways 1 If SmartRamp pressure reaches the minimum pressure of the therapy mode selected then SmartRamp ends and the device continues to deliver therapy under the selected therapy mode or 2 If SmartRamp pressure does not reach the minimu...

Page 38: ... patient to change it Rise Time Rise time is the time it takes for the device to change from EPAP to IPAP This screen allows you to adjust the rise time so you can find the desired setting This is only available if Flex has been disabled and the device is in Bi level or Auto Bi level mode 0 off reduces the Rise Time feature to the lowest setting off 150 msec 1 sets Rise Time to 1 200 msec 2 sets R...

Page 39: ...r Philips Respironics mask This feature allows the device to adjust the level of pressure compensation to match your mask Refer to the packaging of your mask to identify the resistance setting for your mask Note It is important to use the appropriate Mask Type resistance setting to ensure proper pressure delivery to the patient Mask Type Lock This enables you to lock the Mask Type resistance setti...

Page 40: ...ff whenever the patient removes the interface mask from their airway Language This feature allows you to choose which language to display on the interface You can choose English or Spanish Clear Default Reminders This setting turns off the default patient reminders that are enabled in the therapy device from the factory Note This does not turn off additional reminders that you may have activated i...

Page 41: ... screen VIC90 VIC90 This Visual Inspection Check screen will display a check code number created from information gathered over the most recent 90 day period This 15 digit number will display as xxx xxxx xxxx xxxx Days 4 Days Greater Than 4 This screen displays the cumulative number of device therapy sessions that exceeded 4 hours over a 1 day a 7 day and a 30 day time frame Therapy Hours The devi...

Page 42: ...tion the 5 day average value will be seen under the 7 day display 90 90 Pressure During any given night the device recognizes the 90 Pressure achieved by the Auto Algorithm 90 Pressure is defined as the pressure at which the device spent 90 of the session time at or below For example if the device recognized airflow for 10 hours and 9 hours were spent at or below 11 cm H2O and 1 hour was spent abo...

Page 43: ...he patient to read you the five codes off the Performance Check screen over the phone You can decode these codes in EncoreAnywhere EncorePro or Encore Basic to populate the troubleshooting dashboard 4 12 BLUETOOTH WIRELESS TECHNOLOGY The device may be equipped with Bluetooth wireless technology If available you can pair the therapy device to a mobile device that has the DreamMapper app installed D...

Page 44: ... Dial to choose If no is selected or the pop up screen times out after 30 seconds the device will reject the pair request If yes is selected the therapy device will acknowledge the 001008 passkey If the mobile device also acknowledges the request the two will now be paired and ready to connect using DreamMapper Note Do NOT select yes on the pop up screen unless you are currently trying to pair you...

Page 45: ...odule also includes an RS 232 or DB9 port to allow remote control of the DreamStation Sleep Therapy Device by a personal computer To clean the module remove the module from the therapy device Wipe the outside of the device with a cloth slightly dampened with water and a mild detergent Let the device dry completely before reinstalling into the therapy device CONNECTING DISCONNECTING THE LINK MODULE...

Page 46: ...ction 5 2 7 Listen to the device for noisy operation or loose components 8 Refer to section 5 2 to retrieve the device Error Log and refer to the chart for troubleshooting guid ance based on the Error 9 Check all other components for physical damage 10 Perform repairs to the device as necessary 5 1 2 HUMIDIFIER If the Humidifier was returned with a PAP device perform these steps with the returned ...

Page 47: ...l Assembly 2 Closed end cap 3 Philips Respironics flexible tubing 4 Pressure tubing 5 Philips Respironics Digital Manometer 6 or equivalent Minimum Specifications 0 25 cm H2O or better 0 3 cm H2O accuracy 0 1 cm H2O resolution Blue pollen filter not shown FIGURE 5 1 PRESSURE VERIFICATION WARNING If the device fails to perform within the stated specifications have the system serviced by a qualified...

Page 48: ...fy that the pressure setting matches the pressure displayed on the manometer If the pressure setting does not match the measured value for the device contact Philips Respironics or an autho rized service center to have the device serviced 8 Set up the remaining parameters and exit provider mode The unit is ready for patient use 5 3 SERVICE CENTER TOOLS SUITE The Service Center Tools Suite will pro...

Page 49: ...n the left side or drop down menu of the page 2 Click on the Download button adjacent to the Service Center Tools Suite v3 6 or greater FIGURE 5 2 SERVICE CENTER TOOLS SUITE SOFTWARE 3 Save the Service Center Tools Installer to your PC default directory is recommended 4 To use the Service Center Tools suite launch the Service Center Tools Suite software FIGURE 5 3 SERVICE CENTER TOOLS SUITE LAUNCH...

Page 50: ...n ID This function allows you to retrieve the session ID on the device The session ID is a unique number that interfaces with Encore Set Session ID This function allows you to set the session ID on the device This should only be executed when the Therapy PCA is replaced on a device Read Time Meters This function allows you to read the therapy and blower hours on the device DS Logs DreamStation Log...

Page 51: ...erapy hours should remain on the device If the PCA is NOT replaced during device servicing the blower hours should be cleared only if the Blower is replaced Otherwise the blower hours should remain on the device 5 3 4 SETTING THE SESSION ID 1 Connect the device to your PC and launch the Service Center Tools Suite 2 Select QPAP SET SESSIONS ID then click on the EXECUTE TOOL button 3 Enter the date ...

Page 52: ... DATE 4 The following screen should appear indicating the Session ID has been set FIGURE 5 6 SESSION ID SET 5 Select the OK button 6 Select the New Device button if you are setting sessions on multiple devices otherwise select the Close button to exit the tool ...

Page 53: ...e promoted by the system to a STOP level error ABORT The error information is recorded in NVRAM The fifth occurrence of a ABORT level error within a 24 hour period while power is maintained will be promoted by the system to a STOP level error This error is similar to a Reboot Level Error with the exception that the system is unable to handle the error prior to the reset e g watchdog timeout CONTIN...

Page 54: ...t E 11 ERR_WDOG_TEST REBOOT CPU 1 If error was NOT Last Stop Error clear error log and test 2 If error was Last Stop Error replace PCA and test E 15 ERR_CYCLE_HANDLER_ OVERRUN REBOOT CPU 1 If error was NOT Last Stop Error clear error log and test 2 If error was Last Stop Error replace PCA and test E 19 ERR_WDOG_TIMEOUT ABORT CPU 1 If error was NOT Last Stop Error clear error log and test 2 If erro...

Page 55: ...Last Stop Error clear error log and test 2 If error was Last Stop Error replace PCA and test E 27 ERR_MOTOR_RL_NOCO NVERGE STOP 1 Motor connection 2 Blower Box 3 PCA 1 Reseat motor connector clear error log and test 2 If error still occurs replace blower and retest 3 If 2nd retest fails replace PCA E 28 ERR_NEGATIVE_QUADR ATURE_VOLTAGE_VECT OR REBOOT 1 Motor connection 2 Blower Box 3 PCA 1 Reseat ...

Page 56: ...TLET CONTINUE 1 Air Path 2 PCA 3 Blower Box 1 Clear air path including filter and test 2 If test fails replace PCA and retest 3 If retest fails replace blower box and retest E 40 ERR_NVRAM STOP PCA 1 Replace PCA and test E 41 ERR_STORAGE_UNIT_R AM REBOOT PCA 1 If error was NOT Last Stop Error clear error log and test 2 If error was Last Stop Error replace PCA and test E 48 ERR_NVRAM_MAX_RET RIES_E...

Page 57: ...UNABLE_T O_OBTAIN_BUS REBOOT PCA 1 If error was NOT Last Stop Error clear error log and test 2 If error was Last Stop Error replace PCA and test E 73 ERR_SENSOR_PRESS_ OFFSET_STOP STOP PCA 1 Replace PCA and test E 74 ERR_PSENS_NO_CALLB ACK REBOOT PCA 1 If error was NOT Last Stop Error clear error log and test 2 If error was Last Stop Error replace PCA and test E 82 ERR_FLOW_SENSOR_O FFSET CONTINUE...

Page 58: ...CONTINUE Heater Plate 1 Clear error log and test 2 Test humidifier separately E 105 ERR_HUMID_AMBIENT_ COMM CONTINUE PCA 1 Clear error log and test 2 If the test fails or the error reoccurs replace the PCA and retest E 106 ERR_HEATED_TUBE_MA X_TEMP CONTINUE Heated Tube 1 Clear error log and test 2 Test humidifier separately E 107 ERR_HEATEDTUBE_DIS CONNECT CONTINUE N A 1 Clear error log and test E...

Page 59: ...T PCA 1 Replace PCA and test E 154 ERR_CPU_USAGE_FAUL T ABORT PCA 1 Replace PCA and test E 155 ERR_CPU_UNHANDLED _EXCEPTION ABORT PCA 1 Replace PCA and test E 170 ERR_BT_RESET_TX CONTINUE PCA 1 Replace PCA and test E 171 ERR_BT_RESET_RX CONTINUE PCA 1 Replace PCA and test E 172 ERR_BT_STACK_ERROR CONTINUE PCA 1 Replace PCA and test E 173 ERR_BT_STACK_MASK_ DATA_WR_FAIL CONTINUE PCA 1 Replace PCA a...

Page 60: ...NOT Last Stop Error clear error log and test 2 If error was Last Stop Error replace UI Panel and test 3 If retest fails after UI Panel replacement replace PCA and retest E 191 ERR_ALS_BIST CONTINUE PCA 1 Clear error log and test 2 If the retest fails or the error reoccurs replace the PCA and retest E 192 ERR_USB_DEVICE_LOS T REBOOT Accessory Module 1 Remove and reinsert the accessory module 2 If e...

Page 61: ... PCA and test E 221 ERR_MOTOR_SHUNT_S AFETY_TIMEOUT REBOOT PCA 1 If error was NOT Last Stop Error clear error log and test 2 If error was Last Stop Error replace PCA and test E 222 ERR_MOTOR_DIV_ZERO CONTINUE N A 1 Clear error log and retest E 230 ERR_HUMID_PLATE_CY CLE_OVERRUN REBOOT PCA 1 Clear error log and test 2 Test humidifier separately E 231 ERR_HUMID_PLATE_NO _MEASUREMENT REBOOT 1 Heater ...

Page 62: ...or was Last Stop Error replace PCA and test PROBLEM FAILURE MODE POSSIBLE CAUSE STEPS TO TAKE Power Supply Related Error Incorrect Power Supply Power Cord not pushed in the whole way If returned check to see if the power supply is correct Make sure power cord is pushed in the whole way No Power All connections not made Power Supply not functioning PCA Failure Damaged PCA components Intermittent Co...

Page 63: ... for loose components Check Blower wire length outside of Blower Box should measure approx 9 5 inches Replace any failed damaged component Whistling Noise from Humidifier Humidifier Seals are damaged or not seated Humidifier Back Panel not seated Wire guard loose Tank is cracked Dry Box not seated Flip Lid latch damaged or not latching well PAP and Humidifier not fully connected Make sure all Seal...

Page 64: ...l connections Run device for extended period of time is necessary Replace any failed component Dial Does Not Work The UI ribbon cable is damaged or not seated Check Encoder ribbon cable Remove and reinsert Encoder ribbon cable Replace UI Panel if problem still occurs Therapy Button Does Not Work Damage to PCA Damage to mechanical buttons Therapy Button damaged Contamination User perception Check f...

Page 65: ...ims Too Quickly User perception Ambient light sensor not functioning Verify ambient light sensor is functioning by covering the sensor hole on the Top Enclosure Replace PCA if ambient light sensor does not function Back Light Does Not Dim Ambient light sensor not functioning Verify ambient light sensor is functioning by covering the sensor hole on the Top Enclosure Replace PCA if ambient light sen...

Page 66: ... with Humidifier Electrical Issue with PAP User perception Ensure heater plate setting is anything but 0 and verify the heater plate is warming Allow enough time for plate to warm Ensure connection is fully made between PAP and Humidifier Check for open circuit Check for physical damage Replace damaged failed components Tank Runs Out of Water Settings are at max for an unsuitable environment User ...

Page 67: ...Clear any errors on the PCA If error is not duplicated replace SD Card If same error occurs with a properly working SD Card and after PCA errors are cleared replace the PCA Can t Read SD Card Data A previous version of Encore is being used SD Card corrupted Ensure Encore is up to date Use Encore or similar software to verify SD Card data can be read PROBLEM FAILURE MODE POSSIBLE CAUSE STEPS TO TAK...

Page 68: ...alert can occur during therapy Safe State These alerts consist of the pop up screen a blinking Power LED and a repeating audi ble beep Note Status alerts automatically time out after 30 seconds and their pop up screens dis appear All other alerts must be acknowledged to clear Alert Summary Table The following table summarizes the alerts ALERT ICON TYPE DESCRIPTION POSSIBLE CAUSE ACTION Data Activi...

Page 69: ... can be identified by the digits displayed n a Rotate control dial to accept pairing Yes or decline No then press control dial to confirm selection SD Card Removed Notification or Alert 2 Indicates SD card has been removed from therapy device and not reinserted before the start of the current therapy session SD card was not reinserted into device Reinsert SD card or click to clear alert Oximetry G...

Page 70: ...ification Message from your Provider n a Press Control Dial to acknowledge and clear the message Change Rejected Alert 1 A prescription or settingschange was rejected Change missing or incorrect n a Humidification Error Contact support if the problem persists Status Humidifier error only when humidifier is present Humidifier heater plate error or humidifier not properly connected to therapy device...

Page 71: ...ached power supply is not capable of supporting humidification or heated tube Incorrect power supply Switch to a Philips Respironics DreamStation power supply that is capable of supporting humidification Or operate therapy device without humidifier Service Required Safe State Indicates an error which enters device into Safe State This allows power to remain on but airflow is disabled Device error ...

Page 72: ...upply is attached Confirm a compatible Philips Respironics power supply is attached Switch to compatible power supply if needed If battery is being used ensure battery is adequately charged Automatic Off Status Displayed when therapy ends due to automatic off function The mask has been removed n a Inlet blocked Check filter Notification Blocked airway Blockage at device inlet Check device air inle...

Page 73: ... when a new language is selected from the menu n a No action needed Times out when complete Busy Status Displayed when the device is temporarily inaccessible due to data communication n a No action needed Sleep Progress n a Status Displays last 3 nights hourly use on first screen and nights of use on second screen n a Press Control Dial to acknowledge and clear each screen Otherwise message times ...

Page 74: ...fy its proper operation Refer to Chapter 8 for testing procedures WARNING To prevent electrical shock disconnect the electrical supply before attempting to make any repairs to these devices CAUTION Components used in this device are subject to damage from static electricity Repairs made to this device must be performed only in an anti static Electro Static Discharge ESD protected environment CAUTI...

Page 75: ...lower Upper Cap 1115481 Blower Box Assembly 1121548 Blower Assembly SK 1121550 Blower Isolators SK 1121552 Blower Assembly Moog 1121549 Blower Isolators Moog 1121551 Blower Outlet Seal 1121553 DC Power Cable 1121554 DC Jack Color Insert 1121555 Rear Panel 1115543 Rear Panel O Ring 1121559 Bottom Enclosure 1115487 Warning Label DOM 1121556 Warning Label INTL 1121557 Warning Label Canada Latin Ameri...

Page 76: ... VER 07 Travel Power Supply JP 65W 1127196 Travel Power Supply AU 65W 1127197 Travel Power Supply GB 65W 1127238 Power Cord 1038928 Standard Tubing 15mm PR15 Torx Driver Kit T8 T10 T15 1040889 DESCRIPTION RP KIT NUMBER ...

Page 77: ...E THE FLIP DOORS 1 Squeeze the Flip Door standoffs inward and pull the cover away from the device 2 Repeat on other side TO INSTALL THE FLIP DOORS 1 Place the Flip Door standoffs back into the holes on the device 2 Repeat on other side 3 Verify the Doors are fully seated NOTE The cutout on the Flip Doors should be towards the back of the device Kit Included in Kit Tools Required Accessory Module F...

Page 78: ...o place 6 1 3 REPLACING THE UPPER ENCLOSURE KEYPAD TO REMOVE THE UPPER ENCLOSURE KEYPAD 1 Remove the Flip Doors refer to previous section 2 Remove the two 4 x 1 2 screws that secure the Upper Enclosure to the Bottom Enclosure using a T 10 Torx driver refer to Figure 6 3 3 Pull the Upper Enclosure off the device Kit Included in Kit Tools Required Upper Enclosure Assembly Upper Enclosure Keypad 4 x ...

Page 79: ...ure the Upper Enclosure to the Bottom Enclosure using the two 4 x 1 2 torque to 6 IN LB 3 Install the Keypad on the Upper Enclosure as shown in Figure 6 3 above and verify it is fully seated 4 Assemble the remainder of the device as instructed in the previous section FIGURE 6 4 UPPER ENCLOSURE SEATED Torque screws to 6 IN LB when installing Upper Enclosure Verify Top is fully seated ...

Page 80: ... up on the connector latch and pulling the ribbon away from the connector FIGURE 6 5 UI PANEL TO INSTALL THE UI PANEL 1 Align the UI Panel ribbon into the connector latch on the PCA 2 Snap down the connector latch to hold the ribbon in place 3 Verify the UI connection is properly seated refer the Figure below FIGURE 6 6 UI PANEL CLASP Kit Included in Kit Tools Required UI Panel Assembly UI Panel T...

Page 81: ...PAGE 6 8 1117539 VER 07 4 Seat the UI Panel into Bottom Enclosure grooves 5 Assemble the remainder of the device as instructed in the previous sections FIGURE 6 7 UI PANEL ALIGNMENT GOOD BAD BAD GOOD ...

Page 82: ...s that secure the PCA to the Blower Cap using a T 10 Torx driver 3 Lift the PCA up away from the device 4 Disconnect the DC Connector and Blower Connector from the PCA FIGURE 6 8 PCA Kit Included in Kit Tools Required PCA PCA 4 x 1 2 screws qty 2 Torx Screwdriver T10 is recommended Torque screws to 2 5 IN LB when installing PCA DC Connector Blower Connector ...

Page 83: ...into the Seals refer to Figure 6 10 3 Secure the PCA with the two 4 x 1 2 screws torque to 2 5 IN LB 4 Assemble the remainder of the device as instructed in the previous sections FIGURE 6 9 PCA INSTALLATION FIGURE 6 10 FLOW AND PRESSURE SENSOR ALIGNMENT CAUTION The PCA s Flow and Pressure Sensors must be in proper alignment with the Seals Otherwise the device will not operate properly Align stando...

Page 84: ... PCA Remove it from the PCA if this is the case FIGURE 6 11 FLOW AND PRESSURE SENSOR SEALS TO INSTALL THE SEALS 1 Align the Seals into the Blower Box Assembly grooves Ensure the seals are flush against the Blower Box Assembly 2 Assemble the remainder of the device as instructed in the previous sections Kit Included in Kit Tools Required Flower Sensor Seal Flower Sensor Seal Torx Screwdriver T10 is...

Page 85: ...ound the Blower Cap chimney as to not damage the Blower Cap seal FIGURE 6 12 BLOWER UPPER CAP REMOVAL Kit Included in Kit Tools Required Blower Upper Cap Blower Upper Cap 4 x 1 2 screws qty 4 Torx Screwdriver T10 is recommended Flathead Screwdriver CAUTION Damage can occur to the seal on the underside of the Blower Upper Cap if prying in the wrong spots Be sure to pry the Cap off only at the Chimn...

Page 86: ...ower Cap is fully seated 2 Secure the Blower Cap to the Blower Box Assembly using the four 4 x 1 2 screws torque to 2 5 IN LB 3 Assemble the remainder of the device as instructed in the previous sections FIGURE 6 13 BLOWER UPPER CAP ALIGNMENT CAUTION Ensure the Blower Cap is seated properly refer to the Figures below Not Seated Bad Seated Good ...

Page 87: ...PANEL FIGURE 6 14 SK AND MOOG BLOWER IDENTIFICATION Kit Included in Kit Tools Required Blower Assembly SK or Blower Assembly Moog Blower Torx Screwdriver T10 is recommended Blower Box Assembly Blower Box Assembly Rear Panel Assembly Rear Panel Rear Panel O Ring BLOWER SK BLOWER MOOG ...

Page 88: ...d carefully pull the Rear Panel from the Blower Box Assembly by pulling it out of the grooves 4 Remove the DC Connector ferrite from the Rear Panel refer to the Figure below 5 Lift the Blower Box Assembly out of the Bottom Enclosure FIGURE 6 16 REAR PANEL FERRITE 6 Remove the Blower wire ferrite from the Blower Box Assembly by pushing the ferrite straight down 7 Unwrap the wire around the Blower B...

Page 89: ...Y AND REAR PANEL 1 Position the Blower inside the Blower Box Assembly so that the Blower Outlet Seal and Blower Isolators are aligned in their grooves refer to the Figure below FIGURE 6 18 SEATING OF BLOWER CAUTION The SK and Moog Blowers are not interchangeable Ensure to replace SK with SK and Moog with Moog The Blower with the Isolators attached should be rested inside the Blower Box Do not pres...

Page 90: ...he Blower Box Assembly FIGURE 6 19 GROMMET INSERTION WIRE ROUTING SK BLOWER FIGURE 6 20 GROMMET INSERTION WIRE ROUTING MOOG BLOWER Grommet Wire length approx 9 5 in from this point Ensure wire is routed just as shown SK Blower Wire length approx 9 5 in from this point Ensure wire is routed just as shown Moog Blower Grommet ...

Page 91: ...539 VER 07 4 Verify the Blower Outlet Seal is properly seated FIGURE 6 21 BLOWER OUTLET SEAL ALIGNMENT 5 Route the Blower wires as shown below FIGURE 6 22 BLOWER WIRE ROUTING GOOD Seated BAD Not Seated Seat in groove ...

Page 92: ...PAGE 6 19 1117539 VER 07 FIGURE 6 23 BLOWER WIRE ROUTING BLOWER BOX UNDERSIDE FIGURE 6 24 BLOWER WIRE ROUTING FERRITE INSERTION Slide Ferrite up to the top of the groove ...

Page 93: ...7 6 Snap DC Cable ferrite into groove on Rear Panel FIGURE 6 25 FERRITE ON BACK PANEL 7 Attach Rear Panel onto Blower Box Assembly NOTE Ensure O Ring is properly seated FIGURE 6 26 REAR PANEL SEATING Snap Ferrite into groove ...

Page 94: ...Panel attached into the Bottom Enclosure 9 Secure the Blower Box Assembly with the two 4 x 1 2 screws torque to 6 IN LB 10 Assemble the remainder of the device as instructed in the previous sections FIGURE 6 28 BLOWER BOX Rear Panel GOOD BAD GOOD BAD Torque screws to 6 IN LB when installing the Blower Box ...

Page 95: ...solators on the Blower and verify they are fully seated 2 Assemble the remainder of the device as instructed in the previous sections FIGURE 6 30 ISOLATOR ALIGNMENT Kit Included in Kit Tools Required Blower Outlet Seal Blower Outlet Seal Torx Screwdriver T10 is recommended Blower Isolators SK or Blower Isolators Moog Blower Isolators CAUTION The Isolators are prone to falling off the Blower Ensure...

Page 96: ...PAGE 6 23 1117539 VER 07 FIGURE 6 31 ISOLATORS SEATED ON BLOWER BAD FIGURE 6 32 ISOLATORS BLOWER INSTALLED IN DEVICE BAD ISOLATORS SK BAD ISOLATORS MOOG BAD ISOLATORS MOOG BAD ISOLATORS SK BAD ...

Page 97: ... DC Jack Color Insert FIGURE 6 33 BOTTOM ENCLOSURE FLIPPED TO REMOVE COLOR INSERT DC CABLE TO INSTALL THE DC POWER CABLE AND DC JACK COLOR INSERT 1 Align the DC Jack Color Insert and DC Cable into the grooves as shown in the Figure below 2 Assemble the remainder of the device as instructed in the previous sections FIGURE 6 34 DC CABLE AND COLOR JACK INSERT Kit Included in Kit Tools Required DC Pow...

Page 98: ... require replacement TO INSTALL THE BOTTOM ENCLOSURE 1 Place a new warning label and Serial Model Number label on the bottom of the Bottom Enclosure refer to Figure 6 31 for label placement and refer to Section 6 2 for Serial Model Number label creation 2 Assemble the remainder of the device as instructed in the previous sections FIGURE 6 35 WARNING LABEL AND SERIAL MODEL NUMBER LABEL PLACEMENT Ki...

Page 99: ...430T or similar Printer Specifications Label printer Monochrome Direct thermal thermal transfer Roll 4 25 in 300 dpi up to 240 9 inch min USB LAN serial 6 2 2 SOFTWARE Recommended Software Loftware Software and Print Key Fees Apply For a full detailed list of Loftware supported printers and fees please refer to http www loft ware com support tech_printers cfm For software support visit their websi...

Page 100: ...RINTING OPTIONS There are three different options available for reprinting the serial number label One of these three options must be used If option 3 cannot be duplicated to match the original label options 1 and 2 may be used in its place ...

Page 101: ... module only Use a cloth with one of the following cleaning agents to clean the exterior of the device and link module Mild Detergent 70 Isopropyl Alcohol DisCide Towelettes 10 Chlorine Bleach solution 3 Allow the therapy device to dry completely before plugging in the power cord and re inserting the filter s WARNING To avoid electrical shock always unplug the power cord from the wall outlet befor...

Page 102: ... take the reusable filter to the sink turn it upside down and run warm tap water through the white filter media to rinse away any debris Next lightly shake the filter to remove as much water as possible Allow the filter to air dry completely before reinstall ing it If the reusable blue pollen filter is torn replace it Only Philips Respironics supplied filters should be used as replacement filters ...

Page 103: ...the tubing in a solution of warm water and a mild detergent 4 Rinse thoroughly and air dry 5 Inspect the tubing for damage or wear cracking crazing tears punctures etc Discard and replace if necessary 6 7 PREVENTIVE MAINTENANCE There is no preventive maintenance required for the device The device does not require routine service NOTE Refer to section 7 4 for instructions on how to clean the heated...

Page 104: ...ect the Humidifier from the PAP device before attempting to make any repairs CAUTION Components used in this device are subject to damage from static electricity Repairs made to this device must be performed only in an anti static Electro Static Discharge ESD protected environment DESCRIPTION RP KIT NUMBER Dry Box Assembly 1120668 Dry Box Inlet Seal 1120613 Flip Lid Bottom Assembly 1120873 Flip Li...

Page 105: ...ATER CHAMBER ASSEMBLY 1 Pull back on the latch located on the Bottom Assembly and lift up the Flip Lid 2 Pull the Water Tank Assembly out of the Humidifier FIGURE 7 1 WATER CHAMBER ASSEMBLY TO INSTALL THE WATER TANK ASSEMBLY 1 Position the Water Tank back into the Humidifier as shown in Figure 7 1 2 Close the Flip Lid and verify it latches into place Kit Included in Kit Tools Required Tank Assembl...

Page 106: ...LS 1 Remove the Water Tank as instructed in the previous section not required for Flip Lid Seal replacement only 2 Pull the Flip Lid Seal off of the Flip Lid and pull the Dry box Inlet Seal from the Dry Box Assembly Kit Included in Kit Tools Required Flip Lid Seal Flip Lid Seal None Dry Box Seal Dry Box Seal Flip Lid Seal GOOD BAD Dry Box Seal ...

Page 107: ...BOX ASSEMBLY 1 Remove the Water Tank and Dry Box Seal refer to previous corresponding sections 2 Pull back on the Dry Box Latch and pull the Dry Box out of the Bottom Assembly FIGURE 7 4 DRY BOX ASSEMBLY TO INSTALL THE DRY BOX ASSEMBLY 1 Position the Dry Box into the Bottom Assembly 2 Snap the Dry Box into place and verify it is fully seated 3 Assemble the remainder of the device as instructed in ...

Page 108: ...onding sections 2 Push the bottom of the Wire Guard down and inward toward the Flip Lid while prying upward with a small flathead screwdriver 3 Pull the Wire Guard away from the Flip Lid FIGURE 7 5 WIRE GUARD Kit Included in Kit Tools Required Wire Guard Wire Guard Flathead Screwdriver Wire Guard Push at base of Wire Guard and pry upward to remove ...

Page 109: ... seat Wire Guard FIGURE 7 6 WIRE GUARD INSTALLATION 2 Verify wires are properly seated by wiping your finger across Wire Gard in location shown in the illustration below If Wire Guard is not flush with the Flip Lid surface remove Wire Guard re seat wires and reinstall Wire Guard Repeat process if necessary FIGURE 7 7 VERIFY WIRES SEATED FIGURE 7 8 WIRE GUARD FLUSH WITH SURFACE GOOD BAD ...

Page 110: ... Guard 4 Assemble the remainder of the device as instructed in the previous sections NOTE Ensure the wires are not pinched when installing the Wire Guard and verify it is fully seated secure refer to illustrations below FIGURE 7 9 WIRE GUARD ALIGNMENT GOOD BAD ...

Page 111: ...se the Back Panel tab from the latch area FIGURE 7 10 BACK PANEL ASSEMBLY TO INSTALL THE BACK PANEL ASSEMBLY 1 Align the Back Panel onto the Bottom Assembly 2 Secure the Back Panel with the four 4 x 1 2 screws torque to 6 IN LB 3 Verify the Back Panel is fully seated secure Kit Included in Kit Tools Required Back Panel Assembly Back Panel Assembly 4 x 1 2 screws qty 5 Torx Screwdriver T10 is recom...

Page 112: ...e Latch out of the Humidifier Assembly FIGURE 7 11 FLIP LID LATCH TO INSTALL THE FLIP LID LATCH 1 Align the Latch into the Bottom Assembly grooves 2 Push up on the Latch tabs while pushing the Latch until it clicks into place 3 Verify the Flip Lid latches into place FIGURE 7 12 LATCH ALIGNED Kit Included in Kit Tools Required Flip Lid Latch Flip Lid Latch Torx Screwdriver T10 is recommended Push t...

Page 113: ...ING TRAY FIGURE 7 13 LIFTING TRAY TO REMOVE THE LIFTING TRAY 1 Push out one side of the Lifting Tray out of the groove and then repeat on the other side FIGURE 7 14 LIFTING TRAY REMOVAL Kit Included in Kit Tools Required Lifting Tray Lifting Tray None ...

Page 114: ...hen repeat on the other side FIGURE 7 15 LIFTING TRAY REMOVAL TO INSTALL THE LIFTING TRAY 1 Place one end of the Lifting Tray back into the cut out groove and then repeat on other side NOTE The Tray will only fit one way into the groove Refer to illustration below FIGURE 7 16 LIFTING TRAY INSTALLATION ...

Page 115: ... out holes turn the Tray downward 3 Pull back one of the other ends of the Lifting Tray and align into the groove refer to illustration below 4 Repeat on other side FIGURE 7 17 LIFTING TRAY INSTALLATION FIGURE 7 18 LIFTING TRAY INSTALLED Pull back Tray and align into groove Heat Shield ...

Page 116: ...1 Align the Bottom Cover onto the Bottom Assembly 2 Secure the Bottom Cover with the four 6 x 1 4 screws torque to 6 IN LB NOTE Ensure the wires are routed as shown below before installing the Bottom Cover Also ensure the wires aren t pinched when installing the Bottom Cover FIGURE 7 20 WIRE ROUTING Kit Included in Kit Tools Required Bottom Cover Bottom Cover 6 x 1 4 screws qty 4 Torx Screwdriver ...

Page 117: ...ed in the previous section 2 Remove the Heat Shield from the Bottom Cover TO INSTALL THE HEAT SHIELD 1 Place the Heat Shield on the Bottom Cover as shown in the Figure above 2 Install the Bottom Cover as instructed in the previous section Included in Kit Included in Kit Tools Required Heat Shield Heat Shield Torx Screwdriver T15 is recommended ...

Page 118: ...Assembly as shown in the Figure above 2 Place the Heater Plate back into position 3 Install the Bottom Cover as instructed in section 7 1 8 NOTE Ensure the Heater Plate is seated properly and the wires are routed as shown in the Figure below before installing the Bottom Cover Also ensure the wires aren t pinched when installing the Bottom Cover FIGURE 7 23 HEATER PLATE INSTALLED Included in Kit In...

Page 119: ...Bottom Flip Lid Assembly Dry Box Heater Plate Heater Plate O Ring Heat Shield Bottom Cover Back Panel 6 x 1 4 screws qty 4 Torx Screwdriver T10 and T15 is recommended ISO Port ISO Port None ISO Port Cover ISO Port Cover Warning Label DOM Warning Label INTL Warning Label None NOTE If the Heater Plate is faulty this assembly is required to be replaced It will be come pre assembled ...

Page 120: ...nd Tank Assembly onto the new Bot tom Flip Lid Assembly as instructed in the previous sections 3 Place a new warning label and Serial Model number label on the bottom of the Humidifier refer to Section 6 2 for creating the Serial Model number label FIGURE 7 25 WARNING LABEL AND SERIAL MODEL NUMBER LABEL PLACEMENT 4 Route the heated tube wire harness through the Flip Lid opening as shown below FIGU...

Page 121: ...RE 7 27 ISO PORT COVER 6 Install heated tube wire connector into ISO Port and verify it is connected the whole way as shown below FIGURE 7 28 CONNECTING THE WIRE HARNESS 7 Install the ISO Port into the top opening of ISO Port Cover and snap into place FIGURE 7 29 ISO PORT INSTALLATION ...

Page 122: ...rt Cover FIGURE 7 30 ISO PORT INSTALLATION VERIFICATION 9 Verify correct orientation of ISO Port assembly as shown below port facing toward front of unit and fully install ISO Port assembly into Flip Lid FIGURE 7 31 ISO PORT ASSEMBLY INSTALLATION FIGURE 7 32 ISO PORT AND COVER INSTALLED GOOD BAD ...

Page 123: ...Lid and ensure there are no pinched wires FIGURE 7 33 VERIFY NO PINCHED WIRES 11 Route the wires flat as shown and ensure they are in the middle within the grooves FIGURE 7 34 WIRE ROUTING 12 Install the Wire Guard as indicated in Section 7 1 4 ...

Page 124: ...rapy device 2 Inspect the humidifier base for any damage and replace it if necessary 3 Clean the humidifier outlet port by using a damp bottle brush or a damp cloth Insert the brush or cloth approximately 2 75 inches 7 cm into the outlet opening while cleaning WARNING Allow the humidifier heater plate and water to cool down for approximately 15 minutes before removing the water tank A burn may res...

Page 125: ...NG PRIOR TO DISINFECTION 1 Gently wash the items tank seal and heated tubing using Medizyme or an equivalent enzymatic detergent and a soft bristle brush to adequately remove adhering substances 2 Rinse the items separately by immersing each in at least 3 gallons 11 4 liters of water and agitate vigorously 3 Remove each item from the water and allow the water to drain from tank seal and heated tub...

Page 126: ... of water and air dry out of direct sunlight CAUTION Follow all instructions from the manufacturer of the treatment products Any deviation from these instructions the manufacturer s instructions or agents not listed in this guide may impact the performance of the product Review all applicable instructions for additional warnings and cautions A brush is not necessary for the inside of the tube of t...

Page 127: ...rt PN 1127131 Qty 1 ea Pollen Filter PN 1122446 Qty 1 ea SD Card PN 1063859 10 pk Qty 1 ea Printer network or local connection PC with the following minimum requirements Windows 7 32 64 Bit Operating System Professional Enterprise can be used for Philips net work users only 3 20 GHz Processor 100 GB Free hard drive space 8 GB RAM 1 serial port Minimum 4 USB port Keyboard mouse and 17 inch monitor ...

Page 128: ...e following temperature specifications 41 º F to 95 º F 5 º C to 35º C 8 4 FINAL TESTING PROCEDURE 1 Download the NI LabVIEW 2014 Support Package from my respironics com and install the soft ware by accepting all license agreements and default installation locations 2 Download the DreamStation Device Driver Package from my respironics com and unzip the files to your PC 3 Follow the installation in...

Page 129: ...PAGE 8 3 1117539 VER 07 6 A window will popup asking for a user name and password These are not required select OK to proceed 7 Select the Open file button FIGURE 8 1 TEST EXECUTIVE LAUNCHED 1 2 ...

Page 130: ...DreamStation Service Test seq file then select OK to load it into the test executive FIGURE 8 2 LOADING THE SEQUENCE FILE 9 You will see the test files loaded into the software 10 Connect the Serial Communication Cable to COM 1 of your PC ...

Page 131: ... identification information serial model number etc 13 Follow the next prompt by connecting all hardware items listed and as shown below and then select OK The Serial USB Cable must be connected to COM 1 The Micro USB Cable can be connected to any other USB COM port FIGURE 8 3 DEVICE SETUP ...

Page 132: ...PAGE 8 6 1117539 VER 07 14 Continue to follow all prompts 15 Once the pressure and flow testing is complete the following prompt will be displayed FIGURE 8 4 CONNECT HUMIDIFIER ...

Page 133: ...hown below then selects OK 17 Continue to follow all prompts until the test is complete 18 If the test fails evaluate for possible causes and make any necessary adjustments or repairs and then retest the device 19 Print and keep a copy of the test report for your records ...

Page 134: ...PAGE 8 8 1117539 VER 07 This page intentionally blank ...

Page 135: ...NO 1117539 VER 07 EMH 06 04 2016 ...

Reviews: