


Chapter 13: Dominion KX II Local Console
234
Configuring Dominion KX II Local Port Settings from the Local Console
The standard local port and the extended local port can be configured
from the Remote Console on the Port Configuration page or from the
Local Console on the Local Port Settings page. See
Configuring
Dominion KX II Local Port Settings
(on page 171) for details on
configuring these ports.
Dominion KX II Local Console Factory Reset
Note: This feature is available only on the Dominion KX II Local Console.
The Dominion KX II offers several types of reset modes from the Local
Console user interface.
Note: It is recommended that you save the audit log prior to performing a
factory reset. The audit log is deleted when a factory reset is performed
and the reset event is not logged in the audit log. For more information
about saving the audit log, see
Audit Log
(on page 192).
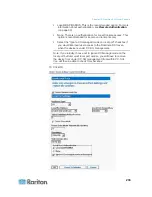
To perform a factory reset:
1. Choose Maintenance > Factory Reset. The Factory Reset page
opens.
2. Choose the appropriate reset option from the following options:
•
Full Factory Reset - Removes the entire configuration and resets the
device completely to the factory defaults. Note that any management
associations with CommandCenter will be broken. Because of the
complete nature of this reset, you will be prompted to confirm the
factory reset.
•
Network Parameter Reset - Resets the network parameters of the
device back to the default values (click Device Settings > Network
Settings to access this information):
IP auto configuration
IP
address
Subnet
mask
Gateway IP address
Primary DNS server IP address
Secondary DNS server IP address
Discovery
port
Bandwidth
limit
LAN interface speed & duplex
Enable automatic failover
Summary of Contents for Dominion KX II
Page 10: ......
Page 14: ...Chapter 1 Introduction 4...
Page 16: ...Chapter 1 Introduction 6 Product Photos Dominion KX II KX2 832...
Page 17: ...Chapter 1 Introduction 7 KX2 864...
Page 89: ...Chapter 4 Virtual Media 79...
Page 111: ...Chapter 6 User Management 101...
Page 144: ...Chapter 7 Device Management 134 3 Click OK...
Page 154: ...Chapter 7 Device Management 144 3 Click OK...
Page 198: ...Chapter 9 Security Management 188 3 You are prompted to confirm the deletion Click OK...
Page 277: ...Appendix B Updating the LDAP Schema 267...
Page 324: ......


