


Chapter 7: Device Management
154
b. Maximum Number of Slots - The default maximum number of
slots available on the blade chassis is automatically entered.
c. Administrative Module Primary IP Address/Host Name - Not
applicable.
d. Port Number - The default port number for the blade chassis is
22. Not applicable.
e. Username - Not applicable.
f.
Password - Not applicable.
2. Change the blade chassis name if needed.
3. Indicate the blades that are installed in the blade chassis by checking
the Installed checkbox next to each slot that has a blade installed.
Alternatively, use the Select All checkbox. If needed, change the
blade server names.
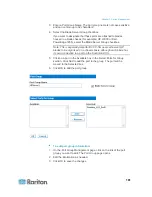
4. In the Blade Chassis Managed Links section of the page, you are
able to configure the connection to a blade chassis web browser
interface if one is available. Click the Blade Chassis Managed Links
icon
to expand the section on the
page.
The first URL link is intended for use to connect to the blade chassis
Administration Module GUI.
Note: Access to the URL links entered in this section of the page is
governed by the blade chassis port permissions.
a. Active - To activate the link once it is configured, select the
Active checkbox. Leave the checkbox deselected to keep the link
inactive. Entering information into the link fields and saving can
still be done even if Active is not selected. Once Active is
selected, the URL field is required. The username, password,
username field and password field are optional depending on
whether single sign-on is desired or not.
b. URL - Enter the URL to the interface. See
Blade Chassis
Sample URL Formats
(on page 167) for sample configurations
for the Dell PowerEdge 1855/1955.
c. Username - Enter the username used to access the interface.
d. Password - Enter the password used to access the interface.
Note: Leave the username and password fields blank for DRAC, ILO,
and RSA web applications or the connection will fail.
Summary of Contents for Dominion KX II
Page 10: ......
Page 14: ...Chapter 1 Introduction 4...
Page 16: ...Chapter 1 Introduction 6 Product Photos Dominion KX II KX2 832...
Page 17: ...Chapter 1 Introduction 7 KX2 864...
Page 89: ...Chapter 4 Virtual Media 79...
Page 111: ...Chapter 6 User Management 101...
Page 144: ...Chapter 7 Device Management 134 3 Click OK...
Page 154: ...Chapter 7 Device Management 144 3 Click OK...
Page 198: ...Chapter 9 Security Management 188 3 You are prompted to confirm the deletion Click OK...
Page 277: ...Appendix B Updating the LDAP Schema 267...
Page 324: ......


