


4300 ACT Wood Stove Series
Page 6
250-7061C December 10, 2004
R
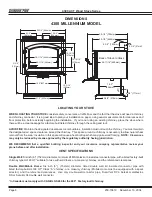
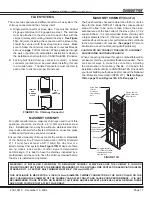
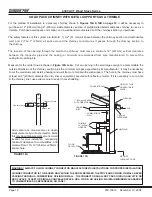
DIMENSIONS
4300 MILLENNIUM MODEL
CL
21.0" (533mm)
14-15/16"
(379mm)
10-15/16"
(278mm)
10-3/16"
(259mm)
18.0"(457mm)
25-1/2" (648mm)
12-3/4"
(324mm)
9-1/2"
(241mm)
19-1/16" (484mm)
15-1/16" (383mm)
31-1/8"
(791mm)
CL
24-11/16" (628mm)
Back of Stove to Glass
CL
28-1/2" (724mm)
25-1/2" (648mm)
5-1/2" (140mm)
2-1/4" (57mm)
16.0"
(406mm)
4-3/8" (111mm)
20-3/8" (518mm)
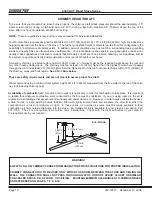
LOCATING YOUR STOVE
WHEN LOCATING YOUR STOVE
consider safety, convenience, traffic flow, and the fact that the stove will need a chimney
and chimney connector. It is a good idea to plan your installation on paper, using exact measurements for clearances and
floor protection, before actually beginning the installation. If you’re not using an existing chimney, place the stove where
there will be a clear passage for a factory-built listed chimney through the ceiling and roof.
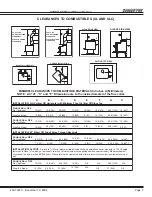
AVOID FIRE
: Maintain the designated clearances to combustibles. Insulation must not touch the chimney. You must maintain
the designated air space clearance around the chimney. This space around a chimney is necessary to allow natural heat
removal from the area. Insulation in this space will cause a heat buildup, which may ignite wood framing.
NOTE: Clearances
may only be reduced by means approved by the regulatory authority having jurisdiction.
WE RECOMMEND
that a qualified building inspector and your insurance company representative review your
plans before and after installation.
VENT SPECIFICATIONS
Single Wall:
Six inch (6”) (152mm) diameter, minimum 24 MSG black or blued steel connector pipe, with a listed factory-built
chimney type UL103 HT* suitable for use with solid fuels, or a masonry chimney, and the referenced clearances.
Double Wall/Mobile Home:
Six inch (6”) (152mm) diameter, listed double wall air insulated connector pipe with
listed factory-built UL103 HT* Class “A” chimney, or a masonry chimney (Mobile Home must be equipped with a spark
arrestor), and the referenced clearances. Use only double-wall connector pipe, Dura-Vent DVL, Selkirk metalbestos
DS or Security DL double wall connector.
*
In Canada must comply with CAN/ULC-S269 for the 650° Factory-built chimney.


