background image

Page 21


250-7061C    December 10, 2004

4300 ACT Wood Stove Series

R

NOTE:  

These are approximate settings, and will vary with type of wood or chimney draft. Due to altitude and other environmental circumstances, this 

operation information is a guideline only.  Similar burn rates may be obtained using other settings unique to your situation.

There are many ways to build a fire.  The basic principle is to light easily-ignitable tinder or paper, which ignites the fast burning 

kindling, which in turn ignites the slow-burning firewood.  Here is one method that works well:
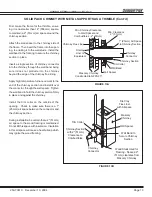
1

.  Place several wads of crushed paper on the firebox floor.  

Heating the flue with slightly crumpled newspaper before 

adding kindling keeps smoke to a minimum.

2.  Lay small dry sticks of kindling on top of the paper.

3.  Open Start-Up Air Control and Primary Air Control fully.

4.  Make sure that no matches or other combustibles are in the immediate area of the stove.  Be sure the room is adequately 

ventilated and the flue unobstructed.

5.  Light  the  paper  in  the  stove.    NEVER  light  or  rekindle  stove  with  kerosene,  gasoline,  or  charcoal  lighter  fluid;  the 

results can be fatal.

6.  Once  the  kindling  is  burning  quickly,  add  several  full-length  logs  3”  (76mm)  or  4”  (102mm)  in  diameter.    Be  careful  not 

to smother the fire.  Stack the pieces of wood carefully:  near enough to keep each other hot, but far enough away from 

each other to allow adequate air flow between them.

7.  When  ready  to  reload  the  stove,  add  more  logs.    Large  logs  burn  slowly,  holding  a  fire  longer.    Small  logs  burn  fast 

and hot, giving quick heat.

8.  Adjust the Start-Up Air Control and Primary Air Control; the more you close down the Primary Air Control, the lower and slower 

the fire will burn.  The more you open the Primary Air Control, the more heat will be produced.  The Start-Up Air Control is only 

used for the first 5 to 15 minutes.

As long as there are hot coals, repeating steps 7 and 8 will maintain a continuous fire throughout the season.

NOTE:

  The special high temperature paint that your stove is finished with will cure as your stove heats.  You will notice an 

odor and perhaps see some vapor rise from the stove surface; this is normal.  We recommend that you open a window 

until the odor dissipates and paint is cured.

NOTE:

  Stove should be run full open for 15 minutes a day to keep air passages clean.

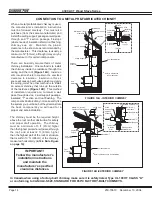
WARNING!  ALWAYS OPERATE THIS APPLIANCE WITH THE DOOR 

CLOSED AND  LATCHED  EXCEPT  DURING  START-UP AND  RE-

FUELING .

WARNING!  DO NOT LEAVE THE FIRE UNATTENDED WHEN THE DOOR 

IS  UNLATCHED.    UNSTABLE  FIREWOOD  COULD  FALL  OUT  OF  THE 

FIREBOX CREATING A FIRE HAZARD TO YOUR HOME.

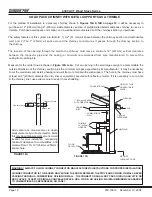
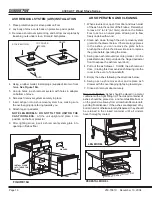
CAUTION:  Before lighting your first fire in the stove: 1) Make certain that the baffle is correctly positioned.  It 

should be resting against the rear support; 2) Follow instructions on page 22 for cleaning plated surfaces,  and; 

3) Remove all labels from glass front.
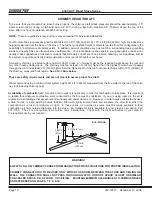
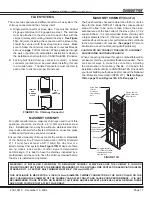
BUILDING A FIRE

CAUTION:  Never use gasoline, gasoline-type lantern fuel, kerosene, charcoal lighter fluid, or similar liquids to start 

or “freshen up” a fire in this heater. Keep all such liquids well away from the heater while it is in use.

For maximum operating efficiency with the lowest emissions, follow these operating procedures:

1.  Regardless of desired heat output, when loading stove, burn your stove with both air controls wide open for 5 to 15 minutes.

2.  Regulate burn rate (heat output) by using the Primary Air Control (center under ashcatcher).  The Start-Up Air Control (on the 

right) is used for initial start-up and reloading.

3.  Heat output settings:  Following 5 to 15 minutes of burning with controls wide open (

see #1 above

):

4.  Burn dry, well-seasoned wood. 

OPERATING INSTRUCTIONS (Cont’d)

IMPORTANT - PLEASE READ BEFORE USING STOVE

WARNING:

  Do not operate with Start-Up Air 

Control  in  the  open  position  in  excess  of  15 

minutes!  Risk of extreme temperatures! Pro-

longed  operation  of  this  stove  with  the  Start-

Up Air Control in the open position may cause 

the combustible materials around the stove to 

exceed safe temperature limits.

BTU / Hr

Below 10,000

10,000 - 15,000

15,000 - 30,000

Maximum Heat

Start-Up Air Control

Closed after 5 to 15 minutes

Closed after 5 to 15 minutes

Closed after 5 to 15 minutes

Closed after 5 to 15 minutes

*Primary Control

Pull to Stop

1” - 1-1/4” open

1-1/4” - 2-1/2” open

Fully open

Summary of Contents for 4300 Series

Page 1: ...owing has stopped OVERFIRING VOIDS YOUR WARRANTY 4 Cool ashes should be disposed of carefully using a metal container 5 Do not burn wet or green wood Store wood in a dry location 6 DO NOT BURN GARBAGE...

Page 2: ...are old fashioned when it comes to craftsmanship Each unit is meticulously fabricated and gold and nickel surfaces are hand finished for lasting beauty and enjoyment Our pledge to quality is completed...

Page 3: ...Dimensions 5 6 Locating Your Stove 6 Vent Speci cations 6 Clearances to Combustibles 7 Floor Protection 8 9 Alternate Materials Worksheet 9 INSTALLATION METHODS Chimney Height Draft 2 10 3 Rule 10 Flu...

Page 4: ...the chimney support base firestop as appropriate attic insulation shield insulated tee etc are necessary to assure a safe chimney installation Use only components manufactured for the chimney Chimney...

Page 5: ...mm 4 3 16 106mm 25 3 16 640mm 4300 STEP TOP UNI BODY PEDESTAL MODEL 4300 STEP TOP UNI BODY LEG MODEL 26 1 2 673mm 34 1 4 870mm 10 1 2 267mm 15 0 381mm 4 3 16 106mm 25 3 16 640mm 25 3 16 640mm 8 9 16 2...

Page 6: ...maintain the designated air space clearance around the chimney This space around a chimney is necessary to allow natural heat removal from the area Insulation in this space will cause a heat buildup...

Page 7: ...el INSTALLATION 90 Elbow Off Top of Stove Through Backwall DOUBLE WALL PIPE Flat Top Model Step Top Model INSTALLATION ALCOVE Six inch 6 152mm diameter listed Double Wall air insulated connector pipe...

Page 8: ...from the sides and rear of the stove See exception below EXCEPTION Non combustile oor protection must extend beneath the ue pipe when installed with horizontal venting and extend 2 51mm beyond each si...

Page 9: ...ormula in step 1 to convert values not expressed as R ii For multiple layers add R values of each layer to determine overall R value 3 If the overall R value of the system is greater than the R value...

Page 10: ...structure that is within 10 ft 305cm of the chimney measured horizontally See 2 10 3 Rule below These are safety requirements and are not meant to assure proper ue draft We recommend using a minimum t...

Page 11: ...iner 5 8 16mm Minimum or Equivalent Sill support Header Wood Stud 2 51mm Clearance from chimney wall Fireclay liner 5 8 16mm Minimum or Equivalent The ue should be checked to determine that it is not...

Page 12: ...speci ed by its manufacturer It may be necessary to cut the wall studs and install a header and a sill frame to maintain the wall support The hole in the chimney must have at least an 8 203mm diamete...

Page 13: ...nst the chimney Install the trim collar on the outside of the opening Check to make sure there is a 1 25mm air space between the connector and the chimney section During installation be certain that a...

Page 14: ...may ignite the ceiling joists The other method is to install an exterior chimney that runs up the outside of the residence Figure 14B This method of installation requires at a minimum a wall pass thr...

Page 15: ...Canada this appliance must be connected to a 6 152mm factory built chimney conforming to CAN ULC 629M STANDARD FOR FACTORY BUILT CHIMNEYS Floor protection referenced on pages 8 9 must be followed 8 U...

Page 16: ...below 6 Swing open ash removal door and replace ash drawer with the overhanging lip facing toward you 7 Close ash removal door securely ARS OPERATING AND CLEANING FIGURE 16A 4 Using a rubber mallet i...

Page 17: ...Head socket or wrench from the adapter and save 5 Secure mounting brackets to the bottom of the stove with 1 4 20 Phillips screws These screws are located on the outer skin at the bottom rear of the...

Page 18: ...ower speed control for this unit is adjusted at the factory and normally does not require further adjustment 1 Remove the three bolts 1 4 20 Phillips Head on the outer skin at the bottom rear of stove...

Page 19: ...mm metal ex or rigid piping to directly connect outside air to the unit or into vented crawl space Do not put ex into a non vented crawl space Use the supplied termination cap with a rodent screen Sea...

Page 20: ...w burn rate you should close down the air to the point where you can still maintain some ame If the ames tend to go out the stove is set too low for your burning conditions The air control in the cent...

Page 21: ...will cure as your stove heats You will notice an odor and perhaps see some vapor rise from the stove surface this is normal We recommend that you open a window until the odor dissipates and paint is c...

Page 22: ...wer should be left off until a good burn is established then turned on at a medium or high rate 4 Low burn setting The blower tends to cool off the stove If you are using wet wood or a very low burn s...

Page 23: ...glass This air ow washes the glass helping to keep smoke from adhering to its surface When operated at a low burn rate less air will be owing over the glass and the smokey relatively cool condition o...

Page 24: ...0550 when ordering individual brick Please provide brick dimensions or copy this page and mark the desired brick and take it to your authorized dealer The Millennium Model does not accept the Ash Remo...

Page 25: ...e and ceramic blanket repeat steps 2 through 4 in reverse Be sure that the ber board baf e is pushed back fully and the blanket is down at The front of the blanket should be ush with the front of the...

Page 26: ...ndle Assembly 10 Leg Mounting Brackets 11 Legs Cast 12 Manifold Tubes 4 13 Oak Trim for Pedestal 2 14 Pedestal Base 1 11 2 3 4 5 6 7 8 9 10 12 13 14 EXPLODED VIEWS Item Part Name 1 Door Cast 2 Door Ha...

Page 27: ...sions needed see page 24 832 3401 Ceramic Blanket 1 thick eld cut to t size 17 x 19 831 1990 Component Pack includes paint gold spring handles and manual 472 5130 Door Handle Assembly 832 1680 Door Ro...

Page 28: ...4300 ACT Wood Stove Series Page 28 250 7061C December 10 2004 R NOTES...

Page 29: ...Page 29 250 7061C December 10 2004 4300 ACT Wood Stove Series R NOTES...

Page 30: ...4300 ACT Wood Stove Series Page 30 250 7061C December 10 2004 R Date of Service Performed By Description of Service Service and Maintenance Log...

Page 31: ...al accessories Adjustments regular maintenance cleaning and temporary repairs do not qualify for a service call fee and will not be covered The replacement of consumer replaceable items and installati...

Page 32: ...6374822 6413079 6439226 6484712 6543698 6550687 6601579 6672860 6688302B2 6715724B2 6729551 6736133 6748940 6748942 D320652 D445174 D462436 Canada 1297749 2195264 2225408 or other U S and foreign pat...

Reviews: