15
5. Note: Cable connectors are installed on the following PCB connectors: Controller cord -J2, Kneepot
Cable -J4-1,2.3, Power switch cord - J4- 4.5, Motor cord -J5
6. Reinstall bottom cover (refer to section 2.1)
10.2 Replacing PCb (480E PRO)
1. Remove bottom cover (see section 2.1)
2. Disconnect wire harnesses from PCB.
3. Remove the two screws that fasten the PCB.
4. Replace PCB. Reconnect the wire harnesses according to the printing on the PCB.
5. Replace the two screws.
6. Replace the bottom cover.
note 1:
The PCB is by default configured for the Maxon motor. For use with a Faulhaber motor, connect a
pendant, switch the power on, and go to the Service Screen. Select "Set to 480e Maxon", use the up and down
arrows to choose "Set to 480e Faulhaber", and press Select to save the change. Wait for the system to turn
itself off and on.
note 2:
The system will need to be recalibrated, see section 11.3.
note 3:
Go to the System Settings screen. If the System Hours are not 0, go to the Service Screen and select
"Zero Mtr Hrs".
11 CALIBRATION
11.1 Calibration (480/480E)
attention:
The Printed Circuit Board is a Static Sensitive Device. Repair should be attempted by qualified
personnel only. All anti-static handling procedures should be observed.
1. The calibration jumper must be in place during initial start-up. After machine calibration is complete,
remove the calibration jumper.
2. Do not remove the EEPROM from the printed circuit board. The printed circuit board is designed for use
only with the latest revision of firmware loaded into the EEPROM installed by the factory.
3. Thoroughly test all machine functions and test run the machine a minimum of two (2) hours prior to
patient use.
Procedure:
1. Turn off CPM.
2. Remove bottom cover (refer to section 2.1).
3. Lay the unit on its side.
4. Make sure all connectors are connected.
5. Install calibration jumper on the PC board on J1 at CTE.
6. Turn power on.
7. If the error code screen is displayed record the error codes. Fix error before calibration and re-power
base to clear error.
8. Press Start/Stop to clear error codes.
9. Choose machine model using arrow keys.
10. Press Start/Stop.
11. When screen displays motor type, press Start/Stop.
12. Remove cradle from thigh assembly
13. Hold the kneepot side cradle at zero degrees (straight), using calibration fixture.
14. Press EXT.
Summary of Contents for 480
Page 1: ...480 480E 480E PRO CPM Service and Technical Manual 2011 QAL Medical 05070812 3 Rev C 08 11...
Page 2: ......
Page 25: ...25 14 Assembly Drawings 14 1 Main Assembly...
Page 26: ...26 14 2 Thigh Assembly...
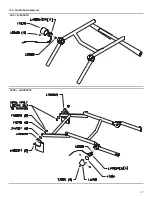
Page 27: ...27 14 3 Cradle Sub Assembly 480 L480SA011 480E L480SA022...
Page 28: ...28 14 4 Foot Cradle Assembly...
Page 29: ...29 14 5 Ballscrew Assembly...
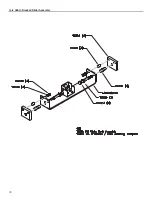
Page 30: ...30 14 6 480 U Bracket Slider Assembly...
Page 31: ...31 14 7 480E 480E PRO U Bracket Slider Assembly...
Page 32: ...32 14 8 480E or 480E PRO Motor Assembly Faulhaber...
Page 33: ...33 14 9 480E PRO ONLY Motor Assembly Maxon...
Page 34: ...34 14 10 Motion Controller Assembly 480 480E...
Page 36: ...36 14 12 480 Wiring Diagram...
Page 37: ...37 14 13 480E Wiring Diagram...
Page 39: ...39 14 15 480 480E Electrical Schematic...
Page 40: ...40...
Page 41: ...41...


