


SECTION 4
Pronar RC2100-2
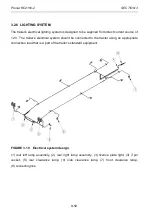
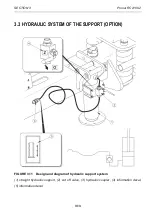
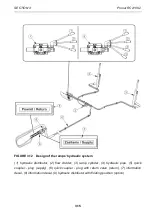
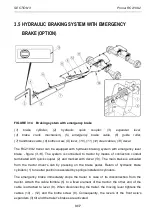
4.3
4.1.2 PREPARING THE TRAILER FOR THE FIRST HITCHING TO TRACTOR
Preparation
Check all the trailer's lubrication points, lubricate the machine as needed
according to recommendations provided in section 5.
Check if the nuts and bolts fixing the wheels are properly tightened.
Drain the air tank of the pneumatic braking system.
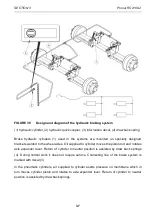
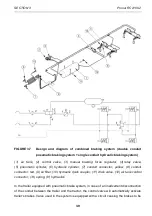
Ensure that pneumatic, hydraulic and electrical connections in agricultural
tractor are according to the requirements (table 1.3), if not the trailer should
not be hitched to the tractor.
Adjust the height of the drawbar or position of upper transport hitch.
A detailed description can be found in section 5.
Test drive
If all the above checks have been performed and there is no doubt as to the trailer's good
technical condition, it can be connected to tractor. Start the tractor, check all systems and
conduct test run of trailer without load (no load in load box). It is recommended that the
inspection is conducted by two people, one of which should always remain in the tractor cab.
Test drive should be conducted according to the sequence shown below.
Connect the trailer to appropriate hitch on agricultural tractor.
Connect brake system and electrical system lines.
Switch on individual lights, check correct operation of electrical system.
When moving off check if the main brakes operate correctly.
Perform test drive.
If during test run worrying symptoms occur such as:
•
noise and abnormal sounds originating from the abrasion of moving elements of
the trailer design,
•
hydraulic oil leak,
•
pressure drop in braking system,
•
incorrect operation of hydraulic and/or pneumatic cylinders,
Summary of Contents for RC2100-2
Page 2: ......
Page 6: ......
Page 10: ...5 11 TROUBLESHOOTING 5 31 ...
Page 11: ...SECTION 1 BASIC INFORMATION ...
Page 24: ...PRONAR RC2100 2 SECTION 1 1 14 ...
Page 25: ...SECTION 2 SAFETY ADVICE ...
Page 40: ...Pronar RC2100 2 SECTION 2 2 16 FIGURE 2 3 Locations of information and warning decals ...
Page 41: ...SECTION 3 DESIGN AND OPERATION ...
Page 59: ...SECTION 4 CORRECT USE ...
Page 78: ...Pronar RC2100 2 SECTION 4 4 20 ...
Page 79: ...SECTION 5 MAINTENANCE ...
Page 110: ...Pronar RC2100 2 SECTION 5 5 32 FIGURE 5 12 Lubrication points part 1 ...
Page 111: ...SECTION 5 Pronar RC2100 2 5 33 FIGURE 5 13 Lubrication points part 2 ...
Page 119: ...NOTES ...
Page 120: ... ...
Page 121: ...ANNEX A Tyre dimensions LP TYRES WHEEL RIM 1 215 75 R17 5 135 133 J 17 5x6 75 ...