background image

english

48

Multi image processor User’s Guide – Black Level Management

Summary of Contents for WB1920

Page 1: ...ssors use and set up user s guide Multi Image Processing System www projectiondesign com an introduction to the processors use and set up user s guide Multi Image Processing System Designed and manufa...

Page 2: ...english 2 Multi image processor User s Guide Introduction...

Page 3: ...s 1 1 Features Geometry correction Blending and overlap 2560x1600 and 1920x1200 models available User selectable algorithm setups 4x4 Lanczos scaling Bi linear scaling B cubic scaling Project onto any...

Page 4: ...4 8 Mounting the multi image processing system processor in rack 5 Getting to know the GUI 15 5 1 ProNet site 5 2 WB Calibrator Device View 5 2 1 Creating and saving a multi image processing system s...

Page 5: ...rking with the perspective algorithm 6 5 Working with the Mesh Transform algorithm 6 6 Working with Mesh Bezier algorithm 6 7 Fine tuning control points 6 8 Real Time Warp 7 Edge blending 35 7 1 Intro...

Page 6: ...l in a defined zone 10 Masking 49 10 1 Adding areas to clip 10 2 Removing clip areas 11 Storing and recalling data 53 11 1 Storing recalling calibration to from the multi image processor unit 11 2 Sto...

Page 7: ...h the certification labels facing down Any other mounting directions are not allowed When rack mounted care must be taken to keep ventilation on back and front sides open Operating the device in other...

Page 8: ...to the State of California to cause birth defects or other reproductive harm Recycle properly do not dispose of in ordinary waste 2 1 1 WARNING SYMBOLS READ USER GUIDE Attention Read the user guide f...

Page 9: ...wing Multi image processing system unit Power Cable Country Dependant 2x Dual Link DVI cables CD with software Network cable User Documentation Please verify that you have all compoents upon unpacking...

Page 10: ...english 10 Multi image processor User s Guide What s in the Box...

Page 11: ...dows operating systems only The following versions are sup ported Windows XP 32 bit only SP xx or Windows Vista 32 or 64 bit Windows 7 32 or 64 bit In addition Microsoft NET Framework 3 5 or later mus...

Page 12: ...r channel One projector per channel A PC for setup and control Optional CAD tool for designing systems not provided by projectiondesign Figure 4 1 shows a complete system overview of a multi image pro...

Page 13: ...on and LED indicators 4 5 Network settings For optimum performance during calibration a 1 0 Gbps Ethernet connection is recommended 100 Mbps will also give adequate performance The communication betwe...

Page 14: ...AN ICMP Type 8 ICMP Echo Request 4 7 Software To the use multi image processing system ProNet site must be installed on a control PC The latest version of the software can be found at www projectionde...

Page 15: ...monitoring and timed operations overviews for one or more selected devices on the right hand side Status messaging window at the bottom Figure 5 1 Overview of ProNet site To start the multi image pro...

Page 16: ...h their arrangement Figure 5 1 WB calibrator Device View 5 2 1 Creating and saving a multi image processing system setup project When starting the multi image processing system calibrator a new projec...

Page 17: ...drag and drop units from the tree view in the Device Pool Figure 5 1 to the Device View Desktop The multi image processing system units in the Device Pool are detected using ProNet s built in univers...

Page 18: ...iguration tool Visual ID on screen identification and custom notes are configured System latency is also set up from this menu The Basic Blend page sets the number of overlapping pixels for the select...

Page 19: ...ettings 5 2 7 Performing software upgrades All multi image processing system units can easily be upgraded via the ProNet 2 0 user interface System software is available from www projectiondesign com S...

Page 20: ...lti image processing system unit that is in use EDID data can also be configured manually or the unit can pass EDID data information from the projector directly to the image generator referred to as E...

Page 21: ...n Calibration View mode will bring you back to Device View See Figure 5 1 Figure 5 1 Switching views from Calibrator view to Device view and back 5 3 1 Using the Calibration View Toolbar CVT Like in D...

Page 22: ...processing system units in a project Figure 5 12 In this window WB units can be selected or deselected either by clicking on them or using the assigned short cut key combination Figure 5 1 WB Navigat...

Page 23: ...oolbar CPT The calibration panel has a set of tools on the left hand side of the window This toolbar can be shown with or without help texts Figure 5 1 Calibration Panel Toolbar without and with help...

Page 24: ...e inactive controls Only active points will be visible on the WB output display Active Guide Points When using Mesh Bezier Warp or Bezier lines in clipping masking or black level management feature th...

Page 25: ...witch between the different states using the action toolbar 5 4 1 Bypass states The DVI input signal is bypassed through the system and passed to the DVI output 5 4 2 Calibration state Calibration mod...

Page 26: ...english 26 Multi image processor User s Guide Getting to know the GUI...

Page 27: ...ged to online which enable you to see the result 6 1 1 Perspective This is advanced keystone Only the four corners of the image can be manipulated 6 1 2 Mesh Warp Transform This is recommended for use...

Page 28: ...d in addition If Mesh Warp Transform or Mesh Warp Bezier is added first a combination of algorithms is not allowed In this window grid size is also configured For the control points of an algorithm to...

Page 29: ...filter available in multi image processing system is of the type Cubic B spline This filter is slightly softer than the Lanczos filter but has better quality on curved and straight lines In many cases...

Page 30: ...king with the perspective algorithm click the Warp icon add the perspective algorithm and set grid size to 1x1 In order to map the geometry to the surface being projected on drag the control points wi...

Page 31: ...tion As required increase the grid size This will add more rows columns and control points to the mesh and enable the possibility to map the grid correctly onto the surface Figure 6 4 is showing a sim...

Page 32: ...r vectors in a given point Figure 6 5 Figure 6 5 Mesh Bezier with 1x1 grid First map the four control points orange to their desired location Then move the Bezier control point to curve the lines betw...

Page 33: ...rl while using the arrow keys on the keyboard to move the control point 6 8 Real Time Warp Real Time Warp state can be turned off and on in the Calibration View Toolbar see Figure 6 7 When Real Time W...

Page 34: ...an be enabled in the Calibration Panel Toolbar see Figure 6 8 Figure 6 8 Calibration panel guide points NOTE When working on a warp in Real Time mode the displayed warped image will be generated using...

Page 35: ...ding is used for simple and slightly curved surfaces A percentage or a defined number of overlapping pixels is specified The overlapping region of each side top bottom left right of the image is then...

Page 36: ...1 Basic edge blending In the Basic Blend setup window overlapping pixels or percent can be specified The blend drop off curve of can also be tuned Tuning the blend drop off curve is also possible whe...

Page 37: ...ding To apply advanced edge blending to an image select Blend from the actions toolbar and select Advanced Blend Setup All blend zones will now have to be added manually Click Add zone and select a de...

Page 38: ...se blend zone will be completely disconnected from the warp ing and should hence be applied after the geometry correction is complete Figure 7 3 Add blend zone window 7 2 5 Adjusting the shape of adva...

Page 39: ...control point in the blend zone you would like to adjust or select multiple points or blend zones with by dragging a selection rectangle over the areas of interest Then select Drop off Curve in the C...

Page 40: ...english 40 Multi image processor User s Guide Edge Blending Go to custom if you need to change the selected curve or enter a new manually as seen in Figure 7 6 Figure 7 6 Drop off curve setup...

Page 41: ...est patterns are Circles Add circle to your calibration view to visually configure for aspect ratio Grid Pixel Specify a grid with height and width in pixels of all cells in the grid Grid Angle Specif...

Page 42: ...s 8 1 Circle test pattern Circles can be added to calibration area to ease the setup The position x y pixel coordinates and the radius pixels can be specified Figure 8 3 shows the Test Image Setup win...

Page 43: ...Bezier Warp where the calibration can be done with very few control point To add a Grid Pixel select the Grid Pixel tab and specify your parameters The parameters are offset x y in pixels for top left...

Page 44: ...s to specify for this grid are to and from angles in degrees in horizontal and vertical direction The frequency of the reference points can also be specified as seen in Figure 8 5 Figure 8 5 Grid Angl...

Page 45: ...black levels in projectors This enables the possibility to have seamless images in all the gradients of all colors To start the black level management tool click on Black Level in the Calibration View...

Page 46: ...lines added To create the next side in the zone click on one of the control points in the first line created not the Bezier points and then click Add again Figure 9 1 This will add other line to the c...

Page 47: ...one select a complete zone by performing a drag and drop selection over a given zone Individual points can also be select by pressing and holding Ctrl while selecting with mouse pointer Click Remove i...

Page 48: ...english 48 Multi image processor User s Guide Black Level Management...

Page 49: ...o called clipping is used to cut out areas of the image which should be blanked out An example of this is overshooting of the image in a dome To start the masking tool click Clip in the Calibration Vi...

Page 50: ...cessor User s Guide Masking 10 1 Adding areas to clip Start with clicking Add in the Calibration View Toolbar This will create the first line in the area to mask out Figure 10 2 Figure 10 2 Adding the...

Page 51: ...rst line created not the Bezier points and then click Add again Figure 10 3 This will add other line to the calibration panel Continue to add lines as needed All these lines have the same controls as...

Page 52: ...rop a selection rectangle over the points Finally click Add again to add the last line Figure 10 4 Clipping area complete Finally go to online mode to see the results 10 2 Removing clip areas To remov...

Page 53: ...be used automatically when the unit is powered on 11 1 Storing recalling calibration to from the multi image processor unit When storing calibration to the multi image processor unit it will be saved...

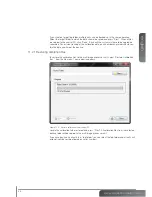
Page 54: ...to save your calibration to the multi image processor unit When performing a backup to the control PC the last data stored in the multi image processor unit will be copied to the control PC To backup...

Page 55: ...er should con tain the date and time of the backup 11 2 1 Restoring calbration files To restore the calibration files to the multi image processor unit select Restore Calibration files from the file m...

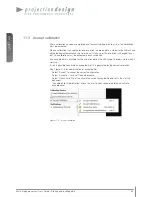
Page 56: ...tion must be accepted in each resolution If no accepted file is available for the actual resolution the unit will go to bypass state when it starts up It is only possible to activate an accepted file...

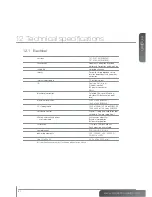
Page 57: ...ion Patented Pixel Level Matching individual RGB channel on pixel level maximum resolution 2560 x 1600 WB2560 1920 x 1200 WB1920 3D stereographic 1920 x 1200 120 Hz on WB2560 1280 x 800 120 Hz on WB19...

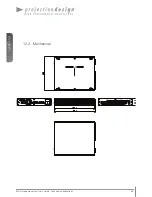
Page 58: ...english 58 Multi image processor User s Guide Technical specifications 12 2 Mechanical...

Page 59: ...5 1 Bezier point settings 25 Figure 6 1 Warping algorithm setup 28 Figure 6 2 Scaling filters 29 Figure 6 3 Working with the perspective transform 30 Figure 6 4 Working with the Mesh Transform algori...

Page 60: ...f figures Figure 11 1 Save current calibration to the multi image processor unit 53 Figure 11 2 Backup up calibration data 54 Figure 11 3 Selecting folder for backup 54 Figure 11 4 Restore calibration...

Page 61: ......

Page 62: ...ph 9714 4 8872525 fx 47 69 30 45 80 sales projectiondesign com Wickfield UK Ireland ph 44 0 844 8099 577 fx 47 69 30 45 80 sales projectiondesign com D sseldorf Germany Austria Swtizerland ph 49 0 21...

Reviews: