background image

P r i m a L u c e L a b   i S r l


E AG L E 3   U s e r   M a n u a l

First use: Setting the wireless control device 

Download  to  your  control  device  (smartphone,  tablet  computer  or  external)  the 
"Microsoft Remote Desktop" app. Depending on the store of your system it can 
also be found under the name "RD Microsoft Client". How to download and install 
the application of remote control depends on your control device; so if you do not 
know how to install the app from the Store, please read the manual of your device. 

Thanks to the remote control App, you have Eagle with all your software on your 
device screen: the remote control App uses a special mode so you can use your 
finger on the touch screen as if it were a mouse: simple and fast. After setting the 
acquisition parameters and started the auto-guide, you can launch shooting and 
turn off the controller: Eagle will make shooting automatically. 
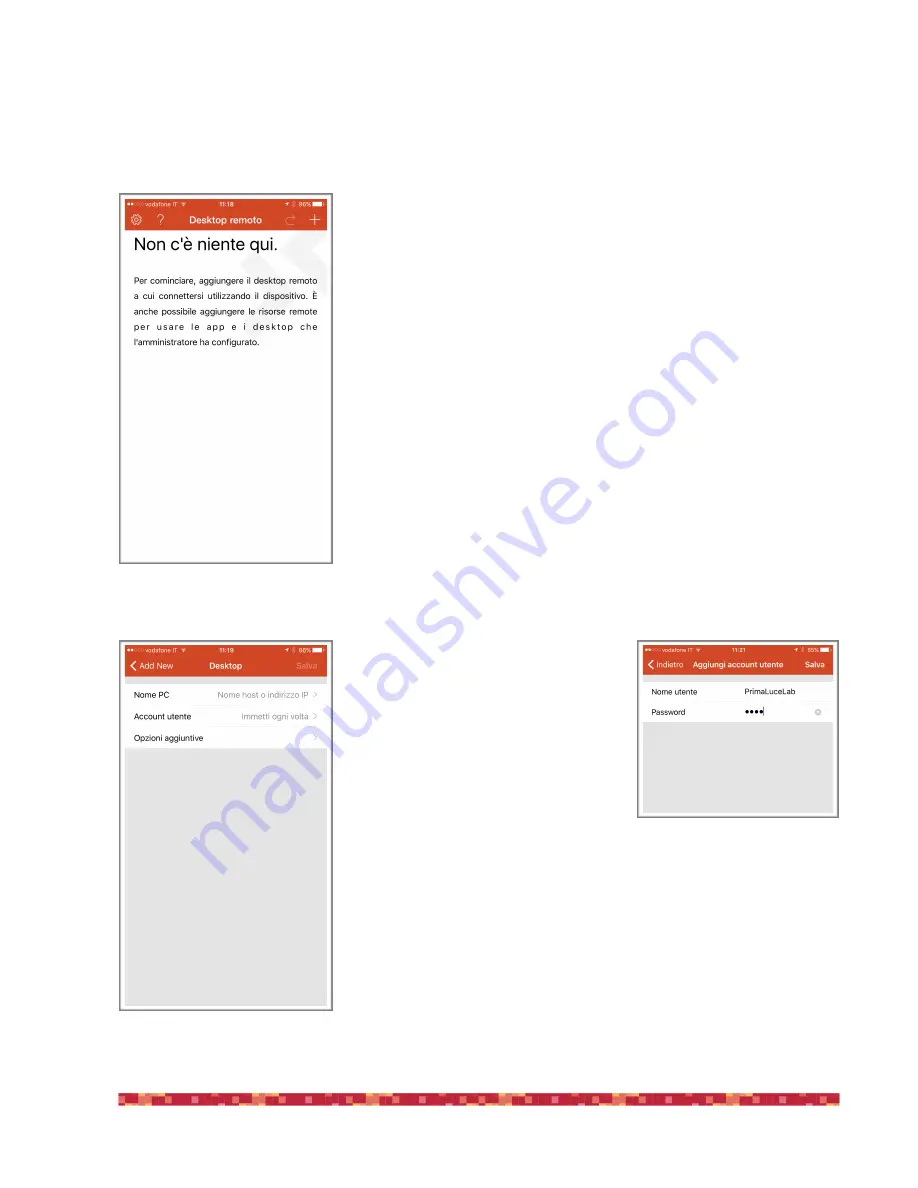
Start the "

Microsoft Remote Desktop

" app. You will see a screen like the one visi-

ble in the image 7.  
Now link to your EAGLE: Click the + button, then select "Desktop". 

In the window that opens, in "PC name" enter 192.168.137.1 
 

Then select the "Username" field and choose 
"Add user account". a window will open (pic-
ture  8)  where  you  can  enter  your  username 
and password to log on to Windows.  
The values are:  
- Username: 

PrimaLuceLab

- Password: (that shown on the first page of 
this manual)  
Then press the button "Save" to save the ac-
cess data. 


WARNING

:  when  entering  your  data  check 

that your device does not automatically insert 
a space after the word "username" and "password".  

Then (image 9), press the "Save" button to confirm and save the access data.   

p a g e  

!

9

Image 7: Press the + button to add the 

parameters to access your EAGLE.

Image 9: Press “Save” to confirm ac-

cess data.

Image 8: Insert User name and  

Windows access password.

Summary of Contents for EAGLE3 PRO

Page 1: ...RL Italy For any matters relating to the use service and warranty please refer to the addresses given in the relevant documents Prima LuceLab i Srl Vi a Roveredo 2 0 B 33170 Pordenone www primalucelab...

Page 2: ...approval in order not to loose the Producer Warrantee p a g i n a 1 PLEASE NOTE EAGLE is designed to control telescopes and accessories for astronomy and it s not a normal computer Please do not modi...

Page 3: ...rst use remotely control devices with EAGLE Manager 24 connect or disconnect every power out port of EAGLE 26 set power out tension of the 3 power out ports with adjustable tension 27 connect or disco...

Page 4: ...nt Read the paragraphs below for detailed operations descrip tion p a g e 3 Power IN 12V HDMI port for external monitor 3 4 n 2 USB 3 0 ports 5 n 2 USB 3 0 ports 7 On Off switch 8 9 10 n 4 12V power O...

Page 5: ...0 consumption power from the USB port of EAGLE Total maximum power consumption 7 2A So for this setup you should use the 12A AC adapter If you want to use a battery WARNING The battery must have a 12V...

Page 6: ...c For remote control you need to download the App Microsoft Remote Desktop to the device you will use to control EAGLE smartphone tablet computer or external Depending on the store of your system the...

Page 7: ...ower cable for 12V Eagle with banana plug in case of battery power image 2 Then press the power button 7 A red LED will light up the brightness is calibrated not to be annoying during the night so in...

Page 8: ...ted by EAGLE The network name matches the serial number of your EAGLE picture 4 A window will appear where you will be asked to enter the password of your net work image 5 The password is primalucelab...

Page 9: ...ed to enter your password your device will connect automatically when you select the network created by EAGLE p a g e 8 Image 6 connection to WiFi network confirmed NOTE Using the EAGLE sometimes you...

Page 10: ...launch shooting and turn off the controller Eagle will make shooting automatically Start the Microsoft Remote Desktop app You will see a screen like the one visi ble in the image 7 Now link to your EA...

Page 11: ...w connection picture 10 Select it and the screen will change to the following picture 11 Select the option Do not ask me again for connections to this computer and press the Accept button p a g e 10 I...

Page 12: ...y use your finger to click on icons and buttons visible on the screen as you usually do with your tablet or smartphone If you prefer to view the classic arrow Windows select the Mouse Pointer On the s...

Page 13: ...and press Next button to proceed p a g e 12 Before installing your devices driver and your astronomy software in the Windows operative system of the EAGLE we suggest you to create a backup copy of you...

Page 14: ...sks of your EAGLE Select the SSD disk of the EAGLE the first line by checking the leftmost box option and click Image This Disk In the next window choose your destination disk the one that will house...

Page 15: ...ima LuceLab i Srl EAGLE3 User Manual In the next window please leave the options as they are and press Next to continue In the next window please press Finish button finish the backup wizard p a g e 1...

Page 16: ...button to start the backup of your SSD drive Finally Macrium Reflect will begin the cloning process This can take some time depending on the size of your SSD unit and on the speed of the USB pen or dr...

Page 17: ...ium Reflect and disconnect your drive from the EAGLE Now you have a full backup copy of your SSD drive that you can use if you will have troubles with Windows in the future In order to use this backup...

Page 18: ...ftware to install connect the USB stick to a USB port of the EAGLE and follow the onscreen in structions to complete the installation as if EAGLE were a normal desktop computer For a better organizati...

Page 19: ...you can close the remote connection of your device You can then exit the Microsoft Remote Desktop Then press the power button 7 picture 17 Take a look at the LED at the right of the 4 USB 2 0 ports wh...

Page 20: ...and support rings spaced up to 12cm When using compact apochromatic telescopes the distance of the support rings is set by the PLUS Vixen or Losmandy dovetail clamp installed with the telescope In th...

Page 21: ...compact guide scope in parallel But to do so you first need to add a PLUS Vixen or Losmandy dovetail bar above PLUS support rings and then secure EAGLE image 19 In order to use the EAGLE with this con...

Page 22: ...etail bar also from different brand Take the PLUS Vixen Losmandy dovetail clamp and using 3 M6x12 screws f install it in the bottom plate of EAGLE as shown in image 20 This way you can connect the EAG...

Page 23: ...designed for connection to the cooled CCD cameras which often have a high power consumption p a g e 22 CAUTION EAGLE distribute power only at 12V If the instrument you want to use requires a differen...

Page 24: ...f your instrument 2 AFTER connect the power supply or stabilized battery to the IN power port of the EAGLE All devices will be powered on You can turn on the EAGLE activate the remote control and use...

Page 25: ...e tension connect or disconnect connection to devices connected to the 4 USB 2 0 ports check for power in tension and battery lifetime set WiFi connectivity remotely turn on off the entire telescope I...

Page 26: ...ower out regulated ports USB 3 0 ports USB 3 0 ports 12V power OUT ports 12V power IN port EAGLE Mana ger advanced settings Remote switch ON OFF WiFi mode Power con sumption and battery life Image 24...

Page 27: ...green and it will power the connected device Click with the mouse right button or a 2 finger tap on the screen of tablet or smartphone used for remote control on one of the 12V power out ports to see...

Page 28: ...n or a 2 finger tap on the screen of tablet or smartphone used for remote control on one of the power out ports to see advanced options of the selected power out port image 28 Here you can insert the...

Page 29: ...remote control on one of the power out ports to activate it the port will be come green and it will connect the device Make a double click on the NAME label to change its name check for power in tens...

Page 30: ...you want to connect EAGLE to a pre existing WiFi network click the ADVANCED PARAMETERS button to activate the advanced options window Here in the WiFi Host field Image 32 se lect the WiFi network tha...

Page 31: ...d of 192 168 137 1 as previously set Click on Save to save software connection options Going back to main page you will find a new connec tion Connect your computer or other device you use to control...

Page 32: ...u can set the switch ON OFF setting you prefer for the POWER button of the EAGLE Manager software In order to switch off the EAGLE when you press the POWER but ton please select the Power off setting...

Page 33: ...k name created by your EAGLE SSID You can modify the password field with the password you prefer and click OK to confirm image 36 NOTE The password must be 8 characters long it may contain both letter...

Page 34: ...status of the ports when EAGLE is shutdown Image 37 To enable this feature just select Enable for the two fields To set the configuration you want to get click OK to exit this window then set the EAG...

Page 35: ...If you want to remotely control the EAGLE in a different way than the one here described please contact us and we will help you customize your system The simplest way of remote control is the wired o...

Page 36: ...s IP address 192 168 100 100 Subnet mask 255 255 255 0 Then click OK to confirm Also the computer you want to use to control EA GLE must have a static IP then in this computer repeat the steps above b...

Page 37: ...itch on EAGLE with a network cable connection you will need to set up a new connection to the Microsoft Remote Desktop software on your computer to control it In this example we will see how to set it...

Page 38: ...example EAGLE Wired to activate the remote connection Image 44 p a g e 37 Immagine 43 set the Remote Desktop for wired connection Image 44 start wired remote connection Tip if using EAGLE Manager you...

Page 39: ...n order to do this you need to have 1 a computerized mount 2 installed the ASCOM driver of the computerized mount into the EAGLE the ASCOM platform is pre installed in the EAGLE Please follow this eas...

Page 40: ...lescope then Control panel This will open a new window ASCOM interface Click on Select and this will open a new window ASCOM Telescope Chooser Now based on the way you connect the mount to the EAGLE h...

Page 41: ...u Ciel planetarium software The EQMOD creates a vir tual COM port you need to know the number In order to do that go to Windows Control Panel then select System and then Device Manager In the window t...

Page 42: ...e right number port in Port field and then press OK to close the window 5 Then press OK in the ASCOM Telescope Chooser window and press Connect button in the ASCOM interface window The red button will...

Page 43: ...you can select the object make a mouse right click select Telescope and then Slew The mount will move to the selected object 7 If after automatic pointing of the mount you see that the object is not p...

Page 44: ...object centering and center the object in the telescope field of view in your eyepiece or in the camera 9 When done select the object you re pointed in in this example Vega star make a mouse right cli...

Page 45: ...be synchronized and the sky chart position will be set to the object 11 When you want to disconnect the planetarium software from the mount select Telescope then COntrol panel and then Discon nect You...

Page 46: ...llel to the main one or to an off axis guider the autoguide ca mera generates the guide star image that is analyzed by a special software the autoguida software that automatically sends tracking corre...

Page 47: ...grates an ST4 autoguide port Press Connect and then press Close This will close the Connect Equipment window 4 Now select a proper exposition time for the guide camera usually 1 or 2 seconds and press...

Page 48: ...that are too short usually 1 to 2 se conds are fine 5 Now even if the software does not strictly require it it is advisable to match the X and Y camera axes columns and rows of the sen sor with the ax...

Page 49: ...hird button on the left the one with the green icon PHD2 Guiding will automatically start the calibration process that allows the software to understand which direction to move the guide star when a s...

Page 50: ...automatically guiding 9 To check for guide quality you can see the graph in the lower part of the PHD2 Guiding window This guide allows you to easily start guiding but PHD2 Guiding also has many adva...

Page 51: ...pe is balanced and ready for guiding Try to get your mount s polar axis roughly aligned by using your mount s polar alignment scope if it has one Otherwise make sure the mount s polar axis is pointing...

Page 52: ...Prima LuceLab i Srl EAGLE2 User Manual Azimuth Alignment Open the Drift Align Tool You will see a window like this p a g e 51...

Page 53: ...for the Azimuth axis adjustment Point near the Meridian and the celestial equator You can either click the Slew button or move the mount manually Your scope should now be pointing something like this...

Page 54: ...e Dec trend line will be jumping up and down but soon the noise should average out and the slope of the line will become somewhat stable When that happens you are ready to adjust the mount s Azimuth O...

Page 55: ...and moving the guide star towards the magenta cir cle The magenta circle shows how far the guide star needs to move The magenta circle is larger when the Dec slope is steeper and it may initially be s...

Page 56: ...ng you will have another Dec trend line Did it get better closer to horizontal or worse away from horizontal Make a note to yourself in the Azimuth adjustment notes area of describing how you adjusted...

Page 57: ...titude Alignment Now you will need to repeat the process for the mount s Altitude adjustment Click the Altitude button the Drift tool will now look like this Click Slew or manually slew your mount tow...

Page 58: ...cle Again the goal is to get the dec drift line to be horizontal Note about ASCOM The instructions and screenshots above correspond to what you see in PHD2 with an ASCOM connection to the mount There...

Page 59: ...mplemented in the operating system So if you format the EAGLE s SSD drive you will lose the functions of the wireless remote control Since the version of the operating system does not imply real chang...

Page 60: ...re no more active in the EAGLE Manager software how can I fix this A Enter in ADVANCED SETTINGS and click on RECONNECT button ports will be reactivated D I can t connect to EAGLE WiFi network how can...

Page 61: ...return it to the reseller upon the purchase of a new type of equivalent equipment one by one Properly differentiated collection for the subsequent start of dismantled equipment for recycling treatment...

Page 62: ...ar 4 THE GUARANTEE DOES NOT APPLY IN THE FOLLOWING CASES Repair by anyone not authorized by PrimaLuceLab Invasive interventions or tampering with internal and or external parts Missing of the invoice...

Reviews: