


EN
6
against the anchor point could prevent correct alignment. If that is the
case, release the tension on the rope and position the sling on the
anchor point so that the tension is equally distributed on both winch
anchor hooks.
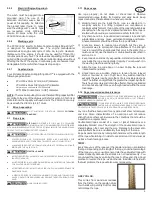
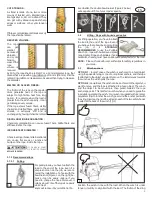
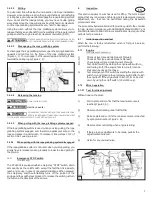
DON'T DO THIS•!
WHEN YOU ANCHOR THE WINCH, MAKE SURE THAT YOU
DO NOT DO A COMPLETE WRAP AROUND THE ANCHOR POINT (FIGURE 2 BELOW).
THIS SET-UP WILL PREVENT PROPER ALIGNMENT OF THE WINCH WITH THE LOAD AND
WILL PUT UNEVEN TENSION ON THE WINCH ANCHOR HOOKS.
AVOID INSTALLING THE SLING ON SHARP EDGES THAT
MIGHT DAMAGE IT. WHETHER YOU ARE USING A POST, A
TREE OR A STUMP, ALWAYS INSTALL THE SLING NEAR THE ANCHOR'S BASE.
USING A STUMP AS AN ANCHOR POINT MEANS PAYING
SPECIAL ATTENTION IN ORDER TO PREVENT THE SLING
FROM SLIPPING OVER IT.
MAKE SURE THE ANCHOR POINT IS STRONG ENOUGH TO
RESIST THE PULL WITHOUT BREAKING OR BEING DAMAGED.
You can refer to our Website
www.portablewinch.com
to find out
about other anchoring accessories available
3.4
Oil Alert
MD
(PCH1000 and PCH2000 only)
The GHX-50 and GX160UT2-QX2 Honda engines are equipped with
an
Oil Alert
TM
system that automatically turns off the ignition when the
oil level goes below a safe level. The
Oil Alert
TM
system also turns off
the ignition when the winch is operating at an angle greater than 20
degrees (± 4 degrees). Make sure that your set-up keeps the winch
at a relatively horizontal level while winching and idling.
3.5
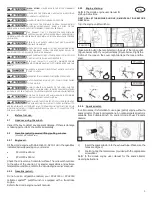
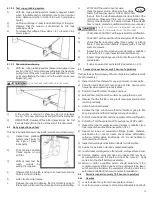
Installing the rope
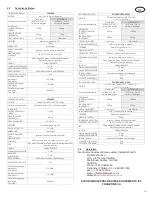
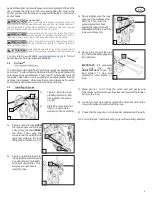
1)
Figure 1: Open the rope
grabbing system (A) and
lock in place with spring
pin (B);
2)
Start the engine and let it
idle for 30 seconds to
warm-up
(PCH1000/2000);
3)
Figure 2: Run the rope
OVER
the rope keeper and the rope
entry pulley (A) and
UNDER
the drum. Then, wrap the
rope around the drum (B) 2-6
turns (according to the load
lifting chart of section 3.6.1.2);
4)
Figure 3: Insert the rope into
rope grabbing system device
by pulling the spring-loaded
cam lever upwards (A). This
will give enough room to
insert the rope.
5) Figure 4: Make sure the rope
goes over the stainless steel
knob (A). Then, push the
spring-loaded cam back
against the rope which will
automatically hold a load if the
rope end is let go (B).
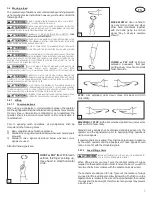
6) Figure 5: As you pull the rope
(A), the throttle will engage and
load will move.
IMPORTANT
: It is necessary
to
pull
the
rope
HORIZONTALLY
to get
the
load started. To stop load
movement, stop pulling on
rope.
7) Stand about 1 m (3') from the winch and pull gently and
horizontally on the rope to get the slack until you feel the tension
rising on the rope;
8)
Look at your set-up to make sure that the winch anchor and the
rope entry pulley are aligned with the rope;
9)
Check that the rope does not rub against objects along the path;
10) Pull on the rope, the throttle will go up and the winching will start.
A
B
1
B
A
2
3
A
A
B
5
A
4
Summary of Contents for PCH1000
Page 14: ...14 DE Annex PCH1000 ...
Page 15: ...15 DE Annex PCH2000 ...
Page 16: ...16 DE Annex PCT1800 50Hz P PCT1800 60Hz P ...
Page 17: ...17 DE Annex Diagramm PCT1800 50Hz P PCT1800 60Hz P ...
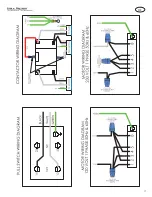
Page 34: ...14 EN Annex PCH1000 ...
Page 35: ...15 EN Annex PCH2000 ...
Page 36: ...16 EN Annex PCT1800 50Hz P PCT1800 60Hz P ...
Page 37: ...17 EN Annex diagram PCT1800 50Hz P PCT1800 60Hz P ...
Page 54: ...14 FR Annexe PCH1000 ...
Page 55: ...15 FR Annexe PCH2000 ...
Page 56: ...16 FR Annexe PCT1800 50Hz P PCT1800 60Hz P ...
Page 57: ...17 FR Annexe diagramme PCT1800 50Hz P PCT1800 60Hz P ...