background image


ēno play  

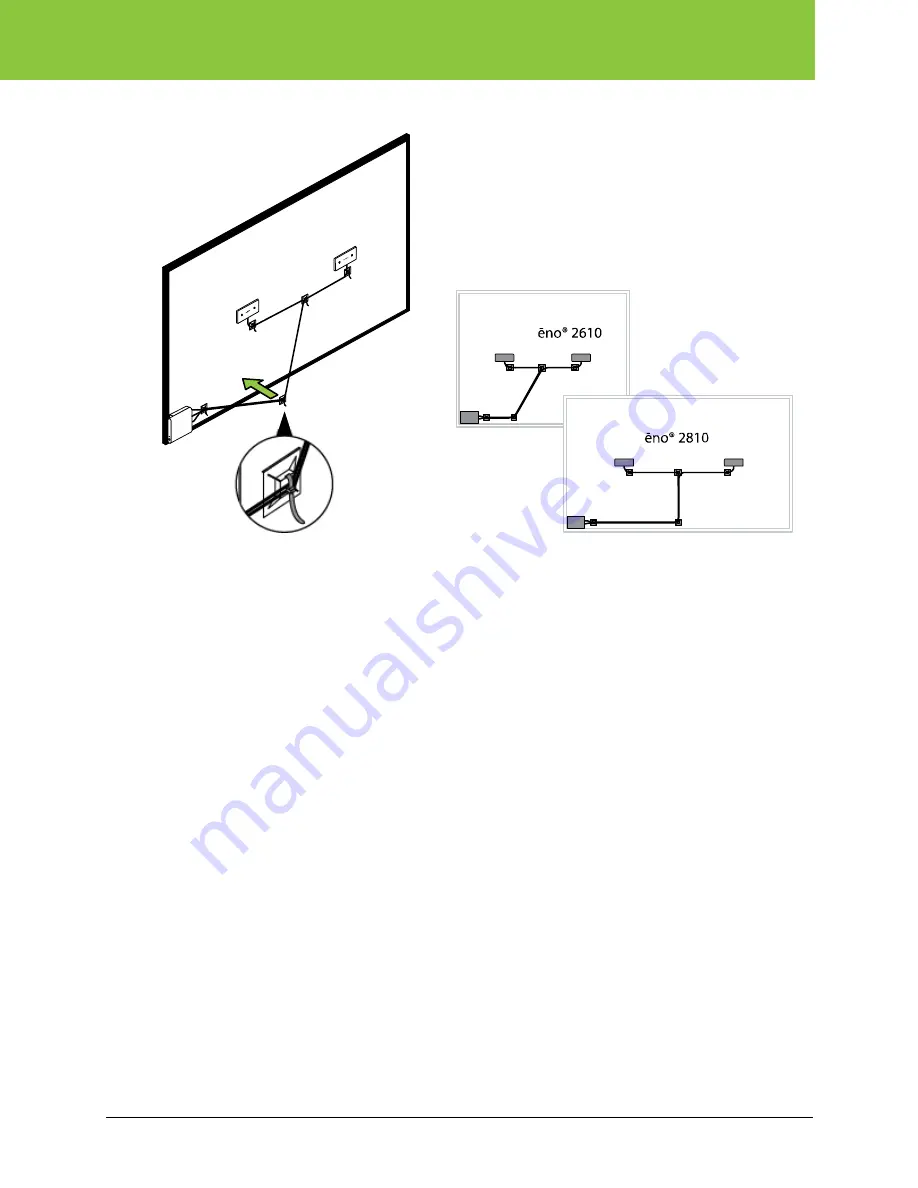
2.  Pull the cables toward to bottom edge of the board to remove all slack.  


3.  Ensure that all cables are taut, then remove self adhesive back from a tie holder. 

4.  Press the tie holder to the board. 

5.  Tighten the tie wrap. 

Install cable ties for power or audio cable routing options 

To install cable ties on the back of the whiteboard for permanent audio input cable or power cable 
routing options that extend to other locations across the back of the whiteboard: 

1.  Remove self-adhesive back from a tie holder. 

2.  Position the tie holder at the center top, center bottom, or along the edge where cables exit 

from routing that is against the back of the whiteboard. 

3.  Press the tie holder to the board. 

4.  Install a tie wrap through the vertical holes in the holder and capture the power supply and 

permanent audio input cables as appropriate for your installation. Refer to “Plan power and 
audio input cable routing”. 

5.   Ensure that cables are taut, and then tighten the tie wrap. 

Note

: To install optional cable ties for your adjustable height mobile stand or wall mount, refer to 

“Cable routing for adjustable height mobile stand or wall mount options” and “Option: Cable 
management for adjustable height systems”. 

PolyVision 

2002480-001 Rev C  

21 of 38 

Summary of Contents for ?no play

Page 1: ...PolyVision no play Installation and Operation Guide Part number 2002480 001 Rev C 2012 PolyVision Corporation All rights reserved...

Page 2: ...Install the amplifier cable tie 18 Install a cable tie at the center of the whiteboard 19 Install a cable tie between the center and bottom of the board 20 Install cable ties for power or audio cable...

Page 3: ...no play provides audio for these no classic whiteboards and mounting options no classic 2610 no classic 2810 no classic 2615 no classic 2815 no classic 2610 2810 or no classic 2615 2815 with all no o...

Page 4: ...alternate audio input cables from a third party PolyVision provides a 6 ft 1829mm power cable and a 10 ft 3048mm extension for the amplifier Before installing the amplifier consider which edge of the...

Page 5: ...stall the driver pack with driver pack offset kit Fixed wall mount considerations Whenever adding no play to a whiteboard that is mounted to the wall you must first install bracket extenders to the wh...

Page 6: ...racket extender 7 Foam pads 8 Cable tie holders x10 9 Power cable and adapters 10 3 5mm stereo male to male audio input cable 25 ft 7629mm 11 Power cable extension 12 13 Driver packs x2 14 Replacement...

Page 7: ...mounting solution unfasten the screws holding the whiteboard to the mounting brackets and remove the whiteboard 2 Lean the no whiteboard against a wall with the back facing you Plan power and audio in...

Page 8: ...an adjustable height system Cable routing for whiteboards mounted directly to the wall To route the amplifier power or permanent audio input cable for whiteboards that will be mounted directly to the...

Page 9: ...board mounting solution To route the amplifier power or permanent audio input cable when the whiteboard is mounted to an adjustable height system 1 Consider the locations of the power and audio source...

Page 10: ...ble height lift system looks like the one shown below on the left before installing the driver pack without the offset kit Locate and have ready to use driver packs x2 alcohol wipes x2 driver pack mou...

Page 11: ...ional supplies are provided Refer to Removing and replacing the cable tie holders driver packs or amplifier 5 Orient the driver pack with the wires facing the floor Note the two tabs at the top of the...

Page 12: ...wall mounts PolyVision provides driver pack offset kit If no play components include the driver pack offset kit use the steps below to install the driver packs Assure that your adjustable height lift...

Page 13: ...spacer with the circle of adhesive on the driver pack and press in place for 15 seconds Repeat for the second driver pack spacer 2 Slide the driver pack adapter mounting template to the upper left cor...

Page 14: ...driver packs to the back of the whiteboard The supplied adhesive is intended to be permanent If you need to remove or reposition the components additional supplies are provided Refer to Removing and...

Page 15: ...t the board 9 Press hard on the driver pack for 15 seconds 10 Reverse the template and tape it to the upper right corner of the whiteboard 11 Repeat steps 1 through 9 to install the second driver pack...

Page 16: ...rd where the amplifier will be fastened 3 Remove the self adhesive backing from the amplifier Note Use care when mounting the amplifier and drive packs to the back of the whiteboard The supplied adhes...

Page 17: ...o the amplifier include that cable along with the driver pack cables to the extent possible and secure them as described below If installing the whiteboard on an adjustable height mobile stand or adju...

Page 18: ...en the tie holder and driver pack then tighten the tie wrap IMPORTANT Make sure the service extension or tie wrap are not pointed toward the whiteboard or touching it 6 Repeat for the second driver pa...

Page 19: ...ier then tighten the tie wrap IMPORTANT Make sure the service extension or tie wrap is not pointed toward the whiteboard or touching it Install a cable tie at the center of the whiteboard To install a...

Page 20: ...or audio input cables through this cable tie assure that all cables routed from the amplifier to this cable tie are the same length then tighten the tie wrap Install a cable tie between the center and...

Page 21: ...tion the tie holder at the center top center bottom or along the edge where cables exit from routing that is against the back of the whiteboard 3 Press the tie holder to the board 4 Install a tie wrap...

Page 22: ...o play audio from unwanted vibrations tape cables to the back of the whiteboard To tape cables to the back of the whiteboard 1 Use tape provided to attach cables to the board Tape can be torn with fin...

Page 23: ...ove the adjustable height lift system 1 Assure that the cable is long enough to allow for raising and lowering the adjustable height system 2 Raise the lift system to its highest position 3 Route cabl...

Page 24: ...g two 10 x 1 2 fasteners provided 6 Lower the lift system to its lowest position 7 Route the cable down to the amplifier making sure that the cable passes between the lift system tubular support struc...

Page 25: ...ires 35 889mm audio and power service loop Note Service loops should not be in view of users 9 Connect the cable to the amplifier 10 Secure the cable to the whiteboard about 2 50mm from the amplifier...

Page 26: ...e whiteboard to the adjustable height system and fasten it to the brackets using two 10 x 1 2 fasteners provided 3 Lower the lift system to its lowest position 26 of 38 2002480 001 Rev C Installation...

Page 27: ...no 2610 requires 27 685mm audio and power service loop no 2810 requires 35 889mm audio and power service loop Note Service loops should not be in view of users 6 Connect the cable to the amplifier 7...

Page 28: ...ing solution 2 Back out each of the screws that fasten the wall bracket to the wall by 1 8 3 Hook the top bracket extenders over the screws on the wall bracket and fasten using two 8 x 1 2 fasteners p...

Page 29: ...LED status 4 Check that all cables are in tracks or otherwise coiled and out of the way so there is no trip or safety hazard and cable service loops are not visible to users 5 If using an adjustable h...

Page 30: ...To remove and replace a driver pack amplifier or cable tie holder 1 Insert a flat blade screw driver between the whiteboard and the adhesive 2 Use firm prolonged pressure to pry up the component 3 Cl...

Page 31: ...free disk space 512 MB Ram USB port PolyVision driver installation To install the PolyVision driver in Windows 1 Insert the PolyVision Getting Started CD in your computer 2 Double click My Computer on...

Page 32: ...river on a Macintosh 1 Insert the PolyVision Getting Started CD in your computer 2 Double click My Computer on your desktop 3 Double click the disk Macintosh folder to open it 5 Double click Setup Ins...

Page 33: ...rectly to no play bypassing the need to use the input device s software To enable or disable the computer s mic for no play 1 Right click the PolyVision driver icon in the task bar 2 Choose Turn off m...

Page 34: ...center of the whiteboard The guest audio input connector is located at the edge of the whiteboard for easy access to temporary connections Guest audio connector on the amplifier When both permanent a...

Page 35: ...water lightning or other acts of nature unauthorized product modification or failure to follow instructions supplied with the product Excessive force on mechanical or electronic components or vandalis...

Page 36: ...ENT SHALL POLYVISION BE LIABLE FOR ANY INDIRECT DAMAGES WHETHER INCIDENTAL CONSEQUENTIAL OR OTHERWISE AND EXPRESSLY INCLUDING LOST PROFITS AND LOSS OF DATA OR FOR ANY DAMAGES IN EXCESS OF THE PURCHASE...

Page 37: ...put power 24VDC 1 88A Input power 100 240 VAC 50 60Hz PolyVision Replacement 2002532 001 Mfg K Tec KSAS0452400188D5 Driver Pack Size 5 9 L x 2 4 W x 0 9 D 152 0mm L x 60 0mm W x 22 9mm D Driver pack w...

Page 38: ...le connections 16 driver pack cable ties 17 driver pack installation 10 foam strips 25 guest audio connector 30 install wall bracket extender 24 LED status 29 on line registration 3 PolyVision driver...

Reviews: