background image

E-21

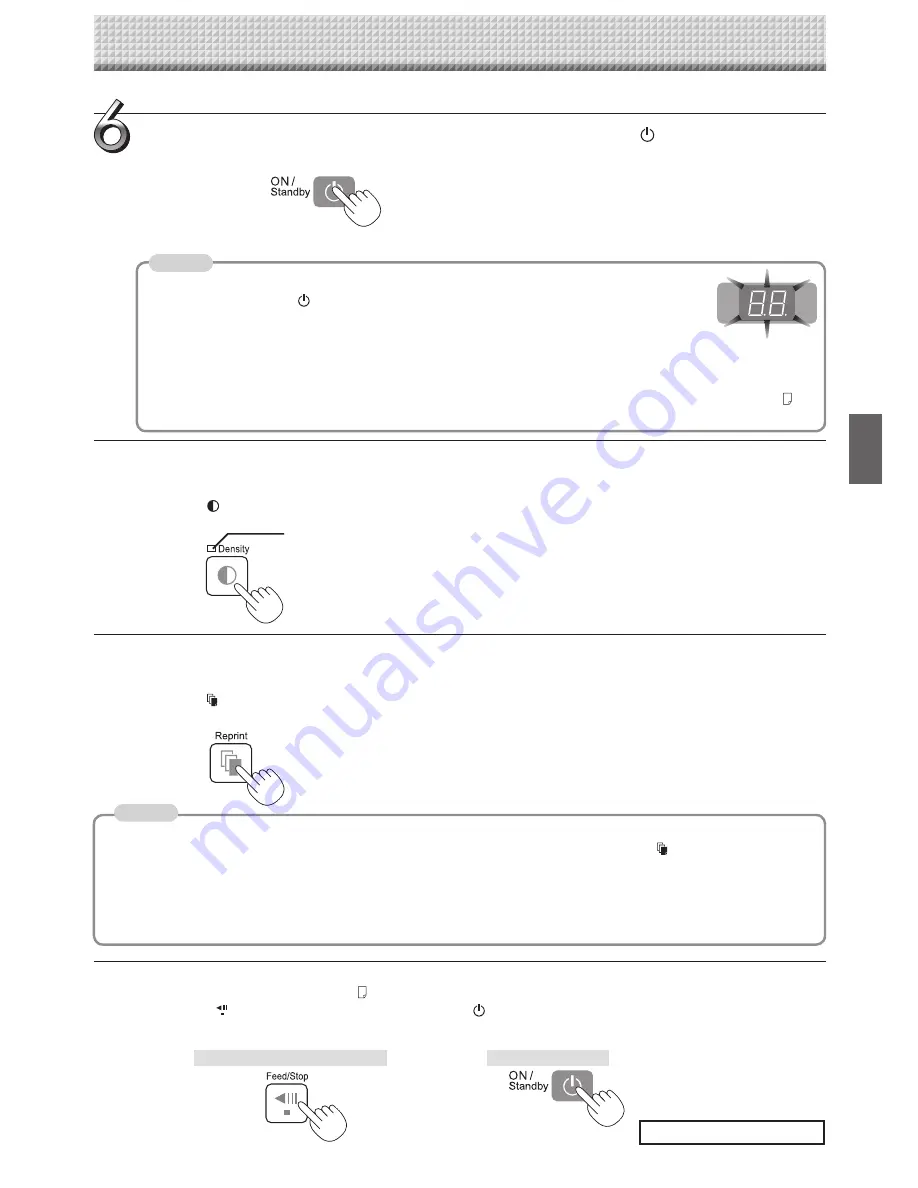
When the copyboard is not going to be used, press the ON/Standby 

 button and switch off 

the power (standby mode).

•  Switch off the printer power. 

•  When the Erase Reminder function is set to "Enable"

   When the ON/Standby 

 button is pressed, the display window and all the indicators flash 

simultaneously, the sheet automatically moves to the surface that is not yet erased and the 
power turns off. (For Model M-125, the sheet moves to the start of the surface that is not yet 
erased and the power turns off.)

   * The Erase Reminder function may not work properly due to dirt on the sheet's adhesive sections or marker residue.
•  If no button is operated for 30 minutes or greater, the unit is set to the sleep mode and the LEDs on the control 

panel turn off. If the power button is pressed, the LEDs on the display window turn on. If the print button 

 is 

pressed at this time, the printing operation starts.

Printing

Note

Making additional copies 

This will print the copy of the sheet that was scrolled previously one more time.

Press the Reprint 

 button. 

This starts the printing of the image data that has accumulated in internal memory. 


• The sheet is not scrolled when additional copies are made. 

 • The number of copies can be changed. To do so, make the change before pressing the Reprint 

 button. 

 • In repeat printing, the color/black & white and density settings will be the same as those of the prior printing. 
 • When printing or USB memory storage has not been performed since switching on the power, image data will not have 

accumulated in the internal memory and this operation will not be possible.

 • If additional printing is set to "Disable" in the security function settings, display number "E8" is displayed. For details, see the 

separate "Software Operation Manual".

Selecting the printing density

Select this when the density of the print is light. 

Press the Density 

 button and select darker or standard. 

Density mode lamp 

Lit Darker 
Unlit Standard 

Note

Continued on next page

Cancellation of the print operation in progress 

During the read operation (when the Print 

 button was pressed) 

When the Feed/Stop 

 button (for model M-125, the ON/Standby


button) is pressed, the reading of the sheet stops (for model 

M-125, the copyboard returns to the original page), and the partially read image data is printed. Wait until the sheet is expelled 

from the printer.

For models M-12S and M-12W

For model M-125

Display window

Summary of Contents for M-12S

Page 1: ...Copyboard Please read this User s Manual carefully before use to take full advan tage of the functions of this product After you have finished reading the manual please keep it for future reference Co...

Page 2: ...of the various companies and the product trademarks even when not written down will be given due respect Product names and company names appearing in this manual are registered trademarks or trademark...

Page 3: ...M 12S and M 12W E 12 Control Panel model M 125 E 13 Operation Steps E 14 Connecting the Power E 15 Setting the Time E 16 Printing E 18 Preparing the Printer E 18 Basic Printing Operation E 19 Selecti...

Page 4: ...dangerous to make any kind of contact with any part inside of this unit This symbol alerts the user that important lit erature concerning the operation and mainte nance of this unit has been included...

Page 5: ...ation Only a specially trained technician should install the set Improper installation could lead to injury When mounting on a wall be sure to check first that the wall surface is strong enough to sup...

Page 6: ...ead the data USB Memory The USB memory formats supported by the copyboard are FAT and FAT 32 There are also types of USB memory that cannot be used by this unit Check the PLUS Vision web site for type...

Page 7: ...this manual Includes information about safety precautions and the use of the copyboard Software Operation Manual 1 This manual includes instructions on setting the copy board s operating environment...

Page 8: ...the sheet surface is stored on the USB memory device as an image file in either PNG JPEG or PDF format selectable 4 copyboard pages 1 screen model M 125 In addition to the 4 page copyboard function t...

Page 9: ...is stand supports the copyboard Pen tray Main unit Effective Reading Size The area that can be copied is the gray area of the diagram It might not be possible to print or copy when storing to USB memo...

Page 10: ...onto the computer See the separate software operation manual Printer connector USB port Type A Connect this with the USB connector of the printer See Page E 37 The printer connector is dedicated for...

Page 11: ...m Fully hook the 2 left and right installation holes of the main unit rear frame onto the hooks of the stand If a stay for preventing shaking is mounted on the printer table insert the stay in its ori...

Page 12: ...Selects whether to print or store in memory in color or black white Color mode lamp The color mode indicator lights green when color is selected When a black white printer is connected the printout wi...

Page 13: ...copyboard to the specified page Each press of the page change button moves the page indicator one step in the sequence of S 4 3 2 1 making it flash and scrolls the copyboard to the specified page Scro...

Page 14: ...ion Manual 3 Switch off the printer power Saving to USB Memory 1 Press the ON Standby button of the copyboard to switch on the power 2 Insert USB memory into the Memory port USB port of the copyboard...

Page 15: ...lusive use with this product Never use them with another product Be sure to insert all the plugs securely Notice When not using the copyboard for long periods of time Disconnect the AC power adapter s...

Page 16: ...16 pm November 8 2008 2008 11 08 14 16 1 Switch to the function settings With the power turned on press and hold in the Density button then press the ON Standby button 2 Press the Print button to swi...

Page 17: ...n to finalize There will be a change to the day setting mode display Press the button or the button select 08 the day and press the Print button to finalize There will be a change to the hour setting...

Page 18: ...tions for a description of the paper that can be used Switch on the power Press the power switch The power indicator lights This completes the preparation of the printer Press the Print button on the...

Page 19: ...ly the page indicator stops flashing remaining lit The one screen that is visible is printable position To fine adjust the sheet surface position M 12S and M 12W only with the sheet stopped move the s...

Page 20: ...the reading of the page is completed i e printing is completed there will be a return to Page 4 When a USB memory has been inserted a press of the Save button during printing will start the USB memory...

Page 21: ...cumulated in internal memory The sheet is not scrolled when additional copies are made The number of copies can be changed To do so make the change before pressing the Reprint button In repeat printin...

Page 22: ...page then stops and the corresponding page indicator stops flashing remaining lit Page change button Each time the button is pressed the page indicators flash in the order S 4 3 2 1 the sheet scrolls...

Page 23: ...heck that the power is turned on that the display window is lit 1 While pressing in the Density button press the ON Standby button to switch to the function settings mode F1 appears on the display win...

Page 24: ...the resolution of images when storing them on USB memory devices is Standard There are two ways to switch this to a high resolution by changing the copyboard s function Settings see page E 29 or by s...

Page 25: ...s completed When the wide type M 12W copyboard has been adjusted to the paper size in the horizontal direction the image will be compressed to about 75 The date and time of the saved file will reflect...

Page 26: ...ory device will switch off the power A function that serves as a reminder to unplug the USB memory device If no button is operated for 30 minutes or greater the unit is set to the sleep mode and the L...

Page 27: ...e personal computer for the first time the installation of a USB driver is required Follow the instructions manual of the USB memory device that you are using Usually with Windows 2000 XP Vista the st...

Page 28: ...puter s operating system For details refer to the computer s operating instructions or help files 1 Click the Hardware Removal icon that is displayed in the task tray Click Stop USB Mass storage Devic...

Page 29: ...Print button to finalize See the Table of Function Numbers Selected Modes and Lamp Statuses on the following page Selecting the function s setting Press the Feed Stop button or for Model M 125 use th...

Page 30: ...Resolution Setting of resolution for images stored in the memory and images transferred to the computer Standard Unlit Lit High Unlit Lit Image format Setting of format of images stored on the USB me...

Page 31: ...e This driver may not work on some applications This driver conforms to TWAIN standard ver 1 9 PLUS TOOLBOX dedicated software This is a utility for loading images from a computer setting the copyboar...

Page 32: ...d on the USB memory device JPEG PNG PDF PNG Paper Size A4 Letter A4 Aspect Ratio Sets the aspect ratio for printed images Original Image Match Paper Size Match Paper Size Erase Reminder Sheet rear sur...

Page 33: ...Memory storage problem An error occurred during USB memory storage Please perform USB memory storage again Do not insert or remove the USB memory during processing Reading problem There is a lighting...

Page 34: ...es are not printed or stored in memory Portions of blurred characters or thin lines may not be printed or stored in USB memory Change Density setting to Dark Scanned copy image is dirty Erase Reminder...

Page 35: ...t is very pale there are white lines on it or page is dirty Printed colors are very different from those of the markers that were used Is the print cartridge s nozzle partially choked Make a test prin...

Page 36: ...terface USB1 1 or USB2 0 full speed mode 4 Control panel Control buttons ON Standby Print Save Reprint Color Density Feed Stop ON Standby Print Save Reprint Color Density Page Change Screen LED Indica...

Page 37: ...ector To USB connector Printer USB cable supplied To DC input connector AC power adapter supplied Printer AC power adapter supplied with the printer Appendix Connections and Wiring Diagram The connect...

Reviews: