background image

Basic Setup

04

45

en

Chapter 4:

Basic Setup

 Important

• The procedure for setting the receiver operation 

mode differs for the remote controls included with 
the SC-27 and SC-25. For the SC-27’s remote control, 
set the remote control operation selector switch to 

RECEIVER

. For the SC-25’s remote control, press the 

 button. When “set the remote control to 

the receiver operation mode” is indicated in these 
instructions, use the respective procedure described 
above.

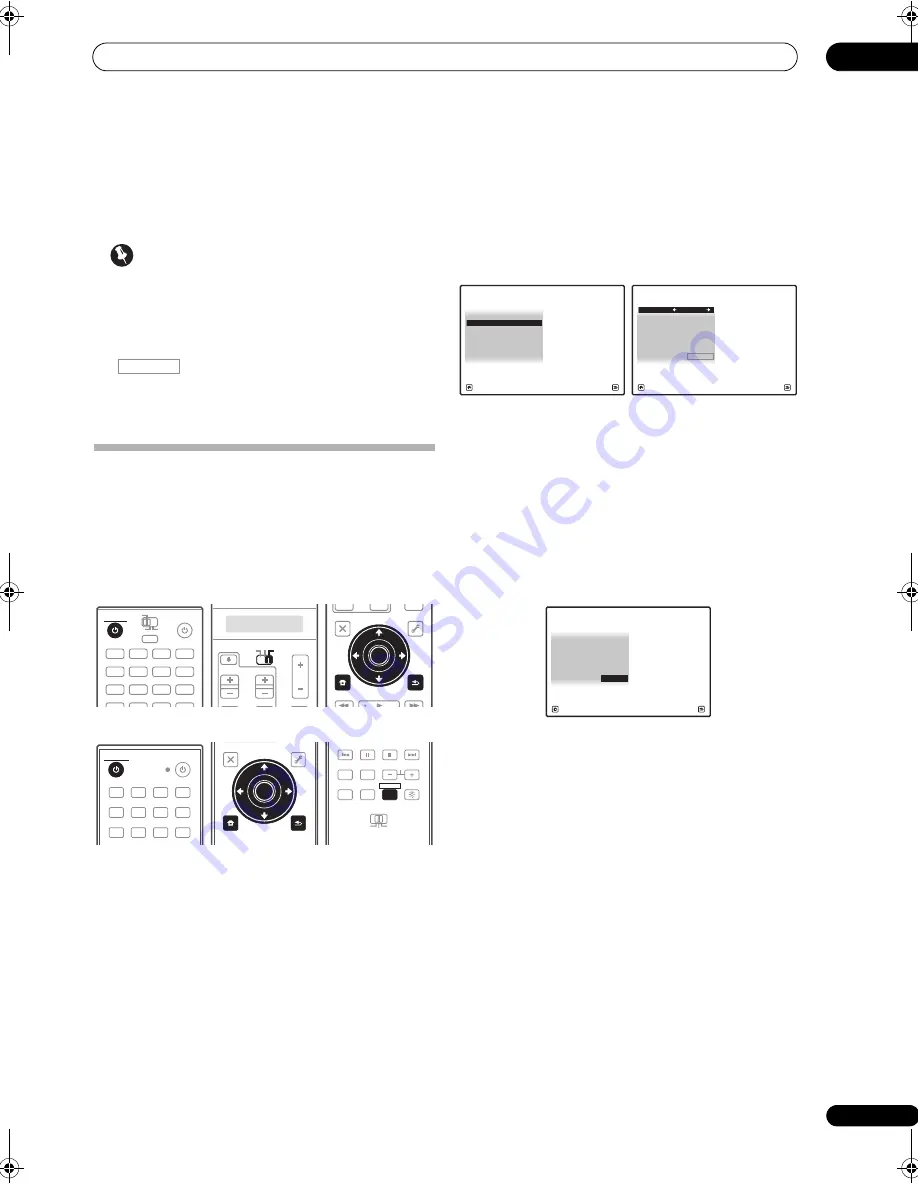
Changing the OSD display language 
(OSD Language)

The language used on the Graphical User Interface 
screen can be changed.

• The explanations in these operating instructions are 

for when English is selected for the GUI screen.

SC-27:


SC-25:


1

Switch on the receiver and your TV.

Use 

 RECEIVER

 to switch on.

2

Set the remote control to the receiver operation 

mode, then press HOME MENU.

A Graphical User Interface (GUI) screen appears on your 
TV. Use 

///

 and 

ENTER

 to navigate through the 

screens and select menu items. Press 

RETURN

 to exit 

the current menu.

3

Select ‘System Setup’ from the HOME MENU.

4

Select  ‘OSD Language’ from the System Setup 

menu.


5

Select the desired language.

English

French

German

Italian

Spanish

Dutch

Russian

6

Select  ‘OK’ to change the language.

The setting is completed and the 

System Setup

 menu 

reappears automatically.

RECEIVER

DVD

RECEIVER

SOURCE

MAIN

MULTI

OPERATION

ZONE2

3

VIDEO1

iPod

USB

MULTI CH

GALLERY

HOME MEDIA

CD

PHONO

XM

SIRIUS

IN

TUNER

VIDEO2

HDMI

BD

TV

DVR

CD-R

RECEIVER

SOURCE

TV

RECEIVER

VOL

VOL

TV CONTROL

CH

RECEIVER

AUDIO

PARAMETER

TOP MENU

BAND

iPod CTRL

CATEGORY

LIST

TOOLS

HOME

MENU

STATUS

PHASE CTRL

CH LEVEL

T.EDIT

GUIDE

VIDEO

PARAMETER

INPUT

MUTE

TUNE

TUNE

PRESET

PRESET

MUTE

ENTER

RETURN

HOME

MENU

ENTER

RETURN

DVD

BD

DVR

HDMI

TV

CD

CD-R

TUNER

XM

SIRIUS

HOME MEDIA

GALLERY

iPod USB

INPUT

RECEIVER

SOURCE

RECEIVER

T.EDIT
GUIDE

TOP MENU
BAND

RETURN

iPod CTRL

HOME

MENU

LIST

TOOLS

CATEGORY

AUDIO

PARAMETER

ENTER

TUNE

PRESET

PRESET

TUNE

VIDEO

PARAMETER

HOME

MENU

RETURN

ENTER

REMOTE

SETUP

ZONE 2

MAIN

ZONE 3

ANT

AUDIO

MULTI OPE

INFO

DISP

MPX

PQLS

MEMORY

CH

RECEIVER

TV CTRL

RECEIVER

A/V RECEIVER

Exit

Return

a.Manual SP Setup
b. Input  Setup

c. OSD  Language

d. Other  Setup

4.SystemSetup

4c.OSD Language

A/V RECEIVER

Exit

Return

Language :  


English

 OK

4c.OSD Language

A/V RECEIVER

Exit

Return

Language :  


English

 OK

SC-27_25.book  Page 45  Monday, April 6, 2009  7:15 PM

Summary of Contents for Elite SC-25

Page 1: ...Operating Instructions audio video multi channel receiver ...

Page 2: ...erference will not occur in a particular installation If this equipment does cause harmful interference to radio or television reception which can be determined by turning the equipment off and on the user is encouraged to try to correct the interference by one or more of the following measures Reorient or relocate the receiving antenna Increase the separation between the equipment and receiver Co...

Page 3: ...s product is for general household purposes Any failure due to use for other than household purposes such as long term use for business purposes in a restaurant or use in a car or ship and which requires repair will be charged for even during the warranty period K041_En WARNING The voltage of the available power supply differs according to country or region Be sure that the power supply voltage of...

Page 4: ...s unit does not match the AC outlet you want to use the plug must be removed and appropriate one fitted Replacement and mounting of an AC plug on the power supply cord of this unit should be performed only by qualified service personnel If connected to an AC outlet the cut off plug can cause severe electrical shock Make sure it is properly disposed of after removal The equipment should be disconne...

Page 5: ... MULTI ZONE connections 38 Connecting an IR receiver 40 Operating other Pioneer components with this unit s sensor 40 Switching components on and off using the 12 volt trigger 41 Connecting a PC for Advanced MCACC output 41 Connecting an HDMI equipped component to the front panel input 42 Connecting an iPod 43 Connecting a USB device 43 Plugging in the receiver 44 04 Basic Setup Changing the OSD d...

Page 6: ...RO LINK connections 84 Cautions on the KURO LINK function 84 About connections with a product of a different brand that supports the KURO LINK function 85 KURO LINK Setup 85 Setting the PQLS function 86 Before using synchronization 87 Synchronized amp mode 87 Synchronized amp mode operations 87 Canceling synchronized amp mode 87 09 Using other functions Setting the Audio options 88 About the SRC S...

Page 7: ...6 THX Audio Setting 127 The Other Setup menu 128 Multi Channel Input Setup 128 ZONE Audio Setup 129 Power ON Level Setup 129 Volume Limit Setup 129 Remote Control Mode Setup 130 Flicker Reduction Setup 130 13 Additional information Speaker Setting Guide 131 Positional relationship between speakers and monitor 132 Troubleshooting 132 Power 132 No sound 133 Other audio problems 134 Video 135 Setting...

Page 8: ...5 7 Surround back speaker setting page 124 8 MCACC speaker settings Automatically setting up for surround sound Auto MCACC Full Band Phase Control page 46 9 The Input Setup menu page 48 When using connections other than the recommended connections 10 Basic playback page 50 11 Switching the HDMI output page 94 12 Adjusting the sound and picture quality as desired Using the various listening modes U...

Page 9: ...experience as faithful as possible to what the director intended THX certified design In case of SC 25 This receiver bears the THX Select2 Plus logo which means it has passed a rigorous series of quality and performance tests covering every aspect of the product This includes testing of pre amplifier and power amplifier performance and operation and hundreds of other parameters in both the digital...

Page 10: ... high definition digital video audio via a single cable High quality sound formats such as DTS HD and Dolby TrueHD are supported while this receiver is also compatible with the Deep Color and x v Color feature x v Color is trademarks of Sony Corporation You can operate this receiver in synchronization with your Pioneer component that supports the KURO LINK function by connecting your component to ...

Page 11: ... environmental public instruction s rules that apply in your country or area WARNING Do not use or store batteries in direct sunlight or other excessively hot place such as inside a car or near a heater This can cause batteries to leak overheat explode or catch fire It can also reduce the life or performance of batteries Operating range of remote control unit The remote control may not work proper...

Page 12: ...Indicates the setup mode from which you choose the options below PRESET See Selecting preset codes directly on page 96 LEARNING See Programming signals from other remote controls on page 97 MULTI OP See Multi Operation and System Off on page 99 SYS OFF See Multi Operation and System Off on page 99 DIRECT F See Direct function on page 99 RENAME See Renaming input function names on page 98 ERASE See...

Page 13: ... first to access MPX Switches between stereo and mono reception of FM broadcasts If the signal is weak then switching to mono will improve the sound quality page 56 NOISE CUT MODE 1 to 2 can be selected when receiving AM broadcasts Set the remote control operation selector switch to RECEIVER first to access STATUS Press to check selected receiver settings page 94 PHASE CTRL Press to switch on off ...

Page 14: ...to set the listening volume 16 MUTE Mutes the sound or restores the sound if it has been muted adjusting the volume also restores the sound 17 AUDIO Changes the audio or channel on DVD or BD discs DISP Switches between named station presets and radio frequencies CH Use to select channels for DVD DVR units Note 1 Press and hold in the remote control illumination button for 5 seconds to change the i...

Page 15: ...26 Press TUNER first to access D ACCESS After pressing you can access a radio station directly using the number buttons page 56 CLASS Switches between the seven banks classes of radio station presets page 56 4 TV CONTROL buttons These buttons are dedicated to control the TV assigned to the TV operation selector switch Thus if you only have one TV to hook up to this system assign it to the TV opera...

Page 16: ...tches between stereo playback and Front Stage Surround Advance modes page 65 STANDARD Press for Standard decoding and to switch between the various 2 Pro Logic IIx and Neo 6 options page 62 ADV SURR Use to switch between the various surround modes page 63 THX Press to select a Home THX listening mode page 63 PHASE CTRL Press to switch on off Phase Control or Full Band Phase Control page 68 STATUS ...

Page 17: ... component is connected page 29 4 Remote sensor Receives the signals from the remote control see Operating range of remote control unit on page 11 5 Character display See Display on page 18 6 MASTER VOLUME dial 7 Front panel controls To access the front panel controls push gently on the lower third portion of the panel with your finger 8 AUDIO PARAMETER Use to access the Audio options page 88 9 VI...

Page 18: ... iPod iPhone USB terminals Use to connect your Apple iPod as an audio and video source or connect a USB device for audio and photo playback page 43 20 MCACC SETUP MIC jack Use to connect the supplied microphone page 46 21 PHONES jack Use to connect headphones When the headphones are connected there is no sound output from the speakers Display 1 SIGNAL indicators Light to indicate the currently sel...

Page 19: ...s when a broadcast is being received STEREO Lights when a stereo FM broadcast is being received in auto stereo mode MONO Lights when the mono mode is set using MPX 13 SOUND Lights when any of the Midnight Loudness or tone controls feature is selected page 88 Lights when Dialog Enhancement is switched on 14 Lights when the sound is muted page 16 15 Master volume level Shows the overall volume level...

Page 20: ...cording to a CD or MiniDisc recorder See Connecting other audio components on page 35 Use the IN jacks for digital audio sources including DVD players recorders digital satellite receivers CD players etc See also The Input Setup menu on page 48 to assign the inputs 6 12 V trigger jacks total 50 mA max x2 Use to switch components in your system on and off according to the input function of the rece...

Page 21: ... outputs Use to connect monitors and TVs See Connecting your TV with no HDMI input on page 31 15 Stereo analog audio source inputs x3 output x1 Use for connection to audio sources such as CD players tape decks turntables etc See Connecting other audio components on page 35 16 Audio video source inputs x5 output x1 Use for connection to audio visual sources such as DVD players recorders VCRs etc Ea...

Page 22: ...ch surround ZONE 2 connection Multi Zone With these connections you can simultaneously enjoy 5 1 channel surround sound in the main zone with stereo playback on another component in ZONE 2 The selection of input devices is limited Surr Back System setting ZONE 2 4 5 1ch surround Speaker B connection With these connections you can simultaneously enjoy 5 1 channel surround sound in the main zone wit...

Page 23: ...ngle If not place them at a narrower angle Place the center speaker above or below the TV so that the sound of the center channel is localized at the TV screen Also make sure the center speaker does not cross the line formed by the leading edge of the front left and right speakers It is best to angle the speakers towards the listening position The angle depends on the size of the room Use less of ...

Page 24: ...Bare wire connections 1 Twist exposed wire strands together fig A 2 Loosen terminal and insert exposed wire fig B 3 Tighten terminal fig C Banana plug connections If you want to use speaker cables terminated with banana plugs screw the speaker terminal fully shut then plug the banana plug into the end of the speaker terminal Important Please refer to the manual that came with your speakers for det...

Page 25: ... IN 2 OUTPUT 12V TOTAL 50 mA MAX 1 2 IN 1 IN IN 2 OUT OUT DVD PR PB Y PR PB Y PR PB Y DVR IN 3 VIDEO 1 ZONE 2 OUT MONITOR OUT ZONE 2 OUT VIDEO ZONE 3 OUT PHONO IN CD IN OUT IN CD R TAPE TV SAT IN VIDEO1 IN VIDEO2 IN DVD IN OUT DVR IN SIGNAL GND S VIDEO VIDEO FRONT CENTER SUBWOOFER SURROUND SURROUNDBACK FRONT CENTER B A R SURROUND BACK Class 2Wiring SUBWOOFER SURROUND SURROUNDBACK Single L Single R...

Page 26: ...Don t connect different speakers from the same terminal in this way When bi wiring as well heed the cautions for bi amping shown at the left LAN 10 100 SPEAKERS CAUTION SPEAKERIMPEDANCE 6Ω 16Ω ATTENTION ENCEINTE D IMPEDANCE DE 6Ω 16Ω OPTICAL RS 232C HDMI COAXIAL COMPONENT VIDEO ANTENNA PRE OUT AC IN MULTI CH IN XM IR CONTROL SIRIUS BD IN IN IN 12V TRIGGER IN 1 IN 2 IN 3 OUT 1 OUT 2 OUT 1 OUT 2 ASS...

Page 27: ...r setting on page 124 to do this Bi Amping setup Bi amping connection of the front speakers for high sound quality with 5 1 channel surround sound 1 Connect Bi amp compatible speakers to the front and surround back speaker terminals See Bi amping your speakers on page 26 2 Select Front Bi Amp from the Surr Back System menu See Surround back speaker setting on page 124 to do this About the audio co...

Page 28: ... signal input resolutions that can be converted from the component video input for the HDMI output are 480i 576i 480p 576p 720p and 1080i 1080p signal cannot be converted Only signals with an input resolution of 480i 576i can be converted from the component video input for the composite and S Video MONITOR OUT HDMI IN VIDEO IN VIDEO MONITOR OUT COMPONENT VIDEO IN S VIDEO IN S VIDEO MONITOR OUT HDM...

Page 29: ... be heard over the receiver if the TV is connected using an HDMI cable If you want to listen to the sound of the TV over the receiver connect the receiver and TV with audio cables LAN 10 100 SPEAKERS CAUTION SPEAKERIMPEDANCE 6Ω 16Ω ATTENTION ENCEINTE D IMPEDANCE DE 6Ω 16Ω OPTICAL RS 232C HDMI COAXIAL COMPONENT VIDEO ANTEN XM IR CONTROL SIRIUS BD IN IN IN 12V TRIGGER IN 1 IN 2 IN 3 OUT 1 OUT 2 OUT ...

Page 30: ...ge 34 LAN 10 100 SPEAKERS CAUTION SPEAKERIMPEDANCE 6Ω 16Ω ATTENTION ENCEINTE D IMPEDANCE DE 6Ω 16Ω OPTICAL RS 232C HDMI COAXIAL COMPONENT VIDEO XM IR CONTROL SIRIUS BD IN IN IN 12V TRIGGER IN 1 IN 2 IN 3 OUT 1 OUT 2 OUT 1 OUT 2 ASSIGNABLE 3 1 3 1 ASSIGNABLE KURO LINK ASSIGNABLE ASSIGNABLE CD R IN 4 VIDEO1 IN 3 DVR IN 2 TV SAT IN 1 IN 3 VIDEO2 IN 2 CD IN 1 DVD IN 1 IN 2 OUTPUT 12V TOTAL 50 mA MAX 1...

Page 31: ...ource component to check whether they are compatible with progressive scan video If your DVD player has multichannel analog outputs you can connect these instead See also see Connecting the multichannel analog inputs on page 34 LAN 10 100 SPEAKERS CAUTION SPEAKERIMPEDANCE 6Ω 16Ω ATTENTION ENCEINTE D IMPEDANCE DE 6Ω 16Ω OPTICAL RS 232C HDMI COAXIAL COMPONENT VIDEO XM IR CONTROL SIRIUS BD IN IN IN 1...

Page 32: ... the KURO LINK function see KURO LINK on page 84 HDMI the HDMI logo and High Definition Multimedia Interface are trademarks or registered trademarks of HDMI Licensing LLC x v Color and x v Color logo are trademarks of Sony Corporation Input function Input Terminals Digital HDMI Component DVD COAX 1 IN 1 BD BD TV SAT OPT 1 DVR OPT 2 IN 2 VIDEO 1 OPT 3 IN 3 VIDEO 2 COAX 3a a SC 27 only HDMI 1 HDMI 1...

Page 33: ...GNABLE 3 1 3 1 ASSIGNABLE KURO LINK ASSIGNABLE ASSIGNABLE CD R IN 4 VIDEO1 IN 3 DVR IN 2 TV SAT IN 1 IN 3 VIDEO2 IN 2 CD IN 1 DVD IN 1 IN 2 OUTPUT 12V TOTAL 50 mA MAX 1 2 IN 1 IN IN 2 OUT OUT DVD PR PB Y PR PB Y PR PB Y DVR IN 3 VIDEO 1 ZONE 2 OUT MONITOR OUT ZONE 2 OUT VIDEO ZONE 3 OUT PHONO IN CD IN OUT IN CD R TAPE TV SAT IN VIDEO1 IN VIDEO2 IN DVD IN OUT DVR IN SIGNAL GND S VIDEO VIDEO FRON FR...

Page 34: ...XIAL COMPONENT VIDEO ANTENNA XM IR CONTROL SIRIUS IN IN 12V TRIGGER OUT 1 OUT 2 3 1 ASSIGNABLE ASSIGNABLE ASSIGNABLE CD R IN 4 VIDEO1 IN 3 DVR IN 2 TV SAT IN 1 IN 3 VIDEO2 IN 2 CD IN 1 DVD IN 1 IN 2 OUTPUT 12V TOTAL 50 mA MAX 1 2 IN 1 IN IN 2 OUT OUT DVD PR PB Y PR PB Y PR PB Y DVR IN 3 VIDEO 1 ZONE 2 OUT MONITOR OUT ZONE 2 OUT VIDEO ZONE 3 OUT PHONO IN CD IN OUT IN CD R TAPE TV SAT IN VIDE IN DVD...

Page 35: ...n connected to a WMA9 Pro compatible player However the connected DVD player set top box etc must be able to output WMA9 Pro format audio signals through a coaxial or optical digital output LAN 10 100 SPEAKERS CAUTION SPEAKERIMPEDANCE 6Ω 16Ω ATTENTION ENCEINTE D IMPEDANCE DE 6Ω 16Ω OPTICAL RS 232C HDMI COAXIAL COMPONENT VIDEO ANTENNA XM IR CONTROL SIRIUS BD IN IN IN 12V TRIGGER IN 1 IN 2 IN 3 OUT ...

Page 36: ... protective shields of both AM antenna wires 2 Push open the tabs then insert one wire fully into each terminal then release the tabs to secure the AM antenna wires 3 Fix the AM loop antenna to the attached stand To fix the stand to the antenna bend in the direction indicated by the arrow fig a then clip the loop onto the stand fig b If you plan to mount the AM antenna to a wall or other surface s...

Page 37: ...5 Ω coaxial cable ANTENNA FM UNBAL 75 AM LOOP Outdoor antenna 5 m to 6 m 16 ft to 20 ft Indoor antenna vinyl coated wire LAN 10 100 SPEAKERS CAUTIO SPEAKERI ATTEN ENCEINTE OPTICAL RS 232C HDMI COAXIAL XM IR CONTROL SIRIUS BD IN IN IN 12V TRIGGER IN 1 IN 2 IN 3 OUT 1 OUT 2 OUT 1 OUT 2 ASSIGNABLE 3 1 KURO LINK ASSIGNABLE ASSIGNABLE CD R IN 4 VIDEO1 IN 3 DVR IN 2 TV SAT IN 1 IN 3 VIDEO2 IN 2 CD IN 1 ...

Page 38: ... IMPE OPTICAL RS 232C HDMI COAXIAL XM IR CONTROL SIRIUS BD IN IN IN 12V TRIGGER IN 1 IN 2 IN 3 OUT 1 OUT 2 OUT 1 OUT 2 ASSIGNABLE 3 1 KURO LINK ASSIGNABLE ASSIGNABLE CD R IN 4 VIDEO1 IN 3 DVR IN 2 TV SAT IN 1 IN 3 VIDEO2 IN 2 CD IN 1 DVD IN 1 OUTPUT 12V TOTAL 50 mA MAX 1 2 IN 1 IN IN 2 OUT OUT DVD PR PB Y PR DVR ZONE 2 OUT ZONE 2 OUT VIDEO ZONE 3 OUT PH SI G L R SEE INSTRUCTION MANUAL SELECTABLE V...

Page 39: ...IN 4 VIDEO1 IN 3 DVR IN 2 TV SAT IN 1 IN 3 VIDEO2 IN 2 CD IN 1 DVD IN 1 OUTPUT 12V TOTAL 50 mA MAX 1 2 IN 1 IN IN 2 OUT OUT DVD PR PB Y ZONE 2 OUT ZONE 2 OUT VIDEO Z L R SEE INSTRUCTION MANUAL SELECTABLE VO D S ZONE 2 OUT VIDEO L R R L AUDIO IN VIDEO IN Main zone Sub zone ZONE 2 Note 1 SC 27 only COMPONENT VIDEO ZONE 2 OUT can be used to output clear images SPEAKERS CAUTION SPEAKERIMPEDANCE 6Ω 16Ω...

Page 40: ...the CONTROL OUT jack of that component to the CONTROL IN jack of another Pioneer component Use a cable with a mono mini plug on each end for the connection Continue the chain in the same way for as many components as you have Note 1 Remote operation may not be possible if direct light from a strong fluorescent lamp is shining on the IR receiver remote sensor window Note that other manufacturers ma...

Page 41: ...ype female female The software to output the results is available from the support area of the Pioneer website http www pioneerelectronics com PUSA Home Entertainment Custom Install Instructions for using the software are also available here If you have any questions regarding please contact the Customer Support Division of Pioneer Please make sure your system meets the following requirements The ...

Page 42: ... front panel input Select this input using HDMI INPUT SELECT remote or the INPUT SELECTOR dial front panel to select HDMI 4 Note 1 The various parameters the reverb characteristics data and group delay characteristics data used for display on the computer are not cleared when the power is turned off see Output PC on page 120 LAN 10 100 SPEAKERS CAUTION SPEAKERIMPE ATTENTI ENCEINTE D IM OPTICAL RS ...

Page 43: ... playing the iPod see Playing an iPod on page 51 Connecting a USB device It is possible to playback files using the USB interface on the front of this receiver Switch the receiver into standby then connect your USB device to the USB terminal on the front panel of this receiver Push down on the lower portion of the front panel door to access the USB terminal For instructions on playing the USB devi...

Page 44: ...a fire or give you an electric shock Check the power cord once in a while If you find it damaged ask your nearest Pioneer authorized independent service company for a replacement Do not use any power cord other than the one supplied with this unit Do not use the supplied power cord for any purpose other than that described below The receiver should be disconnected by removing the mains plug from t...

Page 45: ...ct OSD Language from the System Setup menu 5 Select the desired language English French German Italian Spanish Dutch Russian 6 Select OK to change the language The setting is completed and the System Setup menu reappears automatically RECEIVER DVD RECEIVER SOURCE MAIN MULTI OPERATION ZONE2 3 VIDEO1 iPod USB MULTICH GALLERY HOMEMEDIA CD PHONO XM SIRIUS IN TUNER VIDEO2 HDMI BD TV DVR CD R RECEIVER S...

Page 46: ... do not have a tripod use some other object to install the microphone 1 The Full Auto MCACC display appears once the microphone is connected 2 3 Set the remote control to the receiver operation mode DVD RECEIVER SOURCE MAIN MULTI OPERATION ZONE2 3 VIDEO1 iPod USB MULTICH GALLERY HOMEMEDIA CD PHONO XM SIRIUS IN TUNER VIDEO2 HDMI BD TV DVR CD R RECEIVER SOURCE TV RECEIVER VOL VOL TVCONTROL CH RECEIV...

Page 47: ...o disconnect the microphone from this receiver upon completion of the Auto MCACC Setup The settings made in the Auto MCACC Setup should give you excellent surround sound from your system but it is also possible to adjust these settings manually using The Advanced MCACC menu on page 109 or The system and the other setup on page 123 7 Note 1 For details on the speaker layout and the Surr Back System...

Page 48: ...beside the inputs on the back of the receiver If your component is connected via a component video cable to an input terminal other than the default you must tell the receiver which input terminal your component is connected to or else you may see the S Video or composite video signals instead of the component video signals 1 7 When you re finished proceed to the settings for other inputs There ar...

Page 49: ... differently from or in addition to the defaults below see The Input Setup menu on page 48 to tell the receiver how you ve connected up The dots indicate possible assignments 4b Input Setup A V RECEIVER Exit Finish Input DVD Input Name Rename Digital In COAX 1 HDMI Input Input Skip OFF Component In Comp 1 12V Trigger1 OFF 12V Trigger2 OFF Input function Input Terminals Digital HDMI Component DVD C...

Page 50: ...Turn down the volume of your TV so that all sound is coming from the speakers connected to this receiver Playing a source with HDMI connection Use INPUT SELECT to select the HDMI input you ve connected to for example HDMI 1 You can also perform the same operation by using the INPUT SELECTOR dial on the front panel or by pressing HDMI on the remote control repeatedly Note 1 Make sure that the TV s ...

Page 51: ... from the iPod 3 Main Zone Sub Zone Playing back audio files stored on an iPod To navigate songs on your iPod you can take advantage of the GUI screen of your TV connected to this receiver 4 You can also control all operations for music in the front panel display of this receiver Note 1 When playback from the multichannel inputs is selected only the volume and channel levels can be set You can t l...

Page 52: ...If you re in the song category you can also press ENTER to start playback Play mode Track title Album title Artist name Track Title Artist Name Genre xxxxxxxxxxx Chapter Number xxx xxx xxxx xxxx Now Playing Album Title iPod iPod CTRL Top Menu List Shuffle Songs PLAY 3 02 2 02 Playing time File information Track number Track Title Shuffle Songs 3 02 2 02 Artist Name Album Title Play xxxx xxxx Chapx...

Page 53: ...d digital audio players MP3 players of format FAT16 32 It is not possible to connect this unit to a personal computer for USB playback Pioneer cannot guarantee compatibility operation and or bus power with all USB mass storage devices and assumes no responsibility for any loss of data that may occur when connected to this receiver 2 Make sure the receiver is in standby when disconnecting the USB d...

Page 54: ...t it does Press to start playback Pauses unpauses playback Press and hold during playback to start scanning Press to skip to previous next track Press repeatedly to switch between Repeat One Repeat Folder Repeat All and Repeat Off Press repeatedly to switch between Random On and Random Off DISP Press repeatedly to change the song playback information displayed in the front panel display ENTER When...

Page 55: ... kbps to 320 kbps VBR CBR Supported Supported WAV wav LPCM Sampling frequency 32 kHz 44 1 kHz 48 kHz Quantization bitrate 8 bit 16 bit Channel 2 ch Monaural WMA wma WMA8 9b b Files encoded using Windows Media Codec 9 may be playable but some parts of the specification are not supported specifically Pro Lossless Voice Sampling frequency 8 kHz to 48 kHz Quantization bitrate 16 bit Channel 2 ch Bitra...

Page 56: ...trol operation selector switch to SOURCE 2 Press TUNER to select the tuner 3 Use BAND to change the band FM or AM if necessary Each press switches the band between FM and AM 4 Press D ACCESS Direct Access 5 Use the number buttons to enter the frequency of the radio station For example to tune to 106 00 FM press 1 0 6 0 0 If you make a mistake halfway through press D ACCESS twice to cancel the freq...

Page 57: ...variety of commercial free music from categories ranging from Pop Rock Country R B Dance Jazz Classical and many more plus coverage of all the top professional and college sports including play by play games from select leagues and teams Additional programming includes expert sports talk uncensored entertainment comedy family programming local traffic and weather and news from your most trusted so...

Page 58: ...nnels each 3 1 Select the channel you want to memorize See Selecting channels and browsing by genre above 2 Set the remote control operation selector switch to SOURCE SC 27 only then press T EDIT The display shows a blinking memory class 3 Press CLASS to select one of the seven classes then press to select the channel preset you want You can also use the number buttons to select a preset The defau...

Page 59: ...Connect tuner After connecting you will be able to use this receiver to select channels and navigate categories using the GUI screen display 4 The information displayed is as follows Main Zone Sub Zone Note 1 You can reset the Channel Skip Add settings in Resetting the system on page 95 2 In order to activate your radio subscription you will need the SIRIUS ID SID which uniquely identifies your tu...

Page 60: ...he SIRIUS Menu below to recall this information Listening to channel presets 1 Set the remote control operation selector switch to SOURCE SC 27 only then press CLASS to select the class in which the channel is stored Press repeatedly to cycle through classes A to G 2 Press to select the channel preset you want You can also use the number buttons on the remote control to recall the channel preset U...

Page 61: ... on this and also when listening to the FM Radio the Neural THX feature is selected automatically see Using Neural THX on page 56 for more on this ALC In the Auto level control ALC mode this receiver equalizes playback sound levels OPTIMUM SURR In the Optimum Surround mode this receiver automatically optimizes sound balance in each scene based on actually set volume The sound balancer controls thr...

Page 62: ...ces and provides pure decoding for 6 1 channel sources like Dolby Digital Surround EX DTS ES Allows you to hear 6 1 channel playback with DTS ES encoded sources DTS Neo 6 Allows you to hear 6 1 channel playback with DTS encoded sources Note 1 In modes that give 6 1 channel sound the same signal is heard from both surround back speakers 2 The STANDARD listening mode cannot be selected in the follow...

Page 63: ...ffects Most Advanced Surround modes are designed to be used with film soundtracks but some modes are also suited for music sources Try different settings with various soundtracks to see which you like SC 27 Note 1 When the function is set to TUNER iPod USB PHONO HOME MEDIA GALLERY XM or SIRIUS it is not possible to select 2 Pro Logic IIx GAME THX GAMES or THX Ultra2 Select2 GAME The THX mode canno...

Page 64: ...e receiver operation mode 2 While listening to a source press STEREO for stereo playback 3 Press repeatedly to switch between STEREO The audio is heard with your surround settings and you can still use the Midnight Loudness and Tone functions F S SURR FOCUS See Using Front Stage Surround Advance below for more on this F S SURR WIDE See Using Front Stage Surround Advance below for more on this Note...

Page 65: ...the HDMI audio output parameter is set to THROUGH in Setting the Audio options on page 88 SOURCE TV RECEIVER VOL VOL TVCONTROL CH RECEIVER iPod CTRL STATUS THX PQLS MPX MEMORY PHASE CTRL CH LEVEL TUNE PGM MENU STEREO SIGNAL SEL SLEEP AUDIO INFO DIMMER A ATT SBch MCACC DISP AUTO ALC DIRECT STANDARD ADV SURR MENU STEREO AUTO ALC DIRECT PHASE CTRL STATUS REMOTE SETUP HDD PGM DVD STANDARD STEREO MENU ...

Page 66: ...are detected in the input signals SBch OFF Matrix decoding processing for generating the surround back component from the surround component is turned off Using the Virtual Surround Back mode Default setting OFF When you re not using surround back speakers selecting this mode allows you to hear a virtual surround back channel through your surround speakers You can choose to listen to sources with ...

Page 67: ...to a source press MCACC Press repeatedly to select one of the six MCACC presets3 See Data Management on page 121 to check and manage your current settings Note 1 Set to ON regardless of this setting when playing DTS HD signals May automatically be set to OFF even when set to ON depending on the input signal and listening mode C SW FL FR SL SR SBL SBR SBL SBR C SW FL FR SL SR Up Mix OFF Up Mix ON S...

Page 68: ...heory however this type of processing involves a group delay that varies with frequency resulting in phase distortion where the low frequency sound is delayed or muffled by the conflict with other channels With the Phase Control mode switched on this receiver can reproduce powerful bass sound without deteriorating the quality of the original sound see illustration below Phase Control OFF Rhythms b...

Page 69: ...e then the sound will be out of phase and an unreliable sound image will be produced The PHASE CONTROL feature is available even when the headphones are plugged in If your subwoofer has a phase control switch set it to the plus sign or 0 However the effect you can actually feel when PHASE CONTROL is set to ON on this receiver depends on the type of your subwoofer Set your subwoofer to maximize the...

Page 70: ...h the Phase Control and Full Band Phase Control functions are switched on The FULL BAND and indicator on the front panel lights Tweeter Midrange Woofer Group Delay Characteristics ms Hz Tweeter Midrange Woofer Group Delay Characteristics ms Hz Note 1 The Full Band Phase Ctrl mode cannot be set to ON in the following cases When headphones are plugged in When the PURE DIRECT mode is switched on When...

Page 71: ...ion from the list of Internet radio stations created edited and managed by the vTuner database service exclusively for use with the Pioneer products See Playback with Home Media Gallery on page 74 and Listening to Internet radio stations on page 75 Listening to Rhapsody Sirius Neural THX internet radio or Neural Music Direct See Listening to Rhapsody on page 77 See Listening to Sirius Internet Rad...

Page 72: ... This unit allows for the playing of files stored on the following PCs running Microsoft Windows XP with Windows Media Connect installed PCs running Microsoft Windows Vista or XP with Windows Media Player 11 installed DLNA compatible digital media servers on PCs or other components To play back audio files stored on components on the network or listen to Internet radio stations you must turn on th...

Page 73: ...r service marks of Digital Living Network Alliance Content playable over a network Even when encoded in a compatible format some files may not play correctly Movie or Photo files cannot be played back There are cases where you cannot listen to an Internet radio station even if the station can be selected from a list of radio stations Some functions may not be supported depending on the server type...

Page 74: ...dio stations are displayed 4 Use to select the folder music files or Internet radio station to play back and then press ENTER Press to scroll up and down the list and select the desired item When you press ENTER playback starts with the playback screen being displayed for the selected item To return to the list screen press RETURN 1 In case of a server DVD RECEIVER SOURCE MAIN MULTI OPERATION ZONE...

Page 75: ...he air radio stations are geographically restricted on the range of radio waves broadcast from a transmitter through the air Internet radio stations are accessible from anywhere in the world as long as there Internet Radio Top Menu Return Folder1 Folder2 Folder3 Folder4 A V RECEIVER 5 32 Music1 Music2 Music3 Music4 Track Title Now Playing Channel Name Internet Radio Top Menu Return Random On PLAY ...

Page 76: ...ed Make a memo of this address The following can be checked on the Help screen Get access code The access code required for registration on the special Pioneer Internet radio site is displayed Show Your WebID PW After registering on the special Pioneer Internet radio site the registered ID and password are displayed Reset Your WebID PW Resets all the information registered on the special Pioneer I...

Page 77: ...u must have a registered account in order to listen to songs using Sirius Internet Radio For details see Checking about the Accounts on page 81 Some functions may be changed at Sirius s discretion Listening to Neural Music Direct About Neural Music Direct Neural Music Direct is an Internet radio station managed and operated by Neural THX Neural radio stations deliver multichannel surround sound Th...

Page 78: ... wav LPCM Sampling frequency 8 kHz to 44 1 kHz Quantization bitrate 16 bit 20 bit 24 bit Channel 2 ch WMA wma WMA2 7 8 Sampling frequency 8 kHz to 48 kHz Quantization bitrate 16 bit Channel 2 ch Bitrate 5 kbps to 320 kbps VBR CBR Supported Supported WMA9 Sampling frequency 8 kHz to 48 kHz Quantization bitrate 16 bit Channel 2 ch Bitrate 5 kbps to 320 kbps VBR CBR Supported Supported AAC m4a aac 3g...

Page 79: ...n the DHCP server function and you will not need to set up the network manually You must set up the network as described below only when you have connected this receiver to a server without the DHCP server function Before you set up the network consult with your ISP or the network manager for the required settings It is advisory that you also refer to the operation manual supplied with your networ...

Page 80: ...not need to follow Steps 7 to 8 Proceed with Step 9 7 Select Change and press ENTER to confirm your selection The Edit IP address screen appears 8 Enter the IP address Press to select a number and to move the cursor After you select the last number press or ENTER You can also use the numeric buttons to enter a number The Enable Proxy Server screen appears SOURCE TV RECEIVER VIDEO1 iPod USB MULTICH...

Page 81: ...The Firmware Version for the Home Media Gallery of this receiver screen appears The version of the illustration is not the latest 2 Check the network settings Press to switch the display Each time you press the display switches as follows Firmware Version MAC Address IP address Gateway IP Proxy Server Subnet Mask 3 Press RETURN The Setup screen appears To return to the Top Menu screen press RETURN...

Page 82: ...dards DLNA delivers technical design guidelines that companies can use to develop digital home products that share content through wired or wireless networks in the home DNS DNS is an abbreviation for the Domain Name System which stores and associates many types of information with domain names Most importantly DNS translates domain names computer hostnames or sitenames such as www pioneerelectron...

Page 83: ...Windows Media is either a registered trademark or trademark of Microsoft Corporation in the U S and or other countries Use an application licensed by Microsoft Corporation to author distribute or play Windows Media formatted content Using an application unauthorized by Microsoft Corporation is subject to malfunction Windows Media DRM Windows Media DRM is a DRM Digital Rights Management service for...

Page 84: ...unit For details see Connecting your TV and playback components on page 29 Important When connecting this system or changing connections be sure to switch the power off and disconnect the power cord from the wall socket After completing all connections connect the power cords to the wall socket After this receiver is connected to an AC outlet a 2 second to 10 second HDMI initialization process beg...

Page 85: ...n When playback starts on the player or recorder the receiver s input switches to the HDMI input to which that component is connected See the Pioneer website for the latest information on the models of non Pioneer brands and products that support the KURO LINK function KURO LINK Setup You must adjust the settings of this receiver as well as KURO LINK compatible connected components in order to mak...

Page 86: ...for all sources Set the player s audio output to Linear PCM On players compatible with PQLS 2 ch Audio PQLS only works when playing CDs Please refer to the operating instructions supplied with your player for more information This function is activated when KURO LINK is set to ON SC 27 SC 25 1 Set the remote control to the receiver operation mode then press PQLS to select PQLS setting The setting ...

Page 87: ...dby Only when the input for a component connected to the receiver by HDMI connection is selected or when watching the TV The receiver s input switches automatically when the KURO LINK compatible component is played The receiver s input switches automatically when the TV s channel is switched The synchronized amp mode remains in effect even if the receiver s input is switched to a component other t...

Page 88: ...CEIVER DELAY Sound Delay Some monitors have a slight delay when showing video so the soundtrack will be slightly out of sync with the picture By adding a bit of delay you can adjust the sound to match the presentation of the video 0 0 to 10 0 frames 1 second 30 frames NTSC Default 0 0 MIDNIGHT Allows you to hear effective surround sound of movies at low volumes MIDNIGHT LOUDNESS OFF MIDNIGHT ON LO...

Page 89: ...ing it sound wider higher settings or narrower lower settings 0 to 7 Default 3 DIMENSIONi Adjusts the depth of the surround sound balance from front to back making the sound more distant minus settings or more forward positive settings 3 to 3 Default 0 PANORAMAi Extends the front stereo image to include the surround speakers for a wraparound effect OFF ON Setting What it does Option s C IMAGEj Cen...

Page 90: ...ie video 576i 25 frames second STB video output or DVD disc playback etc that contain film progressive material cannot be recognized as such by this receiver AUTO PAL OFF P MOTIONc d Progressive Motion Adjusts the motion and still picture quality when video output is set to progressive 4 to 4 Default 0 YNRc Adjusts the amount of noise reduction NR applied to the Y brightness component 0 to 8 Defau...

Page 91: ... ZONE CONTROL on the front panel to select the sub zone s you want If you selected ZONE 2 3 ON above you can toggle between ZONE 2 and ZONE 3 When the receiver is on 2 make sure that any operations for the sub zone are done while ZONE and your selected sub zone s show in the display If this is not showing the front panel controls affect the main zone only 3 Use the INPUT SELECTOR dial to select th...

Page 92: ...necessary set the remote control to the receiver operation mode then press SIGNAL SEL to select the input signal corresponding to the source component see Choosing the input signal on page 68 for more on this Note 1 The volume levels of the main and sub zones are independent 2 You won t be able to switch the main zone off completely unless you ve switched off the MULTI ZONE control first If you do...

Page 93: ... options again 2 Dimming the display You can choose between four brightness levels for the front panel display Note that when selecting sources the display automatically brightens for a few seconds SC 27 Note 1 The attenuator isn t available with digital sources or when using the Stream Direct ANALOG DIRECT modes SOURCE TV RECEIVER VOL VOL TVCONTROL CH RECEIVER PGM MENU S O SIGNAL SEL SLEEP AUDIO ...

Page 94: ... mode switch to HDMI OUT 1 then select the synchronized amp mode on the flat panel TV using the flat panel TV s remote control When the power is turned off then back on after switching the HDMI output the input is set to a setting between HDMI1 and HDMI4 or BD INPUT 1 2 3 HDMI OUT SLEEP MCACC SELECT SIGNAL SEL 4 5 6 DIMMER A ATT SBch 7 8 9 CLASS MASTER VOLUME CH LEVEL D ACCESS CLR 0 ENTER DIMMER 9...

Page 95: ... Brightest Inputs See Input function default and possible settings on page 49 MULTI ZONE ZONE 2 3 Volume Level Variable ZONE 2 3 Volume 60 dB HDMI HDMI Audio Amp HDMI output HDMI OUT ALL KURO LINK ON DSP Surround back channel Processing ON Phase Control ON Full Band Phase Control OFF Sound Retriever iPod USB or HOME MEDIA GALLERY function ON Other functions OFF Sound Delay 0 0 frame Dual Mono CH1 ...

Page 96: ...acturer in the remote control will not work for the model that you are using If you can t find a preset code that matches the component you want to control you can still teach the remote individual commands from another remote control see Programming signals from other remote controls on page 97 Note You can cancel or exit any of the steps by pressing MULTI OPERATION To go back a step press RETURN...

Page 97: ...e operation hasn t been learned the LCD will display ERROR briefly and then display PRES KEY again If this happens keep pressing the teaching button as you vary the distance between the two remotes until the LCD display shows OK 5 Certain buttons represent operations that cannot be learned from other remote controls The buttons available are shown below Note 1 When using a Pioneer HDD recorder ple...

Page 98: ...remote presets have been erased Confirming preset codes Use this feature to check which preset code is assigned to an input function button 1 While pressing MULTI OPERATION press HOME MENU The remote LCD display shows SETUP 2 Use to select READ ID then press ENTER The LCD on the remote prompts you for the input function button you want to check 3 Press the button of the component for which you wan...

Page 99: ...essing MULTI OPERATION press HOME MENU The remote LCD display shows SETUP 2 Use to select MULTI OP or SYS OFF from the menu and press ENTER If you selected Multi Operation MULTI OP the LCD on the remote prompts you for an input function button If you selected System Off SYS OFF go to step 4 3 Press the input function button for the component that will start the multi operation then press ENTER For...

Page 100: ...hes in the display 2 Press SOURCE The command sequence you programmed will run then all Pioneer components will switch off1 followed by this receiver DVD RECEIVER SOURCE MAIN MULTI OPERATION AUDIO VIDEO ZONE2 SOURCE TV RECEIVER 3 VIDEO1 iPod USB MULTICH GALLERY HOMEMEDIA INPUTSELECT CD PHONO INPUT MUTE MUTE VOL VOL TVCONTROL CH XM SIRIUS IN TUNER VIDEO2 HDMI BD TV DVR CD R AUDIO PARAMETER TOP MENU...

Page 101: ... POWER ON OFF POWER ON OFF POWER ON OFF POWER ON OFF POWER ON OFF POWER ON OFF Number buttons numerics numerics numerics numerics numerics numerics dot dot KURO LINK CLEAR ENTER CLASS CH ENTER CH ENTER ENTER CLEAR ENTER EXIT INFO EXIT TOP MENU TOP MENU DISC NAVI LIST TOOLS GUIDE USER MENU TOOLSa a Controls for BD GUIDE GUIDE ENTER ENTER ENTER ENTER ENTER ENTER HOME MENU HOME MENU HOME MENU HOME ME...

Page 102: ... ENTER TOP MENU LEGATO LINKb b Controls for SACD ENTER ENTER SACD SETUPb RETURN PGM Red PROGRAM Yellow REPEAT Blue SHUFFLE MS c c Controls for DAT MS c AUDIO AUDIO PURE AUDIOa DISP DISPLAY INFO TIMEa Button s TV Projector SOURCE POWER ON 1 MOVIE 2 STANDARD 3 DYNAMIC 4 USER1 5 USER2 6 USER3 7 COLOR 8 SHARP 9 GAMMA 0 COLOR dot SHARP ENTER CLASS COLOR TEMP EXIT INFO ENTER ENTER TEST HIDE MENU HDMI1 H...

Page 103: ...ent s manufacturer preset code stored in the remote However there are cases where only certain functions may be controllable after assigning the proper preset code or the codes for the manufacturer in the remote control will not work for the model that you are using If you can t find a preset code that matches the component you want to control you can still teach the remote individual commands fro...

Page 104: ... the number buttons to enter 9 7 6 The LED flashes twice 3 Press the input function button corresponding to the command to be erased then press the button to be erased twice To erase all the settings stored at the input function buttons press the input function button twice here The LED flashes twice to confirm the button has been erased 4 Repeat step 3 to erase other buttons Note 1 The remote can...

Page 105: ...u can start multi operations with the receiver switched on or in standby 1 Press MULTI OPE 2 Press an input function button that has been set up with a multi operation The receiver switches on if it was in standby and the programmed multi operation is performed automatically Note 1 Before Multi Operation and System Off will work correctly you must setup the remote to work with your TV and other co...

Page 106: ...recorder power off codes are sent 2 When Selecting preset codes directly on page 103 are set all the signals learned in the input function buttons are cleared This function is convenient when you want to reset some but not all of input function buttons Input function button Preset code DVD 3 1 5 7 1 BD 3 2 4 4 2 DVR 2 2 3 0 6 HDMI 3 2 4 4 2 TV 1 4 0 0 1 CD 7 0 4 6 8 CD R 7 1 0 8 7 TV CTRL 1 4 0 0 ...

Page 107: ...TER EXIT INFO EXIT TOP MENU TOP MENU DISC NAVI LIST TOOLS GUIDE USER MENU TOOLSa GUIDE GUIDE ENTER ENTER ENTER ENTER ENTER ENTER HOME MENU HOME MENU HOME MENU HOME MENU HOME RETURN RETURN RETURN RETURN RETURN HDD Red Red Red HDD B Red DVD Green Green Green DVD C Green Yellow Yellow Yellow VCR MENU Yellow Blue Blue Blue MENU MENU A Blue E AUTO SETUP FREEZE D ANT AV SELECTION SCREEN SIZE AUDIO AUDIO...

Page 108: ...TER CLASS ENTER DISK ENTER OPEN CLOSEb ENTER TOP MENU MS LEGATO LINKa MS ENTER ENTER SACD SETUPa RETURN HDD Red PROGRAM Yellow REPEAT Blue SHUFFLE AUDIO AUDIO PURE AUDIOa DISP DISPLAY INFO TIMEa Button s TV Projector SOURCE POWER ON 1 MOVIE 2 STANDARD 3 DYNAMIC 4 USER1 5 USER2 6 USER3 7 COLOR 8 SHARP 9 GAMMA 0 COLOR dot SHARP ENTER CLASS COLOR TEMP EXIT INFO ENTER ENTER TEST HIDE MENU HDMI1 HDMI2 ...

Page 109: ...terface GUI screen appears on your TV Use and ENTER to navigate through the screens and select menu items Press RETURN to confirm and exit the current menu Press HOME MENU at any time to exit the HOME MENU The screen saver will automatically appear after five minutes of inactivity 3 Select Advanced MCACC from the HOME MENU then press ENTER 4 Select the setting you want to adjust Full Auto MCACC Se...

Page 110: ...alibration is performed each of the following three correction curves can be stored separately in the MCACC memory SYMMETRY default implements symmetric correction for each pair of left and right speakers to flatten the frequency amplitude characteristics ALL CH ADJ is a flat setting where all the speakers are set individually so no special weighting is given to any one channel FRONT ALIGN6 sets a...

Page 111: ...e see Problems when using the Auto MCACC Setup on page 48 and verifying the mic connection If there doesn t seem to be a problem you can simply select GO NEXT and continue 7 If necessary confirm the speaker configuration in the GUI screen 3 The configuration shown on screen should reflect the actual speakers you have If no operations are performed for 10 seconds while the speaker configuration che...

Page 112: ...ished checking each screen When you re finished select RETURN to go back to the HOME MENU Be sure to disconnect the microphone from this receiver upon completion of the Auto MCACC Setup Manual MCACC setup You can use the settings in the Manual MCACC setup menu to make detailed adjustments when you re more familiar with the system Before making these settings you should have already completed Autom...

Page 113: ... the Channel Level of each speaker in 0 5 dB increments The following setting can help you make detailed adjustments that you may not achieve using the Manual speaker setup on page 124 1 Select Fine Channel Level from the Manual MCACC setup menu The volume increases to the 0 0 dB reference level 2 Adjust the level of the left channel This will be the reference speaker level so you may want to keep...

Page 114: ...istening area During playback of a source you can customize the filters used for Standing Wave Control for each of your MCACC presets 3 1 Select Standing Wave from the Manual MCACC setup menu 2 Adjust the parameters for the Standing Wave Control Filter Channel Select the channel to which you will apply the filter s MAIN all except center channel and subwoofer Center or SW subwoofer TRIM only avail...

Page 115: ...ur system based on the direct sound coming from the speakers It can also provide you with a graphical output of the frequency response of your room 3 How to use Acoustic Calibration EQ Professional If you find that lower frequencies seem overly reverberant in your listening room i e it sounds boomy or that different channels seem to exhibit different reverb characteristics select EQ Pro S Wave or ...

Page 116: ...ture or paintings will affect the calibration results In such cases you should recalibrate your system Using Acoustic Calibration EQ Professional 1 Select EQ Professional then press ENTER 2 Select an option and press ENTER Reverb Measurement Use this to measure the reverb characteristics of your room for graphical output using a PC see Connecting a PC for Advanced MCACC output on page 41 to connec...

Page 117: ...the measurement results as a reference for your time setting For an optimal system calibration based on the direct sound coming from the speakers we recommend using the 30 50ms setting Use to select the setting Use to switch between them Select the setting from the following time periods in milliseconds 0 20ms 10 30ms 20 40ms 30 50ms 40 60ms 50 70ms and 60 80ms This setting will be applied to all ...

Page 118: ...ers See Channel Level below for more on this Speaker Distance Used to check the distance to the different speakers See Speaker Distance below for more on this Standing Wave Used to check the standing wave control filter settings See Standing Wave on page 119 for more on this Acoustic Cal EQ Used to check the calibration values of the listening environment s frequency response See Acoustic Cal EQ o...

Page 119: ...on this 1 Select Speaker Distance from the MCACC Data Check menu 2 When MCACC is highlighted use to select the MCACC preset you want to check The distance from the various channels set at the selected MCACC preset is displayed is displayed for channels that are not connected Standing Wave Use this to display the standing wave related adjustment values for the various MCACC memories See Standing Wa...

Page 120: ... transmitted to the connected computer 1 The 3D graphs of the reverb characteristics and group delay characteristics before and after calibration and the MCACC results parameters can be checked 1 Select Output PC from MCACC Data Check menu and press ENTER When the receiver is ready for transmission Start the MCACC application on your PC shows on the GUI screen 2 Start the MCACC application on your...

Page 121: ...finished You will return to the Data Management setup menu Copying MCACC preset data If you want to manually adjust the Acoustic Calibration EQ see Manual MCACC setup on page 112 we recommend copying your current settings2 to an unused MCACC preset Instead of just a flat EQ curve this will give you a reference point from which to start 1 Select MCACC Memory Copy from the Data Management setup menu...

Page 122: ...f that preset 1 Select MCACC Memory Clear from the Data Management setup menu 2 Select the MCACC preset you want to clear Make sure you don t clear an MCACC preset you re currently using this can t be undone 3 Select OK to confirm and clear the preset When MCACC Memory Clear is displayed select YES If NO is selected the memory is not cleared Completed shows in the GUI screen to confirm the MCACC p...

Page 123: ...tup below Input Setup Specifies what you ve connected to the digital HDMI and component video inputs see The Input Setup menu on page 48 OSD Language The GUI screen s display language can be changed see Changing the OSD display language OSD Language on page 45 Other Setup Changes customized settings to reflect how you are using the receiver see The Other Setup menu on page 128 Note 1 Make sure not...

Page 124: ...peakers they can be used for bi amping the front speakers or as an independent speaker system in another room 1 Select Surr Back System from the Manual SP Setup menu See Making receiver settings from the System Setup menu on page 123 if you re not already at this screen 2 Select the surround back speaker setting Normal Select for normal home theater use with surround back speakers in your main spe...

Page 125: ...tion MANUAL Move the test tone manually from speaker to speaker and adjust individual channel levels AUTO Adjust channel levels as the test tone moves from speaker to speaker automatically Note 1 If you select SMALL for the front speakers the subwoofer will automatically be fixed to YES Also the center surround and surround back speakers can t be set to LARGE if the front speakers are set to SMALL...

Page 126: ...you want Use to adjust the setting The X Curve is expressed as a downwards slope in decibels per octave starting at 2 kHz The sound becomes less bright as the slope increases to a maximum of 3 0dB oct Use the following guidelines to set the X Curve according to your room size If you select OFF the frequency curve will be flat and the X Curve has no effect 3 When you re finished press RETURN Note 1...

Page 127: ... t THX Ultra2 Select21 certified but you still want to switch boundary gain compensation on select YES here but the effect might not work properly 5 Select either ON or OFF for Boundary Gain Compensation BGC setting 6 When you re finished press RETURN You will return to the Manual SP Setup menu Note 1 Ultra2 for the SC 27 Select2 for the SC 25 4a Manual SP Setup A V RECEIVER Exit Return 1 Surr Bac...

Page 128: ...Setup You can adjust the level of the subwoofer for a multi channel input Also when the multi channel input is selected as an input function you can display the video images of other input functions In the Multi Channel Input Setup you can assign a video input to the multi channel input 1 Select Multi Ch In Setup from the Other Setup menu 2 Select the SW Input Gain setting you want 0dB Outputs sou...

Page 129: ...of 0 5 dB It is not possible to set a volume level greater than the value specified at Volume Limit Setup 3 When you re finished press RETURN You will return to the Other Setup menu Volume Limit Setup Use this function to limit the maximum volume The volume cannot be increased above the level set here even by operating MASTER VOLUME button or the dial on the front panel 1 Select Volume Limit Setup...

Page 130: ...s setting Note that the resolution in this setting only affects the GUI screen it has no influence on the video output 1 Select Flicker Reduction Setup from the Other Setup menu 2 Select the Flicker Reduction setting you want 3 When you re finished press RETURN You will return to the Other Setup menu Note 1 If you change this receiver s setting also change the setting on the remote control 4d Othe...

Page 131: ...o point it to the listening position Set surround speaker 1 so that it is not under the height of the ears Step 3 Adjusting the speaker orientation If the left and right speakers are not pointing in the same direction the tone will not be the same on the right and left and as a result the sound field will not be reproduced properly However if all the speakers are pointed towards the listening posi...

Page 132: ...ice company to carry out repair work Note If the unit does not operate normally due to external effects such as static electricity disconnect the power plug from the outlet and insert again to return to normal operating conditions Power Monitor L R 45 to 60 Installation on floor Diagram as seen from the side Monitor Symptom Remedy The power does not turn on Make sure that the power cord is plugged...

Page 133: ...nd is output when an input function is selected No sound output from the front speakers Check the volume mute setting press MUTE and speaker setting press SPEAKERS Make sure the correct input function is selected Check that the MCACC setup microphone is disconnected Make sure the correct input signal is selected press SIGNAL SEL Note that when PCM is selected you won t be able to hear any other si...

Page 134: ...tal DTS software is played back Check that your DVD player is compatible with Dolby Digital DTS discs Check the digital output settings of your DVD player Make sure that the DTS signal output is set to On If the source component has a digital volume control make sure this is not turned down No sound when using the HOME MENU If the HDMI input function is selected sound is muted until exiting the HO...

Page 135: ...HDMI or when digital video conversion is set to OFF and a TV and another component are connected with different cords in Setting the Video options on page 90 you must connect your TV to this receiver using the same type of video cable as you used to connect your video component Make sure the input assignment is correct for components connected using component video HDMI or S Video cables see The I...

Page 136: ...m option for the Auto MCACC menu in Automatic MCACC Expert on page 110 if this is a recurring problem Gauge value does not increase with the Precision Distance adjustment Check that the speakers are all in phase make sure the positive and negative terminals are matched up properly Perform the Full Auto MCACC procedure before the Precision Distance adjustment see Automatically setting up for surrou...

Page 137: ...erent input function 2 DIGITAL or DTS does not light when playing Dolby DTS software These indicators does not light if playback is paused Check the playback especially the digital output settings of the source component When playing Dolby Digital or DTS sources the receiver s format indicators do not light Check that the player is connected using a digital connection Make sure that the receiver i...

Page 138: ...port If video images do not appear on your TV or flat panel TV try adjusting the resolution Deep Color or other setting for your component While analog video signals are being output over HDMI use a separate connection for audio output When this receiver reproduces MULTI CH IN audio sources with the HDMI setting set to THROUGH you cannot hear audio output from all channels In this case make a digi...

Page 139: ...limited to the number of channels available from the connected display unit for example audio output is reduced to 2 channels for a monitor with stereo audio limitations If you want to switch the input function you ll have to switch functions on both the receiver and your display unit Since the sound is muted on the display when using the HDMI connection you must adjust the volume on the display e...

Page 140: ...ly authorized you need to enter the corresponding information again Check whether the connection status is set to Do not authorize There are no playable audio files on the component connected to the network Check the audio files stored on the component connected to the network Audio playback is undesirably stopped or disturbed The audio file currently being played back was not recorded in a format...

Page 141: ...ble region Store the folders files in the FAT region The number of levels in a folder is more than 8 Limit the maximum number of levels in a folder to 8 page 53 There are more than 30 000 folders files stored in a USB memory device Limit the maximum number of folders files stored in a USB memory device to 30 000 page 53 The audio files are copyrighted Copyrighted audio files stored on a USB memory...

Page 142: ...ed an XM channel that is blocked or cannot be received with your XM subscription package Consult the latest channel guide at www xmradio com for the current list of channels For information on receiving this channel visit www xmradio com or contact XM Satellite Radio at 1 800 967 2346 CH Unavailable The selected channel is not available The channel may have been reassigned to a different channel n...

Page 143: ...l is matrixed into the surround left right channels for 6 1 channel playback This allows for compatibility with Dolby Digital 5 1 channel decoding as well as for decoding using Dolby Digital EX Dolby Pro Logic IIx and Dolby Surround Dolby Pro Logic IIx is an improved version of the Dolby Pro Logic II and Dolby Pro Logic decoding system Using the innovative steering logic circuit this system extrac...

Page 144: ... DVD and Blu ray Disc standards currently limit their maximum number of audio channels to eight whereas Dolby Digital Plus and Dolby TrueHD support more than eight audio channels Manufactured under license from Dolby Laboratories Dolby Pro Logic Surround EX and the double D symbol are trademarks of Dolby Laboratories DTS The DTS technologies are explained below See www dtstech com for more detaile...

Page 145: ...red trademark and the DTS logos Symbol DTS HD and DTS HD Master Audio are trademarks of DTS Inc 1996 2008 DTS Inc All Rights Reserved Windows Media Audio 9 Professional Windows Media Audio 9 Professional WMA9 Pro is a discrete surround format developed by Microsoft Corporation Windows Media and the Windows logo are trademarks or registered trademarks of Microsoft Corporation in the United States a...

Page 146: ...oducts you purchase will give you superb performance for many years to come THX Select2 Plus requirements cover every aspect of the product including pre amplifier and power amplifier performance and operation and hundreds of other parameters in both the digital and analog domain THX Surround EX THX Surround EX Dolby Digital Surround EX is a joint development of Dolby Laboratories and the THX Ltd ...

Page 147: ...e THX Ultra2 Select2 Games For the playback of stereo and multi channel game audio the THX Ultra2 Select2 Games mode should be selected In this mode THX ASA processing is applied to the surround channels of all 5 1 and 2 0 encoded game sources such as analog PCM DTS and Dolby Digital This accurately places all game audio surround information providing a full 360 degree playback environment THX Ult...

Page 148: ...distribution and use in source and binary forms with or without modification are permitted provided that the following conditions are met Redistributions of source code must retain the above copyright notice this list of conditions and the following disclaimer Redistributions in binary form must reproduce the above copyright notice this list of conditions and the following disclaimer in the docume...

Page 149: ...IE DTS Surround Neo 6 CINEMA Neo 6 CINEMA Other stereo sources Stereo playback Stereo playback Analog sources As above ANALOG DIRECT stereo PCM sources As above Stereo playback DVD A sources As above As above SACD sources As above As above Input signal format Auto Surround ALC PURE DIRECT DIRECT Surround Back speaker s Connected Dolby Digital EX 6 1 channel flagged Dolby Digital EX 2 Pro Logic llx...

Page 150: ...0 mA USB terminal USB2 0 Full Speed Type A iPod terminal USB and Video Composite SIRIUS antenna cable 8 pin mini DIN cable Network Section LAN terminal 10 BASE T 100 BASE TX Integrated control section Control SR terminal Ø 3 5 Mini jack MONO Control IR terminal Ø 3 5 Mini jack MONO IR signal High Active High Level 2 0 V 12 V Trigger terminal Ø 3 5 Mini jack MONO 12 V Trigger output type 12 V Total...

Page 151: ...t system settings 95 Demo 110 Detail 90 Dialog Enhancement 88 Digital Noise Reduction 88 Digital Video Conversion 90 Dimension 89 Display 18 93 137 Dolby 62 143 DTS 62 144 Dual Mono 88 Dynamic Range Control 89 E Effect 89 F Fine Channel Level 113 Fine Speaker Distance 114 Flicker Reduction 130 Front Stage Surround Advance 65 Full Band Phase Control 46 68 H HDCP 32 HDMI 29 32 42 50 84 87 94 138 HDM...

Page 152: ... 93 Sound Delay 88 Sound Retriever 88 Speaker 22 27 131 Speaker B 22 25 27 91 124 Speaker Distance 119 126 Speaker Setting 119 124 Standard surround 62 Standing Wave 88 114 Status 94 Stream direct 65 149 Streo 64 Surround back channel processing 66 Surround back speaker 124 Synchronized amp mode 87 System Setup 123 T THX 23 110 127 145 Home THX 63 Tone Control 88 Treble 88 Troubleshooting 132 Tune...

Page 153: ...able sound level Set the dial and leave it there Taking a minute to do this now will help to prevent hearing damage or loss in the future After all we want you listening for a lifetime We Want You Listening For A Lifetime Used wisely your new sound equipment will provide a lifetime of fun and enjoyment Since hearing damage from loud noise is often undetectable until it is too late this manufacture...

Page 154: ...4 0 4 Please do not ship your product to Pioneer without first calling the Customer Support at the above listed number for assistance Pioneer Electronics Service Inc P O BOX 1760 Long Beach CA 90801 1760 U S A For warranty information please see the Limited Warranty sheet included with your product Should this product require service in Canada please contact a Pioneer Canadian Authorized Dealer to...

Reviews: