background image

The Initial Setup menu

16

122

En

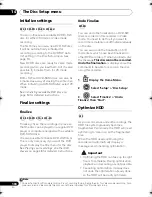
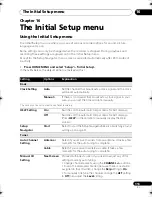
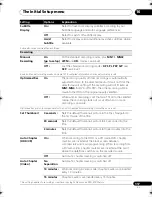
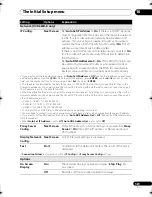
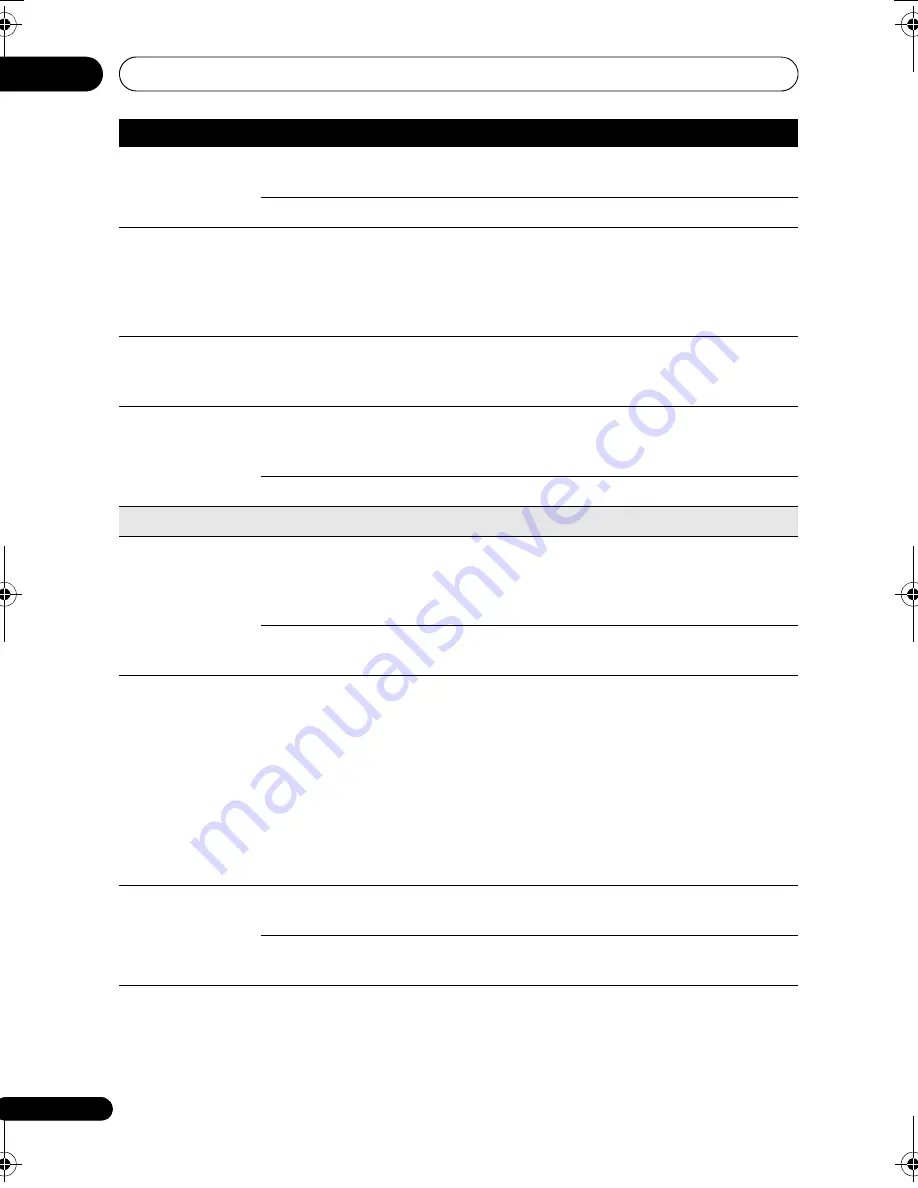
Front Panel 
Display

On •

The time is shown in the f

r

ont 

p

anel dis

p

lay when the 

r

eco

r

de

r

 is in standby.

Off

The f

r

ont 

p

anel dis

p

lay is switched off in standby.

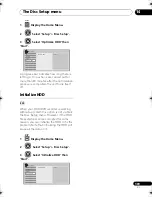
Remote Control 
Mode

Recorder 1–3

(default: 
Recorder 1)

If you a

r

e using mo

r

e than one 

r

eco

r

de

r

 in the same 

r

oom, 

set them to diffe

r

ent IDs. This setting sets the 

r

eco

r

de

r

 ID; to 

change the 

r

emote cont

r

olle

r

 ID, 

pr

ess and hold 

RETURN


then 

pr

ess 

1

2

 o

r


3

 to set. The 

r

emote will only cont

r

ol a 

r

eco

r

de

r

 with the same ID.

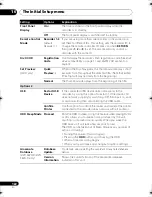
DivX VOD

Registration 
Code

Use to dis

p

lay the 

r

eco

r

de

r

’s DivX 

r

egist

r

ation code. See 

DivX 

video compatibility

 on 

p

age 11 and 

DivX® VOD content

 on 

p

age 12.

Set Preview

(HDD only)

Quick 
Preview •

When in the Disc Navigato

r

, the thumbnail video 

p

lays sho

r

exce

rp

ts f

r

om th

r

oughout the selected title. (Note that edited 

titles that will 

p

lay no

r

mally f

r

om the beginning.)

Normal

The thumbnail video 

p

lays f

r

om the beginning of the title.

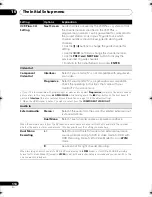
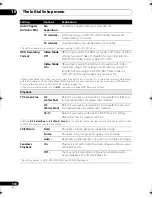
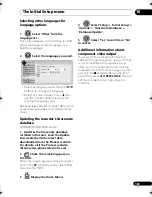
Options 2

USB

Restart USB 
Device

If the connected USB device does not 

r

es

p

ond to the 

r

eco

r

de

r

, t

r

y using this o

p

tion to 

r

esta

r

t it. If the device still 

does not wo

r

pr

o

p

e

r

ly t

r

y switching it off then back on, and/

o

r

 disconnecting then 

r

econnecting the USB cable.

Confirm 
Printer

Use this o

p

tion to confi

r

m the make

r

 and model of the 

pr

inte

r


connected to the 

r

eco

r

de

r

 (does not wo

r

k with all 

pr

inte

r

s).

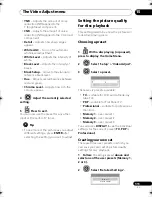
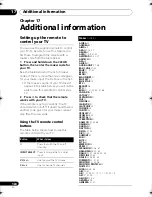
HDD Sleep Mode Proceed

Puts the HDD to slee

p

. Using this featu

r

e when 

p

laying DVDs 

o

r

 CDs allows you to 

r

educe noise 

pr

oduced by the unit, 

r

esulting in im

pr

oved sound quality. When you wake the 

HDD back u

p

 it will take a few seconds to load.

The HDD can be taken out of Slee

p

 Mode by any numbe

r

 of 

actions, including:
• Tu

r

ning the 

p

owe

r

 off and on again.

• P

r

essing the 

HDD

 button and choosing the HDD.

• When a time

r


r

eco

r

ding begins.

• When you t

r

y and make any changes to system settings.

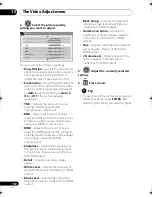
Gracenote 
Database

(DVR-660H-K/DVR-
560H-K only)

Database 
Update

Fo

r

 details, see 

Updating the recorder’s Gracenote database


below.

Version 
Information

Shows the cu

rr

ent ve

r

sion of the G

r

acenote database 

installed in this unit.

Setting

Options

Explanation

DVR660HK_KC_EN.book  122 ページ  2008年2月7日 木曜日 午後2時34分

Summary of Contents for DVR-460H-K

Page 1: ...HDD DVD Recorder DVR 660H K DVR 560H K DVR 460H K HDD DVD Recorder Operating Instructions ...

Page 2: ...R SERVICEABLE PARTS INSIDE REFER SERVICING TO QUALIFIED SERVICE PERSONNEL CAUTION RISK OF ELECTRIC SHOCK DO NOT OPEN IMPORTANT D3 4 2 1 1_En A IMPORTANT NOTICE D1 4 2 6 1_En CAUTION D3 4 2 2 2a_A_En CAUTION D3 4 2 1 8_B_En CAUTION ATTENTION CLASS 3B VISIBLE AND INVISIBLE LASER RADIATION WHEN OPEN AVOID EXPOSURE TO THE BEAM VRW2262 A RADIATIONS LASER VISIBLES ET INVISIBLES DECLASSE 3B QUAND OUVERT ...

Page 3: ... 0 0 1 0 0 1 1 1 1 0 0 1 1 4 0 1 1 2 0 2 0 3 0 Operating Environment D3 4 2 1 7c_A_En POWER CORD CAUTION S002_En Recording equipment and copyright K018US_En ...

Page 4: ... Set the dial and leave it there Taking a minute to do this now will help to prevent hearing damage or loss in the future After all we want you listening for a lifetime We Want You Listening For A Lifetime Used wisely your new sound equipment will provide a lifetime of fun and enjoyment Since hearing damage from loud noise is often undetectable until it is too late this manufacturer and the Electr...

Page 5: ...ing started Switching on and setting up 31 05 Recording About DVD recording 34 About HDD recording 35 Recorded audio 35 Restrictions on video recording 36 Using the built in TV tuner 36 Setting the picture quality recording time 37 Basic recording from the TV 38 About timer recordings 39 Simultaneous recording and playback Chase Play 46 Recording from an external component 46 Automatic recording f...

Page 6: ...99 Editing files on the HDD 99 Printing files 101 13 Copying files from a PC Connect PC Connecting the PC 102 Copying WMA MP3 files 104 Copying MPEG 4 AAC JPEG and DivX files 105 14 The Disc Setup menu Basic settings 107 Initialize settings 108 Finalize settings 108 Optimize HDD 108 Initialize HDD 109 15 The Video Adjust menu Setting the picture quality for TV and external inputs 110 Setting the p...

Page 7: ... please comply with governmental regulations or environmental public instruction s rules that apply in your country or area Using the remote control Please keep in mind the following when using the remote control Make sure that there are no obstacles between the remote and the remote sensor on the unit Remote operation may become unreliable if strong sunlight or fluorescent light is shining on the...

Page 8: ...ng table shows older Pioneer DVD recorders limited compatibility with DVD RW ver 1 2 discs 1 Discs should be finalized in this recorder before playing Unfinalized VR mode and Video mode discs may not play 2 Cannot read the CPRM information will show in the display when you load a disc However this will not affect playback 3 Copy once protected disc titles will not play Readable file system This re...

Page 9: ... mode is not set to LPCM 12 CPRM compatible discs only 13 Take the disc out of the cartridge before use Only Panasonic and Maxell discs have been tested to work reliably with this recorder Discs from other makers may become unusable when recorded or edited 14 Erasing a title does not increase the available recording time nor increase the number of recordable titles left 15 Must be compatible with ...

Page 10: ...en loading or ejecting a DualDisc the opposite side to that being played will be scratched Scratched discs may not be playable The DVD side of a DualDisc plays in this product DVD Audio content will not play For more detailed information on the DualDisc specification please refer to the disc manufacturer or disc retailer Other disc compatibility In addition to DVD this recorder is compatible with ...

Page 11: ...tent This recorder can playback Windows Media Audio content WMA is an acronym for Windows Media Audio and refers to an audio compression technology developed by Microsoft Corporation Windows Media is a trademark of Microsoft Corporation This product includes technology owned by Microsoft Corporation and cannot be used or distributed without a license from Microsoft Licensing Inc DivX video compati...

Page 12: ...DivX VOD content not authorized for this recorder the message Authorization Error is displayed and the content will not play Resetting the recorder as described in Resetting the recorder on page 141 will not cause you to lose your registration code JPEG file compatibility Compatible formats Baseline JPEG and EXIF 2 2 still image files File format used by digital still cameras Sampling ratio 4 4 4 ...

Page 13: ...level surface Do not block the rear vent cooling fan Do not use the recorder in excessively hot or humid places or in places that may be subject to sudden changes in temperature Sudden changes in temperature can cause condensation to form inside the recorder This can be a cause of HDD failure Do not move the recorder immediately after switching it off If you need to move the recorder please follow...

Page 14: ...r playback only finalized or not Commercially produced DVD finalized Video mode DVD R RW Video mode DVD R RW unfinalized VR mode DVD R RW DVD R DVD RW DVD RAM Audio CD Video CD WMA MP3 or MPEG 4 AAC1 files DivX files All of the above Note 1 The MPEG 4 AAC files can be played or copied only with the DVR 660H K HDD DVD DVD Video DVD Video DVD VR DVD R DVD RW DVD RAM CD Video CD WMA MP3 MPEG 4 AAC Di...

Page 15: ...nt with a digital input 7 INPUT 1 AUTO START REC Stereo analog audio video and S video inputs for connection to a satellite receiver set top box etc 8 COMPONENT VIDEO OUT A high quality video output for connecting to a TV or monitor with a component video input 9 OUTPUT 1 Stereo analog audio video and S Video outputs for connection to a TV or AV amplifier receiver 10 CONTROL IN Use to control this...

Page 16: ...camcorder 2 USB port Type A USB port for connecting an HDD camcorder digital camera keyboard or other USB device 3 USB port Type B USB port for connecting a PictBridge compatible printer or PC Right side 4 INPUT 2 Audio video input stereo analog audio composite and S Video especially suitable for camcorders game consoles portable audio etc USB DV IN 1 2 3 INPUT 2 VIDEO S VIDEO L MONO R AUDIO 4 ...

Page 17: ...hain connect this recorder directly to your TV and skip the next step 3 Use an RF antenna cable to connect the antenna output on your VCR to the antenna input on your TV 4 Connect the AUDIO and VIDEO OUTPUT jacks 1 or 2 to a set of audio video inputs on your TV Use the supplied three pin audio video cable It is colour coded to help you match them up red white for the right left audio connections a...

Page 18: ...nt Use an S video cable not supplied to connect an S VIDEO OUTPUT 1 or 2 to an S video input on your TV monitor or other equipment 2 Connecting using the component video output Component video carries the picture as two separate colour signals plus a luminance brightness signal See also Component Video Out on page 114 for how to set up the component video output for use with a progressive scan com...

Page 19: ...own This enables you to watch and record TV channels 2 Connect the AUDIO and VIDEO OUTPUT jacks 1 or 2 on this recorder to a set of audio video inputs on your TV using a set of A V cables as supplied This enables you to watch the output from this recorder 3 Connect the audio video output of your cable box satellite receiver to the INPUT 1 jacks on this recorder using a set of A V cables This enabl...

Page 20: ...io video inputs on your TV using a set of A V cables as supplied This enables you to watch discs 3 Connect the audio video output of your cable box satellite receiver to the INPUT 1 jacks on this recorder using a set of A V cables This enables you to record scrambled TV channels Note 1 The setup on this page does not allow you to watch one channel and record another The diagram shows standard vide...

Page 21: ...to watch and record TV channels 2 Connect the AUDIO and VIDEO OUTPUT jacks 1 or 2 on this recorder to a set of audio video inputs on your AV amp receiver 3 Use an coaxial digital audio cable not supplied to connect the DIGITAL AUDIO OUT COAXIAL jack on this recorder to an coaxial digital input on your AV amp receiver This enables you to listen to multichannel surround sound 1 4 Connect the AV amp ...

Page 22: ...ar PCM signals as well as Dolby Digital DTS and MPEG audio bitstream If your connected component is only compatible with Linear PCM the signal is output as Linear PCM DTS audio is not output If you have connected to a Pioneer Flat Panel TV please select the HDMI setup on the display refer to the supplied manual for more on this About HDMI HDMI High Definition Multimedia Interface supports both vid...

Page 23: ...anguage information from a connected Flat Panel TV you can have this unit s language settings automatically change to those of the Flat Panel TV language information can be received only when no media is being played back and no recordings are taking place or when you choose not to display this unit s GUI displays Important The KURO LINK function name used on the web and in catalogues is referred ...

Page 24: ...tal satellite receivers or D VHS video decks Use a DV cable not supplied to connect the DV jack of your DV camcorder to the front panel DV IN jack of this recorder Connecting a USB device Using the USB ports on the front of the recorder you can connect USB devices such as HDD camcorders digital cameras printers keyboards and PCs Please also see the instructions that came with the device you want t...

Page 25: ...e of memory card USB memory PC Use Connect PC function Note that although multi slot card readers can be used the recorder will only recognize the first card inserted To read another card remove all the cards and insert the card to be read again Using a USB hub Use a hub compatible with USB 1 1 and or 2 0 Use an independently powered hub bus powered hubs may not work reliably In the event of unrel...

Page 26: ... this unit can be made unnecessary by enabling the DHCP server function of the router When the connected router does not have the DHCP function make the network settings of this unit after connecting the router see Network DVR 660H K only on page 121 for detailed instructions For best performance we recommend using a 100BASE TX compatible PC and Ethernet hub Connecting via an Ethernet hub If you a...

Page 27: ...or See Display on page 28 for details 11 STANDBY ON Press to switch the recorder on into standby 12 Front panel inputs See Front panel connections on page 16 for more information on these 13 Press to start or restart playback Press to stop playback F STOP REC Press to stop recording ONE TOUCH COPY Press to start One Touch Copy of the currently playing title to DVD or the HDD CH Use to change chann...

Page 28: ...deo output is set to progressive scan 6 Recording quality indicators page 37 XP Lights when the recording mode is set to XP high quality SP Lights when the recording mode is set to SP standard play LP SLP Lights when the recording mode is set to LP long play or SLP super long play EP SEP Lights when the recording mode is set to EP extended play or SEP super extended play MN Lights when the recordi...

Page 29: ... PlusCode programming number for timer recording VCR Plus and PlusCode are registered trademarks of Gemstar Development Corporation The VCR Plus system is manufactured under license from Gemstar Development Corporation Use CLEAR to clear an entry and start again 5 INPUT SELECT page 46 Press to change the input to use for recording 6 HDD pages 38 52 Press to select the hard disk HDD for recording a...

Page 30: ... or to display the previous or next menu page PAUSE Press to pause playback or recording STOP Press to stop playback 12 TIMER REC page 39 Press to start setting a timer recording MENU page 53 Press to display the disc menu if a DVD Video finalized DVD R RW Video mode or finalized DVD R RW disc is loaded CM BACK commercial back Press repeatedly to skip progressively backward through the video playi...

Page 31: ...r Cable depending on how you receive your terrestrial TV channels After selecting Antenna or Cable the recorder starts automatic tuning This takes a couple of minutes to complete Select Do not set if you want to skip channel setup because they have already been set up for example You can go back to the previous screen in the Setup Navigator by pressing RETURN 6 Select Auto for automatic time setti...

Page 32: ...rd 4 3 8 Select whether or not your TV is compatible with progressive scan video This screen is not displayed when an HDMI signal is being output 9 Press to continue after reading the HDD caution 2 Start Auto Clock Setting Date Time Clock Set CH AM 2 Start Next Auto Clock Setting Date Time Clock Set CH 01 01 2008 TUE 11 20 AM 1 2 D S T Off Canada Eastern Manual Clock Setting Time Zone On Canada Ea...

Page 33: ... again That completes basic setup using the Setup Navigator If there are blank channels with no station you can set these to skip using the manual channel setting See Manual CH Setting on page 113 ENTER k Setting Line System er Save p Navigator p Navigator Setup is complete Finish Setup Go Back Finish Setup ...

Page 34: ...54 chapters are recordable per disc This recorder cannot play or record unfinalized DVD R RW Video mode and DVD R discs recorded on another recorder DVD RW discs recorded on another recorder are playable on this recorder but are not recordable The maximum continuous recording time for one title is eight hours when using a DVD R RW disc If you delete a title from a DVD R RW disc the total number of...

Page 35: ...he maximum number of titles has been reached The maximum continuous recording time for one title is 12 hours HDD Video mode compatibility When recording to the HDD you can choose to record in one of two formats Set the format from the HDD Recording Format item in the Initial Setup menu see page 118 When set to Video Mode On high speed copying from HDD to DVD R RW Video mode or DVD R RW is possible...

Page 36: ...ment and copyright You may use this product only to reproduce or copy materials for which you own the copyright or have obtained permission to copy from the copyright owner or for which you otherwise have a legal right to reproduce or copy Unless you own the copyright or have obtained permission from the copyright owner or otherwise have a legal right to reproduce or copy you may be violating the ...

Page 37: ...ich language you want to record before recording by setting the Dual Mono Recording setting see Dual Mono Recording on page 114 Setting the picture quality recording time Before starting a recording you will usually want to set the picture quality recording time There are six standard settings available which allow you to choose a balance between picture quality and recording time When Manual Reco...

Page 38: ... to record The front panel display shows the channel number While the recorder is stopped you can also use the number buttons on the remote to select the channel For channel 24 press 2 4 then ENTER If the recorder is stopped you can also use the CH buttons on the front panel to select the channel number 3 Set the picture quality recording time See Setting the picture quality recording time on page...

Page 39: ...n set timer recordings to record to a recordable DVD or to the hard disk drive For regular daily or weekly HDD timer recordings that you don t need to keep you can use the Auto Replace Recording feature to automatically replace the previous timer recording with the new one Note that when you use this feature the previous recording made on that timer programme will be replaced by the next one regar...

Page 40: ...time of recording HDD recording The AUTO option automatically sets the best recording quality that would fit on to a blank DVD disc 4 Select the HDD or DVD for recording 5 Move the cursor to the recording start date and time on the grid You can move the cursor forward or back an hour at a time using the and buttons Each row of the grid is one day you can set the timer recording for up to a month i...

Page 41: ...umber To clear the last digit entered press CLEAR You can also use the buttons to select digits from the on screen display 2 After making the settings select Enter and press ENTER The timer recording screen appears with the timer programme you just set 3 Confirm that the settings are correct If the channel number isn t displayed use the buttons to highlight CH then use the buttons to set the corre...

Page 42: ...E MENU select Timer Recording then Timer Recording This screen shows all the timer programmes currently set Each row is for one timer recording programme with the date and time information channel recording mode DVD or HDD and recording status The amount of free space available on the HDD and the currently loaded recordable DVD is shown towards the bottom of the screen In the upper right corner th...

Page 43: ... to a Video mode DVD or to the HDD with the HDD Recording Format set to Video Mode On HDD Recording Format Select Video Mode On or Video Mode Off depending on whether you need high speed copying to Video mode DVD capability or not 5 After entering all the timer recording information highlight Store Programme and press ENTER The timer recording list screen is displayed again The timer programme you...

Page 44: ...rogramme before the recording is due to start 1 Press HOME MENU select Timer Recording then Timer Recording 2 Highlight the timer programme you want to change 3 Press then select Modify from the command menu panel Alternatively press ENTER The Timer Programme Set screen appears from which you can edit the settings 4 Edit the timer recording settings as necessary 5 Select Store Programme to finish ...

Page 45: ...k feature This is useful when you set a timer recording and want to make sure that the timer settings are not changed before recording has finished 1 If the recorder is on switch it into standby 2 Front panel Press and hold for three seconds to lock the controls The front panel display briefly shows LOCKED If any buttons are pressed on the remote or front panel LOCKED is briefly displayed again To...

Page 46: ...ordable discs and the HDD on page 56 Chase Play is not possible when DV is the recording input Press during recording to start playback from the beginning of the current recording1 Press during recording to select another title to play You can use all the usual playback controls such as pause slow motion play scan and skip To stop playback press STOP recording will continue To stop recording press...

Page 47: ...8 Important It takes a little while for this recorder to switch on and start recording after detecting a signal Please bear this in mind when setting the timer If Auto Start Recording is set it will not start if another timer recording is in progress Timer recordings take precedence over Auto Start Recording Auto Start Recording will stop if a timer recording is due to start After the timer record...

Page 48: ...You should see whatever the STB is tuned to 3 Program the IR controller supplied with your STB to send start stop recording codes for a Pioneer VCR See the manual that came with the STB for how to do this Only the REC and STOP codes have any effect when used with this recorder REC Start recording STOP Stop recording 4 Position the IR controller so that it will control this recorder The IR sensor o...

Page 49: ...ve finalized a DVD R RW Video mode or DVD R disc you can t edit or record anything else on that disc However the finalization on a DVD RW disc maybe undone see Undo Finalize on page 108 for how to do this A VR mode DVD R RW excluding DVD R DL disc can still be recorded and edited on this recorder even after finalizing DVD R DL Video mode discs and DVD R DL discs must be finalized in order to play ...

Page 50: ... for Video mode recordings out of the box if you want to use a DVD R for VR mode recording you must initialize it before recording anything on the disc DVD RW and DVD RAM discs can also be initialized in order to erase the contents of the disc Important Initializing a DVD RW DVD RW or DVD RAM disc will erase everything recorded on it Make sure there is nothing on the disc that you want to keep You...

Page 51: ...lank DVD RW You must set the desired initialization mode before inserting a disc 1 Display the Home Menu 2 Select Setup Disc Setup 3 Select Basic DVD RW Auto Init then VR Mode or Video Mode DVD RW HOME MENU ENTER ENTER Basic Initialize Finalize Optimize HDD Disc Setup Input Disc Name Basic VR Mode Video Mode Lock Disc DVD RW Auto Init ...

Page 52: ...c to a particular kind of DVD disc it is specified Some DVD Video DVD R and DVD RW discs don t allow certain playback controls to operate at certain points in the disc This is not a malfunction 1 Select the HDD or DVD for playback If playing video from the HDD skip to step 3 below 2 Load a disc Load a disc with the label side facing up using the disc tray guide to align the disc if you re loading ...

Page 53: ...ress CLEAR to clear a number entry and start again Commercial back skip Each press skips backward forward progressively up to a maximum of two hours in either direction PLAY STOP PAUSE PREV NEXT ENTER CM SKIP CM BACK While paused press and hold to start slow motion playback Press repeatedly to change the playback speed While paused press to advance a single frame in either direction Press to displ...

Page 54: ...Switching audio channels on page 61 Press to start playback Press to stop playback Pauses playback or restarts playback when paused Press to start scanning Press again to increase the scanning speed There are two scan speeds the current scan speed is shown on screen Press to skip to previous next track ENTER CM SKIP CM BACK PLAY STOP PAUSE PREV NEXT Press to start playback If RESUME is displayed o...

Page 55: ... of a Video CD playing in PBC mode CM SKIP CM BACK RETURN Press to start playback Press to stop playback Pauses playback or restarts playback when paused Press to start scanning Press repeatedly to increase the scanning speed Press to skip to previous next title During playback you can also use the front panel CH buttons While paused press to advance one frame Press and hold to start slow motion p...

Page 56: ...ther to display four or eight titles on the screen at the same time 1 Display the view options panel 2 Choose Style Sort order or Genre then press ENTER to see the available view options Style Select four or eight titles per screen view Sort order Sort by date most recent first unwatched first title name or recording date oldest first Genre Display all genres or just a selected genre 3 Choose a vi...

Page 57: ...ess repeatedly to change the scanning speed There are four scanning speeds available when playing HDD video a DVD or a DivX title Reverse playback is also possible with HDD and DVD Video 2 There are two scanning speeds for other types of disc 3 Resume normal playback Playing in slow motion You can play video at various slow motion speeds DVDs and video on the HDD can be played in slow motion in ei...

Page 58: ...playback from a specified point in a disc by time2 or by title chapter track number 1 Select Search Mode from the Play Mode menu then choose a search option The available search options depend on the type of disc 2 Enter a title chapter track number or a search time Time Search HDD DVD For example for 25 minutes into the current title press 2 5 0 0 For 1 hour and 15 minutes and 20 seconds into the...

Page 59: ...playback select Repeat Off from the Repeat Play menu or press CLEAR if no menu OSD such as the Play Mode menu is displayed Programme play This feature lets you program the play order of titles chapters3 albums tracks on a disc or the HDD 1 Select Programme from the Play Mode menu then Input Edit Programme The Input Edit Programme screen varies according to the disc type Below is the DVD input scre...

Page 60: ...gramme list From the programme menu you can also Start Programme Play Starts playback of a saved programme list Cancel Programme Play Turns off programme play but does not erase the programme list Erase Programme List Erases the programme list and turns off programme play Displaying and switching subtitles Some DVD and DivX discs have subtitles in one or more languages the disc box will usually te...

Page 61: ...om two or more angles check the disc box for details it should be marked with a icon if it contains multi angle scenes When a multi angle scene is playing the same icon appears on screen to let you know that other angles are available this can be switched off if you prefer see Angle Indicator on page 119 Switch the camera angle The angle number is displayed on screen If the disc was paused playbac...

Page 62: ...V recording is approximately 0 1 shorter than the actual time This is because of the slightly different frame rates of TV broadcasts versus DVD The frame number is shown next to the elapsed time display when the disc is paused Copy Once or Can t Record messages may appear in the stop or recording displays These indicate that the broadcast TV programme contains copy control information Rec Mode SP ...

Page 63: ... should appear on your TV To record the incoming video press HDD or DVD to select the HDD or a DVD for recording then press REC Press F STOP REC to finish recording If there is no signal from the device connected to the DV jack or the signal is copy protected recording will pause It will automatically restart once there is a recordable signal The recorder will only start recording from the DV IN j...

Page 64: ...corder you can use this recorder s remote to control the camcorder using the and buttons 8 Select Start Rec You can pause or stop the recording by selecting Pause Rec or Stop Rec from the on screen display You cannot control the camcorder from this remote control during recording If you restart recording after stopping the camcorder the first few seconds of the camcorder tape will not be recorded ...

Page 65: ...art and in some other instances the disc will not be finalized Frequently Asked Questions I can t get my DV camcorder to work with the recorder Check that the DV cable is properly connected Also make sure that what you re trying to record is not copy protected If it still doesn t work try switching off the camcorder then switch back on There s a picture but no sound Try switching the DV Input sett...

Page 66: ...r are copied Images that have already been copied are not copied even if they have been deleted from the recorder s HDD When All Movie Copy is selected all the images on the HDD camcorder are copied 5 Select Yes to confirm or No to cancel Select Yes and press ENTER The screen shown below appears To cancel copying press ENTER No other recorder operation is possible during copying The timer recordin...

Page 67: ...W Video mode DVD R RW DVD R RW DVD RAM VR mode Original Play List Create page 69 Play page 69 Erase page 69 Edit Title Name page 70 Edit Set Thumbnail page 71 Edit Erase Section page 71 Edit Divide page 72 Edit Chapter Edit page 73 Edit Set Genre page 74 Edit Lock page 74 Edit Move page 74 Edit Combine page 74 Genre Name page 75 Multi Mode page 75 Undo page 76 1 1 ...

Page 68: ...erved in any copy you make if you use the high speed copy function to make a DVD R RW Video mode or DVD R RW Video Mode Compatible Editing is less precise The edit point you choose will only be accurate to within one half to one second On the other hand these edit points will be preserved if you use high speed copy to make a DVD R RW Video mode or DVD R RW HDD genres The large capacity of the HDD ...

Page 69: ...m a DVD R VR mode or Video mode or DVD R will not result in any more free space on the disc 1 Highlight the title you want to erase 2 Select Erase from the command menu panel 3 Select Yes to confirm or No to cancel Tip You can erase a title quickly by pressing CLEAR when the title is highlighted Confirm the edit by pressing ENTER DVD VR DVD RAM Disc Navigator DVD 2h00m 1 0G 1h00m 1 0G 4 Titles Rem...

Page 70: ...he main Disc Navigator screen To return to the main Disc Navigator screen without saving changes to the title name press RETURN Using the remote key shortcuts to input a name The table below shows the remote control key shortcuts that you can use to input characters in the name input screen Pressing a button repeatedly cycles through the characters shown If you want to enter two characters in succ...

Page 71: ...his command you can delete a part of a title ideal for cutting out the commercial breaks in a recording made from the TV 1 Highlight the title containing the section you want to erase 2 Select Edit Erase Section from the command menu panel Note 1 It s possible that some USB keyboards will not work exactly as expected when connected to this recorder See also Connecting a USB device on page 24 for m...

Page 72: ... once divided the two new HDD titles cannot be recombined into one again 1 Highlight the title you want to divide 2 Select Edit Divide from the command menu panel 3 HDD only Select the type of edit For more information about these options see Editing accuracy on page 68 4 Use the playback controls etc to find the place you want to divide the title 5 Press to divide the title at the current playbac...

Page 73: ...ER 5 Select Exit to get back to the main Disc Navigator screen DVD VR DVD RAM HDD ENTER ENTER Video Mode Compatible Editing Frame Accurate Editing HDD DVD RECORDER Please select the type of editing Video Mode Compatible Editing is recommended for compatibility with high speed copying Chapter Edit DVD VR mode Play List Rec time 1 1 Play 0 00 00 12 03Sun 11 00PM 4ch SP 1h00m Chapters 5 Exit Erase Mo...

Page 74: ...lay List only Use this function to combine two Play List titles into one 1 Highlight the title you want to combine This title will remain in the same place after combining with another title HDD ENTER ENTER Disc Navigator HDD 11 29 MON 7 00PM 11 29Mon 7 00PM 2ch SP 2h00m 1 0G 1 4 Titles Remain All Genres 10Titles 30h30m Recent first HDD SP 9 8 7 10 12 03 SUN 8 00PM 9ch SP 12 03 Sun 8 00PM 9ch SP 2...

Page 75: ...om the title list Selected titles are marked with a ENTER ENTER Disc Navigator DVD 4 Titles Remain 10Titles 0h30m DVD VR Mode MENU Play List 11 29Mon 7 00PM 2ch SP 1 2 1 3 4 12 03 SUN 8 00PM 12 03 Sun 8 00PM 9ch SP 2h00m 1 0G 12 02 SAT 10 00PM 12 02 Sat 10 00PM 7ch SP 1h00m 1 0G 11 29 WED 7 00PM 11 29 Wed 7 00PM 2ch SP 1h00m 1 0G 12 03 SUN 11 00PM 12 03 Sun 11 00PM 4ch SP 2h00m 1 0G ENTER Yes OK t...

Page 76: ...r displayed but the content remains on the disc DVD R R are write once media they can t be erased or rewritten I can t edit my disc You may find that as the available recording time is reduced on a VR mode DVD R disc editing is no longer possible This is because information about your edits requires a certain amount of disc space As you edit this information builds up eventually preventing you fro...

Page 77: ... Chapter markers are put into the copy at intervals according to the Auto Chapter settings see also Auto Chapter Video on page 117 and Auto Chapter DVD R RW on page 118 Restrictions on copying Commercial DVD Video discs are protected using Copy Guard These discs cannot be copied to the HDD Some video material is copy once protected This means that it can be recorded to HDD but it can t then be fre...

Page 78: ...g One Touch Copy Copying to DVD Title name chapter markers as well as thumbnail picture markers for the Disc Navigator are also copied However if you copy to a DVD R RW Video mode or DVD R RW only the first 40 characters of a name are copied The chapter markers in the copy may not be in exactly the same positions as the original when recording on to a DVD R RW Video mode or DVD R RW You can t use ...

Page 79: ...r having an uninitialized DVD loaded however the steps are slightly different If you want to use a DVD RW VR mode disc for the copy make sure it is initialized before you start 2 Display the Home Menu 3 Select Copy HDD DVD If this is the first time to create a Copy List skip to step 5 below 4 If there is already a Copy List stored in the recorder choose whether to Create New Copy List or Continue ...

Page 80: ...ode and DVD R RW Widescreen titles recorded at low resolution SEP through LP MN1 to MN15 Video Mode Off or MN1 to MN8 Video Mode On LP MN9 to MN15 recordings when HDD Recording Format is set to Video Mode Off Dual mono recordings Combined titles that were originally recorded using different recording modes The following titles cannot be copied at high speed for any types of DVD XP titles Copy Sele...

Page 81: ...purple The Current DVD Remain bar will be half length if the first layer of a DVD R DL or DVD R DL disc is already full Copying from DVD to HDD Important The DVD to HDD Copy screen isn t accessible when a finalized Video mode DVD R RW or a DVD Video is loaded As long as the disc is not Copy Guard protected you can still use the One Touch Copy function however see One Touch Copy on page 78 The reco...

Page 82: ...inal XP SP LP EP SLP SEP MN2 The Copy List is copied at the specified recording quality in real time Note that if you copy at a higher quality setting than the original the copy will not be better quality than the original If you select MN above you can also change the level setting MN1 to MN323 LPCM or XP 4 from the Recording Quality box that appears Optimized2 5 The recording quality is automati...

Page 83: ...dy on the HDD to a recordable DVD Erase back up data Erase the backup data on the HDD 4 Load the disc you want to make a backup of You can only make backup copies of finalized Video mode DVD R RW discs finalized DVD R or DVD RW discs excluding DVD R DL DVD R DL discs 5 Select Start To see the progress of the backup press DISPLAY You can cancel the backup process by pressing ONE TOUCH COPY for more...

Page 84: ...scs on page 50 8 After the recorder has finished recording the backup disc you can select whether to make another backup of the same data or exit Select Start to make another backup copy or Cancel to finish If you want to make another backup copy return to step 7 above 9 If you don t need to keep the backup data on the HDD you can delete it now Select Yes to delete the data from the HDD select No ...

Page 85: ...ription of operations during playback see Playing DivX video files on page 55 Playing DivX files on the HDD that have not yet been viewed The files can be played easily simply by pressing the PC VIDEO button 1 Playing DivX files If there are multiple DivX files that have not yet been viewed the file recorded on the HDD at the most recent date is played 2 If there are no DivX files that have not ye...

Page 86: ... on the DVD CD or the USB device are copied to the HDD When a folder is selected you can copy only the titles contained in the folder by using Copy to HDD You can also copy titles by selecting Copy DVD CD HDD VIDEO FILE from the Home Menu To cancel copying press ENTER Up to 50 000 files or 999 folders can be recorded on the HDD Up to 999 files can be stored in one folder Up to 99 folders 999 title...

Page 87: ...CLEAR when the title or folder is highlighted Press ENTER to confirm Naming titles and folders 1 Select the title or folder you want to rename 2 Select Edit from the command menu panel 3 Select Title Name or Folder Name 4 Enter a new name for the title folder Title names or Folder names can be up to 64 characters long See Using the remote key shortcuts to input a name on page 70 and Using a USB ke...

Page 88: ...ayed on the recorder is loaded the recorder automatically searches for the titles on that Audio CD see About the automatic display of titles on page 89 Play Music on a USB Device Copies files from a USB device onto the HDD 5 Display the command menu panel Note 1 The MPEG 4 AAC files can be played or copied only with the DVR 660H K 2 Up to 50 000 tracks can be created in the Jukebox You can create ...

Page 89: ...lay of titles DVR 660H K DVR 560H K only This unit has built in information on titles extracted from the Gracenote database DVR 660H K only When the recorder is connected to the Internet the title names are searched for from the most recent Gracenote database on the Internet When an Audio CD that has never been played on the recorder is loaded and the track list screen is opened from the Jukebox t...

Page 90: ...ay of titles on page 89 Play Music on a USB Device Listen to music from an external USB device Proceed to step 5 4 Select the artist you want to play back The screen below shows artists stored on the HDD To play back all of the tracks of the selected artist proceed to step 7 Press ENTER to switch to the album display of the selected artist This step is for the display mode set to Artist The operat...

Page 91: ...on from the command menu panel Repeat Artist Repeats all tracks of an artist being played back Repeat Album Repeats all tracks of an album being played back Repeat Track Repeats the track being played back Repeat Off Cancels repeat playback Playing your favourite music Play List You can collect and play back only your favourite songs stored on the HDD Creating a play list 1 Select a track you want...

Page 92: ...e switching of the display 1 Display the view options panel 2 Select a view option Data Format CD Displays the Audio CD s tracks MUSIC FILE Displays the folders tracks of the WMA MP3 MPEG 4 AAC1 files Cancel Cancels the switching of the display Display Mode Album Displays the folders of the WMA MP3 MPEG 4 AAC1 files Track Displays the tracks of the WMA MP3 MPEG 4 AAC1 files Cancel Cancels the swit...

Page 93: ...edit 4 Select an edit function from the command menu panel Erase Deletes the selected artist album track 1 Edit Artist name Enter a name of up to 64 characters for the artist See Title Name on page 70 for how to enter names Edit Album name Enter a name of up to 64 characters for the album See Title Name on page 70 for how to enter names Edit Track name Enter a name of up to 64 characters for the t...

Page 94: ...s displayed as thumbnail at the bottom of the screen From the Folder Information column you can change thumbnails via the buttons Press PREV or NEXT to change the page 5 Select the file you want to view copy or edit The larger the file size the longer it takes the recorder to load the file Note 1 Up to 999 files or 99 folders are viewable but if there are more files folders than this on the disc o...

Page 95: ...of thumbnails 1 Display the view options panel 2 Choose Display Mode or Style then press ENTER to see the available view options Display Mode Choose between folder and file display modes Style Choose between displays of 1 4 and 12 thumbnails 3 Choose a view option then press ENTER The display mode will change to that which you have chosen Playing a slideshow 1 Select a folder from the folder list ...

Page 96: ...between zoom off 2x zoom and 4x zoom The zoom factor is displayed on screen 2 Use to move the zoomed area Rotating an image You can rotate the displayed picture during a slideshow so you can always view pictures the right way up whichever way they were taken 1 Press during the slideshow to rotate the displayed picture clockwise by 90º Press repeatedly to continue rotating the picture in increments...

Page 97: ...os switch with motion enlargement reduction movement etc Normal OFF Photos are displayed on the entire screen and switch Play List Select the music to be used for the photo movie For details see Playing your favourite music Play List on page 91 Play List 1 to Play List 4 Select from the play lists stored in the Jukebox Favourites Use up to 25 of the tracks you listen to most often 4 Select Next Ca...

Page 98: ...folder are selected 4 Display the command menu panel 5 Select the command you want to apply to all the selected items Copying files to a DVD R RW Using this feature you can copy all the files1 including audio and movie files stored on a connected USB camera to a recordable DVD disc A slideshow of the files is also recorded on the disc as a Video mode title making it possible to view the photos on ...

Page 99: ...ontain up to 99 files If there are more files than this in the slideshow multiple slideshows are created on the disc If you erase a slideshow title from a DVD the slideshow will become unplayable but the free space will not increase 1 Load a blank or unfinalized Video mode DVD R or DVD RW disc 2 Display the Home Menu 3 Select PhotoViewer View Edit Photos on the HDD 4 Select the file s or folder s ...

Page 100: ... 5 Select Yes to confirm or No to cancel Copying to the HDD will not work if there is insufficient space on the HDD if there are already the maximum number of files and or folders on the HDD Naming files and folders 1 Select the file or folder you want to rename You can t rename files that have been locked 2 Select File Options or Folder Options from the command menu panel 3 Select Rename File or ...

Page 101: ...the HDD a CD DVD or directly from a digital camera Make sure that the printer and your digital camera if you are using that as a source is connected to the recorder before starting 1 Select the file s you want to print To print multiple files use the Multi Mode see Selecting multiple files or folders on page 98 2 Select Print from the command menu panel 3 Select Start to confirm or Cancel to cance...

Page 102: ...etwork and then Network and Sharing Center on the command bar When the Network and Sharing Center window appears ensure that Network discovery under the Sharing and Discovery section is enabled 1 Connect the PC via LAN cable 2 Display the Home Menu 3 Select Connect PC Ethernet 4 Select Yes to confirm or No to cancel The driver must be installed on the PC when first connecting it to the recorder us...

Page 103: ...rried out for 20 minutes or if the Ethernet connection is disconnected the import screen is automatically closed To reopen it you will have to repeat steps 2 through 4 To copy WMA MP3 files see Copying WMA MP3 files on page 104 To copy MPEG 4 AAC JPEG DivX files see Copying MPEG 4 AAC JPEG and DivX files on page 105 USB connection Important For more information on Connect PC see Using a PC on page...

Page 104: ...or song you would like to copy and press the right mouse button 4 Click Add to Sync list 5 Click Start Sync This begins the synchronization process When finished the message Synchronized to Device is displayed in Windows Media Player 11 For more information refer to the Help menu of Windows Media Player 11 The screen shown below is displayed on the recorder To cancel the synchronization process on...

Page 105: ...xported from this recorder Note that no recording functions including timer recordings will be carried out when you are using the Connect PC function Copying MPEG 4 AAC1 JPEG and DivX files From the PC 1 Open Windows Explorer 2 Select the folder containing the files to be copied Always copy entire folders 3 Right click the mouse and select Copy from the menu 4 Select the folder into which you want...

Page 106: ...w It is not possible to place JPEG files directly into the Picture folder Also it is not possible to create more folders under folders you have created DivX files can only be copied with the folder structure shown below It is not possible to place DivX files directly into the Video folder Also it is not possible to create more folders under folders you have created For details on files that can be...

Page 107: ...ing the input screen Lock Disc Default setting Off Locking the disc will prevent accidental recording editing or erasing of the disc Important A locked disc can still be initialized which will completely erase the disc 1 Display the Home Menu 2 Select Setup Disc Setup 3 Select Basic Lock Disc then On or Off Set to On to prevent accidental recording editing or erasing of the disc loaded If you need...

Page 108: ...orded on this recorder in Video mode You need to do this if you want to record more material or edit material already on the disc You can also undo the finalization of VR mode discs which have been finalized on other DVD recorders If when you load a disc the message This disc cannot be recorded Undo the finalization is displayed use this command to be able to record on the disc using this recorder...

Page 109: ...problem this option is not visible in the Disc Setup menu However if the HDD file system becomes corrupted for some reason you can initialize the HDD to fix the problem Note that initializing the HDD will erase all the data on it 1 Display the Home Menu 2 Select Setup Disc Setup 3 Select Initialize HDD then Start HOME MENU ENTER ENTER Basic Initialize Finalize Optimize HDD Disc Setup Optimize HDD ...

Page 110: ...settes DTV LDP suitable for digital broadcasts and Laserdiscs Memory1 user preset 1 Memory2 user preset 2 Memory3 user preset 3 You can press DISPLAY to see the individual settings for the current preset Tuner VCR or DTV LDP Creating your own set There are three user presets in which you can save your own set of picture quality settings 1 Follow Choosing a preset above and select one of the user p...

Page 111: ... selecting the setting you want to adjust Setting the picture quality for disc playback This setting determines how the picture will look when playing discs Choosing a preset 1 With a disc playing or paused press to display the Home Menu 2 Select Setup Video Adjust 3 Select a preset There are six presets available TV suitable for LCD and cathode ray tube TVs PDP suitable for Flat Panel TV Professi...

Page 112: ...on Sharpness Adjusts the sharpness of the high frequency detailed elements in the picture Sharpness is ineffective for HDMI output Detail Adjusts how sharp edges appear White Level Adjusts the intensity of white White Level is ineffective for HDMI output Black Level Adjusts the intensity of black Black Level is ineffective for HDMI output Black Setup Corrects the standard reference black level Bla...

Page 113: ...e and date manually The clock must be set in order to use timer recording HELP Setting On Switches on the automatic Help screens for GUI displays Off Switches off the automatic Help screens for GUI displays Press HELP on the remote to manually display the Help screen Setup Navigator Start Select to start the Setup Navigator See also Switching on and setting up on page 31 Tuner Auto Channel Setting...

Page 114: ...ure at all In this case press OPEN CLOSE while holding down the Stop button on the front panel to switch to Interlace this also switches Screen Resolution on page 119 to the default setting When the HDMI signal is output no video is output from the COMPONENT VIDEO OUT Audio In External Audio Stereo Select if the audio from the currently selected external input is standard stereo Dual Mono Select i...

Page 115: ...ted equipment doesn t have a DTS decoder In this case use the analog audio outputs 96 kHz PCM Out 96 kHz 48 kHz Convert 96 kHz digital audio sources to 48 kHz output Use if your connected equipment doesn t support 96 kHz sampling rate 96 kHz Output 96 kHz digital audio when a 96 kHz source is being played MPEG Out MPEG Output an MPEG audio signal when a source using MPEG audio is being played MPEG...

Page 116: ...Also some discs override the Subtitle Language preference Auto Language On On this setting DVD Video discs whose main audio track is in your default language will play using that language without subtitles Discs whose main audio track is not in your default language but that have a subtitle track in your default language will play the original audio track with subtitles Off Select to play DVD Vide...

Page 117: ...ing is set that won t fit on to the selected media the recording starts but is cut off when no more recording is possible Optimized Rec will only compensate for the next scheduled timer recording if more than one is set Set Thumbnail 0 seconds Sets the default thumbnail picture in the Disc Navigator to the first frame of the title 30 seconds Sets the default thumbnail picture to 30 seconds into th...

Page 118: ...itch between them on playback See also Dual Mono Recording on page 114 When the recording mode is set to XP you cannot change HDD Recording Format Playback TV Screen Size 4 3 Letter Box Select if you have a standard 4 3 TV and prefer the letter box format presentation for widescreen material 4 3 Pan Scan Select if you have a standard 4 3 TV and prefer the pan and scan presentation for widescreen m...

Page 119: ...cator On A camera icon appears on screen during multi angle scenes on a DVD Video disc Off Nothing is indicated on screen when a multi angle scene is showing HDMI Output only available when an HDMI device is connected Screen Resolution 1920 x 1080p Constant 1920 x 1080p output 1920 x 1080i Constant 1920 x 1080i output 1280 x 720p Constant 1280 x 720p output 720 x 480p Constant 720 x 480p output 72...

Page 120: ...o channels and the HDMI connected device Linear PCM audio may be output PCM All audio signals are converted to Linear PCM except DTS Bitstream Priority Select if the connected device is compatible with bitstream audio This setting is not available when a DVI device is connected HDMI Control On Enables the HDMI Control function Select this option when connected to an HDMI Control compatible Pioneer...

Page 121: ...n with an Ethernet connection cannot be used if the IP address is set for the Auto IP function When inputting the IP address set within the range shown below The functions for searching for titles in the Gracenote database on the network and the Connect PC function with an Ethernet connection cannot be used if other IP addresses are set CLASS A 10 0 0 1 to 10 255 255 254 CLASS B 172 16 0 1 to 172 ...

Page 122: ... Options 2 USB Restart USB Device If the connected USB device does not respond to the recorder try using this option to restart it If the device still does not work properly try switching it off then back on and or disconnecting then reconnecting the USB cable Confirm Printer Use this option to confirm the maker and model of the printer connected to the recorder does not work with all printers HDD...

Page 123: ...ctronics ca 2 Check the remaining space on the HDD When the remaining space drops to under 1 hour in the SP recording mode delete titles stored on the HDD 3 Display the Home Menu 4 Select Setup Initial Setup Option2 Gracenote Database Database Update 5 Select Yes to confirm or No to cancel Additional information about component video output If you switch the Component Video Out setting to Progress...

Page 124: ...able below shows how to use this remote control with your TV Button What it does Press to switch the TV on off standby INPUT SELECT Press to change the TV s video input VOL Use to adjust the TV volume CH Use to change TV channels Maker Code s ACURA 44 ADMIRAL 31 AIWA 60 AKAI 32 35 42 AKURA 41 ALBA 07 39 41 44 AMSTRAD 42 44 47 ANITECH 44 ASA 45 ASUKA 41 AUDIOGONIC 07 36 BASIC LINE 41 44 BAUR 31 07 ...

Page 125: ...OSO 41 OSUME 48 OTTO VERSAND 31 32 07 42 PALLADIUM 38 PANAMA 46 PANASONIC 31 07 08 42 22 PATHO CINEMA 42 PAUSA 44 PHILCO 32 42 Maker Code s PHILIPS 31 07 34 56 68 PHOENIX 32 PHONOLA 07 PROFEX 42 44 PROTECH 07 42 44 46 49 QUELLE 31 32 07 42 45 53 R LINE 07 RADIOLA 07 RADIOSHACK 10 23 21 02 RBM 53 RCA 01 10 15 16 17 18 61 62 09 REDIFFUSION 32 42 REX 31 46 ROADSTAR 41 44 46 SABA 31 36 42 51 SAISHO 39...

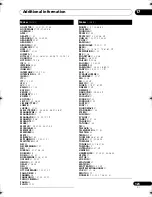
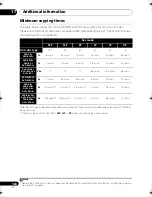
Page 126: ...nding on the disc the copy speed may be reduced for example although a 6x disc is used the copy may be made at 2x speed Rec mode SEP SLP EP LP SP XP DVD disc type 10 h 8 h 6 h 4 h 2 h 1 h DVD R 1x DVD RW 1x 1x 6 mins 7 5 mins 10 mins 15 mins 30 mins 60 mins DVD RW 2x DVD R DL DVD RAM 2x 2x 3 mins 4 mins 5 mins 7 5 mins 15 mins 30 mins DVD R 2 4x DVD RW 2 4x DVD R DL 2 4x 1 1 1 6 3 mins 12 5 mins 2...

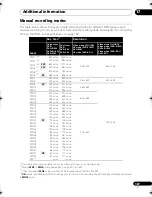
Page 127: ...eo mode On HDD Video mode DVD R RW DVD R RW Video mode DVD R DL DVD R DL MN 1 2 3 803 mins 1440 mins 352 x 240 352 x 240 MN 2 2 3 720 mins 1292 mins MN 3 2 3 SEP 600 mins 1077 mins MN 4 3 SLP 480 mins 861 mins MN 5 3 420 mins 754 mins MN 6 3 EP 360 mins 646 mins MN 7 300 mins 538 mins 352 x 480 352 x 480 MN 8 270 mins 484 mins MN 9 LP 240 mins 431 mins 480 x 480 720 x 480 MN 10 230 mins 413 mins M...

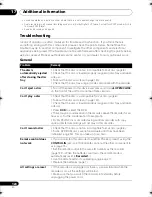
Page 128: ... and hold OPEN CLOSE on the front of the unit for more than three seconds Can t play a disc Check that the disc is a compatible format disc page 8 Take out the disc and clean it page 140 Check that the disc is loaded properly aligned in disc tray and label side up Press DVD to select the DVD There may be condensation in the recorder Leave the recorder for an hour or so for the condensation to evap...

Page 129: ...Check the audio cable connections page 15 If the sound is distorted try cleaning the cable plugs Cannot switch a dual mono programme During real time copying it is not possible to switch audio channels The main and sub channels are both output The picture from the external input is distorted If the video signal from the external component is copy protected you cannot connect via this recorder Conn...

Page 130: ...ers per disc Video mode disc 99 titles per disc 99 chapters per title DVD R RW 49 titles per disc 99 chapters per title max 254 chapters per disc Check that the source you are trying to record is not copy protected For a VR formatted disc check that the disc isn t locked page 107 The power may have failed during recording Timer programme doesn t record successfully When setting the recording chann...

Page 131: ...h you can use a DVD R DL One Touch Copy can t be used for MN1 to MN6 SEP SLP or EP titles when copying to DVD R RW One Touch Copy doesn t work if the recorder is already recording to DVD Can t use One Touch Copy DVD to HDD Make sure that there is space available on the HDD and that there are fewer than 999 titles on the HDD One Touch Copy doesn t work if the recorder is already recording to the HD...

Page 132: ...atible DVI devices will work with this recorder No video from the HDMI output If you choose a setting that is incompatible with your TV you may not be able to see any picture at all In this case press OPEN CLOSE while holding down the Stop button on the front panel to switch the setting this also switches Component Video Out on page 114 to the default setting There s no sound from the connected HD...

Page 133: ...ystem For more information refer to the operating instructions of your Flat Panel TV or AV system Controls may not function properly in certain situations such as immediately after you have connect an HDMI cable turn this unit s power off or remove the power cable for this unit or the connected component If you experience any problems set HDMI Control to On for all connected units and then display...

Page 134: ...s power is turned on The Connect PC function does not work properly with an Ethernet connection Check that the IP address is properly set Either turn the router s DHCP server function on or change the Network settings according to the environment page 121 On the PC click Start Network and then Network and Sharing Center on the command bar When the Network and Sharing Center window appears ensure t...

Page 135: ...uld not record the information to the disc Cannot edit Could not initialize disc Could not complete finalization successfully Could not undo finalization successfully Could not successfully unlock the disc The disc may be dirty or damaged Take out the disc clean it and retry If the error persists use a new disc If the error appears even with a new disc please ask your nearest Pioneer authorized se...

Page 136: ...erly Please erase some titles from the HDD and optimize again An error occurred Please consult the service center Note that contents on the HDD may be erased when servicing this unit This message is displayed when information from the HDD cannot be read The HDD may be damaged or broken Please ask your nearest Pioneer authorized service center or your dealer to carry out repairs The Hard Disk Drive...

Page 137: ...se of the error either reconnect the printer and start the printing job again or select Yes to resume printing select No to cancel the print job See also the operating instructions that came with your printer for possible causes of print errors Message Explanation Action E01 The HDD may be damaged or broken Please ask your nearest Pioneer authorized service center or your dealer to carry out repai...

Page 138: ...n lt 1220 Latvian lv 1222 Malagasy mg 1307 Maori mi 1309 Macedonian mk 1311 Malayalam ml 1312 Mongolian mn 1314 Moldavian mo 1315 Marathi mr 1318 Malay ms 1319 Maltese mt 1320 Burmese my 1325 Nauru na 1401 Nepali ne 1405 Occitan oc 1503 Oromo om 1513 Oriya or 1518 Panjabi pa 1601 Pashto Pushto ps 1619 Quechua qu 1721 Rhaeto Romance rm 1813 Kirundi rn 1814 Romanian ro 1815 Kinyarwanda rw 1823 Sansk...

Page 139: ...of the screen 4 3 Pan Scan The sides of the programme are cropped so that the picture fills the whole screen 4 3 4 3 Letter Box 4 3 Pan Scan The programme is presented correctly on either setting When viewing on a widescreen TV or monitor Screen format of disc Setting Appearance 16 9 16 9 The programme is presented in widescreen 4 3 16 9 Your TV will determine how the picture is presented check th...

Page 140: ... paper or put stickers onto the disc or use a pencil ball point pen or other sharp tipped writing instrument These could all damage the disc For more detailed care information see the instructions that come with discs Do not load more than one disc into the recorder Damaged discs Discs spin at high speed inside the recorder If you can see that a disc is cracked chipped warped or otherwise damaged ...

Page 141: ...interference especially if the television uses an indoor antenna Use in a kitchen or other room where the recorder may be exposed to smoke or steam Use on a thick rug or carpet or cover with cloth this may prevent proper cooling of the unit Place on an unstable surface or one that is not large enough to support all four of the unit s feet Moving the recorder If you need to move the recorder first ...

Page 142: ...ay EP Approx 319 h Super Long Play SLP Approx 425 h Super Extended Play SEP Approx 532 h Manual Mode MN Approx 36 h to 711 h DVR 560H K DVR 460H K 160 GB XP Approx 23 h Fine XP Approx 34 h Standard Play SP Approx 68 h Long Play LP Approx 136 h Extended Play EP Approx 204 h Super Long Play SLP Approx 272 h Super Extended Play SEP Approx 340 h Manual Mode MN Approx 23 h to 455 h DVD R RW DVD R RW DV...

Page 143: ...nput 2 V rms Input impedance more than 22 kΩ Jacks RCA jacks Audio output Output 1 2 L R During audio output 2 V rms Output impedance less than 1 5 kΩ Jacks RCA jacks Output Control input Mini jack Digital audio output Coaxial DV input 4 pin front i LINK IEEE 1394 standard USB Type A front Type B front HDMI output 19 pin LAN DVR 660H K only Ethernet jack 10BASE T 100BASE TX Supplied accessories Re...

Page 144: ...Data the Gracenote Software and the Gracenote Servers including all ownership rights Under no circumstances will Gracenote become liable for any payment to you for any information that you provide You agree that Gracenote Inc may enforce its rights under this Agreement against you directly in its own name The Gracenote service uses a unique identifier to track queries for statistical purposes The ...

Page 145: ... sheet included with your product Si ce produit doit être réparé au Canada veuillez vous adresser à un distributeur autorisé Pioneer du Canada pour obtenir le nom du Centre de Service Autorisé Pioneer le plus près de chez vous Vous pouvez aussi contacter le Service à la clientèle de Pioneer Pioneer Électroniques du Canada Inc Service Clientèle 300 Allstate Parkway Markham Ontario L3R 0P2 1 877 283...

Reviews: