background image

Going inside

: Upgrading

Inside the System

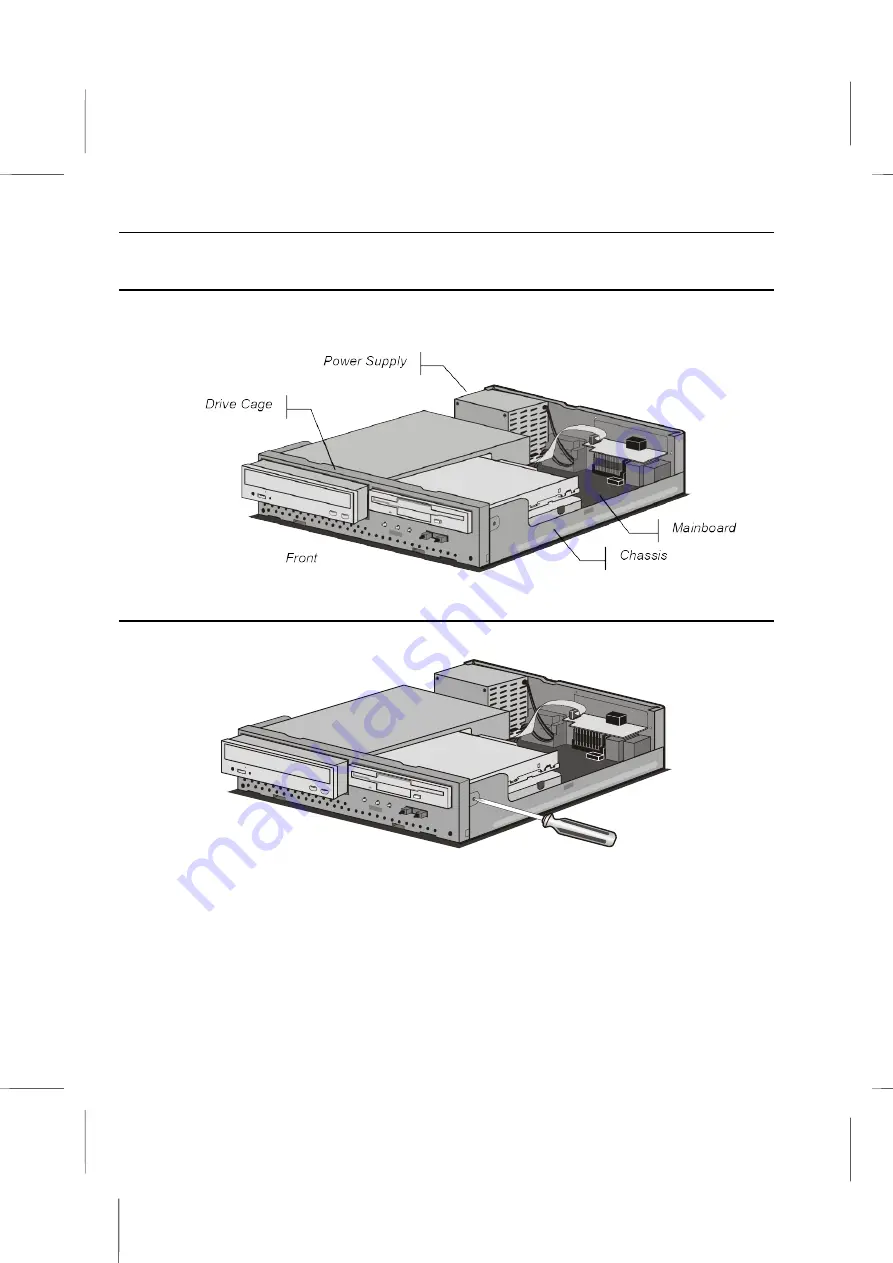
With your open Book PC in front of you, use the pictures below to locate each of the 
labeled parts.

Removing the Drive Cage

1. Use a Philips-head screwdriver to remove the screws on each side of the chassis.

2. Disconnect all the connectors and power supply cables from the drives in the drive 

cage. Also disconnect the indicator panel connector cable.

3. Pull the drive cage out of the chassis from the front, and gently slide it out until it is 

completely free.

4 – 5

Summary of Contents for BKi810

Page 1: ...such revision or changes Trademarks VGA and PS 2 are registered trademarks of International Business Machines Intel Pentium Pentium II Pentium III MMX and Celeron are registered trademarks of Intel C...

Page 2: ...tents and other intellectual property rights owned by Macrovision Corporation and other rights owners Use of this copyright protection technology must be authorized by Macrovision Corporation and is i...

Page 3: ...ups 1 5 Shock Precautions 1 5 Care of the Computer 1 5 Unpacking 1 6 Checklist 1 6 Installing the System 1 7 Introducing the System 1 8 Looking at the Front 1 9 Looking at the Back 1 10 Connecting the...

Page 4: ...4 3 To Close the System Unit Case 4 4 Inside the System 4 5 Removing the Drive Cage 4 5 Mainboard Items 4 6 Upgrading 4 7 Changing the CPU 4 7 Changing System Memory 4 8 Changing the Drives 4 9 The D...

Page 5: ...e diskette drive indicator light stays on A 3 How to upgrade the Flash BIOS A 4 How do I backup my data files to prevent loss of data A 4 Appendix B Gamut Documentation B 1 Introduction B 2 Produce MP...

Page 6: ...arental Control Password C 8 Closing WinDVD C 9 Understanding the DVD System C 10 Region Codes C 10 NTSC and PAL C 11 Aspect Ratios C 11 DVD Audio C 11 Parental Control Properties C 12 Quality Setting...

Page 7: ...Chapter 1 Chapter 1 Getting Started Getting Started...

Page 8: ...t Sound 3D and A3D compatible interface and support for Four Channel Speakers 2 Prevides Digital Audio Interface SPDIF In Out with 24 bit stereo 44KHz sampling rate and measured 120dB audio quality 3...

Page 9: ...have Dampness causes oxidation and dryness causes static electricity Heat is probably the single most damaging environmental element to a computer Because of this never push the rear of the unit again...

Page 10: ...follow the instructions supplied with the cleaning kit you use Subjecting a system to a dusty or smoky environment significantly shortens its life and increases the probability of failure If you use t...

Page 11: ...Unplug all power cords from their power sources if severe weather threatens When you disconnect a cable always pull on the plug or connector not on the cable itself Know the static electricity precaut...

Page 12: ...ink while using the computer Unpacking If your system arrives in very cold or damp weather you should not apply power to the system unit until it has reached room temperature and no condensation is pr...

Page 13: ...together so that cables can reach to the appropriate connectors Be sure there is a wall outlet close to the table or desk Installing the System Most of the work of setting up your system computer is a...

Page 14: ...System Before you actually set up your system and plug everything in it s a good idea to locate all its features switches and controls The next few illustrations familiarize you with the system comput...

Page 15: ...boot the system instead of using the power switch button Indicator LEDs The front panel has three indicator lights The indicator LEDs turn on to show that a particular function is active From right to...

Page 16: ...files that require a lot of capacity You can play audio and video files using the supplied Gamut audio player or the optional WINDVD software Looking at the Back The back of the system is where most...

Page 17: ...nector The RCA video jack can be used to output video to devices that use RCA plugs such as most TV receivers S Video Connector The S video jack can be used to output video to devices that use S video...

Page 18: ...straightforward and easy to do however be sure to follow each step carefully and don t leave any steps out 1 Connect a keyboard and pointing device through the PS 2 connectors 2 Connect any speakers a...

Page 19: ...ng the Cables 3 Connect a computer monitor to the VGA connector 4 Connect phone lines to the Line Phone jacks 5 Connect any USB devices you want to use with your system 1 13 USB Con RJ 11 Line Jack RJ...

Page 20: ...el device you might want to use to the Parallel port 7 Connect a TV receiver to the Video or S Video Connectors 8 Connect a network cable to the LAN connector 1 14 Parallel Port Connector Video Connec...

Page 21: ...ly connected to a power source if they do not draw their power from the system You are now ready to start up your system Check Chapter 2 for detailed information on starting up your system for the fir...

Page 22: ...Chapter 2 Chapter 2 Using the system Using the system...

Page 23: ...ll the cables are still securely attached to the appropriate connectors 5 The hard disk and other drive indicators will blink briefly as the system checks them quickly 6 Various messages appear on the...

Page 24: ...ain unless you activate it again later 14 Next you will be asked to setup your printer If you do not have a printer you can skip this step If you are familiar with the process of setting up your print...

Page 25: ...any other additional software with your system you will need to install that software yourself before you can use it which is discussed below The installation of software can be done through the Add R...

Page 26: ...n You can find out the capacity used space and available space on the C drive by right clicking on the C icon and then selecting properties The Windows Explorer Start Programs Windows Explorer provide...

Page 27: ...ll it out of the drive When the system is reading from or writing to a diskette the light underneath the diskette drive will turn on Do not try to eject the diskette when the light is on or you may lo...

Page 28: ...ed 2 Carefully pull the tray out to its fullest extent and place the disk into the tray Hold disks by the edge so that you don t smear the storage surface Normally the disks install with the label sid...

Page 29: ...Media Player which has similar but somewhat limited functions as the software applications mentioned above 1 In Windows Start menu point to the Programs Accessories and Entertainment headings to displ...

Page 30: ...ou should consider upgrading the total amount of memory in your system This will optimize the performance of system See chapter 4 of this user s manual for information on upgrading your Book PC s memo...

Page 31: ...use of the fax modem that is designed for this system The fax modem is capable of running in two modes both as a fax and as a modem which can be used to connect to other computers The fax modem can se...

Page 32: ...Chapter 3 Chapter 3 Installing the Software Installing the Software...

Page 33: ...necessary files on the support CD Installing the Bundled Software The support CD shipped with your system contains an original copy of all the software that was preinstalled on the hard disk drive in...

Page 34: ...ind of installation you want to do as explained later in this section The Browse CD button is the standard Windows command that allows you to examine the contents of the disc using the Windows 98 file...

Page 35: ...and working If your operating system is not Windows 98 you have to manually install for your drivers refer to the Table of contents of the support CD section below When put the support CD in the CD RO...

Page 36: ...er DOSDRV Windows 9x D SOUND Driver W95 98 Windows NT D SOUND Driver NT40 There is also an Audio Rack application program available for Windows 9x D SOUND Gamut Audio Player Graphics Drivers and Softw...

Page 37: ...lications for Windows Must sure in 800x600 display mode before you install it Windows 95 98 NT D Corel Suite8 AppMan Setup SETUP EXE Installing the Applications The installation of application softwar...

Page 38: ...Chapter 4 Chapter 4 Going inside Going inside...

Page 39: ...ques reduce the possibility of damaging components with electrostatic discharge or static Before handling any components or touching anything inside the system unit discharge your body s static electr...

Page 40: ...ge jumper settings or just want to have a look inside you can open the case without breaking your warranty To Open the System Unit Case 1 Power down the system 2 Disconnect the power cable 3 Observe t...

Page 41: ...ide the unit and find the components labeled in the illustrations below To Close the System Unit Case 1 Replace the front cover by first fixing the latches at the bottom of the chassis Gently push the...

Page 42: ...he Drive Cage 1 Use a Philips head screwdriver to remove the screws on each side of the chassis 2 Disconnect all the connectors and power supply cables from the drives in the drive cage Also disconnec...

Page 43: ...model only Pentium III CPU Short Pins 1 2 133 MHz CPU Short Pins 1 2 Celeron CPU Open Pins 1 2 66 100 MHz CPU Short Pins 2 3 4 6 Processor Socket System Memory Power Supply Connector for Drives Power...

Page 44: ...socket and swing it to the upright position 3 On the processor identify the pin 1 corner by noting that it has a slight bevel 4 On the Socket 370 identify the pin 1 corner The pin 1 corner is on the s...

Page 45: ...se either 66 or 100 MHz memory modules You must install at least one memory module in order to use the Book PC You can install the memory module into any of the two DIMM slots Each module can have a c...

Page 46: ...he connectors for the drives are located on the mainboard Changing the Hard Disk Drive Locate the IDE connector on the mainboard A single IDE cable is provided with the mainboard Connect the cable to...

Page 47: ...rd disk drive Changing the CD ROM DVD Drive Locate the IDE connector on the mainboard A single IDE cable is provided with the mainboard Connect the cable to the IDE connector The cable has two connect...

Page 48: ...ost common setup of this system will include a CD ROM drive but this slot in the drive cage can also hold alternative devices such as a DVD player Changing the Diskette Drive Locate the diskette drive...

Page 49: ...Book PC 3 Connect the diskette drive connector cable to the mainboard 4 Connect a power supply connector to the diskette drive 4 12...

Page 50: ...Chapter 5 Chapter 5 Peripheral Device Setup Peripheral Device Setup...

Page 51: ...the Television and Book PC to get better video quality Step 3 Power on your system Step 4 Press DEL key to enter BIOS SETUP mode while the Press DEL to enter SETUP message is displayed on the screen S...

Page 52: ...TSC Onboard FDC Controller Enabled Onboard IR Port Select Disabled IR Mode Select IrDA IR Duplex Mode Half Onboard Parallel Port 3BC IRQ7 Note 1 If you do not know which system your TV provides please...

Page 53: ...he Start button and then point to Settings and click on the Control Panel item in the menu that appears 2 Find the Display item in the Control Panel window and double click on it to open it The Displa...

Page 54: ...ge the appearance Scheme setting to Windows Standard extra large Click on the Scheme scroll arrow to display the Scheme list and scroll down to the setting and click on it 5 Click on the Apply button...

Page 55: ...b in the Display Properties window to bring it to the front 2 Click on the Advanced button to bring up the Driver Properties window The General tab will be at the front The Font Size setting should be...

Page 56: ...How to install your system with SCART TV console 3 Click on the Monitors tab to bring it to the front Click on the Change button 5 7...

Page 57: ...proceed 5 In the window that appears select the item to display a driver list Click on the radio button to its left to select it A black dot will appear in the circle Click the Next button to proceed...

Page 58: ...nsole 7 If the hardware list appears scroll down the hardware list select the Monitors item by clicking on it and then click on the Next button to proceed If the window below appears click on the Show...

Page 59: ...on Standard monitor types in the Manufacturers list and then click on Television or Generic Television varies by OS version in the Models list Click on the Next button to proceed 9 When the next wind...

Page 60: ...next window to complete configuring TV as the display device The Wizard window will close and return to the driver properties window with the Monitor tab displayed 11 Click on the Apply button at the...

Page 61: ...Click on the check box for Use this device under TV Monitor A check should appear in the box Click on the Fine Tuning button The Fine Tuning Dialog Box will appear 3 Adjust the Contrast Flicker Filter...

Page 62: ...button to close the dialog box and return to the Driver Properties window 5 Click on the Color tab in the Driver Properties window 6 Adjust the Gamma Correction controls for Gamma Brightness and Contr...

Page 63: ...Book PC 8 Click the Okay button in the next dialog box to confirm the desktop size change The screen area will reset to the 800x600 resolution you selected 5 14...

Page 64: ...rt radio button to select it if it isn t already selected and then click on the Okay button to confirm you want to restart the computer Please Note Make sure to also adjust the Brightness and Contrast...

Page 65: ...use invalidly the Analog audio Speaker Line in Microphone How to setup the SPDIF Out function in Win98 Please follow this procedure to setup the SPDIF Out function 1 Click on the Sound icon at the low...

Page 66: ...e Close button to complete enabling SPDIF Out function for the audio system Note Enabling this function might cause invalidly the analog audio How to setup the SPDIF Out function in WinDVD Please foll...

Page 67: ...s not support SPDIF function the Enable S PDIF output item might be hidden 4 Click on the OK button to complete enabling SPDIF Out function for the WinDVD Note 1 Enabling this function might cause inv...

Page 68: ...r BIOS SETUP mode while the Press DEL to enter SETUP message is displayed on the screen 4 Move the cursor to the item Integrated Peripherals then press Enter key to enter the Integrated Peripherals se...

Page 69: ...Appendix A Appendix A Problem Solving Problem Solving...

Page 70: ...device The Mouse doesn t work Make sure that the mouse is firmly and securely connected to the proper connector on the rear side of your computer Do not plug it into the designated PS 2 port for the...

Page 71: ...ces are properly connected to the system power up the system and the Book PC will automatically detect the connected devices and distribute the video display to them If both a monitor and a TV receive...

Page 72: ...drive 3 Copy the downloaded files to the diskette 4 Next copy the BIOS flash utility program Awdfl711 exe for Award BIOS from the support CD to the diskette 5 At the DOS prompt generate the auto exec...

Page 73: ...n Documentation Copyright 1999 Formosoft International Inc All rights reserved The contents of the associated Gamut software are the property and copyright of Formosoft International Inc Any reproduct...

Page 74: ...trol center of your home audio equipment With high compression rate MP3 technology GAMUT performs efficiently on storing and managing music on your PC Designed to exploit the latest MP3 technology it...

Page 75: ...ck with high quality digital technology If the CD ROM drive doesn t provide CDDA audio track capture function select Analog recording from Audio CD to record MP3 files with analog technology However a...

Page 76: ...Book PC 6 Next a window will appear that allows you to track the encoding progress B 4...

Page 77: ...select MP3 files 2 After selecting the MP3 files Musician will start playing the music automatically You can read the track progress from the Status Display You can also adjust the sound effects to yo...

Page 78: ...t is enabled you can click on the surrounding effect in the Play Function area to enable it 4 On the right side of the main panel the simulation effect area you can set various digital effect options...

Page 79: ...e the order Regulate the audio sources Use Mixer Start Mixer from the GAMUT Menu Bar or click Start Program GAMUT Mixer Mixer is used to control the audio sources for playing and recording using your...

Page 80: ...or browse to find an existing file 4 Select the recording source and adjust the volume then select the desired recording mode and compression ratio Note Normally when recording vocal audio select Sin...

Page 81: ...ion Copyright 1998 Intervideo Inc All rights reserved The contents of the associated WINDVD software are the property and copyright of Intervideo Inc Any reproduction in whole or in part is strictly p...

Page 82: ...DVD disks have menus which you can navigate WinDVD recognizes these features and lets you access them through the WinDVD user interface The WinDVD Controls Once WinDVD is launched and active use the...

Page 83: ...the disk in fast forward mode Restarts the same chapter Opens the Audio and Video adjustment window Opens the online help system Sliders Moves to a specific time in the title Increases or decreases t...

Page 84: ...hen click the green checkmark to accept that number Menu Items Displays all of the menus available Root Audio Language Subtitles etc on the DVD disk currently being played and allows you to select a m...

Page 85: ...ores play after a pause Stop stops the current playback Pause pauses the current playback Fast Forward plays the disk in fast forward mode Fast Backward plays the disk in fast reverse mode Previous Ch...

Page 86: ...many files as you want Remember that these files will now play in the order in which they appear Delete and replace files to create the correct order if needed 4 Click Save to save your playlist for f...

Page 87: ...in modified form to allow different ratings for the same movie To set movie rating limits on your WinDVD 1 Launch WinDVD and view the main control panel 2 Click the Properties icon The Properties win...

Page 88: ...ted feature Viewing a DVD Movie or Video CD Insert the Title into the CD ROM DVD Drive WinDVD reads the format of the disk and starts automatically Playing a DVD Interactive Title Interactive DVD or M...

Page 89: ...d 1 From the Parental Control window click Change Password 2 Type your current password in the Old Password text area 3 Type your desired password directly into the New Password text area 4 Type the s...

Page 90: ...nguages for a single movie In addition the format supports 32 closed caption tracks Region Codes Motion picture studios want to control the home release of movies in different countries because theate...

Page 91: ...a 16 to 9 ratio but displays in a standard size screen Pan scan which crops parts of the display out of the visible image in order to fit into a standard size display DVD Audio A DVD Video disk can ha...

Page 92: ...urned off High When this selection is enabled all features displayed in Custom Quality settings are turned on Custom Unlocks the Custom Quality section of Display Properties Select the specific featur...

Page 93: ...mode for the DVD ROM first before you running the WinDVD Set the DMA Mode for the CD ROM DVD ROM 1 Open the Control Panel Click on the Start button and then point to Settings and click on the Control...

Page 94: ...n to accept the new setting And the system will be restart Confidential Unpublished Works Copyright 1992 1997 Dolby Laboratories Inc All rights reserved DVD and the DVD logo are copyright The DVD Foru...

Page 95: ...G50 Documentation Documentation Copyright 1996 1997 1999 Yamaha Corporation All Rights Reserved No parts of this publication may be reproduced in any form or for any purpose without prior written auth...

Page 96: ...technology The S YXG50 lets your computer be a music synthesizer Specifications Tone Generator Type Wave table synthesis Wave Size 2MB Maximum Polyphony 128 notes No of Voices 676 voices 21 drum kits...

Page 97: ...l S YXG50 All deletions will be completed when Windows is restarted Even if you have deleted only the Yamaha folder or the Syxg50 folder use the above procedure to uninstall the software Performance S...

Page 98: ...as two playback modes XG and TG300B and will startup in XG mode When playing song data from commercially available XG collections or GM collections a signal System exclusive message recorded at the be...

Page 99: ...ge s and the beginning of the musical data XG Mode In XG mode the S YXG50 will play XG compatible midi data as well as multitimbral data created for the GM System Level 1 format In XG mode the S YXG50...

Page 100: ...layer Minimize button Clicking on this button minimizes the S YXG50 Player to an icon SONG button Clicking on this button displays the Set Play List dialog box Play button Clicking on this button load...

Page 101: ...the last song in the Play List Tempo Up button Each time this button is clicked the tempo increases Tempo Down button Each time this button is clicked the tempo decreases SET button Clicking this but...

Page 102: ...the SOFTWARE PRODUCT on your computers running validly licensed copies of the operating system for which the SOFTWARE PRODUCT was designed e g Windows r 95 Windows NT r Windows 3 x etc Backup Copies...

Page 103: ...nted are reserved by YAMAHA 5 NO WARRANTIES AND LIMITATION OF LIABILITY The SOFTWARE PRODUCT and any related documentation were developed at and are copyrighted by YAMAHA The SOFTWARE PRODUCT is offer...

Page 104: ...n shall be enforced to the maximum extent permissible so as to give effect the intent of this AGREEMENT and the remainder of this AGREEMENT shall continue in full force and effect This AGREEMENT shall...

Reviews: