background image

Working with Other Objects

133

FS6300 NMS Administrator’s Reference Guide 

9 • Monitoring Managed Objects

E1 Links

Navigate to 

Network Database > Managed Objects > E1 Links 

in the menu tree to view a list of all managed 

E1 links in the network. Select a row and click the new menu in the toolbar at the top of the screen (or right-
click on the row) to view the configuration menu for that link. 

The configuration menu for an E1 link includes the following options:

E1 Port Link Configuration 

– Displays the SDH Test Overview window, where you can view information 

and edit line interface and test paramters. 

UnManage 

– Moves the E1 link to the UnManaged Objects table. Select this option if you no longer want 

to manage the E1 link, but you do not want to delete it from the client.

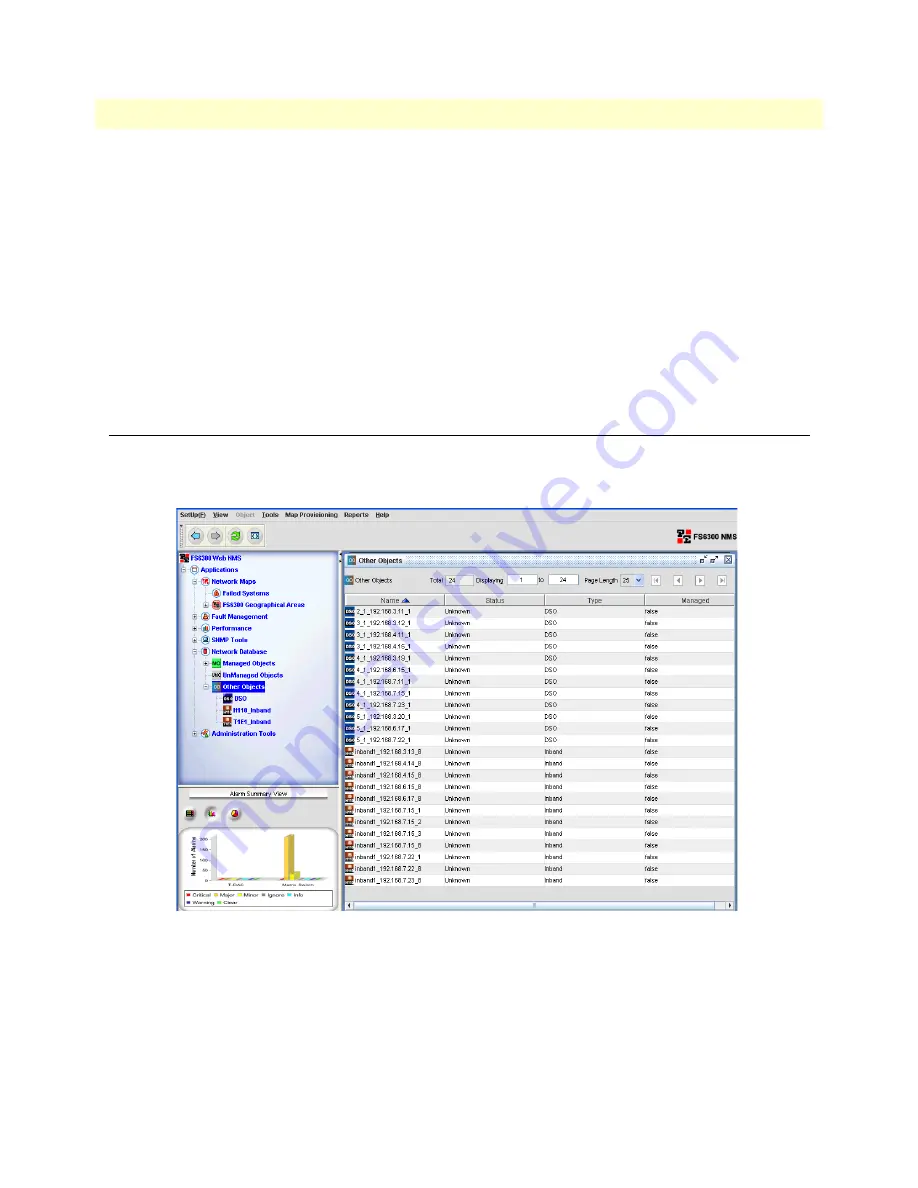
Working with Other Objects

Click on 

Network Database > Other Objects 

to view a list of all of the objects that exist in the network 

although the NMS does

 not

 provide fault management (such as status polling, data collection, trap processing, 

and alarm propagation). 

Figure 103. Other Objects Table

To change an object’s status from unmanaged to managed:

1.

Right-click on the row of the object in the 

Other Objects 

table.

2.

Select 

Manage

 to move the device to the 

Managed Objects 

table. 

3.

Select 

Managed Object Properties 

to view management details about the device. 

Summary of Contents for ForeSight 6300 NMS

Page 1: ...work Management System Administrator s Reference Guide Sales Office 1 301 975 1000 Technical Support 1 301 975 1007 E mail support patton com WWW www patton com Part Number 07MFS6300 ARG Rev B Revised...

Page 2: ...Patton Electronics Company in the United States and other countries Copyright Copyright 2012 Patton Electronics Company All rights reserved Notice The information in this document is subject to chang...

Page 3: ...k 45 4 Configuring Maps 67 5 Managing Logs and Reports 88 6 Managing Alarms and Network Events 94 7 Monitoring Performance Data 105 8 Monitoring SNMP Devices 111 9 Monitoring Managed Objects 128 10 Ma...

Page 4: ...MS Menus 21 Logging out of the Application Client 21 Backing Up the Database 22 Creating a backup file of the database 22 Scheduling a policy to backup the database 22 Restoring the Database 24 Managi...

Page 5: ...efining Containers Before Initial Discovery 46 Adding Pre Defined Containers 47 Modifying Pre Defined Containers 48 Viewing and Deleting Containers 49 Defining Containers During Multiple Card Configur...

Page 6: ...er Chassis Links 79 Managing H 110 Slots 80 Reserving H 110 Slots for Non Managed Cards 80 Viewing H 110 Time Slot Utilization 82 Viewing H 110 Time Slots through H 110 SlotView 82 Viewing H 110 Time...

Page 7: ...ts 103 Enabling Printing 104 7 Monitoring Performance Data 105 Introduction 106 Viewing Configured Collection Data 106 Viewing Current Performance Data 107 Viewing Collected Performance Data 109 8 Mon...

Page 8: ...le Cleanup Policy 137 6300 NMS Backup Policy 138 Alert Delete Policy 139 Alert Action Policy 140 Action Types 141 Modifying Policies 147 Deleting Policies 147 Executing Policies 147 Stopping Policies...

Page 9: ...20 Delete User 36 21 Assign User to Groups 37 22 Add New Group 38 23 Assign Users to Groups 39 24 Add Scope to Group 40 25 Scope Settings 40 26 Delete Scope 41 27 Add Operation 42 28 Auth Audit Scree...

Page 10: ...n Managed Cards 81 68 H 110 SlotView 82 69 H 110 Port Utilization 83 70 TDM Port Utilization 84 71 DS0 Availability by Ports 85 72 Time Slot Details 86 73 Chassis Diagnostics Port Utilization tab 87 7...

Page 11: ...38 109 Policy Scheduler 139 110 Adding Alert Delete Policy 139 111 Adding Alert Action Policy 140 112 Suppress Action 141 113 Send Trap Action 142 114 Send E mail Action 143 115 Add Custom Filter 144...

Page 12: ...rties 23 3 Network Event Details 102 4 Configured Collection Properties 107 5 MIB Manager Menus 113 6 SNMP Error Messages 123 7 Table Cleanup Policy Properties 137 8 FS6300 NMS Backup Policy Propertie...

Page 13: ...se operations Chapter 2 on page 30 provides information on managing security Chapter 3 on page 45 provides information on managing discovery tools Chapter 4 on page 67 provides information on configur...

Page 14: ...on when the client is idle 20 Using the NMS Menus 21 Logging out of the Application Client 21 Backing Up the Database 22 Creating a backup file of the database 22 Scheduling a policy to backup the dat...

Page 15: ...nagement Alarm Management Security Management Administration Management Performance Management Common User Tasks The following are user tasks you will encounter when working with the FS6300 NMS Discov...

Page 16: ...ight click on the client icon and select Run Then enter the authentication information in the FS6300 NMS Authentication dialog box Logging into the Client The FS6300 NMS Authentication box is displaye...

Page 17: ...usly configured To enter a new password click Configure and perform further steps 2 Enter the new password in the Type new password field 3 Re enter the same password in the Confirm new password field...

Page 18: ...ord Click Reuse to keep the same pass word and for the same expiration period configured before Click Configure to enter a new password Refer to Configuring your password before connecting to the clie...

Page 19: ...n the user and the Application Client no mouse or keyboard events Admins see Enabling the lockout function when the client is idle on page 20 to configure this feature Enter a valid password in the Pa...

Page 20: ...y default the lock screen function is disabled To enable it 1 Open the clientparameters conf file located in the Web NMS Home conf directory Web NMS Home is the IP address where the NMS server is runn...

Page 21: ...e To File Export Events Print Fault Management Alarms Custom Views Add Remove Modify Fault Management Alarms Edit Delete Pick Up UnPick Clear Search Fault Management Alarms View Delete Details Events...

Page 22: ...e Now A status message will display as the system completes the backup process Figure 2 FS6300 Schedule Tasks window 3 The backup is saved to the opt FS6300 version backup directory Scheduling a polic...

Page 23: ...igure 5 Policy Scheduler 6 Click OK in the Object Details window to save the policy A confirmation message displays that the pol icy was added successfully Table 2 FS6300 NMS Backup Policy Properties...

Page 24: ...the file that contains the backed up contents under a directory other than backup you need to specify the full path where the file exists Note While specifying the full path for restoring the data usi...

Page 25: ...port Card Configuration window 3 Select the boxes of the desired cards Enter a name for the configuartion in the TagName field Then click Export Configuration The window displays a COMPLETED status me...

Page 26: ...us Click the button to refresh the available device configuration list 3 Select the configuration file from the list and click Import A confirmation message displays after the sys tem successfully app...

Page 27: ...etwork Maps navigate to the Chassis or Card Slot 2 Right click on the card s icon in the main window and select Operator Action The Reset Options win dow appears It shows the card model IP address and...

Page 28: ...system tasks through scripts and CLI commands Backup the database and logs The NMS package includes a shell script for backing up the database con tents and logs directory to the server Refer to Exec...

Page 29: ...of backup Backup configurations for all cards in the NMS To backup the card configuration files for all of the cards in the NMS enter the command pe_card_backup pl DB This command obtains a list of I...

Page 30: ...ing User Passwords 36 Deleting Users 36 Assign Delete Users To From Groups 37 Managing Groups 38 Adding Groups 38 Assign Delete Users To From Groups 39 Deleting Groups 39 Managing Scopes for Groups 40...

Page 31: ...f the screen Figure 13 Tools Security Administration Managing Users Before anyone has access to the FS6300 NMS Client he or she must be added as a user to the FS6300 NMS Server database After you have...

Page 32: ...ype the desired user name and password in the text fields and click Next 3 If desired you can set the account and or password to expire after a certain amount of time By default the user account and p...

Page 33: ...he group that you want to add the new user to Click on the arrow on the right side of the Group Names table to view permissions for a group Figure 17 Adding a New User to a Group If you did not select...

Page 34: ...re 18 Modify User Permissions 2 Click on the Permitted Operations for User tab then click on the Modify Permissions button 3 In the Assign Permissions window select the checkboxes of the allowed opera...

Page 35: ...e button 3 In the User Profile window you can edit the status of the user and when the user account and or password expires 4 To temporarily disable a user de select the No change in status checkbox t...

Page 36: ...status drop down menu Then click OK The user can now log into the system again Changing User Passwords To change a user password 1 In the Security Administration window select the user in the menu tr...

Page 37: ...roups column then click the button to add the group to the user s list Repeat this step if you want to add the user to multiple groups 4 To remove a user from a group click on the group in the Selecte...

Page 38: ...operational tasks and permissions Adding Groups To add a group 1 In the Security Administration window do any of the following From the File menu choose New Add Group Press Ctrl Shift G Click the Add...

Page 39: ...Groups 3 In the Select Users window click on the user in the All Users column then click the button to add the user to the group s list Repeat this step if you want to add multiple users to the group...

Page 40: ...specific properties to which the users have access Scopes are used to set limits to a permission by applying one or more properties to a group permission Adding Scopes To add a scope 1 In the Securit...

Page 41: ...d button The Property value will appear in the table in the Scope Settings window 5 Click the Confirm button to add the scope Deleting Scopes To delete a scope 1 In the Security Administration window...

Page 42: ...you may want to add specific operations for users to use with the new applications Adding Operations To add new operations to the operations tree so that users groups can add it to their permissions 1...

Page 43: ...ser The audit trail identifies all operations that have been performed the time whether it was successful category and audited object You should periodically clear the trails after they have been revi...

Page 44: ...ow do any of the following From the View menu click Audit Trails Press Ctrl Shift A Click the Audit Trails icon The Auth Audit Screen displays 2 Select Edit Search or Ctrl F from the top of the screen...

Page 45: ...ng the Discovery Process 53 Enabling AutoDiscovery 53 Configuring Discovery of Specific Networks 54 Setting Discovery Interval 55 Configuring Discovery of SNMP Devices 56 Adding a Device Manually 57 S...

Page 46: ...same commu nity strings and networks with 24 bit masking Defining Containers Containers are unique identification details about the Geographical Areas Network Nodes and Chassis in your network You ma...

Page 47: ...combination is unique and may only be applied to cards in one chassis subnet Geographical Area GA The Geographical Area ID must be numerical and cannot be changed once it is added to the system Howev...

Page 48: ...fying Pre Defined Containers To modify pre defined containers 1 In the Container window click on Modify in the menu tree Figure 33 Modify Container 2 From the drop down menu select which type of conta...

Page 49: ...ls that were added or modified during mul tiple card configuration but it does not reflect the list of Geographical Areas Network Nodes or Chassis IDs existing on discovered cards You can rearrange co...

Page 50: ...Tools Multiple Card Configuration 1 Click on Card Parameters in the menu tree on the left side of the screen Figure 36 Multiple Card Configuration Card Parameters 2 Select the network address for the...

Page 51: ...uniqueness of Chassis IDs in the NMS The following details are also checked when modifying containers during multiple card configuration If there is already an entry for the GA ID and GA Name entered...

Page 52: ...scover Patton Devices in the menu tree of the Discovery window 2 Click on the General tab then click the Initial Parameters button Figure 38 Set Initial Parameters 3 The initial parameters are Discove...

Page 53: ...s at least one node must be deployed powered up and connected to the network Enabling AutoDiscovery To start Discovery 1 From the Tools menu at the top of the screen select Discovery Administration Th...

Page 54: ...IP subnet has already been entered into the Networks table for discovery Note The discovery process may take some time depending on how many nodes there are to discover on your network During the Disc...

Page 55: ...ry Interval You can set the wait time between discovering devices by configuring the Discovery Interval To set the discovery interval 1 In the General tab of the Discovery Configurator 1 Click on Tool...

Page 56: ...erties window opens Figure 42 Configure Discovery for SNMP Devices 3 Enter information for the following parameters SNMP Discovery Select the checkbox to enable or disable discovery of SNMP devices SN...

Page 57: ...he IP address of the device you want to add Netmask Enter the netmask for the device IP address Default 255 255 255 0 SNMP Password Enter the password to access the device SNMP Agent Port Enter the po...

Page 58: ...n at the top of the screen Then click on Discover Patton Devices in the menu tree of the Discovery window 2 Click on the Start Stop Discovery tab Select the network that you want to edit from the drop...

Page 59: ...6 Re Discover Already Discovered 3 Click Apply This change will take place the next time the NMS goes through the re discovery process See Scheduling Rediscovery on page 60 Re Discovering Cards Manual...

Page 60: ...Days of the Week Regular Interval To schedule re discovery for a regular interval for example every 24 hours 1 Click on Tools Discovery Administration at the top of the screen Then click on Discover P...

Page 61: ...Re Discovery for Specific Dates 3 Select the Specific Dates radio button at the top of the window 4 Select the dates that you want re discovery to occur All Dates Select the radio button for All Re Di...

Page 62: ...scovery to occur All Days Select the radio button for All Re Discovery will occur every day Specific Days Select the radio button for Specific Then click on all of the days of the week that you want r...

Page 63: ...want to update the subnet information so that is displayed as it actually is located in the network Updating the Configuration To configure multiple cards 1 Select Tools from the menu at the top of t...

Page 64: ...sis on the network Chassis Name Descriptive label for the chassis System Manager Name of the person managing this subnet on the network System Location Description of where the system is located Chass...

Page 65: ...on page 59 Upgrading Firmware The FS6300 NMS supports the following Patton models The rack cards must have the following minimum firmware version installed in order to operate properly To update the...

Page 66: ...s play in the firmware table 4 Select the checkbox in the table for the card s you want to upgrade Note The NMS will upgrade the cards in the same order that they are listed in the table In a daisy ch...

Page 67: ...Inter Card Maps 74 Creating End to End Maps 75 Removing Maps 76 Managing Inter Chassis Links 77 Reserving Pools 77 Synchronizing Maps and Trunks 78 Removing Inter Chassis Links 79 Managing H 110 Slots...

Page 68: ...configuring DS0 maps Map Types in the FS6300 There are three types of maps in the FS6300 NMS Same Card Maps A map created between any two TDM ports T1E1 GSHDSL iDSL on the same card Inter Card Maps A...

Page 69: ...e card and valid inter card DS0 maps Then it automates the task of generating a unique Map Description System ID for every DS0 map and setting the ID on the card and in the FS6300 database without any...

Page 70: ...efore screening so that any new maps added outside the FS6300 interface after the last discovery are also included for screening Screen Later No maps will be screened at this time The unscreened maps...

Page 71: ...cards The various stages of processing are displayed in the user interface in a mes sage board and also as progress bars 6 When screening is completed a success message is displayed and the user inte...

Page 72: ...ferent cards the H 110 Tx and Rx Ports and Timeslots on the two maps are exactly complementary After the verification FS6300 auto generates a new map description and updates the map on the card and in...

Page 73: ...the View Delete section under Inter Card maps Managing Maps In the NMS you can create DS0 map connections on the same card inter card or inter chassis Click on Map Provisioning Create and Manage DS0...

Page 74: ...table in the View Delete Maps section Creating Inter Card Maps To create maps between cards in the same chassis 1 Click on Inter Card in the menu tree of the Map Provisioning window Figure 61 Inter C...

Page 75: ...ed on available time slots on two different cards in two different chassis in the same Network Node Pre defined Reserved Pools must exist between the two chassis to create an end to end map see Reserv...

Page 76: ...Slot range on Destination Port 8 optional Enter a Circuit ID Description if needed The same description is assigned to all of the cards you are mapping 9 Click Process to preview the map The FS6300 w...

Page 77: ...nks Reserving Pools You can create reserved pools between chassis or between chassis segments by identifying time slots on selected T1E1 or STM 1 Ports for purposes of inter chassis mapping 1 Click on...

Page 78: ...ation and Trunk T2 is created between CH2 and CH1 Source and Destination only one Pool is created called CH1 CH2 for both T1 and T2 If the selected Chassis ID is a 6U on one side or both sides a suffi...

Page 79: ...n Conflict Message Removing Inter Chassis Links To delete degraded inter chassis links from the system 1 First confirm that all related end to end maps have been removed from the system see Removing M...

Page 80: ...se Time Slots are not auto provisioned for other inter card maps To block identified H 110 Time Slots exclusively for future mapping between unsupported cards Note You do not need to reserve H 110 slo...

Page 81: ...is for future use between two unsupported cards 3 Enter the IP Address of or select from the corresponding drop down menu the unspported card and the Slot Number in which it currently exists Once a ca...

Page 82: ...table also shows in band slots and detected overlaps The H 110 Port Utilization window shows how many time slots are being used on all the ports in a chassis Viewing H 110 Time Slots through H 110 Slo...

Page 83: ...chassis you want to view from the Select Geographic Area Node drop down menu 3 Select the chassis that you want view in the Select Chassis drop down menu If the selected chassis is type 6U select the...

Page 84: ...TDM Port Utilization 2 Select the node of the chassis you want to view from the Select Geographic Area Node drop down menu 3 Select the chassis that you want view in the Select Chassis drop down menu...

Page 85: ...t DS0 Availability by Ports Figure 71 DS0 Availability by Ports 2 Select the node of the chassis you want to view from the Select Network Node drop down menu 3 Select the chassis that you want view in...

Page 86: ...ns The Chassis Diagnostics view provides a way to easily identify and correct conflicting configurations Benefits of the chassis diagnostic view include View all chassis available in the system and vi...

Page 87: ...card in the chassis Overlap H110 Maps This tab lists multiple DS0 maps that use the same H110 timeslots If there are a large number of overlapped H110 DS0 maps select any DS0 map from the top table C...

Page 88: ...nd Reports Chapter contents Overview 89 Managing Logs 89 Saving Log Files 89 Clearing the Log 89 Managing Reports 89 Alarm Tracking Report 90 Chassis Checklist 90 Discovery Checklist 91 Device Checkli...

Page 89: ...2 Navigate to the folder where you want to save the log file 3 Type in a file name for the log Be sure the filename has the txt extension Clearing the Log To clear the log click the Clear button in t...

Page 90: ...ars in the bottom left corner of the screen under the main menu tree It offers a quick glance at the status of alarms that are currently occurring in the system You can change how the Alarm Summary Vi...

Page 91: ...The Discovery Checklist displays a list of geographical areas network nodes and chassis IDS and the status of the discovery schedules for each item Figure 78 Discovery Checklist To sort the columns cl...

Page 92: ...ce Checklist displays a list of network addresses for a certain model of card or all models in the net work Select the model to view from the drop down menu Figure 79 Device Checklist To sort the colu...

Page 93: ...ged objects icon Click on an icon to view a summary of details for that managed object type In the Data Column window on the left you can select which details you want displayed in the report then cli...

Page 94: ...ing a Summary of Alarms 98 Managing Alarm Custom Views 99 Adding an Alarm Custom View 99 Modifying an Alarm Custom View 100 Deleting an Alarm Custom View 100 Viewing Network Events 101 Viewing the cur...

Page 95: ...alarms are detected by the NMS You can configure the Alarm Trap Manager in two different ways by right clicking on a network node in the Geographical Areas section or by right clicking on a card in t...

Page 96: ...for each card 1 From the menu tree on the left side of the screen select the Chassis for the card that you want to config ure 2 In the main window right click on the Card then select Alarm Parameter C...

Page 97: ...Temperature Alarm Trap Managers 1 4 4 Click Modify to save your configuration in the card s volatile memory 5 Return to the Alarm Systems Overview screen Before the most severe active alarm is propaga...

Page 98: ...ical Area level a network node will also display alarm alerts if a card in a chassis has an alarm Viewing Alarms Viewing a Summary of Alarms To view a summary of all systems with an alarm click on Fai...

Page 99: ...o display all alarms in a certain state or to view all alarms from one card or network Adding an Alarm Custom View 1 From the menu tree on the left side of the screen select Alarms under Fault Managem...

Page 100: ...Views Modifying an Alarm Custom View To modify an existing custom view 1 Select the custom view in the menu on the left side of the screen 2 Click Custom Views Modify Custom View from the top of the s...

Page 101: ...lick on Network Events A list of current events in the network will display in the main window Figure 88 Fault Management Network Events Viewing details of an event You can view the details of a netwo...

Page 102: ...ue ID created for each of the events that are generated Severity Specifies the severity of the event such as Critical Major Minor Clear Warning Info Message Specifies the message associated with the e...

Page 103: ...arated values file in the FS6300 NMS server An option is provided to export the entire Custom View data or only the data that is currently displayed in the Custom View To save the current list of even...

Page 104: ...ompt then the entry for the PRINT_COMMAND should be similar to SAVE_DIR state PRINT_COMMAND print state printfile tmp where printfile tmp The temporary file where the data to be printed will be saved...

Page 105: ...105 Chapter 7 Monitoring Performance Data Chapter contents Introduction 106 Viewing Configured Collection Data 106 Viewing Current Performance Data 107 Viewing Collected Performance Data 109...

Page 106: ...ices in the network and adds it to the database Then data collection occurs every 600 seconds default interval The data collected from a device in the network is called Performance Data This chapter d...

Page 107: ...hows a line chart by default of the current perfor mance data for the selected statistic Table 4 Configured Collection Properties Property Description Statistic Name A description to identify the Stat...

Page 108: ...can view Line Chart Bar Chart Area Chart Scatter Chart X Y Chart 7 By default the Current Graph Viewer updates the information in the chart every 15 seconds To change the Polling Interval click Stop P...

Page 109: ...llection window 3 Select the row of the statistic that you want to view collected data for 4 Select View at the top of the screen then choose Plot Collected Statistic OR Right click on the row and cho...

Page 110: ...the last 24 hours Choose Today Last One Week or Custom based on the range of data you want to display For Custom set the From and To range in Month Date Year Hour Seconds AM PM format Then click Plot...

Page 111: ...MIB Parameters 114 Loading MIB Modules 116 Configuring MIB Loading Options 116 Setting Parser Levels 117 Unloading MIBs 117 Peforming SNMP Operations 118 GET GETNEXT 118 GETBULK 118 SET 118 Managing T...

Page 112: ...MP operations and viewing data from SNMP managed devices Note For information on how to discover add SNMP devices in the NMS see Configuring Discovery of SNMP Devices on page 56 and Adding a Device Ma...

Page 113: ...l to view traps received from SNMP agents Line Graph Create a line graph from real time SNMP data Bar Graph Create a bar graph from real time SNMP data SNMP Table Open the tool to track data from sele...

Page 114: ...ost Enter the IP address of an NMS managed card Port Enter the port number to receive SNMP request messages Default 161 Community Enter the same community strings that are configured for the system pa...

Page 115: ...e name of the collection of management information used to identify the SNMP entity Context ID The identifier of an SNMP entity that may recognize an instance of a context with a specific context name...

Page 116: ...to the mibs folder and select the file you want to load Click Open 3 The MIB file appears in the menu tree of the MIB Manager window If you want to load all available MIB files into the menu tree cli...

Page 117: ...ng compiled MIB files or load the MIB file from a database for the first time There are different levels for parsing MIB files To set the parser level click on the MIB Settings tab in the Load a MIB F...

Page 118: ...on the toolbar 6 The requested information displays in the main MIB Manger window GETBULK The GETBULK operation allows you to retrieve volumes of information from a large table It may only be perform...

Page 119: ...he toolbar or click View SNMP Table Valid objects will have a table symbol in the MIB tree Figure 97 Table objects in MIB tree Figure 98 SNMP Table Tool Gathering Table Data 1 Click Start in the SNMP...

Page 120: ...ds the error message Too Big PDU Error Check this box to split the PDU No of Columns Request If you check the box to Split Columns use this field to specify the number of columns to split Port Specify...

Page 121: ...e average of the values at a given polling interval X axis Scale Specify the time value in seconds for the X axis You must enable the Show Polled Values option to modify the X axis Scale Default 300 s...

Page 122: ...ebug window 1 Click View Debug or click on the toolbar The Debug window displays 2 As long as the Debug window is open debugging is enabled and will show output messages To open the Decoder window 1 T...

Page 123: ...oad MibDialog text field RequestFailed Error Request TimedOut To LocalHost Error occurs during GET GETNEXT and SET opera tions and while creating an SNMP Table Line Graph or BarGraph If the agent does...

Page 124: ...sen Error occurs if the SNMP Table is loaded with an OID that is not a Table OID ErrorSendingPDU Failed to Authenticate the Security Parameters for user SnmpEngi neEntry not found for address hostname...

Page 125: ...getBulk request to hostName port no Failed to Authenticate the Security Parame ters for user authUser USMUserEntry not found for Address hostname 161 Error occurs if the ContextName ContextEngineID is...

Page 126: ...m 192 168 1 182 Error Indication in response A no creation error occurred Errindex 1 Error occurs during a SET operation on ipRouteDest which has read write access syntax of datatype IP Address for a...

Page 127: ...ame 161 Request Failed SNMPv3 Error in Response usmStatsNotInTimeWin dows 1 3 6 1 6 3 15 1 1 2 0 Counter value 75 hostname Error occurs if the request is made after a certain interval of time sent get...

Page 128: ...contents Introduction 129 Working with Managed Objects 129 Geographical Areas 130 Network Nodes 130 Chassis 130 Network Addresses 131 Cards 131 Interfaces 132 DSL Ports 132 IDSL Ports 132 T1 E1 Ports...

Page 129: ...Working with Managed Objects Click on Network Database Managed Objects in the main menu tree to view a full list of managed objects in the network Right click on a device in the Managed Objects table...

Page 130: ...s and Traces Deletes elements from the NMS that no longer need to be managed Network Node Overview Displays a summary of the node including geographical area name and ID node name and ID system manage...

Page 131: ...the row to view the configuration menu for that card Each card has different configuration options in the menu depending on the model of the card you select The configuration menu for any card includ...

Page 132: ...ort Configuration window where you can view information and edit the desired state and test mode for a specific DSL port UnManage Moves the DSL port to the UnManaged Objects table Select this option i...

Page 133: ...line interface and test paramters UnManage Moves the E1 link to the UnManaged Objects table Select this option if you no longer want to manage the E1 link but you do not want to delete it from the cl...

Page 134: ...cy 137 6300 NMS Backup Policy 138 Alert Delete Policy 139 Alert Action Policy 140 Action Types 141 Suppress Action 141 Send Trap Action 142 Send E mail Action 143 Custom Filter 144 Run Command Action...

Page 135: ...the Policy toolbar appears at the top of the screen From the Policy toolbar menu you can Add Policy Ctrl P Search Policies Ctrl F Refresh Policies F5 Figure 104 Policy Menu When you click on Policies...

Page 136: ...Policy from the toolbar at the top of the screen Figure 104 on page 135 3 Select the type of policy you want to add from the drop down menu Figure 105 Policy drop down menu 4 Enter a unique name for...

Page 137: ...Name Specify the name of the table that stores the statistical data Default STATSDATA unless you have changed the data collection parameters If you have specified your own table name in the data coll...

Page 138: ...for adding a new 6300NMSBackup policy 5 Click Schedule in the Object Details window The Policy Scheduler window displays Select the radio buttons for Dates or Days depending on what your policy schedu...

Page 139: ...cribes the fields for adding a new AlertDelete policy Figure 110 Adding Alert Delete Policy Table 9 Alert Delete Policy Properties Property Description groupName Specify the name of the group to which...

Page 140: ...led The policy can be executed only if it is Enabled Periodicity secs Specify the interval in seconds between two successive execution of the policy Default 10 seconds Severity Specifies the severity...

Page 141: ...l together or multiple alarms of the same type within a given interval When an alarm occurs you can suppress all the alarms that match a particular filter To suppress alarms 1 In the Escalation Policy...

Page 142: ...ify a name for the trap action Trap Destination Specify the host to send the trap to Destination Port Specify the destination host port to send the trap to Trap Community Specify the community to be s...

Page 143: ...r the e mail action User Name Specify the user name for the mail server that will authenticate you to send the e mail Password Specify the password for the mail server that will authenticate you to se...

Page 144: ...stom filters that you implement must be compiled and placed in the CLASSPATH of the FS6300 NMS Java Virtual Machine To use custom filters 1 In Escalation Policy window select Custom Filter under Actio...

Page 145: ...ts or commands you must invoke the shell as a part of the command string The com mand string should be specified with the full path of the shell where the server has been started Command Results To ap...

Page 146: ...ation Policy window select Set Severity under Action Type Figure 117 Set Severity 2 In the Action Details section specify the following Action Name Enter a name for the set severity action Set Severit...

Page 147: ...if you are sure that you want to delete the policy Click Yes 5 A confirmation message will display Policy deleted successfully Click OK Executing Policies To manually start a policy 1 Click on Polici...

Page 148: ...ntents Introduction 149 Contact information 149 Warranty Service and Returned Merchandise Authorizations RMAs 149 Warranty coverage 149 Out of warranty service 149 Returns for credit 149 Return for cr...

Page 149: ...carefully tested before ship ment All of our products are backed by a comprehensive warranty program Note If you purchased your equipment from a Patton Electronics reseller ask your reseller how you...

Page 150: ...ting a request on the RMA Request page in the Support section at www patton com By calling 1 301 975 1000 and speaking to a Technical Support Engineer By sending an e mail to returns patton com All re...

Page 151: ...151 Appendix A Recovering the NMS Server from Disk Chapter contents Introduction 152 Upgrading the RAID Controller 152 Assigning Spare Drives 154 Rebuilding the NMS Server 155...

Page 152: ...rver perform the following sections in order Upgrading the RAID Controller on page 152 Assigning Spare Drives on page 154 Rebuilding the NMS Server on page 155 Upgrading the RAID Controller To upgrade...

Page 153: ...r off the NMS server and turn it back on At the RAID initialize screen press the CTRL and H keys at the same time to start the BIOS Setting Utility Figure 119 BIOS Setting Utility 3 To show the server...

Page 154: ...r restoring the NMS server follow the instructions in the next section Assigning Spare Drives Assigning Spare Drives Creating a spare drive is the next procedure in the process to restore the NMS serv...

Page 155: ...e steps in this section ensure that you have assigned the spare drives and have removed and replaced one of the drives with the RMA recovery drive as instructed in the section Assigning Spare Drives o...

Page 156: ...NMS server Label the drive as reference for server 2 4 Insert the system1 spare drive into the empty drive bay The rebuild process will start again 5 While system 1 is performing the rebuild process r...

Reviews: