background image

66

ESP

A

ÑOL

RQT6559

Guía de referencia rápida en español

Después de enchufar el aparato en la toma de corriente de su casa y pulsar [

Í

DVD POWER] para encender el aparato por primera vez, éste

sintonizará automáticamente todos los canales que pueda recibir y pondrá en hora el reloj. Utilice [ENTER] y siga las instrucciones de la pantalla.

Cambie los ajustes si:

Conecta el aparato a un televisor de pantalla panorámica con una
relación de aspecto de 16:9. 

 Ponga “TV Aspect” en “16:9”.

Conecta el aparato a través de los terminales de vídeo COMPO-
NENT a un televisor compatible con señales de vídeo progresivo
(480P). 

 Ponga “TV Type” en “480P”.

1. Pulse [SETUP] para mostrar los menús.
2. Pulse [

3

,

 4

] para seleccionar la ficha “TV Screen” y pulse [

1

].

3. Pulse [

3

,

 4

] para seleccionar “TV Aspect” y pulse [ENTER].

4. Pulse [

3

,

 4

] para seleccionar “16:9” y pulse [ENTER].

5. Pulse [

3

,

 4

] para seleccionar “TV Type” y pulse [ENTER].

6. Pulse [

3

,

 4

] para seleccionar “480P” y pulse [ENTER].

7. Pulse [SETUP].

Conexiones de antena y televisor

OPTICAL

VHF/UHF

Y

P

B

P

R

DIGITAL AUDIO OUT

(PCM/BIT STREAM)

R - AUDIO - L

VIDEO

S-VIDEO

(L1)

R - AUDIO - L

VIDEO

S-VIDEO

(L3)

R - AUDIO - L

VIDEO

S-VIDEO

R - AUDIO - L

VIDEO

S-VIDEO

RF OUT

RF IN

COMPONENT

VIDEO OUT

(480P/480I)

IN3

IN1

OUT2

OUT1

AC IN ~

AUDIO 

IN

R    L

VIDEO

IN

VHF/UHF

RF IN

Para disfrutar del vídeo progresivo

Haga la conexión a los terminales de entrada de vídeo compo-
nente (480p) de un televisor que sea compatible con el sistema
de protección contra el copiado de este aparato. (La imagen no
se visualizará correctamente si se hace la conexión a un televi-
sor incompatible.)

Ponga “TV Type” en “480P” (

 abajo).

Durante la reproducción

1.Pulse [DISPLAY].
2.Pulse [

3

,

 4

] para seleccionar “Video” y pulse [

1

].

3.Pulse [

3

,

 4

] para seleccionar “Progressive” y pulse dos 

veces [

1

].

4.Pulse [

3

,

 4

] para establecer “Transfer” según el tipo de 

material que esté siendo reproducido.

Auto1: Para material de películas
Auto2: Para material de películas (Lo mismo que para Auto1, 

pero capaz de convertir vídeo progresivo de 30 
cuadros por segundo.)

Video:  Para material de vídeo

Disc

Video
Audio

Play

Picture

MPEG-DNR

Normal

ON

Progressive

Auto 1

ON

Transfer

A la antena

Antena exterior

TV por cable

Antena interior

Televisor

Cable de alimentación de CA (incluido)
Conéctelo en último lugar.
Conecte también los cables de alimentación 
de CA de otros equipos.

Cable de
audio/vídeo
(incluido)

Cable de antena
(desconéctelo del televisor)

A la toma de CA de casa
(CA 120 V, 60 Hz)

Este aparato

Ventilador de refrigeración

Rojo  Blanco  Amarillo

Rojo  Blanco  Amarillo

o

Cable coaxial de
75 

 (incluido)

Selección del tipo de pantalla del televisor

DVD/TV

DVD

VCR Plus+ TV/VIDEO REC MODE REC

CH

VOLUME

TV

TV

DVD

1

2

3

7

8

9

0

100

4

5

6

SLOW/SEARCH

SKIP

DIRECT NAVIGATOR

TOP

MENU

MENU

RETURN

FUNCTIONS

PROG/CHECK

DISPLAY TIME SLIP

ADD/DLT

ENTER

PLAY LIST

CANCEL

POWER

Í

Í

OPEN/CLOSE

SETUP

ERASE

F Rec

POSITION MEMORY MARKER

AUDIO

INPUT SELECT CM SKIP

STATUS

FRAME

2

1

DIRECT
NAVIGATOR

1

3

2

3
4

POSITION
MEMORY

3

,

4

,

2

,

1

,

ENTER

6

,

 5

:

9

2;

;1

;

SETUP

DISPLAY

Botones
numerados

67

RQT6559

ESP

A

ÑOL

[RAM]


[DVD-R]


[DVD-V]


[CD]


[VCD]

1

Pulse [

Í

, DVD POWER] para

encender el aparato.
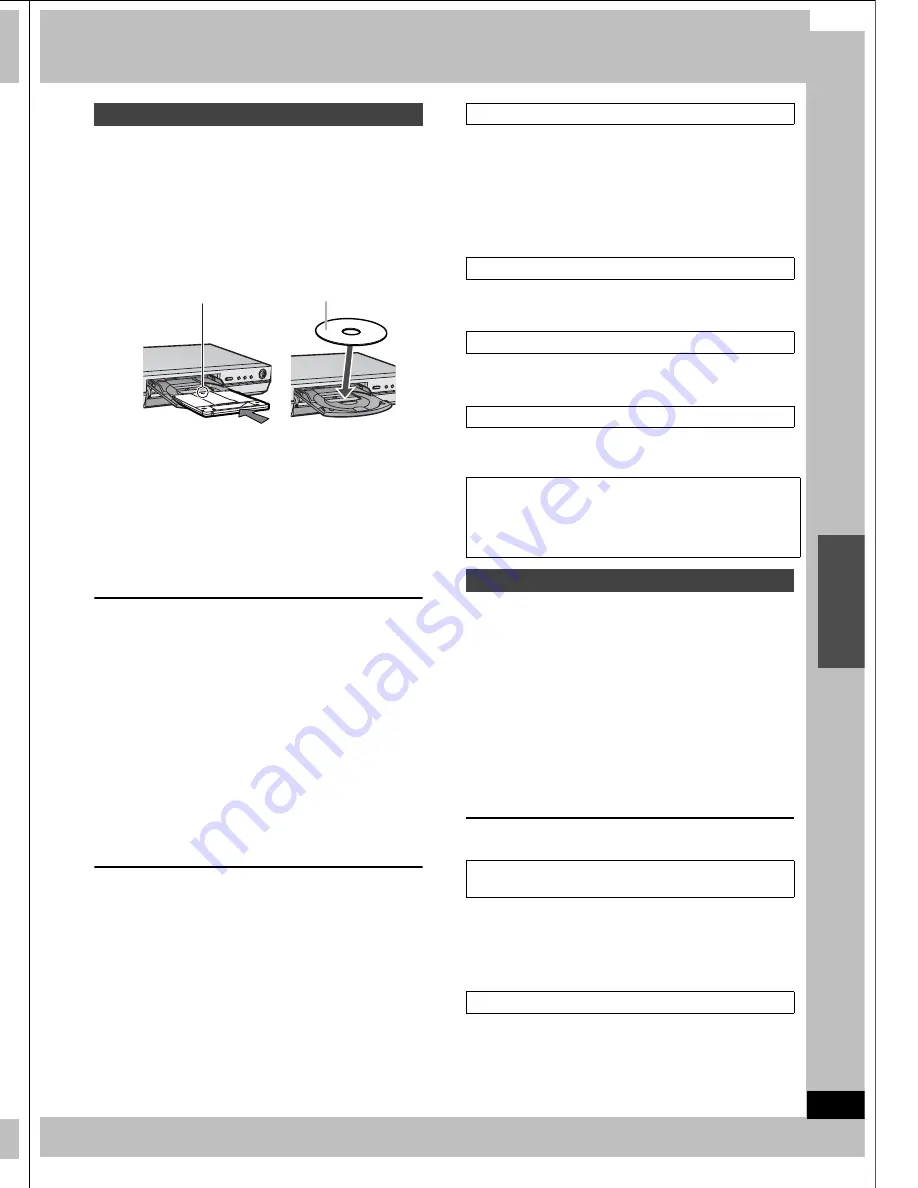
2

Pulse [

<

, OPEN/CLOSE] para abrir la

bandeja e inserte un disco.

Cargue los discos de dos lados de forma que la etiqueta del
lado que quiera reproducir quede hacia arriba.

Pulse de nuevo [

<

, OPEN/CLOSE] para cerrar la bandeja.

3

Pulse [

1

] (PLAY).

El aparato tarda algo de tiempo en leer el disco antes de
empezar la reproducción.

[RAM]


[DVD-R]

La reproducción empieza desde el principio de la grabación
más reciente. Si ese programa es muy breve, la reprodu-
ccion empieza desde la siguiente grabación más reciente.

Para detener la reproducción, pulse [

].

Para hacer una pausa en la reproducción, pulse [

;

].

Cuando aparece una pantalla de menú en el
televisor

Pulse los botones numerados para seleccionar un ele-
mento.

Inicio de la reproducción desde donde usted la
detuvo—Función de reanudación

1. Durante la reproducción

Pulse [

].

El aparato recuerda la posición.

2. Pulse [

1

] (PLAY) mientras parpadea “PLAY” en el visua-

lizador.
La reproducción empieza desde donde usted la detuvo.

Para cancelar la función de reanudación
Pulse [

] hasta que se apague “PLAY”.

Para iniciar la reproducción desde una posición memorizada
después de apagar el aparato
Pulse [POSITION MEMORY] durante la reproducción.
(El mensaje “Position Memorized” aparece en el televisor.)
Ahora, cuando pulse [

1

] (PLAY) después de poner el aparato en el

modo de espera y luego volver a encenderlo, la reproducción
empezará desde la posición memorizada y la posición se can-
celará.

Puede saltar al comienzo de las pistas (CD y CD de vídeo) y de los
capítulos (DVD-Vídeo) y reanudar la reproducción desde ese
punto.
En los discos DVD-RAM y DVD-R, puede saltar al principio de un
programa o a un marcador e iniciar la reproducción desde ese
punto.
Durante la reproducción o la pausa
Pulse [

:

] o [

9

].

Durante la reproducción
Pulse [

6

] o [

5

].

Durante la pausa
Pulse [

6

] o [

5

].

Durante la pausa
Pulse [

2;

] o [

;1

].

[RAM]


[DVD-R]

1

Pulse [

<

, OPEN/CLOSE] para abrir la

bandeja e inserte un disco.

Pulse de nuevo [

<

, OPEN/CLOSE] para cerrar la bandeja.

2

Pulse [

W

X

, CH] para seleccionar el

canal.

3

Pulse [REC MODE] para seleccionar
el modo de grabación.

4

Pulse [

¥

, REC] para iniciar la graba-

ción.

Para hacer una pausa en la grabación, pulse [

;

].

Para detener la grabación, pulse [

].

[RAM]

Durante la grabación
Pulse [

1

] (PLAY).

La reproducción empieza desde el comienzo del programa que
está siendo grabado.

[RAM]

Durante la grabación
Pulse [DIRECT NAVIGATOR], pulse [

3

4

] para seleccionar el

programa y luego pulse [ENTER].

Reproducción de discos

Inserte el disco con la eti-
queta hacia arriba y la 
flecha indicando hacia 
adentro.

Inserte con la eti-
queta hacia arriba.

Salto

Avance rápido y rebobinado—SEARCH

Reproducción a cámara lenta

Visión cuadro a cuadro

Pulse [

1

] (PLAY) para reanudar la reproducción.

Durante los modos de reproducción a cámara lenta y cuadro
a cuadro de CDs de vídeo no es posible retroceder.

[

:

], [

6

], [

2;

] : Retroceso

[

9

], [

5

], [

;1

] : Avance

Grabación de programas de televisión

Reproducción desde el principio del programa que 
está grabando—Reproducción en persecución

Grabación y reproducción simultáneas

Summary of Contents for DMR-E30S

Page 1: ......

Page 2: ...9...

Page 3: ...g to qualified service personnel Servicing is required when the apparatus has been damaged in any way such as power supply cord or plug is damaged liquid has been spilled or objects have fallen into t...

Page 4: ...9...

Page 5: ...play again MARKER 25 Marking positions directly 25 Using on screen menus to mark positions 25 Changing audio 26 Playing while you are recording 28 Playing from the beginning of the program you are re...

Page 6: ...9...

Page 7: ...HAP Chapter number PG Program number PL Play list number D Recording mode page 19 E DVD indicator Flashes When you press DVD POWER to turn the unit off until it actually turns off F Channel G Main dis...

Page 8: ...9...

Page 9: ...mar ket Do not use discs that are badly warped or cracked Do not place or store discs in the following places Locations exposed to direct sunlight Humid or dusty locations Locations directly exposed...

Page 10: ...9...

Page 11: ...d proceed to Auto Channel Setting page 12 If Plug in Auto Tuning fails If unnecessary channels are set or necessary channels are not set Refer to page 12 Adding and deleting channels If the unit could...

Page 12: ...9...

Page 13: ...ed Press SETUP Station name Guide channel Channel number CBS 04 04 A HBO 33 15 B Nickelodeon 38 20 C VOLUME 7 8 9 0 100 SLOW SEARCH SKIP DIRECT NAVIGATOR TOP MENU MENU RETURN FUNCTIONS PROG CHECK DISP...

Page 14: ...9...

Page 15: ...tly manufactured televi sions but may not be able to control older models Operation Point the remote control at the television DVD TV DVD VCR Plus TV VIDEO REC MODE REC CH VOLUME TV TV DVD 1 2 3 7 8 9...

Page 16: ...9...

Page 17: ...me on and play will start when you press 1 PLAY If you play a disc with video and then replace it with an audio only disc the video from the previous disc may continue to be shown on the television RA...

Page 18: ...9...

Page 19: ...n the remaining time on the disc and with the best possible picture quality 1 While stopped Press F Rec 2 Use 2 1 to select Hour and Min and set the time with 3 4 3 To start recording Press 3 4 2 1 to...

Page 20: ...9...

Page 21: ...ist scene Press ERASE A confirmation message will be displayed 2 Erase Cancel or Yes No will be displayed Select Erase or Yes and press ENTER Select Cancel or No and press ENTER to cancel Playing play...

Page 22: ...9...

Page 23: ...topped with some discs the screen saver is on the television RAM DVD R 1 During play Press ERASE A confirmation message will be displayed 2 Press 2 to select Erase and press ENTER Select Cancel and pr...

Page 24: ...9...

Page 25: ...elapsed play time is not shown You are using a play list You have write protected the disc you can still recall the mark ers to play a position Subtitles around markers may fail to appear Markers on...

Page 26: ...9...

Page 27: ...he button This allows you to change things like the soundtrack lan guage While playing Video CD LR L R Note If you cannot change the audio type when you have used only an optical digital cable for con...

Page 28: ...9...

Page 29: ...g To stop recording Press Note When recording using L1 L2 or L3 terminals only the sound received at the time of recording will be recorded DVD TV DVD VCR Plus TV VIDEO REC MODE REC CH VOLUME TV TV DV...

Page 30: ...9...

Page 31: ...begun Press then ENTER within 5 seconds Recording stops Recording standby is also canceled if there are other timer recording programs Be sure to press DVD POWER to put the unit on timer recording sta...

Page 32: ...9...

Page 33: ...may enter a space by pressing 100 and then ENTER To erase a character 1 Press 3 4 2 1 to select the character you want to erase in the title field 2 Press You can also erase characters by selecting E...

Page 34: ...9...

Page 35: ...tting takes up to 70 minutes The message Formatting is completed appears when formatting is finished Press ENTER to complete the procedure Note If the disc is dirty clean it with the recommended clean...

Page 36: ...9...

Page 37: ...t reappears By selecting Preview and pressing ENTER play will begin from a point 10 seconds prior to the division point You may wish to make sure that the division point is at an appropriate location...

Page 38: ...9...

Page 39: ...Y LIST Add Scenes 0 00 05 Start End 3 Start 1 End Next Exit Scene No 0 00 05 RETURN ENTER SELECT PLAY 1 PLAY LIST No 3 Dinosaur Press 3 4 to select Exit and press ENTER Press 3 4 2 1 to select the pos...

Page 40: ...9...

Page 41: ...Y LIST CANCEL POWER 2 3 1 RETURN Icon Refer to DISC SETTING page 34 Disc setting TIMER RECORDING page 30 Timer recording SET UP page 51 Changing the unit s settings DIRECT NAVIGATOR page 20 Using the...

Page 42: ...9...

Page 43: ...disc s elapsed play time is not shown on the unit s display If the Video CD has playback control 1 While stopped the screen saver is on the television press the num bered buttons to select a track pag...

Page 44: ...9...

Page 45: ...ful sound Enjoying 5 1 chan nel surround sound with Dolby Digital and DTS Digital connection Connect to an amplifier with built in decoders 47 A SETUP Audio Digital Audio Output Set PCM Down Conversio...

Page 46: ...9...

Page 47: ...t Change the settings in Digital Audio Output page 51 To enjoy stereo or Dolby Pro Logic Connect an analog amplifier or system com ponent Speakers Example Connect three or more speakers for surround s...

Page 48: ...9...

Page 49: ...change the television s set ting as necessary Other antenna connection to the unit 300 75 transformer not included from the antenna Flat Twin lead 300 cable To this unit s RF IN terminal from the ant...

Page 50: ...9...

Page 51: ...actory preset Output as 96 kHz There is no output if the disc has copy protection Select On in this case On Converted to 48 kHz for output Bitstream Factory preset for Dolby Digital Select if the equi...

Page 52: ...9...

Page 53: ...XP mode recordings Dolby Digital page 57 LPCM page 57 Digital Audio Output page 51 PCM Down Conversion On Off Dolby Digital Bitstream PCM DTS Bitstream Off Display Status Messages Choose whether to sh...

Page 54: ...9...

Page 55: ...4 to select the channel and then press 1 Channels are not displayed if they do not contain a station or if preset captions have been added 5 Press 3 4 to select the first char acter and then press 1...

Page 56: ...9...

Page 57: ...picture This picture is calculated based on past I or P pictures B Bidirectionally predictive coded picture This picture is calculated by comparing past and future I and P pictures so it has the lowes...

Page 58: ...9...

Page 59: ...or benzine to clean this unit Before using chemically treated cloth read the instructions that came with the cloth carefully Observe the following points to ensure continued listening and viewing plea...

Page 60: ...9...

Page 61: ...uages 17 No subtitles Subtitles are not recorded on the disc Turn the subtitles on 42 Angle cannot be changed This function depends on software availability Angles can only be changed during scenes wh...

Page 62: ...9...

Page 63: ...output 525p 525i Y 1 0 Vp p 75 PB 0 7 Vp p 75 PR 0 7 Vp p 75 Antenna reception input TV Channel 2ch 69ch 75 CATV Channel 1ch 125ch 75 Audio system Recording system Dolby Digital XP SP LP EP LINEAR PC...

Page 64: ...9...

Page 65: ...ADA INC BE LIABLE FOR ANY SPECIAL INDIRECT OR CONSEQUENTIAL DAMAGES In certain instances some jurisdictions do not allow the exclusion or limitation of incidental or consequential damages or the exclu...

Page 66: ...9...

Page 67: ...n empezar desde la posici n memorizada y la posici n se can celar Puede saltar al comienzo de las pistas CD y CD de v deo y de los cap tulos DVD V deo y reanudar la reproducci n desde ese punto En lo...

Page 68: ......

Reviews: