Network settings
Installing the software
Be absolutely sure to read through the “Readme.txt” on the CD-ROM
supplied with the unit first before attempting to install the software.
Software provided on the CD-ROM
z
Easy IP Setup Software (EasyIPSetup.exe)
This software establishes the unit’s network settings.
For details,
refer to the sections that follow.
Use the Easy IP Setup Software to establish the
unit’s settings
The settings related to the unit’s network can be established using the
Easy IP Setup Software supplied.
To establish the settings for a multiple number of units, the settings must
be selected for each camera involved.
If the settings cannot be established using the Easy IP Setup Software,
select the settings separately for the unit and personal computer on the
network page of the setting menu. (→ page @@)
<NOTE>
• If, after the network settings have been established, another device in
the same network has the same IP address, the network operations
will not be performed properly.
Set the IP address in such a way that it does not duplicate an existing
IP address.
• Do not establish network settings from a multiple number of Easy IP
Setup Software programs at the same time for a single camera.
Similarly, do not perform the “Auto IP setting” operation of the
AW-RP50 remote camera controller at the same time.
The IP address settings may no longer be recognized as a result.
• The Easy IP Setup Software is designed in such a way that when
around 20 or more minutes have passed after the power was turned
on, the MAC address and IP address of the target camera will no
longer be displayed.
→ For details of the display time setting, refer to “Easy IP Setup
accommodate period” (→page @@).
• The Easy IP Setup Software cannot be used from a different subnet
via a router.
• The unit cannot be displayed or its settings established using an older
version of the Easy IP Setup Software (Ver.2.xx).
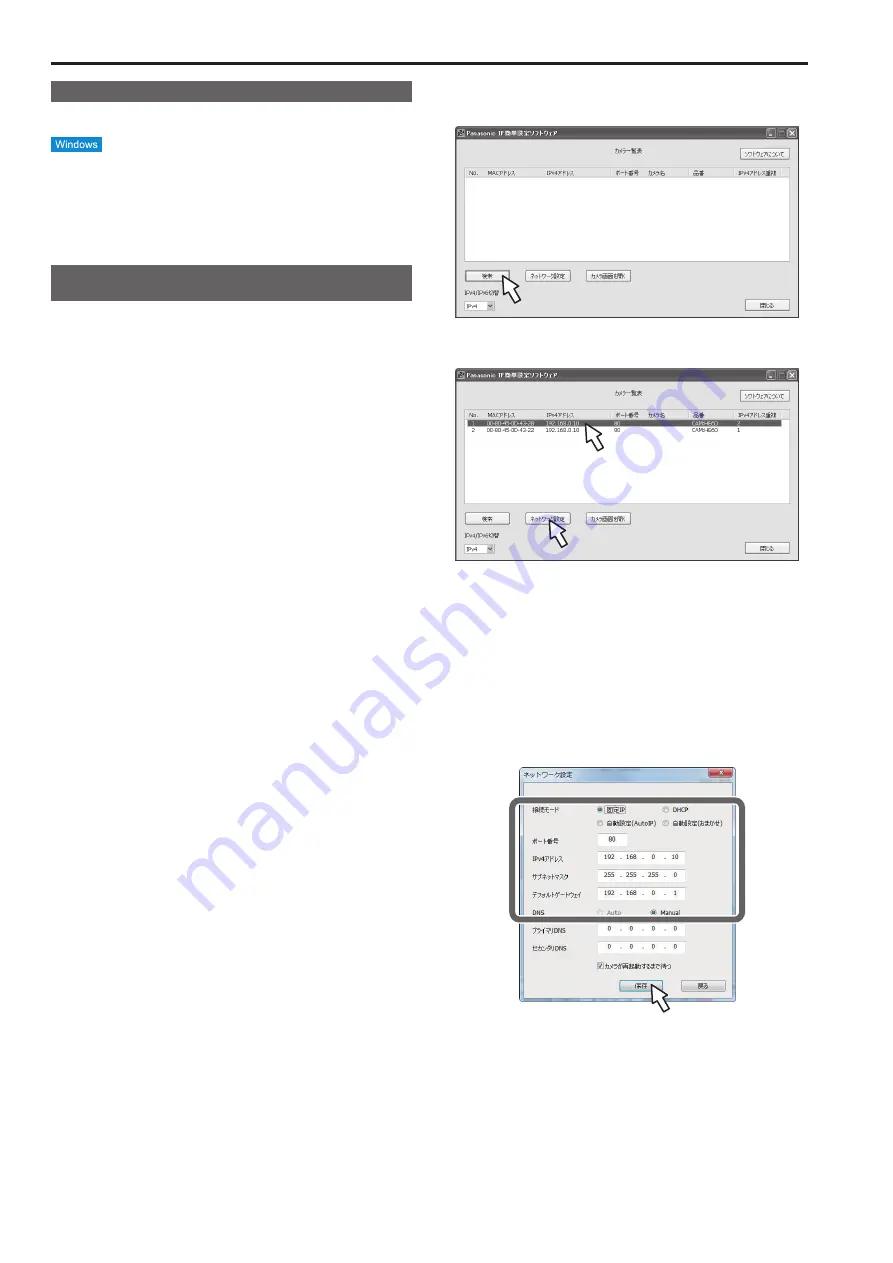
1.
Start the Easy IP Setup Software.
2.
Click the [Search] button.
3.
Click the MAC address/
IPv4 address of the camera to be
set, and click the [Network Settings] button.
<NOTE>
• When a DHCP server is being used, the IP address allocated to the
unit can be checked by clicking the [Search] button of the Easy IP
Setup Software.
• If the same IP address is used for any additional cameras, the
numbers of the additional cameras will be displayed in the “IPv4
overlap” column of the cameras concerned.
• When the [Access Camera] button is clicked, the Live screen of the
selected camera is displayed.
• This unit does not support an IPv4/IPv6 switching function.
4.
Input the network items, and click the [Save] button.
<NOTE>
• When a DHCP server is being used, “DNS” of the Easy IP Setup
Software can be set to “Auto”.
• After the [Save] button is clicked, it takes about 2 minutes for the
settings in the unit to be completed. If the AC adaptor or LAN cable is
disconnected before the settings are completed, the settings will be
canceled. In this case, repeat the steps to establish the settings.
• When a firewall (including software) has been introduced, enable
access to all the UDP ports.
24
25
Summary of Contents for AW-HE130W
Page 124: ...Index 124...
Page 125: ...125 MEMO...


