34
35
Parts and their functions (connectors and DIP switches)
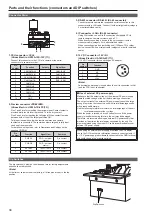
Connector Panel
12V
IN
LAN
RS-422
PREVIEW
CCU
SIGNAL GND
4 3
5
1
2
1.
CCU connector <CCU>
(Hirose Electric: HR10A-10R-10P (71))
Connect this connector to the CCU of a camera or the serial
connector of a camera recorder.
Pin
number
Function
Polarity
Signal flow
1
CAM DATA(H)
+
CAM→ROP
2
CAM DATA(L)
-
CAM→ROP
3
CAM CONT(H)
+
ROP→CAM
4
CAM CONT(L)
-
ROP→CAM
5
CAM No.A
6
CAM No.B
7
CAM No.C
8
CAM No.D
9
12V
10
GND
2.
Preview connector <PREVIEW>
(Hirose Electric: HR10A-7R-4PC(73))
Pins 1 and 2 are for outputting the preview signal. Contact output is
provided while the iris lever is pressed. This is a dry contact.
Pins 3 and 4 are for inputting the tally signal. When contact is made
between both of them, the tally signal turns ON.
Tally input is enabled only when remote cameras and camera
recorders are connected. The camera number assigned to tally input
can be set in setup mode.
For details on setup mode, refer to Operations and Settings on the
supplied CD-ROM.
Pin
number
Function
Signal flow
Remarks
1
P.VIEW1
ROP
external
control
Dry contact
2
P.VIEW2
ROP
external
control
Dry contact
3
EXTRA1
TALLY→ROP
Dry contact
4
EXTRA2
TALLY→ROP
Dry contact
3.
RS-422 connector <RS-422> (RJ-45 connector)
Connect a remote camera that supports a serial connection to this
connector with a LAN cable. Connect it with a straight cable (category
5 or better shielded cable).
4.
IP connector <LAN> (RJ-45 connector)
Using LAN cables, connect to IP connection compatible CCUs,
remote cameras, camera recorders, and a PC.
When directly connecting a device to the unit, connect it with a
crossover cable (category 5 or better shielded cable).
When connecting via a hub (switching hub) (100base-TX) or other
device, connect it with a straight cable (category 5 or better shielded
cable).
5.
12 V DC connector <12 V IN>
(Hirose Electric: HA16RA-4P (77))
A 12 V DC connector for connecting an AC adapter.
Pin
number
Function
1
GND
2
NC
3
NC
4
+12V
<Note>
An external power supply is used when the unit is connected to LAN
(and the CCU is not connected).
Use of external DC power supply
Make sure that the output voltage of the external DC power supply
meets the rated voltage of the unit before making a connection.
The output current of the external DC power supply should be large
enough to provide the connected unit with its total amperage needs
with a reasonable margin.
Use the following formula to calculate the total amperage of the unit.
total power consumption ÷ voltage
When the power is turned on, a rush current occurs. If the power
supply is insufficient during this time, the unit may be damaged.
Therefore, we recommend using an external DC power supply that
provides at least twice the total power consumed by the unit. We
also recommend using the proper DC cable recommended for your
external DC power supply.
When using an external power supply other than the AC adapter,
check the DC IN socket pin information to ensure correct polarity. If
a +12 V power supply is accidentally connected to the GND terminal,
this could cause a fire or personal injury.
Dip Switches
The dip switches (4 pins) on the side panel are for factory adjustments
and should not be touched.
<Note>
At the time of shipment from the factory, all of the pins are set to the top
position.
Dip Switches
1
2
3
4
Summary of Contents for AK-HRP200G
Page 43: ...43 Memo ...

