


26
27
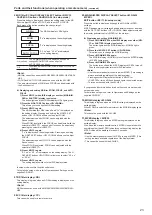
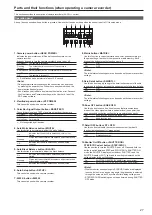
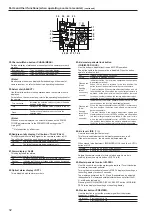
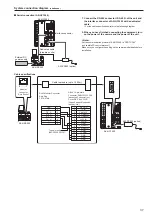
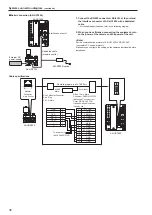
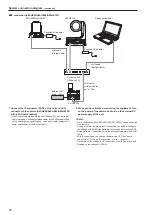
Parts and their functions (when operating a camera recorder)
This section describes the operation of camera recorders (AJ-PX
***
series).
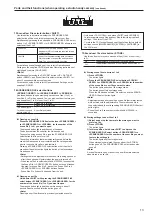
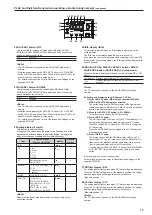
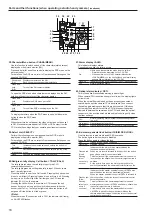
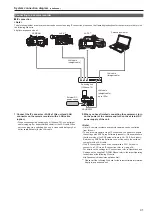
Operation panel
A beep (buzzer) sounds when a button is pressed. However, buttons do not beep when the buzzer is set to Off in setup mode.
AUTO
BLACK
SET UP
WHITE
BARS
TEST
VF
POWER
HEAD
POWER
DTL
OFF
SHUTTER
ON
STEP/SYNC
KNEE
OFF
SKINDTL
MATRIX
5600K
1
2
3
4
5
6
7
8
9 10 11 12
1.
Camera power button <HEAD POWER>
Indicates the power status and IP/serial connection status of the
camera recorder.
It cannot be used to turn the camera recorder's power on or off.
On (green):
The camera is turned on.
Flashing
(green):
The network/serial connection of the camera is
disconnected.
Short flashes
(red)
*
1
:
Network authentication not completed in IP connection
mode.
Off:
The camera is turned off.
*
1
Short flashes have an interval of about 0.5 second.
<Note>
• During network/serial connections, the connection can be broken
by pressing the power button. When the connection is broken, the
power button flashes (green).
• Short flashes (red) indicate a network authentication error. Recheck
the User Name and Password settings in the User Auth. tab of the
ROP setup software.
2.
Viewfinder power button <VF POWER>
This cannot be used with a camera recorder.
3.
Color Bar Signal Output button <BARS/TEST>
The color bar signal and TEST signal are output from the camera.
On (green): TEST signal On
*
1
Off:
Color bar Off
On (yellow): Color bar On
*
1
Not supported by all devices.
4.
Auto White Balance button <WHITE>
Use this button to automatically adjust the white balance.
On:
Indicates that the auto white balance adjustment has
started.
Flashing:
Warns that the automatic white balance adjustment ended
without being completed.
Off:
Indicates that the white balance has been adjusted
correctly.
5.
Auto Black Balance button <BLACK>
Use this button to automatically adjust the black balance.
On:
Indicates that the auto black balance adjustment has
started.
Flashing:
Warns that the automatic black balance adjustment ended
without being completed.
Off:
Indicates that the black balance has been adjusted
correctly.
6.
Auto Setup button <SETUP>
This cannot be used with a camera recorder.
7.
5600 K button <5600K>
This cannot be used with a camera recorder.
8.
Matrix button <MATRIX>
Use this function to correct saturation and color phase according to
the gain setting of each color component in matrix memory. Each
press of the button turns the function on or off.
On:
ON
Off:
OFF
<Note>
The initial status following power on depends on the camera recorder
settings.
9.
Skin Detail button <SKINDTL>
Use this button to apply coring to the detail enhancement of the skin
tone areas to soften or increase the enhancement of skin tone details.
On:
ON
Off:
OFF
<Note>
The initial status following power on depends on the camera recorder
settings.
10.
Knee OFF button <KNEE OFF>
Use this button to cancel the knee function that attenuates those
areas of the video signals where a particular level (knee point) has
been exceeded so that they will not become saturated as easily.
On:
Knee function is canceled. (Knee OFF)
Off:
Knee function is on.
11.
Detail OFF button <DTL OFF>
Use this button to disable the contour enhancement (hard/soft)
function (detail enhancer) of image output.
On:
Detail enhancer off
Off:
Detail enhancer on
12.
Shutter On/Off button <SHUTTER ON>
STEP/SYNC select button <STEP/SYNC>
Use thus button to turn the SHUTTER on or off. Press and hold the
button to switch between STEP and SYNCHRO. In SHUTTER ON
mode, the SHUTTER display select button <SHUTTER> and the
SHUTTER display <SHT> light, and the setting is displayed on the
setting display for about 2 seconds.
On:
SHUTTER ON (STEP/SYNCHRO can be selected)
Off:
SHUTTER OFF (STEP/SYNCHRO can be selected)
<Note>
• Whether shutter speed settings in SYNCHRO mode are displayed
in seconds (sec) or as an opening angle (deg) depends is selected
through the setup mode 22 synchro shutter display setting menu.
• STEP/SYNCHRO switching cannot be performed during SHUTTER
OFF mode.
Summary of Contents for AK-HRP200G
Page 43: ...43 Memo ...


