


10
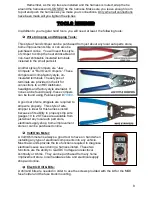
Heat Gun:
Very useful to shrink the heat-shrinkable terminals found in the
parts kit.
Small (10 amp or less) Battery Charger
See
TESTING THE SYSTEM
located on page 145.
Factory Wire Schematic
T
his isn’t absolutely necessary; however, having one handy is
good practice with any electrical job.
PRE-INSTALLATION GUIDELINES
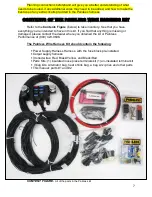
The installation of your wire harness mainly consists of two parts:
• The physical routing and securing of the wire harness, wires, and groups.
• The proper connection of the individual circuits.
These two major tasks are not separate steps, but are combined. That is, you will
route some wires and make some connections, route more wires and make more
connections. Harness routing will depend greatly on mounting locations of things such
as gauges, shifters, lighting lenses/headlights, etc. Harness routing also depends a
great deal on fuse block mounting location and to the extent you want to secure and
conceal the harness. This aspect will be more prominent in the ENGINE SECTION
wiring, where much of the harness is usually visible.
The best pre-installation practice is to become familiar with the harness by
locating each of the harness sections. A good way to do this is by laying out the wire
harness on the floor and identifying each of the section labels found on the harness as
you read through the manual.
The wire index in the back of the second manual will help
to quickly identify each wire in these sections.
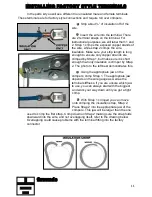
During the install, wires should be
bundled into groups. Use nylon ties, split loom,
or tape.
Exposed wires of the engine
compartment and wires running to the rear of
the vehicles may need some sort of wiring loom
or covering.
Painless offers Power Braid Kit part
#70920 and ClassicBraid #70970 to fill this
need. These kits include everything you will
need to add extra protection to your new
harness.


