background image

9  Program command


77


9.5.24. 

PULSE 

Name 

Set the pulse output mode 

Valid 
mode 

Direct input/program 

PULSE (1 | 2) [, | ] n 

Parameter Data 

range 

Default 

(1 | 2) 

Axis 

1 (select axis 1), 2 (select axis 2) 
If this parameter is omitted, axis 1 will be 
selected. 


Syntax 

n Setting 

for 

pulse 
output 
mode 

1 (1-pulse mode), 2 (2-pulse mode) 

Function 

Sets the pulse output mode.   
Set the mode to either 1-pulse mode (PULSE/DIR.) or 2-pulse mode (CW/CCW). 

Request 0>PULSE1 

0: PULSE1 = 1 
0>PULSE2 
0: PULSE2 = 2 

9.5.25. 

Name System 

request 

Valid 
mode 

Direct input 

R (1 | 2) 

Parameter Data 

range 

Default 

Syntax 

(1 | 2) 

Axis 

1 (select axis 1), 2 (select axis 2) 
If this parameter is omitted, axis 1 will be 
selected. 


Function 

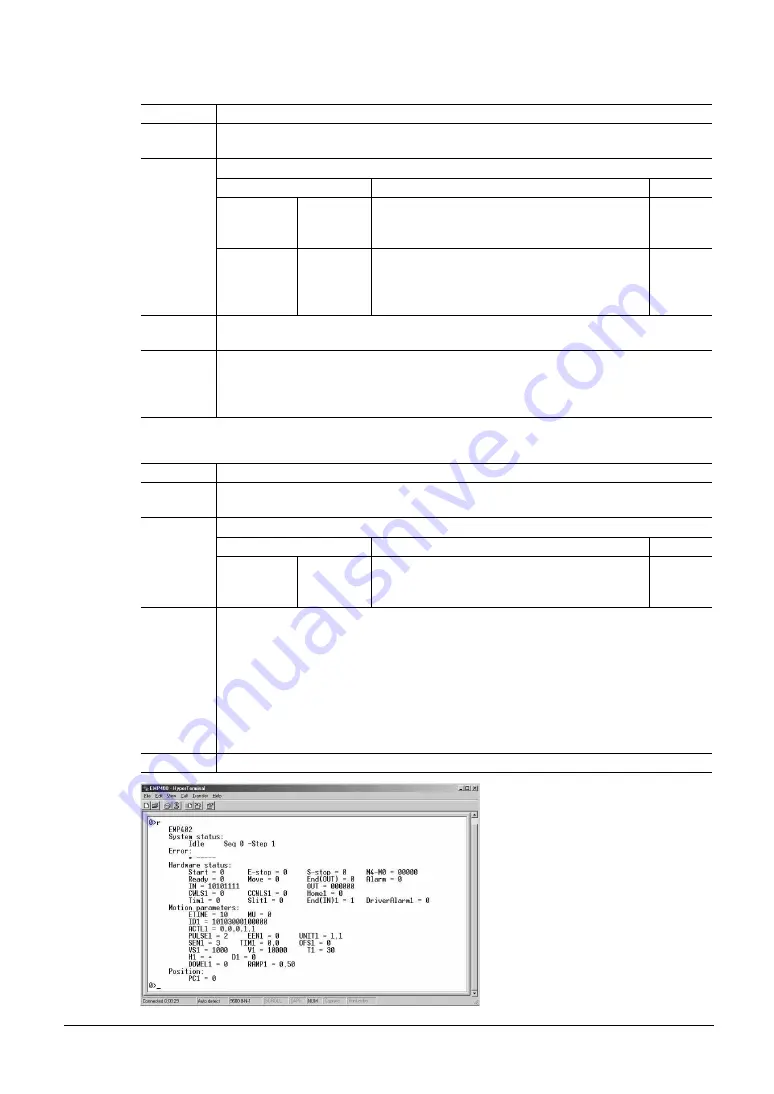
Displays the I/O status, system information and parameter settings for the specified 
axis.  
Product name: Name of the product, name of the product for axis 1, name of the 
product for axis 2 
System status: Operating status 
Error: The last error message displayed 
Hardware status: I/O status of the hardware 
Motion parameters: Present parameter settings 
Position: Current position 

Request 0>R 


Summary of Contents for EMP400 Series

Page 1: ...ERATING MANUAL Thank you for purchasing an Oriental Motor product This Operating Manual describes product handling procedures and safety precautions Please read it thoroughly to ensure safe operation...

Page 2: ...d exiting HyperTerminal 26 7 3 1 Verifying the communication method 26 7 3 2 How to start HyperTerminal 27 7 3 3 How to exit HyperTerminal 29 7 4 Write a sequence program 29 7 4 1 Writing a program wi...

Page 3: ...onitor mode 91 10 4 Edit mode 92 10 5 Teaching mode 93 10 5 1 Operation in teaching mode 94 10 5 2 Operation in HOME mode 95 10 5 3 Operation in step execution mode 96 10 5 4 Operation in speed settin...

Page 4: ...n a separate medium in case a mishap should occur Hazardous substances RoHS Directive 2002 95 EC 27Jan 2003 compliant Main features Writing a sequence program on a PC You can download the sequence pro...

Page 5: ...power supply for I O Host controller 24 VDC power supply for the main unit 24 V Communication cable FC04W5 sold separately GND 24 V GND PC Driver Motor or Linear Rotary Actuator Driver Motor or Linear...

Page 6: ...inspecting the product Failure to do so may result in fire or injury Installation Install the controller and data setter in enclosures in order to prevent injury Do not place any equipment that gener...

Page 7: ...that the entire equipment will operate safely in the event of a system failure or malfunction Failure to do so may result in injury Before supplying power to the controller turn all output signals to...

Page 8: ...ke the following anti noise measures to prevent malfunction of the controller driver and motor due to external noise Wiring the I O cable For I O cables use a shielded cables with connectors sold sepa...

Page 9: ...er 1 unit I O connector 50 pins 1 set EMP401 2 and EMP402 2 only EMP401 2 and EMP402 2 only AXIS connector 26 pins EMP401 2 1 set EMP402 2 2 sets Operating manual 1 copy Model Connector included Molex...

Page 10: ...a CONFIG program Number of program lines 1000 lines Parameters Starting speed 10 to 200 kHz 1 Hz increments Operating speed 10 to 200 kHz 1 Hz increments Acceleration rate 0 5 to 1000 ms kHz 0 1 ms k...

Page 11: ...ct sun Area free of excessive amount dust iron particles or the like Area not subject to splashing water rains water droplets oil oil droplets or other liquids Area free of excessive salt Area not sub...

Page 12: ...controller until the DIN lever locks in place 2 Secure each end of the controller using the end plates Tab DIN rail DIN lever Installing the controller with screws Install the controller on a metal p...

Page 13: ...22 24 26 17 19 21 23 25 I O connector AXIS connector 1 Solder the cable to the connector pins The cable is not included in the package Use a multi core overall shielded twisted pair cable of AWG28 0...

Page 14: ...polarity Note For the power cable use the cable of AWG20 0 5 mm 2 or more in diameter Any cable with a smaller diameter may cause heat generation 3 Tighten terminal screws at a tightening torque of 0...

Page 15: ...V 2 8 IN1 input 33 M0 input 9 IN2 input 34 M1 input 10 IN3 input 35 M2 input 11 IN4 input 36 M3 input 12 IN5 input 37 M4 input Selection of sequence program number 13 IN6 input 38 No connection 14 IN...

Page 16: ...nce program 99 will be executed START input This terminal is used to input the signal for starting the sequence program The sequence program is executed once the START input is turned on S STOP input...

Page 17: ...executed If a LS or LS signal is input an alarm will be output when a motor operation command INC or ABS is executed Executing a MHOME or SCAN command will cause the motor to pull out of the LS range...

Page 18: ...ram selection General purpose input Control output ALM MOVE READY END 25 mA or less 25 mA or less 25 mA or less 25 mA or less OUT1 OUT6 25 mA or less General purpose output COM COM 25 mA or less 5 to...

Page 19: ...output Counter clear 5 END input END signal from driver 18 GND GND signal from driver 6 TIM input Timing signal from driver 19 No connection 7 ALM input Alarm signal from driver 20 No connection 8 LS...

Page 20: ...lose depending on the model If an alarm signal input is fed while the motor is in operation the motor will decelerate to a stop and the sequence program will stop also No pulse can be output while ala...

Page 21: ...minals are used to output pulses Information in parentheses is for 1 pulse output mode In the 1 pulse output mode the motor will rotate in the CW direction with the DIR output turned on and in the CCW...

Page 22: ...5 VDC GND 5 26 5 V output 5 Power supply for TIM 20 mA max 25 0 V 0 V 0 V 0 V 0 V 8 10 11 9 20 mA or less 5 6 7 FG FG 1 Connect the END input 5 pin when using an or servo motor 2 Do not connect the TI...

Page 23: ...Connection 23 6 5 Communication cable connection CN2 6 5 1 Connection method Communication cables are used to connect a PC and the operational unit Plug the communication cable connector into CN2 CN2...

Page 24: ...t each press of the key Input commands using a line editor 1 Connect the controller with a PC See section 7 3 Starting and exiting HyperTerminal on p 26 2 Use a line editor to save commands to the con...

Page 25: ...ough 31 Additionally sequence program number 99 can be written as an automatically executable program See section 8 3 Automatic program execution on p 52 A total of 1000 lines can be configured for th...

Page 26: ...1 Start the PC and open System in the control panel The System window then appears 2 Select the Device Manager tab The Device window then appears 3 Verify that there is Communication Port COM under P...

Page 27: ...able purchased separately 3 Start the PC 4 Click on the Start Program Accessories Communication and HyperTerminal icons to start HyperTerminal 5 Type in a name for the connection e g EMP401 then selec...

Page 28: ...8 Parity None Stop bit 1 Flow control None Note The connection method may vary depending on the PC For details see the operating manual for your PC 8 Power on the controller The HyperTerminal screen...

Page 29: ...quired only after the initial connection For subsequent connections you may start HyperTerminal simply by double clicking the icon 7 4 Write a sequence program 7 4 1 Writing a program with a line edit...

Page 30: ...sequence program is empty You can now write a new sequence program 3 See Chapter 9 Program command on p 53 to enter commands and parameters in order to write a sequence program The example sequence pr...

Page 31: ...iate corrective action 7 4 2 Writing a program with a text editor A sequence program may be written using a text editor on your PC The sequence program should then be saved in text format for download...

Page 32: ...to press the Enter key at least once 5 One text file can contain more than one sequence program 6 The line number may be omitted A space may be entered 7 Any character string entered following will be...

Page 33: ...HyperTerminal If you attempt to download the program while running other applications the motor may move abruptly 1 See section 7 3 Starting and exiting HyperTerminal on p 26 to connect the controller...

Page 34: ...will be correctly received by the controller Since no command exists in the cancelled line the error sequence program if executed will be halted at the cancelled line Correct any error sequence progra...

Page 35: ...aded at once 1 See section 7 3 Starting and exiting HyperTerminal on p 26 to connect the controller with a PC and start HyperTerminal 2 Start a text editor 3 Create and save a new text file Add the tx...

Page 36: ...ll of the sequence programs Then press the Enter key A message appears prompting you to select text capture Start TEXT CAPTURE 7 Select Capture Text from the Transfer menu of HyperTerminal The Capture...

Page 37: ...yed 14 Open the text file you saved and check to see that the sequence program has been uploaded correctly Memo If you try to save a new sequence program to an existing text file the program will be a...

Page 38: ...a new sequence program Use a DEL command to delete a sequence program For details refer to 9 5 Command details on p 62 7 5 1 Checking the number of steps Start HyperTerminal type in EDIT and press the...

Page 39: ...uence program number Insert a space between EDIT and the sequence program number The content of the selected sequence program is displayed for editing 2 Enter the command and line number according to...

Page 40: ...MHOME1 Seq 1 1 LOOP 5 2 V1 20000 3 D1 1200 4 ABS1 5 DELAY 1 6 ENDL Before edit After edit Add the DELAY command between the fourth and fifth lines Change the fourth line from INC 1 to ABS 1 Delete MH...

Page 41: ...7 Writing and editing a sequence program 41 b Type in ABS 1 c Press the Enter key The fourth line of sequence program 1 is changed to ABS 1 and you can now enter another command for editing...

Page 42: ...ting a sequence program 42 3 Follow the steps below to insert DELAY 1 between the fourth and fifth lines a Type in I 5 and press the Enter key The fifth line is added and now ready for command entry b...

Page 43: ...fifth line of sequence program 1 and the subsequent line number is changed You can now enter another command for editing 4 Follow the steps below to delete MHOME 1 from the seventh line a Type in D 7...

Page 44: ...7 Writing and editing a sequence program 44 b Type in Y c Press the Enter key The seventh line of sequence program 1 is deleted and you can now enter another command for editing...

Page 45: ...editing a sequence program 45 7 5 3 Quitting the program editing 1 Type in the Q command to quit the program editing 2 Press the Enter key This completes the program editing and the 0 command prompt...

Page 46: ...The nth line will be deleted Empty Direct Insert Mode ESC Q exit The sequence program is empty A new program may be written End TEXT CAPTURE Stop Text Capture of HyperTerminal Insert line n The nth li...

Page 47: ...ou can select and execute a sequence program via the host controller See section 8 2 Program execution via the host controller on p 48 Automatic program execution The sequence program you have written...

Page 48: ...gram No M4 M3 M2 M1 M0 Sequence program No M4 M3 M2 M1 M0 0 OFF OFF OFF OFF OFF 16 ON OFF OFF OFF OFF 1 OFF OFF OFF OFF ON 17 ON OFF OFF OFF ON 2 OFF OFF OFF ON OFF 18 ON OFF OFF ON OFF 3 OFF OFF OFF...

Page 49: ...EADY output END output MOVE output CW P output CCW P output 3 ON OFF ON OFF ON OFF OFF ON OFF ON OFF ON ON OFF ON OFF ON OFF INC Seq 1 Seq 3 SCAN 1 ms or less 1 ms or more 1 1 ms or less 0 ms or more...

Page 50: ...E STOP input is fed and the operation then resumes Motor E STOP input M0 to M4 inputs READY output ALM output MOVE output CW P output CCR output START input ON OFF ON OFF ON OFF OFF ON OFF ON OFF ON...

Page 51: ...operation when an alarm signal ALM input is fed from the driver during operation and the operation then resumes Motor ALM input M0 to M4 inputs READY output ALM output MOVE output CW P output START i...

Page 52: ...gnal is on 2 When the E STOP input signal is off 3 Upon occurrence of NVRAM sequences checksum error Memo If the driver alarm signal is not used or when the driver alarm logic is set at normally open...

Page 53: ...r a comma between one parameter 1 and another parameter 0 For a command that requires you to specify an axis after entering the command enter the axis to specify If no axis is entered it is assumed th...

Page 54: ...pecify the settings for sensors and drivers Commands entered into sequence program 99 can automatically configure hardware when the power is turned on A command setting is valid until changed by anoth...

Page 55: ...ount of movement or position data 0 p 64 DOWEL Sets the operation interval 0 p 65 H Sets the rotational direction CW direction p 70 MU Sets parallel processing 0 p 75 RAMP Sets the acceleration decele...

Page 56: ...tion Absolute operation Mechanical home seeking Continuous operation Linear acceleration deceleration Jerk limit control 2 axis linear interpolation operation Multistep speed change operation Escape f...

Page 57: ...ordinates have upper and lower limits manageable coordinate range If the counter value lies outside the manageable coordinate range the controller cannot count the number of pulses Incremental operati...

Page 58: ...p 84 Note Sequence programs are stored in the EEPROM The EEPROM allows 100 000 rewrites The EDIT command rewrites the EEPROM after editing a step The DWNLD command rewrites the EEPROM after downloadin...

Page 59: ...in the command string This special key can handle three patterns which are CR 0x0A LF CR 0x0D 0x0A and CR LF 0x0A 0x0D Example 0 MHOME1 ENTER Executes mechanical home seeking ESC Name Escape discard i...

Page 60: ...ENDL Ends a loop section p 68 ETIME Sets the time for END output 10 ms p 69 H Sets the rotational direction CW direction p 70 ID Initializes linear motion products 10 103 000 100 000 p 70 IN Checks g...

Page 61: ...r mode p 81 T Sets the acceleration deceleration rate 30 ms kHz p 82 TIM Sets the usage of TIM input and SLIT input TIM input 0 not used SLIT input 0 not used p 82 UNIT Sets the unit of movement Unit...

Page 62: ...external S STOP input In a 2 axis linear interpolation operation the axis whose movement amount set by a D command is greater becomes the main axis while the other axis becomes the sub axis The speed...

Page 63: ...figuration Request 0 ACTL1 0 ACTL1 0 0 0 1 1 0 ACTL2 0 ACTL2 0 1 0 1 1 9 5 3 CJMP Name Conditional jump Valid mode Program CJMP n1 n2 n3 Parameter Data range Default n1 General purpose input number sp...

Page 64: ...0 Function Movement amount is set for incremental operation while position data is set for absolute operation If the direction is set by or the direction for the H command changes as well This settin...

Page 65: ...seconds Two digits after the decimal point are valid To set a fractional value enter the integral part first for instance as 0 12 Function Once the set time has elapsed the program moves to the next...

Page 66: ...pulses 1000 pulses INC command in step 3 INC command in step 4 DOWEL command setting 10 ms 9 5 8 DWNLD Name Download Valid mode Direct input DWNLD Parameter Data range Default Syntax Function Download...

Page 67: ...8 0Steps Seq 19 0Steps Seq 20 0Steps Seq 21 0Steps Seq 22 0Steps Seq 23 0Steps Seq 24 0Steps Seq 25 0Steps Seq 26 0Steps Seq 27 0Steps Seq 28 0Steps Seq 29 0Steps Seq 30 0Steps Seq 31 0Steps Config 0S...

Page 68: ...ge Default Syntax Function Ends a sequence program When this command is executed during continuous operation the motor will decelerate to a stop Request 9 5 12 ENDL Name End loop section Valid mode Pr...

Page 69: ...the diagram Motor operation END output ETIME setting value If the next positioning operation ends while the END output is on the END output will turn on for the amount of time set by the ETIME comman...

Page 70: ...2 select axis 2 If this parameter is omitted axis 1 will be selected Syntax n ID 14 digits 10 103 000 100 000 Function By entering the ID of the linear motion product initialization of the controller...

Page 71: ...ost controller on p 108 or section 12 2 Speed change operation by the host controller on p 108 9 5 17 INC Name Incremental positioning operation Valid mode Direct input program INC 1 2 C Parameter Dat...

Page 72: ...Function Jumps to the specified line number If the specified line number is not found in the sequence program the sequence program will stop Request 9 5 19 LOOP Name Set a loop Valid mode Program LOO...

Page 73: ...the sensor located at the reference point for positioning operations i e mechanical home position Home detection can be done either by a 2 sensor mode constant speed operation or a 3 sensor mode high...

Page 74: ...echaninal home seeking CW CW CCW LS LS HOMELS Starting direction of mechaninal home seeking CCW CW CCW LS LS HOMELS Between HOMELS and LS CW CCW LS LS HOMELS CW CCW LS LS HOMELS HOMELS CW CCW LS LS HO...

Page 75: ...parallel processing 2 INC1 Positioning operation for the first axis 3 DELAY1 Stands by for one second 4 INC2 Positioning operation for the second axis 5 OUT1 1 Turns on general purpose output 1 Secon...

Page 76: ...ssage will be displayed when mechanical home seeking is executed Pulse range 16 777 215 pulses 0 Function Sets the offset from the home position used in mechanical home seeking Request 0 OFS 0 OFS1 10...

Page 77: ...PULSE1 0 PULSE1 1 0 PULSE2 0 PULSE2 2 9 5 25 R Name System request Valid mode Direct input R 1 2 Parameter Data range Default Syntax 1 2 Axis 1 select axis 1 2 select axis 2 If this parameter is omit...

Page 78: ...o positioning continuous and mechanical home seeking operations excluding the 2 axis linear interpolation operation Jerk limit time will be valid when the acceleration deceleration pattern is set to j...

Page 79: ...ration will immediately stop the operation Execute a RESET command after ending the operation by executing a S command pressing the ESC key or turning on a S STOP input externally 9 5 28 RTNCR Name Cl...

Page 80: ...deceleration rate and rotational direction are to be set prior to this command Operation can be ended by an S command ESC key or by an external S STOP input A multistep speed change operation can be p...

Page 81: ...on modes There are two operation modes for mechanical home seeking the 2 sensor mode constant speed operation and the 3 sensor mode high speed operation Choose the mode according to the number of sens...

Page 82: ...ode Direct input program TIM 1 2 n1 n2 Parameter Data range Default 1 2 Axis 1 select axis 1 2 select axis 2 If this parameter is omitted axis 1 will be selected n1 TIM input usage 0 not used 1 used 0...

Page 83: ...n of step angle is 1 Warning Depending on the setting in the D command the motor may rotate more than you had expected causing a dangerous situation When setting is performed with a UNIT command alway...

Page 84: ...output Unit value when there is no gear and the micro step function is used number of divisions is 10 UNIT1 0 72 10 With D1 90 1250 pulses will be output Basic step angle 0 72 50 0 0144 Unit value whe...

Page 85: ...n operation becomes valid immediately resulting in a multistep speed change operation Request 0 V1 0 V1 10000 0 V2 0 V2 20000 9 5 38 VS Name Set starting speed Valid mode Direct input program V 1 2 n...

Page 86: ...s Operating ambient temperature 0 to 50 C 32 to 122 F non freezing Operating ambient humidity 20 to 85 non condensing Area that is free of explosive atmosphere or toxic gas such as sulfuric gas or liq...

Page 87: ...Plug the supplied cable s modular connectors into the connector port on the operational unit and the CN2 terminal on the controller When disconnecting the cable pull out the cable while lightly pushi...

Page 88: ...ll be displayed based on the operation When the value is negative the empty space to the left will display a minus sign This illuminates when the MON mode is selected This illuminates when the EDIT mo...

Page 89: ...Note When a sequence program is running or when the motor is operating the mode cannot be switched to edit mode or teaching mode in order to prevent a malfunction 10 2 3 Entering and saving numeric va...

Page 90: ...t rightmost digit 2 Confirm that the blinking is at the lowest and rightmost digit then press A decimal point and the first digit after the decimal point will be displayed while the highest leftmost d...

Page 91: ...tion of axis 1 and illuminates the AX1 LED If the movement amount unit has been set with the UNIT command the display will be in movement units If the value is negative the space to the left will disp...

Page 92: ...he four digits after the hyphen 4 Press after entering the sequence program number and the line number The movement amount set in the D command will be displayed The rightmost digit will blink Memo If...

Page 93: ...ion mode In this mode the work position is corrected while running a sequence program Speed setting mode In this mode the starting speed operating speed and acceleration deceleration rate during teach...

Page 94: ...ce program not found will be displayed for one second after which the control will return to step 3 5 Move the work with or to correct the position The data display will show the work position in real...

Page 95: ...simultaneously and hold them down for at least one second to switch to HOME mode The data display will show Ho 4 With and select the axis on which mechanical home seeking is to be performed If the fir...

Page 96: ...ng mode The data display will show tC00 0000 and the digit before the hyphen will blink The TEACH LED will illuminate 3 Press and simultaneously and hold them down for at least one second to switch to...

Page 97: ...erformed as long as the key is held down If is pressed while a continuous operation is performed by holding down or continuous operation at the operating speed will be performed as long as key is held...

Page 98: ...starting speed operating speed or acceleration deceleration rate with or At the leftmost portion of the data display area the starting speed will show vs the operating speed will show vr and the accel...

Page 99: ...setting mode Press both and simultaneously and hold for at least one second Press both and simultaneously and hold for at least one second Press both and simultaneously and hold for at least one seco...

Page 100: ...explains the errors displayed by the OP300 Error display Description Communication between the EMP400 Series and the OP300 could not be performed normally Remedial action While the OP300 is connected...

Page 101: ...the controller illuminates If an alarm is generated check the error message displayed on the PC HyperTerminal Refer to section 11 2 Error messages on p 103 and respond accordingly ALARM LED turns on...

Page 102: ...it sensor output logic for the driver does not match the output logic of the controller Set the output logic for each signal depending on the specifications for the driver and limit sensor See ACTL co...

Page 103: ...ops continuous operation The motor decelerates to a stop and the sequence program stops The START input turned on when a sequence program was being executed An operation command was input from HyperTe...

Page 104: ...echanical home position Continuous operation starts an operation in the rotational direction opposite to the stopped LS regardless of the rotational direction setting The operation stops when the cont...

Page 105: ...espectively The positions of LS and LS are too close to the position of HOMELS Separate HOMELS from LS so that LS and HOMELS do not turn on at the same time Check the connection between the controller...

Page 106: ...ntroller has been corrupted because power was lost while writing data into the EEPROM Delete all sequence programs and ID data then reenter the sequence program Data could not be written correctly due...

Page 107: ...am number S STOP switch active An operation command has been input or an attempt to run the sequence program was made while the S STOP input was on Turn off the S STOP input Syntax error There is a mi...

Page 108: ...2000 Set the movement amount to 2000 8 H1 Sets the rotational direction to CW 9 INC1 Executes an incremental positioning operation IN1 input Motor operation END output 12 2 Speed change operation by...

Page 109: ...ms kHz 3 VS1 500 Sets the starting speed to 500 Hz 4 V1 1000 Sets the operating speed to 1000 Hz 5 H1 Sets the rotational direction to CW 6 SCAN1 Execute continuous operation 7 DELAY 1 Sets the delay...

Page 110: ...ed to 500 Hz 5 V1 1200 Sets the operating speed to 1200 Hz 6 H1 Sets the rotational direction to CW 7 MHOME1 Executes mechanical home seeking 8 LOOP 5 Repeats steps 8 through 12 five times 9 D1 25 Set...

Page 111: ...Hz 5 V1 1200 Sets the operating speed to 1200 Hz 6 H1 Sets the rotational direction to CW 7 MHOME1 Executes mechanical home seeking 8 LOOP 5 Repeats steps 8 through 12 five times 9 D1 9 Sets the amou...

Page 112: ...n rate to 50 ms kHz 4 VS1 500 Sets the starting speed to 500 Hz 5 V1 1200 Sets the operating speed to 1200 Hz 6 H1 Sets the rotational direction to CW 7 MHOME1 Executes mechanical home seeking 8 LOOP...

Page 113: ...o 1000 Hz 5 V1 3000 Sets the operating speed to 3000 Hz 6 H1 Sets the rotational direction to CW 7 T1 10 Sets the acceleration deceleration rate to 10 ms kHz 8 MHOME1 Executes mechanical home seeking...

Page 114: ...ller connection cable One end of this shielded cable has a half pitch connector that can be quickly connected to a driver while the other end has a dedicated EMP400 Series connector Model Length CC01E...

Page 115: ......

Page 116: ...y form of performance guarantee Oriental Motor is not liable whatsoever for the performance of these third party products Copyright ORIENTAL MOTOR CO LTD 2006 Printed on Recycled Paper Please contact...

Reviews: