3 Functions of NB-Designer
3-202
NB-series Programmable Terminals NB-Designer Operation Manual(V106)
Example: Making NUM Keyboard
Number (0 to 9) keys, Float, Minus sign, Enter, CLR and Backspace keys are required in the
keyboard.
Step 1: Create a new project and make the layout of the NUM keyboard.
Firstly add the new screen “Frame 10” and open [Screen Property], then perform the screen
operations such as setting the Width, Height and the border width to be 160, 200 and 2
respectively, setting the Frame Color, checking [Screen Attribute] and setting it to be “Keyboard
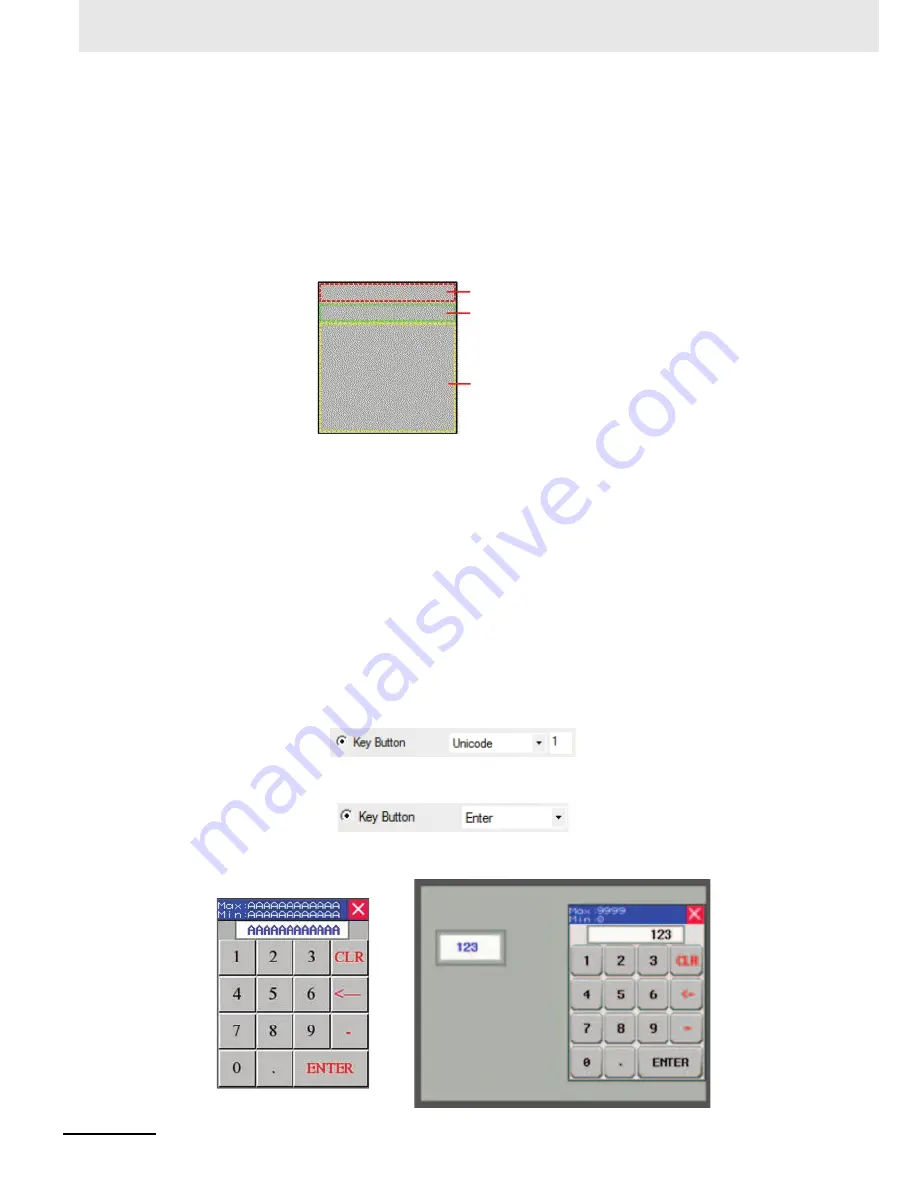
page”. Finally divide Frame10 into three areas, i.e. Screen control area, Input Display area and
Keyboard area, as shown below.
Step 2: Add the required components for the keyboard.
(1) Firstly, add one Function Key as screen title bar into the Screen control area, in this case,
select “Title bar on Pop-up Screen”.
(2) Add two Text Display components for displaying the ranges of the maximum and the
minimum for the Number Input, where the [Read Address] are LW9180 (LW9180 ~ LW9187
is the system special memory for displaying the maximum of Number Input) and LW9190
(LW9190 ~ LW9197 is the system special memory for displaying the minimum of Number
Input) respectively and [Word Length] are both 6.
(3) Add one Function Key to close keyboard screen, i.e. to check [Key Button] and select
“Escape”.
(4) Add one Text Display component to input display box in the Display area with [Read
Address] set to LW9070 (LW9060 ~ LW9075 is the special memory which works as the
buffer of Number Input or Text Display Input.) and [Word Length] set to 6.
(5) Add twelve Function Keys as Character Input Keys in the Keyboard area. Take an example
to input [1]: Select “Unicode” after selecting [Keyboard Function], then input “1” in Input
area. And the operation for the other characters is similar to this operation.
Add three Function Keys as the special keys, i.e. select “Clear”, “Backspace” and “Enter”
respectively after selecting [Key Button] for the three Function Keys.
The final effects of the editing screen and the test are shown as the lower left and lower right
graphics respectively.
Screen control area
Display area
Keyboard area
Summary of Contents for NB10W-TW01B
Page 4: ......
Page 10: ...Terminology 6 NB series Programmable Terminals NB Designer Operation Manual V106 ...
Page 528: ...8 Web Interface 8 10 NB series Programmable Terminals NB Designer Operation Manual V106 ...
Page 544: ...Appendices A 16 NB series Programmable Terminals NB Designer Operation Manual V106 ...
Page 546: ...Revision 2 NB series Programmable Terminals NB Designer Operation Manual V106 ...
Page 547: ......


