background image

MF 64 

Author: Donato Gavino Murru [email protected] 

Pag. 

22

 a 

179


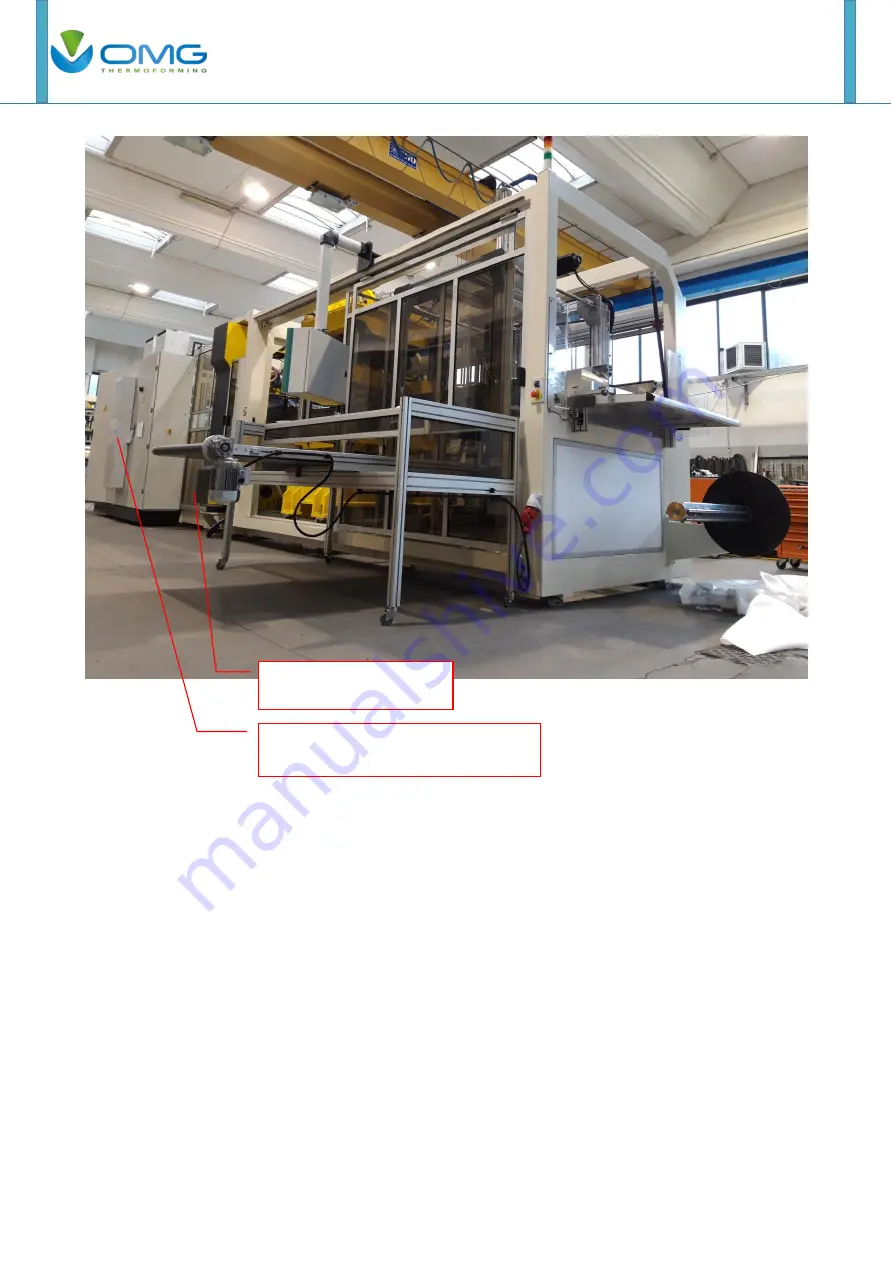
Front side 


Electrical cabinet - Security doors 
with door lock release control 

Sliding security doors 

Summary of Contents for MF 64

Page 1: ...2020 Donato Gavino Murru donato gavino murru omgitaly com OMG Forming Machine Model MF 64 Matr nr 1490 Construction year 2020 INSTRUCTIONS FOR USE ORIGINAL INSTRUCTIONS...

Page 2: ...ing the most common operations that can be done in conformity with security laws It is a simple guide of use Proper use and handling of the machine will ensure proper product performance will lengthen...

Page 3: ...d wait for the least 15 minutes to allow the power to discharge before handling or working with the product Never attempt to disassemble the product 4 We recommended that you add the following precaut...

Page 4: ...use 17 General advising 17 Features 18 Noise 18 List of functional groups 19 Interchangeable tools 19 Dimension of the machine 20 Safety 21 General considerations for the purposes of the CE directive...

Page 5: ...ction 74 Unpacking positioning and assembly 75 Main Spare Parts 76 Safety 76 Touch Screen 77 General Description 77 Schematic 78 Main Spare Parts 79 Troubleshooting 79 Safety 79 Remote Assistance 80 M...

Page 6: ...Setup 115 Heater carriage speed adjustment in and out of the machine 117 Adjustment of the sagging sensor for non woven film indexing 118 Set up for the power intensity of ceramic heating elements 11...

Page 7: ...ption 157 Schematic 158 Common Adjustments 159 Stacker mode type G 163 Automatic Cycle 166 Main Spare Parts 168 Troubleshooting 169 Safety 169 Scrap Wrap Device 170 General Description 170 Schematic 1...

Page 8: ...situations which if not avoided could result in death or serious injury CAUTION SIGNAL Indicates a potentially hazardous situations which if not avoided may result in minor or moderate injury or prop...

Page 9: ...n electric shock Installation operation maintenance or inspection must be performed by authorized personnel Not doing so may result in electric shock or injury Wiring or inspection must not be perform...

Page 10: ...ing so may result in fire electrical shock or damage to the devices Locations subject to sunlight Locations subject to temperatures or humidity outside the range specified in the specifications of ele...

Page 11: ...the specified clearances between all the device Provide also to the correctly lubrication like is indicated in the maintenance tables Not doing so may result in fire or malfunction Do not apply any st...

Page 12: ...al breakers and take other safety measures against short circuiting in external wiring Insufficient safety measures short circuiting may result in burning Take appropriate and sufficient countermeasur...

Page 13: ...you provide to demounting some parts from the machine must be sure to re connecting in same place and in same way that is provided form OMG Doing so may result in unstable operation and injury When an...

Page 14: ...roduct as shown in the following Item Description Label for CE Other safety 1 It s the label that define that the machine is marked 2 General values of consumption type of machine number of electrical...

Page 15: ...d to pay attention and prevent death or injury 6 Place in which there is residual risk to injury for the operator 7 Place in which there is residual risk to hot surface for the operator 8 Stop of warn...

Page 16: ...erent groups of components in the automatic process The first phase of the thermoforming process is called heating The plastic sheet is heated by infrared resistors at a temperature according to the s...

Page 17: ...taly com Pag 16 a 179 Allowed working materials Present equipment has been studied for working the following materials Name Material Description Sound TEx C1986S NON WOVEN MATERIAL Non woven fabric ma...

Page 18: ...ss recommended or approved by OMG and are in good working order so they can guarantee a safety process without any danger for the operator General advising OMG forming machine was engineered to guaran...

Page 19: ...ing index 150 mm Max sheet width 850 mm Max depth drawing top 150 mm Max depth drawing bottom 150 mm Min Pneumatic work pressure For general purpose 4 bar 60 PSI Max Pneumatic work pressure For genera...

Page 20: ...Press tables It gives shapes to the film accordingly to the mold 4 Cutting Press Cut the plastic sheet according to the shape of products and of the die cutting blades 5 Stacker Device for stacking an...

Page 21: ...MF 64 Author Donato Gavino Murru donato gavino murru omgitaly com Pag 20 a 179 Dimension of the machine Lifting and transport Weight 20 Ton...

Page 22: ...led on the machine red mushroom pushbuttons in yellow field self holding type The buttons are located on the front of the machine one in the film entry area one in the control selector area one on the...

Page 23: ...MF 64 Author Donato Gavino Murru donato gavino murru omgitaly com Pag 22 a 179 Front side Electrical cabinet Security doors with door lock release control Sliding security doors...

Page 24: ...MF 64 Author Donato Gavino Murru donato gavino murru omgitaly com Pag 23 a 179 Left Side Fixed safety guards...

Page 25: ...MF 64 Author Donato Gavino Murru donato gavino murru omgitaly com Pag 24 a 179 Right Side Fixed safety guards...

Page 26: ...MF 64 Author Donato Gavino Murru donato gavino murru omgitaly com Pag 25 a 179 Rear Side Sliding security doors Fixed safety guards...

Page 27: ...MF 64 Author Donato Gavino Murru donato gavino murru omgitaly com Pag 26 a 179 Sliding security door Safety micro switches mounted inside the machine on each sliding door Tamper proof screws...

Page 28: ...Gavino Murru donato gavino murru omgitaly com Pag 27 a 179 Location of the emergency buttons Emergency button on machine input material insertion Emergency button on the oven area Emergency button on...

Page 29: ...MF 64 Author Donato Gavino Murru donato gavino murru omgitaly com Pag 28 a 179 Emergency button on the unloading area scrap winding device Description of Safety Functions...

Page 30: ...MF 64 Author Donato Gavino Murru donato gavino murru omgitaly com Pag 29 a 179 Machines guards Manual reset function Emergency stop function...

Page 31: ...MF 64 Author Donato Gavino Murru donato gavino murru omgitaly com Pag 30 a 179 SRP CS components...

Page 32: ...ictly forbidden to tamper with the safety devices and to remove the installed repairs to guarantee personnel safety It is strictly forbidden to use the machine in places subject to explosion risk Misu...

Page 33: ...re that the loading unloading and control stations are free from obstacles that could cause the operator to lose balance Before installing the machine make sure that the power supplies air electricity...

Page 34: ...he machine is equipped with a consent switch integrated in the safety system Electrical system The machine is equipped with a sectioning device the drives are all interlocked by the safety system of t...

Page 35: ...and emergency switches which act on the safety system of the control system preventing unexpected starts in the presence of personnel Setup mode The machine is equipped with interlocked guards which...

Page 36: ...R 1 Accesso alle zone pericolose Pericolo di schiacciamento cesoiamento e urto La macchina dotata di interruttore di consenso progettato come una parte del associata al sistema di sicurezza del siste...

Page 37: ...emergenze Danni causati dall incapacit di porre il macchinario in condizioni di sicurezza a seguito di una situazione di emergenza 4 2 2 2 32 La macchina dotata di interruttori di arresto in prossimi...

Page 38: ...resenza di personale 4 1 1 1 4 12 Modalit di messa a punto Pericoli di urto schiacciamento e cesoiamento derivanti da un movimento imprevisto da parti della macchina 4 2 2 2 32 La macchina dotata di r...

Page 39: ...nd preserve components integrity during transport some parts of the machine are removed or securely attached to the main structure Note The enroller device will be disassembled by untighten the screws...

Page 40: ...MF 64 Author Donato Gavino Murru donato gavino murru omgitaly com Pag 39 a 179 Electrical plugs for enroller Enroller Unwind Air connection Enroller Unwind Air connection...

Page 41: ...ino Murru donato gavino murru omgitaly com Pag 40 a 179 Note The ovens carriage is locked in forward position to avoid possible swings during transportation and the ovens support is removed because of...

Page 42: ...MF 64 Author Donato Gavino Murru donato gavino murru omgitaly com Pag 41 a 179 Plates to be reassembled on the support Don t forget to remove these vertical bars when support is re putted in position...

Page 43: ...ock wood pieces rear right and left the locked ovens carriage during transportation Note Re position the manifold for chiller and thermoregulator water connections on the rear side of machine frame Do...

Page 44: ...osition the chiller and thermoregulator on the rear of the machine and re Connect the plugs and pipes of chiller and thermoregulator every pipe and wire have one plate where you need to plug Chiller T...

Page 45: ...79 Note Re fill water on chiller and thermoregulator circuit also follow instruction of chiller and thermoregulator manual Add 20 30 of glycol Re connect pipes on the chiller Re connect plugs of chill...

Page 46: ...onnection 2 Chiller water Outlet connection 3 Thermoregulator water Inlet connection 4 Thermoregulator Water Outlet Connection 5 Electrical valve for Delivery of cooling water to the chain rails 6 Ele...

Page 47: ...Note Fix at same way at the opposite side the fix saftey panel Note Fix the first rear safety panel Fix the lateral rear door on the machine frame by using the Hex screws Fix the switch door detection...

Page 48: ...d rear safety panel Note Connect the first and the second rear safety panel Fix the rear safety panel on the machine frame by using the 2 Hex screws Take look how will be the situation after the first...

Page 49: ...nato Gavino Murru donato gavino murru omgitaly com Pag 48 a 179 Note Re Connect flashing light for machine signaling with the two screws Connect the first and second rear panel by using platens and th...

Page 50: ...he little cabinet for machine control Open the little cover on the video control support arm This is needed to drive the cables inside the arm to re connect to the control panel Fix the arm of the con...

Page 51: ...Author Donato Gavino Murru donato gavino murru omgitaly com Pag 50 a 179 Note Re plug the wires and cables inside the control cabinet please check also the electrical drawing annexed to the documenta...

Page 52: ...esistors for the trim press platens servomotors will be removed and must reinstalled as showed in next pictures Electrical brakes resistors in position Open the doors of the main cabinet Fix the elect...

Page 53: ...vino Murru donato gavino murru omgitaly com Pag 52 a 179 Tight the screws from the sockets to unlock the wires related to the Electrical brakes resistors Use the grey systems for introducing the cable...

Page 54: ...Murru donato gavino murru omgitaly com Pag 53 a 179 Note Fixing the main cabinet conditioner and re connect Put 2 lifting eyebolts and lift the conditioner near the door Fix the conditioner to the do...

Page 55: ...ru omgitaly com Pag 54 a 179 Note The cutting press and the stacking device are locked at the frame also Before using the machine the supports must be removed Re plug the cables of the conditioner Rem...

Page 56: ...donato gavino murru omgitaly com Pag 55 a 179 Remove this lock systems in rear side of the machine Untight the Hex Screws to remove the 2 pillars used for delivery front and rear Remove the 2 pillars...

Page 57: ...or Donato Gavino Murru donato gavino murru omgitaly com Pag 56 a 179 Final look after remove the 2 pillars used for delivery front and rear and all security system Photo taken from the rear sides of t...

Page 58: ...IN CASE OF DAMAGES DURING TRANSPORTATION AND UNOLADING OMG CANNOT BE HELD RESPONSIBLE RESPONSIBILITY BELONG TO THE CARRIER PLEASE ANY DAMAGE AND DUE MACHINE TRANSPORTATION NEED TO NOTE IN THE CMR DOC...

Page 59: ...MF 64 Author Donato Gavino Murru donato gavino murru omgitaly com Pag 58 a 179 Note The machine gripping points are as follows...

Page 60: ...MF 64 Author Donato Gavino Murru donato gavino murru omgitaly com Pag 59 a 179 Main part machine Weight 15600 Kg...

Page 61: ...or its stability the machine must rest on a well levelled surface in accordance with state laws This foundation must be designed and built according to parameters dependent on the quality of the suppo...

Page 62: ...more photo below Carry out the levelling operations of the machine both horizontally and transversely by adjusting the screws of the feet see description Use a precision level to check flatness Place...

Page 63: ...forming station lock remove the station stop screw and test its extraction Note with the machine off the lock status lamp will not be able to signal any feedback To adjust the support feet screw or u...

Page 64: ...orm a flatness check of the machine With correct positioning it is possible to avoid the occurrence of irregular wear of the moving parts The frequency of periodic checks depends on the quality of the...

Page 65: ...the main disconnect switch located inside the main control panel If technician open the cabinet for the operation just done in the above description please don t take in account the first two photos...

Page 66: ...ide of the main switch the main switch will have 4 connectors Connect the cables on the appropriate terminal following these instructions 3 cables for phases see electrical schematic provided with man...

Page 67: ...cover is installed and that all previously operations are done properly Turn on main disconnect switch before using control board power selector switch ATTENTION after giving the power check if the ph...

Page 68: ...re not well connected to the main switch To turn on the machine When power is on before any movements please turn left and right this switch on the enroller If is mark with arrow up and moving down ne...

Page 69: ...no murru omgitaly com Pag 68 a 179 Emergency stop button will stop all movements of the machine when activated Pull back to reset Use blue button to reset the machine after an alarm or e stop Power on...

Page 70: ...he machine like mold guides chains pin chain system for index trim press cooling water table For that purpose we supplied a connection system for the water We suggest that you use water between 10 C t...

Page 71: ...cooling water to the chain guides 13 Return of cooling water from the chain guides 14 Cooling water delivery to the mold 15 Return of cooling water from the mold 16 Cooling water delivery to the die...

Page 72: ...ld to freeze when machine is in standby mode If needed some manual buttons to turn automatic valve on or off are present on the main page for the mold system the rail chains and the trim press cooling...

Page 73: ...om Pag 72 a 179 Cooling sections of the machine Index system Cooling down the rails when the heating ovens are located in position during the automatic mode End of rails cooling Bypass for recirculati...

Page 74: ...roducts identical and conform to control and quality expectation Cutting press station When using the cutting die heating system you need to cool down the water plate to avoid transferring heat to the...

Page 75: ...r or 90 PSI minimum and 8 bar or 120 PSI maximum Be sure that the compressor is supplying air with low humidity percentage to avoid emptying frequently the filter of the FRL from water accumulation A...

Page 76: ...parable functioning damages and electrical shocks Note O M G keeps the right to cut warranty for components damaged during these operations The machine is supplied with a lot of parts disassembled for...

Page 77: ...Supplier 1 Pneumatic main gauge One Metalwork Safety Don t remove air while the machine is in operation Don t supply air to the machine before controlling if something is inside This can damage some...

Page 78: ...9 Touch Screen General Description Touch Screen Video device is the most important instrument to communicate with the machine With touch screen is possible to set many parameters and watch performance...

Page 79: ...thor Donato Gavino Murru donato gavino murru omgitaly com Pag 78 a 179 Schematic Video Reset button Emergency button Voltage on off selector Voltage light End Cycle button USB port Security exclusion...

Page 80: ...ervention mode Touch screen is blank Touch screen isn t connected Connection Connect cables All modes Safety Do not remove cover or guard without shut down the power Before operating machine with powe...

Page 81: ...hich allow simply connection between machine and OMG factory through internet connection of your factory If assistance is needed connect Ethernet cable to the plug on the left side of electrical box o...

Page 82: ...e machines follow screen appears Digit the account the password and click on the login button for entry in the main page With the op1 account the password is blank and the operator can not do the main...

Page 83: ...the case video If you want return to the previous page pushing the second button on the case video NOTE On touch screen there are button and switch If you push on a button it becomes yellow till push...

Page 84: ...blocking system that keeps the roll with tension and let it rotate freely on its own axis The rotation can be controlled with the brake avoiding that the roll moves because of inertia The unroller is...

Page 85: ...ith handle wheel Adjust the width of the unroller accordingly to the dimension of the roll Install on sliding table a new roll of non woven material Pay attention to install the new roll with the prop...

Page 86: ...tor is near the axis of the roll It could fall on the operator You need to seat the roll on the roll table without compress it before releasing the roll from the axis No Doing so may result equipment...

Page 87: ...l darken the photocell located at the base of the system When the photocell will get free again the unroller will function if selector is engaged Note Let the unroller turns until the photocell will d...

Page 88: ...bout this mode Notes If the internal diameter of the roll carton part that allows keeping the roll together or coring is different from the center s cone it is possible to add an optional cone to atta...

Page 89: ...MF 64 Author Donato Gavino Murru donato gavino murru omgitaly com Pag 88 a 179 Unroller sensor Disk to keep non woven sheet on the roll...

Page 90: ...is decelerated when the sagging is until first photo eye beam If the second down photo eye is covered the unroller stops If the roll is big and heavy it is possible to adjust the break force by turnin...

Page 91: ...material sagging is too short a safety device located in front of the calendar will stop the machine and a message will be displayed on the touchscreen immediately Release this nut to adjust To give...

Page 92: ...Picture Qty Description Type Supplier 1 Lifting Gear Motor BN71B4 cod 830720156 VF 49 F1 18 P71 B14 B3 Bonfiglioli 1 Calendar Gear Motor BN71B4 cod 830720156 MVF 44 F1 P71 B14 BN Bonfiglioli 1 Photoe...

Page 93: ...s too tight Brake Release the screw on the side of brake All modes The calendar turn but the material doesn t move The material doesn t have the appropriate thickness Material Release the screw on the...

Page 94: ...dirty after the calendar The calendar rolls are dirty Calendar rolls Open upper carter and clean the calendar rolls Shut down the power Safety Do not remove cover or guard without shut down the power...

Page 95: ...re is a rapid advancement of the material inside the chain guide system through the drilling of the material by the points on the chain When the material turns out to be hard or thick the motor that m...

Page 96: ...to gavino murru omgitaly com Pag 95 a 179 Schematic 1 Left blade 2 Right blade 3 Cartridge heater 4 Pneumatic cylinder 5 Pneumatic cylinder spacer 6 Film sliding plate 7 Film sliding plate adjustment...

Page 97: ...eheating unit are also automatically adjusted For the fine adjustment of the part of the edge to be heated there are two knobs 7 on the external side of the preheating device as shown in the following...

Page 98: ...blades on the non woven material Turning the knobs 10 clockwise and counterclockwise respectively reduces or increases the air flow to the cylinders that control the blades thus speeding up or slowin...

Page 99: ...On the edges pre heater page you can test the device blade opening and closing by pressing the 1 button shown in the figure On the man page you can check the temperature of the blades set the tempera...

Page 100: ...ended that in the cases described at the beginning of the chapter activate the preheating device by pressing in correspondence of the edges on the layout of the main page This will ensure sufficient h...

Page 101: ...ype Supplier 4 Pneumatic cylinders for the movement of the blades SSCY CIL 2120320020CN Metalwork 1 Thermocouple for blade temperature control TC K 6x15 ATT BAION GITTS HT2 Delcom 2 Cartridge heater f...

Page 102: ...hnician Machine in MANUAL mode The clamps heat up but the temperature is not detected by the system Thermocouple connection or failure Check the integrity of the thermocouple Check the connections of...

Page 103: ...l the power supplies Before starting the machine reset all the safety devices Installation interventions maintenance or inspection must be done by the maintenance technician under the supervision of t...

Page 104: ...step index travelling is assured by a servo driven motor It is powering two double pin chains around a rail system The chains are grabbing the plastic material by piercing it with the help of the two...

Page 105: ...x system straight Fix internal dimension equal to width of material Be sure that the material is centered with the machine center There are 4 adjustments area on the index rail system At the material...

Page 106: ...ason two rail adjustment screws are adjusted independently one from the other When having different production setup material thickness can vary You will need to adjust the wheel that is compressing t...

Page 107: ...ly the groove of wheel with the pin of the chain to avoid damaging the chain and the roll Not doing so may result in damage to the product Be sure that there is no material inside rails during the wid...

Page 108: ...the entry zone work zone and the both zone at the same time with the arrows The quote Actual Zone indicate the rails real position To make the reference setting adjust the rails to the desired positi...

Page 109: ...ru donato gavino murru omgitaly com Pag 108 a 179 Rails chain cooling system On the rail system of the index the heating system section is getting cool down by the main cold water system of the machin...

Page 110: ...9 a 179 Automatic Cycle Insert plastic film inside rollers like picture below Make sure that the material goes through the bottom of the top roller Lift mobile roller to introduce non woven film manua...

Page 111: ...the product Beware when starting automatic cycle that the film is well perforated by the pin chain and that it is inserted by a minimum of 30 cm inside the index system It will avoid material to devi...

Page 112: ...or Donato Gavino Murru donato gavino murru omgitaly com Pag 111 a 179 Main Spare Parts Picture Qty Description Type Supplier 1 Gearbox A 302 UH35 P90 i 13 6 Bonfiglioli 1 Servodrive motors R88M K5K030...

Page 113: ...ance or to be replaced Chains Index rails Clean index system gearing Check if chain tension is equal on both sides Check if there is no rubbing or grabbing from any kind of mechanical source other tha...

Page 114: ...g with power make sure that all guards are re installed and all safety devices are in good working orders Installation operation maintenance or inspection must be performed by authorized personnel Not...

Page 115: ...ng panels at each cycle We calculated the travelling distance of the index versus the maximum speed of the machine to obtain a temperature that is increasing gradually and can be efficient at the mach...

Page 116: ...Pay attention to adjust the position of panels before moving carriage to avoid touching the mold Be sure to leave some space between exit side of panel and entry side of mold Not doing so may result...

Page 117: ...int without using arrow buttons Note Encoder increasing length is in the same direction than the index film travelling in automatic cycle Proximity switches for max and min position of heating carriag...

Page 118: ...Pay attention to adjust the flow controls without the machine being in automatic cycle If speed is set too slow you could melt the plastic film in the lower heating elements and create a fire If it i...

Page 119: ...taly com Pag 118 a 179 Adjustment of the sagging sensor for non woven film indexing Note If the reflector is not aligned properly the heater carriage will not move forward The light beam must be align...

Page 120: ...he button on the right side of the percentage setting By pressing on it you will toggle between or Each zone is fully independent For example the thermocouple zone is set at 50 value for the entire pa...

Page 121: ...per Oven Lower Oven Trim press die cut Edge Pre Heater Note When the actual display is Red the temperature hasn t reach the set value As soon as the display became green the temperature is ok and the...

Page 122: ...creating a risk of fire Before starting the automatic cycle the first thing to do is to bring the heating carriage forward pressing on the layout s carriage Upper Lower or both Note the heaters temper...

Page 123: ...Resolution 2000 P R Omron 1 Gear motor for heater carriage travelling movement PCE 230 M31 048114M i 475 Minimotor 1 Pneumatic cylinder for panel s movements Iso 63 900CIL 121 063 0900 C P Metalwork 2...

Page 124: ...to Gavino Murru donato gavino murru omgitaly com Pag 123 a 179 14 Heating boards HC510 Hetronik 2 Safety proximity for max min travelling E2A M18KS08 M1_B3 Omron 2 Safety Eye for material sagging syst...

Page 125: ...u donato gavino murru omgitaly com Pag 124 a 179 Troubleshooting Note Pictures for reference only Number of heater boards and heater elements can differ PLC DATA COMM EXCHANGE WIRE TERMOCOUPLE WIRE HC...

Page 126: ...equipment from main disconnect switch and open heating control box located on the side of the heaters carriage Look up for the heating card in error You will find it by a red led lighted at the bottom...

Page 127: ...r reinstall all removed guard and make that all safety device are in good working order Installation operation maintenance or inspection must be performed by authorized personnel Not doing so may resu...

Page 128: ...pe to the hot material according to the mold morphology The heated material is being dragged by the index system into the forming station Which system to use to make a part depends on the operator s k...

Page 129: ...asily be turned out for easy changes of the mold At first unlock the station stop column until the light turns off as shown in the figure Then it is necessary to remove the screw from the threaded hol...

Page 130: ...ng the tooling of the forming station You must turn the key on the front of the table and pneumatically unlock the rails You must install the mold with T inserts to keep the tooling on the table Lower...

Page 131: ...r part of the mold just against the positioning blocks if provided at the end of rails Insert the water pipes inlet and outlet of the cold water system to cool down mold and open the valves after T in...

Page 132: ...italy com Pag 131 a 179 Put the upper part of mold on the upper Forming Table Water inlet and outlet port upper table Push upper part of mold inside table and center it Turn the key to unlock the uppe...

Page 133: ...g station and lock the forming press First tighten the screw and then close the station locking column reverse procedure to unlocking Tight the screw to keep the forming station inside the machine Mak...

Page 134: ...vements are made with motors and toggles the combination of both systems give the necessary power to keep the mold closed during the forming cycle When closing forming tables toggle position is always...

Page 135: ...bent open position Once Upper and Lower forming table are open move upward the Lower forming table by using the jog push button as showed below from the same page Check distance between lower forming...

Page 136: ...il the toggle is straight If lower table is lower that the sheet level move it upward using lower forming table s adjustment system You need to be a little bit higher that the sheet level to start You...

Page 137: ...ble with the same procedure Move downward the Upper forming table by using the jog push button as showed below from the same page Move the upper table until the toogle is straight but check to have no...

Page 138: ...ve down Upper forming table till both tooling are touching together Once the upper and lower tooling are touching move again the Upper forming table to open position and go down for a half turn with t...

Page 139: ...nches of the upper forming table from the Forming page press from button layout Fix the value of position the speed and acceleration with the HMI Push here for adjust lower forming table Push here for...

Page 140: ...crashing it against the index rails or against the lower mold Increase the amount of width of the rails for more safety Not doing so may result in injuries or damage to the product Note First move in...

Page 141: ...eds Note Use the manual buttons in manual page to try the air pressure system Adjust the pressure by turning the regulator in the next picture Pay attention to adjust the air gauge at the required pre...

Page 142: ...ton in this page and then enable station one at a time pressing on the layout if the stations are enabled their word will be highlighted yellow The starting form press depends on the setting of the mo...

Page 143: ...ould have components touching the plastic film when it is still in movement Setting from the page of timers counters Pay attention to use plug when material has been preheated only Otherwise plug assi...

Page 144: ...Main Spare Parts Picture Qty Description Type Supplier 2 Motor for table movement R88MK5K020CBS2 Omron 2 Gearbox for close positioning adjustment MVF 49A P71 B14 i 36 Bonfiglioli 4 Spring Cylinders f...

Page 145: ...when the index is working The pieces still attached on the scrap falling down Travelling of the Forming Press Tables too low Increase the travelling distance of tables From menu page reach the moveme...

Page 146: ...Before operating with power re install and check every safety system Installation operation maintenance or inspection must be performed by authorized personnel Not doing so may result in electric sho...

Page 147: ...of the pieces It is made out of two mobile tables that are going up and down between guides The table s movement is provided by a system of servo motors mounted on the upper and lower table Schematic...

Page 148: ...Adjustments Setup Lift and slide the tool into the rails as shown on the pictures Center the cutting tool and tight it with the set screws provided with the machine Slide here Cutting die tool Screws...

Page 149: ...to center the die tool perfectly On each tables of the trim station you will notice 2 regulators Those regulators control the air inside the 4 cylinders on each table They are compensating the weight...

Page 150: ...n moves on position set without operator pushing on arrows button continually When recalling a stored job in the machine memory see the chapter of file mould management the position set is the value s...

Page 151: ...tion of cutting it is the film material level If some adjustment of the day light is needed use the adjustment of the upper table to arrive with the toggles straight to touch the die cut blades with t...

Page 152: ...onato Gavino Murru donato gavino murru omgitaly com Pag 151 a 179 When all parameters have been set both lower and upper platen can be cycle in manual mode using the red button indicated below Single...

Page 153: ...in this page and then enable station one at a time pressing on the layout if the stations are enabled their word will be highlighted yellow The starting trim press depends on the setting of the mode p...

Page 154: ...onato Gavino Murru donato gavino murru omgitaly com Pag 153 a 179 Turn the power on if cutting die needs to be heated Die cut heating Machine state Set heater temperature Delay timers Work timer Setti...

Page 155: ...murru omgitaly com Pag 154 a 179 Pay attention when using press otherwise it will crash with non woven film not formed properly Not doing so may result in damage Die cut heating Plate Die cut heating...

Page 156: ...Motor for upper and lower table movement R88M K5K020C BS2 Omron 1 Gear motor for position adjustment PCE 230 M31 i 475 Minimotor 1 Encoder for position regulation control E62 CWZ5B Resolution 2000 P R...

Page 157: ...ing Remove the die Redo setup in lower trim press motor page in touch screen Safety Do not touch any moving parts in operations or introduce hand inside the press during the adjustments To do so may r...

Page 158: ...h a tool present in the stacking system Depending of the product the operator can choose how he wants the products to get stacked It can be stack upward For these purposes the unit is equipped with tw...

Page 159: ...MF 64 Author Donato Gavino Murru donato gavino murru omgitaly com Pag 158 a 179 Schematic Lower Motor Upper Stacker Lower Stacker Upper Motor Stacker Conveyor Conveyor Motor...

Page 160: ...machine memory see the chapter of file mould management the position set is the value stored in the file and with the Automatic button it will reach the set point without manual centering Note Set th...

Page 161: ...r adjustment needs to be done manually Due to obstruction that could occur during setup procedure an object could be in the way and damage mechanical parts of the unit while travelling to its defined...

Page 162: ...cker without crashing it with other mechanical system Not doing so may result in injuries and or damage to the system It is required to set the lower stacker position from the lower stacker video page...

Page 163: ...extract the piles from the conveyor For this purpose there is a system that pushes the piles out of the stacker and pushes them on conveyor located at the side exit of the machine Advance upper disch...

Page 164: ...r pushes the product on the conveyor The products accumulated on conveyor are pushed out when counter finish The amount of additional travelling setting is located in the lower stacker page on the tou...

Page 165: ...MF 64 Author Donato Gavino Murru donato gavino murru omgitaly com Pag 164 a 179 Number of stacking movement left When the counter finishes the conveyors empty the stacker magazine Timers and counter...

Page 166: ...time counter page Set a minimum stacker parking time and choose the number of stacked If one stacked is configured the product will be unloaded out of the machine from the conveyors If more than one...

Page 167: ...n in this page and then enable station one at a time pressing on the layout if the stations are enabled their word will be highlighted yellow The starting stacker device depends on the setting of the...

Page 168: ...art to move when the index cycle is starting If it is at 0 it will start at the end of the index cycle Note Don t adjust the delay too short from the times counters page This can cause mechanical dama...

Page 169: ...er 3 Motor for upper lower and conveyor stacker movement R88MK4K030C BS2 Omron 3 Gear Motor for lower table movement RC00134 MC2 i 2 Unimec 1 External Motor conveyor rotation BN63B2 cod 830610156 Bonf...

Page 170: ...tool Increase number or size of nicked parts Using spring wire or blade with hammer Some motor brushless go in error The shape are so much attached to the scrap Shapes and precutting phase Change the...

Page 171: ...eady to be sent out to the recycling to produce new plastic film rolls It is engineered to extract the plastic film that is not use from the process and rolling it as a roll following the index paste...

Page 172: ...t and rear in relation to the hardness and thickness of the material and check if these work well by switch on the electrical selector Table for device control By moving the weight from both side it s...

Page 173: ...r is started When the wrapping scrap roll it s too big cut the material with scissors and extract by using the pneumatic selector Pay attention to stop the device before introduce the scarp on the bar...

Page 174: ...ng Symptom Probable cause Item to check Countermeasur es Interventions mode The material is so much pulling The control table work no good Lateral weight Move the lateral weight and adjust the amount...

Page 175: ...ucing the hand can make serious problem Do not remove cover or carter without shut down the power Before operating with power to put again every security at good work Installation operation maintenanc...

Page 176: ...is needed to change the functioning parameters of the machine All these info can be stored in a memory card Unscrew and remove the case The memory card is on the backside of touch screen Pay attention...

Page 177: ...stacker Working timers counters Heating panels temperature setting and zones To memorize a mold insert a recipe name in the textbox then push on the Disk save button from all page except the forming...

Page 178: ...For delete the loaded recipe press to trash button and confirm in the next pop up The import page is this With this button it s possible export the recipes on the usb stick This button open a page in...

Page 179: ...open the file The red trash button deletes what is selection The import button charges the selected recipe in machine Note Before detaching the USB key or the SD you must press one of two buttons with...

Page 180: ...tant to update these variations in the recipe It is to update the mold in working phase Same procedure than for recording Verify that mold name that is written in the Present section is the same mold...

Reviews: