background image

31

4 Basic operation

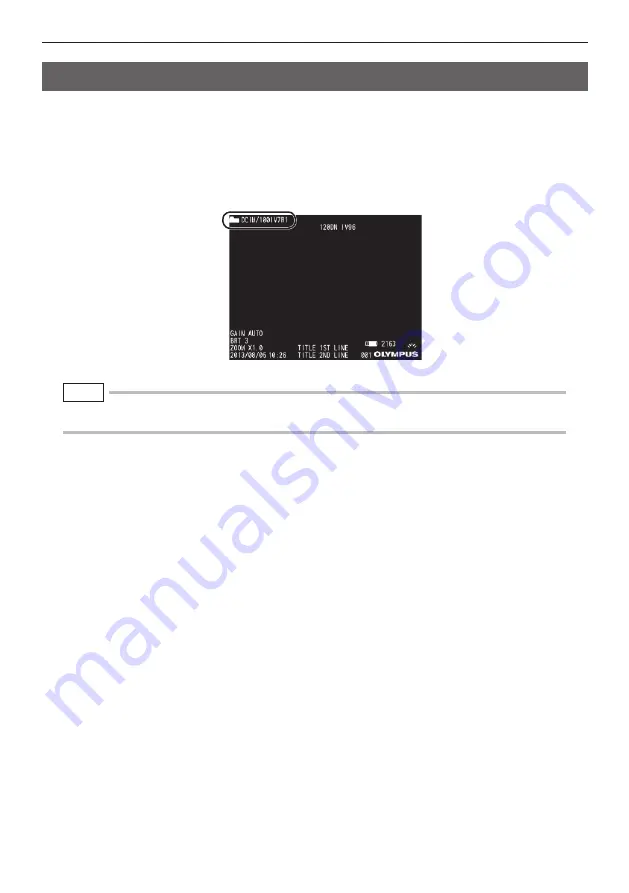
In the live screen, you can use the [MEAS/ENTER] joystick to switch the folder in which you are 
recording or playing back an image.

 4.3  Switching the folder from the live screen

1

  While a live image is displayed, move the [MEAS/ENTER] joystick left, right, up, 

and down.

The folder name shown in the upper left area of the screen changes.

The folder that is displayed, is the folder for the image being recorded or played back.


The folder configuration which can be switched with the [MEAS/ENTER] joystick is up to the second layer.

NOTE

Summary of Contents for IPLEX RX Series

Page 1: ...INSTRUCTIONS INDUSTRIAL VIDEOSCOPE IPLEX RX series IPLEX RT series IV9620RX IV9635RX IV9650RX IV9675RX IV9420RX IV9435RX IV9620RT IV9635RT IV9650RT IV9675RT IV9420RT IV9435RT...

Page 2: ...48 Woerd Avenue Waltham MA 02453 U S A Telephone 1 781 419 3900 L43 Office Tower Langham Place 8 Argyle Street Mongkok Kowloon Hong Kong Telephone 852 2481 7812 Wendenstrasse 14 18 20097 Hamburg Germ...

Page 3: ...Preparing the power supply 13 3 2 Pre operation preparation 15 Attaching the optical adapter 15 Turning on power 16 Selecting the optical adapter 16 Checking the remaining battery level 17 Checking li...

Page 4: ...screens 48 Menu display and functions 48 5 4 Operations in the PDF file display screen RX only 49 Menu items and functions 49 6 Stereo measurement procedures RX stereo measurement function only 51 6...

Page 5: ...s 71 Common problems 72 8 2 Requesting repair of this product 74 9 Specifications 75 9 1 Operating environment 75 9 2 Other specifications 75 External application standard 78 Software license informat...

Page 6: ...iv...

Page 7: ...with options and separately available items not only creates the risk of abnormal operation it also can damage the product Expanded functions of the IPLEX RX RT series The IPLEX RX RT series functions...

Page 8: ...observation object etc or the insertion tube may touch the object resulting in electric shock Before stowing the instrument in its carrying case be sure to turn off power and remove the battery Leavin...

Page 9: ...ved image may be whitish caused by the illumination light or a part of the view field may be lacked The optical adapter may fall off the insertion tube s distal end if used in this condition In this c...

Page 10: ...not open or close covers caps in an area subject to high humidity and or dust Close covers caps before storing the instrument and when they are not in use Note the following precautions whenever remo...

Page 11: ...in a closed automobile in the sun near a heater etc Fluid leaking from the battery can cause loss of sight if it gets into your eyes Flush your eyes with tap water or other clean water without rubbing...

Page 12: ...e spare batteries is recommended when long hours of battery powered operation are expected The battery charging time is normally about two hours and 30 minutes generally speaking Recommended temperatu...

Page 13: ...e safety ratings cautions and serial number are on stickers on parts of the main unit and the control unit If labels are missing or if their contents are illegible contact Olympus Model name serial nu...

Page 14: ...id of the carrying case for in structions on how to pack the instrument in the carrying case Name Count IPLEX RX or RT main unit 1 USB flash drive for recording images 1 AC adapter 1 AC power cord 1 V...

Page 15: ...unit 9 Strap holder 10 Strap bracket 11 Front panel 12 Universal cable 13 Optical adapter case holder 14 Ring 15 Shoulder strap No Name 16 Control unit holder 17 AC adapter connector cap 18 LIGHT butt...

Page 16: ...urement operations RX Stereo measurement function only 4 VIEW button Retrieve screen display thumbnail screen display 5 Grip 6 BRT lever Adjusting the brightness 7 MENU EXIT button Menu display 8 Joys...

Page 17: ...1 Optical adapter positioning cut surface 7 O ring 2 First screw thread 8 Illumination 3 Second screw thread 9 Product abbreviation 4 Connecting screw thread 10 Positioning pin 5 Objective lens 11 Pro...

Page 18: ...e indicator 16 Thumbnail selection frame 17 Folder name 18 File name 19 PDF indicator RX only 20 Remaining media capacity 21 Adapter name RX only 22 Measurement indicator RX ste reo measurement functi...

Page 19: ...turned off before performing pre observation and pre operation preparation and inspection 3 1 Pre observation preparation Preparing the power supply When using the battery See P 13 When using the AC a...

Page 20: ...r connector cap After connecting the provided AC power cord to the AC inlet of the AC adapter plug the plug end of the AC power cord securely into a 3P power outlet If you find it difficult to remove...

Page 21: ...to the distal end 6 mm type 4 mm type Be sure to attach the O ring to the insertion tube s distal end before using the optical adapter Water getting into the area where the insertion tube and optical...

Page 22: ...using the stereo optical adapter see 6 3 Registering the new stereo optical adapter or re register ing the stereo optical adapter P 54 When using AT100S NF IV94 or AT100S FF IV94 selecting 100SN or 1...

Page 23: ...ower about 1 to 2 Charge the battery replace with a charged battery or connect the AC adapter 1 Do not record or delete images and do not format the USB flash drive If power runs out during these oper...

Page 24: ...ptical adapter etc Turning ON the power will light the illumination automatically The light intensity is adjusted depending on the brightness of the observation object The light indicator at the botto...

Page 25: ...a flat surface for observation use the handle as a stand Adjust the handle to an angle that allows the LCD monitor to be easily viewed The angle of the handle can be adjusted smoothly to any position...

Page 26: ...with the platform installed at an angle may cause the main unit to fall off You can use a square platform that measures 45 mm or less from the center of the tripod screw Hang the main unit Set up the...

Page 27: ...the two belt brackets and one of the two belt holders 2 Adjust the length of the shoulder strap by the length adjuster buckle and ad just the screen to an easy to view angle 3 Hang the shoulder strap...

Page 28: ...il you feel a click Pull the control unit straight upward from the main unit When the control unit is affixed to the back of the main unit hold down the center of the lock release button as you pull u...

Page 29: ...tween the handle and the main unit Walking with the control unit attached to the main unit back left side When carrying the control unit fixed to the main unit be careful for followings Hold the handl...

Page 30: ...ith the insertion tube fastening belt near the insert tube bend stopper Transport the instrument by holding the main unit or by hanging it from the strap 1 Pass the Hook Loop fastener of the optical a...

Page 31: ...material buttons joysticks or levers Irregularities such as cuts or kinks in the universal ca ble Insertion tube angulation section distal end Any looseness in materials other than the angulation sect...

Page 32: ...only When the stereo optical adapter is registered Before and after measurement See 6 5 Check ing measurement values P 58 Check the serial number on the optical adapter selection screen when the stere...

Page 33: ...ushing force twisting or tension to the insertion tube 4 Lock the angulation section angle and direction angulation lock and perform observation When the angulation section is at the desired angle and...

Page 34: ...chieve under low temperatures The image noise may be extreme under high ambient temperatures In case of RX a yellow temperature indicator is displayed when ambient temperature is about 80 C to warn yo...

Page 35: ...arging an image Zoom Freezing an image that contains high speed action may result in a blurred image Images are zoomed using digital zoom As a result the image may become slightly coarse at higher zoo...

Page 36: ...nder certain observation conditions Brightness adjustment with the BRT lever The BRT lever can be used to adjust brightness by changing the overall brightness of a live im age during observation While...

Page 37: ...er from the live screen 1 While a live image is displayed move the MEAS ENTER joystick left right up and down The folder name shown in the upper left area of the screen changes The folder that is disp...

Page 38: ...live screen freeze screen P 41 To record the date time title logo measurement results and other on screen information onto the image being recorded press the MENU EXIT button while a live screen is di...

Page 39: ...ames Use this function to categorize image files The category names of the file marks can be changed Contact Olympus for details NOTE 1 Select the folder of the save destination See 4 3 Switching the...

Page 40: ...ect MODIFY change the folder of the save destination and short press the MEAS ENTER joystick 6 Select the strings in the preset title list registered in advance and short press the MEAS ENTER joystick...

Page 41: ...ng the VIEW button stops movie recording and displays the retrieve screen long pressing the VIEW button stops movie recording and displays the thumbnail screen NOTE 4 Select the mark to add to the end...

Page 42: ...mage 3 Switch the image you want to play back Use the MEAS ENTER joystick to switch the image you want to play back MEAS ENTER joystick left operation Scrolls from the currently displayed image to the...

Page 43: ...up down left or right to move the selection boundary around the screen The thumbnail where the selection boundary is located is the currently selected image To play back an image Select the image you...

Page 44: ...the PDF file you want to display and push the MEAS ENTER joystick The PDF file will be displayed You can display a PDF file on the Live or Freeze screen Use alphanumeric characters or symbols to name...

Page 45: ...ite http www olympus ims com en service and support downloads 4 8 Using recorded images on a PC The live image can be displayed on the external monitor by connecting the provided VGA conver sion cable...

Page 46: ...ecute 3 Press the MEAS ENTER joystick to apply the setting and return to the previous screen 5 1 Performing menu operations 5 Menu operations and functions Pressing the MENU EXIT button while doing me...

Page 47: ...ewly creating a folder for image re cording and playback Switches the folder for recording and playing back the image changes the folder name and creates the folder The default is 100IV7R1 Switches to...

Page 48: ...ER Optical adapter selecting Specifies an optical adapter When using the stereo optical adapter with RX see 6 2 Attaching the stereo optical adapter P 53 SELECT PDF FILE RX only PDF file selection Sel...

Page 49: ...sed to specify the type of information to be displayed ALL Show the date time title OLYMPUS logo optical adapter name zoom level and brightness level DATE TIME LOGO Show the date time title and OLYM P...

Page 50: ...ers select CLEAR and then press the MEAS ENTER joystick To input a space Move the cursor to the location where you want to input the space select SPACE and then press the MEAS ENTER joystick 3 Select...

Page 51: ...g a character string as a preset title P 45 1 1 2 2 3 3 The preset title list has five pages To change pages select the text string in line 1 or line 10 of the currently displayed page and then tilt t...

Page 52: ...lete a preset title by performing the registration operation while the title input box is blank 4 Press MEAS ENTER joystick towards the left This closes the preset title list screen Adjusting image sh...

Page 53: ...ocedure below to configure date and time settings Be sure to set the correct date and time before using the instrument for the first time Date and time information is shown on the display and is also...

Page 54: ...displayed on the menu screen see 4 3 Switching the folder from the live screen COPY FILE Copy image files to folder Thumbnail screen only Copies recorded images to a different folder The currently sel...

Page 55: ...ext page Pressing the BRT lever toward gives you the same effect Displays the last page Displays your desired page EXPAND SHRINK PDF DOCUMENT Displays the whole page Displays the page to fit width Dis...

Page 56: ...al horizontal and scroll bars on the PDF screen ON Display OFF Hide SPLIT SCREEN ON OFF Allows you to split and display the PDF screen and live or freeze screen However the split mode will be terminat...

Page 57: ...htness Olympus cannot guarantee the ac curacy of measurement results We recommended that users identify the measurement accuracy through experiments This measurement method identifies a pair of corres...

Page 58: ...ter or re registering the stereo optical adapter See P 54 Selecting the registered stereo optical adapter See P 57 Attaching the stereo optical adapter See P 53 Checking measurement values before meas...

Page 59: ...without dirt or dust If the attached optical adapter rattles or is loose or even though it does not rattle or is not loose if it is not firmly attached completely by rotating in the direction of arro...

Page 60: ...tration is an operation to create the information for the combination of your stereo optical adapter and the insertion tube The information that is created is stored in the internal memory of the main...

Page 61: ...dapter P 53 for details about operations 6 Adjust the brightness of a white image Use the check tool provided with the stereo optical adapter Insert the distal end of the insertion tube into the forwa...

Page 62: ...ection so that no force is applied to the optical adapter and angulation section 8 The following message is displayed Remove the optical data media USB flash drive from the USB connector and then sele...

Page 63: ...is displayed 3 Confirm that Serial No is matched with Serial number of the stereo optical adapter Select OK and press the MEAS ENTER joystick The live image is displayed in the monocular view type or...

Page 64: ...R joystick to specify the measurement points 2 points See Measurement P 63 for details about operations The measurement accuracy may be reduced by loose attachment of the optical adapter or dirt on th...

Page 65: ...after measurement and make sure that both measurement values are almost identical If the measurement results differ significantly from each other check that the optical adapter is not loose and the le...

Page 66: ...the shadow area on the measurement area move or rotate the position of the insertion tube to change the direction or the distance for capturing images And use the BRT lever to adjust to the slightly d...

Page 67: ...ction during spot ranging The zoom function cannot be used The gain mode cannot be switched Fixed to AUTO The sharpness adjustment cannot be switched Fixed to 1 The brightness adjustment range is from...

Page 68: ...igher Green Yellow Red To move the cursor tilt the MEAS ENTER joystick in the desired direction Moving the cursor Spot ranging screen Finishing the spot ranging Press the LIVE GAIN button or press the...

Page 69: ...ement points or reference points specified in the left image area are displayed in the right image area Confirm that positions of measurement points or reference points in the left image area are same...

Page 70: ...insertion tube s distal end to the specified measurement point is displayed The object distance mark is displayed in the following colors Up to 15 mm Green Recommended mea surement distance Up to 30 m...

Page 71: ...ent point or reference point specified immediately before ALL CLEAR Clears all specified measurement point or reference point METHOD Selects a measurement method See Measurement method types P 66 for...

Page 72: ...ints This mode allows for measuring the distance from a measurement point to the reference line de fined by two reference points Measurement method types Distance Point to line Distance Point to line...

Page 73: ...on Then press the MEAS ENTER joystick to specify the required number of measurement points for each measurement method in the left image area on the left side of the screen The measurement results and...

Page 74: ...very short Contact Olympus about changing the battery For details about how to load and remove the battery see Using the battery P 13 7 3 Cleaning components Clean the insertion tube immediately afte...

Page 75: ...rasping the rigid portion of the distal end wipe the optical adapter Best results may be obtained using a commercially available absolute ethanol or isopropyl alcohol Dirt on the threads of the screws...

Page 76: ...e LCD monitor Do not use a cloth that is hard dirty or has foreign matter on it Doing so may damage the surface of the LCD monitor 7 4 Storage precautions Store this product under normal room temperat...

Page 77: ...ly images recorded with this instrument can be displayed RECORDING MEDIA ERROR PLEASE FORMAT THE RECORDING MEDIA The format of the USB flash drive cannot be recognized Format the USB flash drive on th...

Page 78: ...tion tube The nut of the optical adapter is rotated in the wrong direction Reinstall using the correct procedure Attaching the optical adapter P 15 Message Cause and recommended action HIGH TEMPERATUR...

Page 79: ...adjust the external monitor The optical adapter is old Replace the optical adapter with a new one The optical adapter is loose Attach the optical adapter properly Attaching the optical adapter P 15 C...

Page 80: ...the instrument Malfunctions that occur during the warranty period are done at no charge according to the warranty agreement Be sure to attach the warranty agreement when returning the instrument for...

Page 81: ...hed The stereo measurement cannot be carried out underwater Other parts than above Water resistant proof construction Use in water is not supported The instrument is not water resistant if the battery...

Page 82: ...LCD panel 6 5 inch TFT full color low reflective coating type Input Output connector USB connector A connector USB 2 0 compatible Power supply Battery Specified battery Lithium Ion Model Manufactured...

Page 83: ...Distance from a point to a line reference line that is defined by indicating two points on the screen Depth Distance from a point to a plane that is defined by indicating three points on the screen Ar...

Page 84: ...systems available in your country Chinese RoHS Directive This mark indicates the environmental protection use period applicable to electronic infor mation products sold in China in accordance with the...

Page 85: ...ole when mounted on the insertion tube 3 Indicates the length of the rigid portion at the insertion tube s distal end when mounted Adapter name AT40D IV96 AT80D NF IV96 AT80D FF IV96 AT120D NF IV96 AT...

Page 86: ...commercially available Shoulder strap Carrying case The LCD monitor is covered by a LCD protection sheet The distal end is covered with a tip cap 4 mm type RX IV9420RX IV9435RX 4 mm type RT IV9420RT I...

Page 87: ...arger optional USB flash drive for recording images 4 mm type AT80D FF IV94 AT120D NF IV94 AT120D FF IV94 AT120S NF IV94 AT120S FF IV94 AT50D 50D IV94 AT50S 50S IV94 6 mm type AT40D IV96 AT80D NF IV96...

Page 88: ......

Reviews: