


17
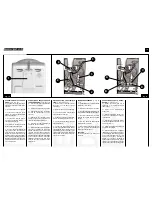
ISTRUZIONI PER LA SCONNES-
SIONE DELLA LINEA FLESSIBILE
Nel caso di installazione a parete (Ø
da 50 a 60 mm), la linea flessibile
può venir separata dalla unità inter-
na. La suddetta linea è composta dai
seguenti particolari scollegabili:
•
cavo di collegamento elettrico
per il motore del ventilatore dell'unità
esterna;
•
tubo in gomma tra la pompa ed
il condensatore dell'unità esterna;
•
due linee di collegamento per
refrigerante che si aprono e chiudo-
no automaticamente.
AVVERTENZA:
TOGLIERE LA SPINA DI ALIMEN-
TAZIONE ELETTRICA PRIMA DI
INIZIARE L'OPERAZIONE DI
SCONNESSIONE DELLA LINEA
FLESSIBILE. LE OPERAZIONI DI
CONNESSIONE E SCONNESSIO-
NE DELLA LINEA FLESSIBILE
DEVONO ESSERE ESEGUITE DA
PERSONALE SPECIALIZZATO. I
DUE RACCORDI RAPIDI DELLA LI-
NEA FLESSIBILE DEVONO
ESSERE MANTENUTI IN STATO
DI ASSOLUTA PULIZIA. PER QUE-
STO MOTIVO, QUANDO
VENGONO FATTI PASSARE AT-
TRAVERSO UN'APERTURA,
OCCORRE PROTEGGERLI CON
GLI APPOSITI TAPPI DATI IN DO-
TAZIONE. SE I RACCORDI RAPIDI
SONO SPORCHI POSSONO POR-
TARE AD UNA CATTIVA TENUTA
CON CONSEGUENTE PERDITA DI
GAS REFRIGERANTE.
IMPORTANTE:
NON ALIMENTATE MAI ELETTRI-
CAMENTE - MEDIANTE
L'INSERIMENTO DELLA SPINA IN
UNA PRESA DI CORRENTE - IL
CLIMATIZZATORE QUANDO LE LI-
NEE SONO SCOLLEGATE. SE LO
STESSO VIENE INAVVERTITA-
MENTE ACCESO CON LE LINEE
STACCATE METTERESTE A SE-
RIO RISCHIO LA VS. SICUREZZA
ED INOLTRE DANNEGGERESTE
IRREPARABILMENTE L'APPA-
RECCHIATURA.
INSTRUCTIONS POUR LA
DECONNEXION ET LA
RECONNEXION DE LA LIGNE
FLEXIBLE
Dans le cas de montage au mur (allant
de 50 à 60 mm), la ligne flexible peut
etre séparée de l'unité interieure. La
ligne se compose des pièces détacha-
bles suivantes:
•
câble de connexion électrique pour
le moteur du ventilateur de l'unité
exterieure;
•
tuyau en caoutchouc entre la
pompe et 'unité extérieure;
•
deux lignes de connexion pour le
réfrigérant qui s'ouvrent et se ferment
automatiquement.
ATTENTION:
DÉBRANCHER LA FICHE D'ALIMEN-
TATION ÉLECTRIQUE AVANT DE
COMMENCER LA DÉCONNEXION
DE LA LIGNE FLEXIBLE. LES
CONNEXIONS DE LA LIGNE
FLEXIBLE DOIVENT ÊTRE EFFEC-
TUÉES PAR DU PERSONNEL
SPECIALISÉ. LES DEUX RACCOR-
DS RAPIDES DE LA LIGNE FLEXIBLE
DOIVENT ÊTRE MAINTENUS
PARFAITEMENT PROPRES.
DANSCE BUT, LORSQU'ILS DOI-
VENT PASSER À TRAVERS UNE
OUVERTURE, IL FAUT LES
PROTÉGER AU MOYEN DES BOU-
CHONS SPÉCIAUX FOURNIS EN DO-
TATION. SI LES RACCORDS
RAPIDES SONT SALES, ILS PEU-
VENT ENTRAINER UNE MAUVAISE
ÉTANCHEITÉ ET PAR CON-
SÉQUENT, UNE PERTE DU GAZ
RÉFRIGÉRANT.
IMPORTANT:
NE JAMAIS ALIMENTER LE
CLIMATISEUR ÉLECTRIQUEMENT
EN BRANCHANT UNE FICHE DANS
UNE PRISE DE COURANT LORSQUE
LES LIGNES SONT
DÉCONNECTÉES. SI LE CLIMATI-
SEUR EST ALLMUMÉ PAR INADVER-
TANCE LORSQUE LES LIGNES
SONT DÉCONNECTÉES, VOUS
RISQUEZ DE METTRE VOTRE
SÉCURITÉ EN DANGER ET, EN
PLUS, D'ENDOMMAGER
IRREMEDIABLEMENT L'APPAREIL.
DISCONNECTING THE FLEXIBLE
LINE
For wall installation (from 50 to 60
mm), the flexible line can be separated
from the inside unit. This line is
composed of the following parts that
can be disconnected:
•
electrical connection cable for the
outside unit fan motor;
•
rubber hose between the pump
and the condenser of the outside unit;
•
two connection lines for coolant,
that open and close automatically.
CAUTION:
ALWAYS REMOVE THE ELECTRICAL
PLUG FROM THE SOCKET BEFORE
DISCONNECTING THE FLEXIBLE
LINE. CONNECTION AND DISCON-
NECTION OF THE FLEXIBLE LINES
MUST ONLY BE CARRIED OUT BY
SPECIALISED PERSONNEL. THE
TWO QUICK COUPLINGS OF THE
FLEXIBLE LINE MUST BE KEPT
PERFECTLY CLEAN. FOR THIS
REASON, THEY NEED TO BE
PROTECTED WHEN THEY ARE RUN
THROUGH AN OPENING USING THE
SPECIAL PLUGS PROVIDED. IF THE
QUICK COUPLINGS ARE DIRTY,
THIS CAN ALSO LEAD TO POOR
SEALING AND THUS A LOSS OF CO-
OLANT GAS.
WARNING:
NEVER SUPPLY CURRENT TO
THE AIR CONDITIONER BY PLUG-
G I N G T H E P L U G I N T O A N
ELECTRICAL SOCKET WHILE THE
LINES ARE DISCONNECTED. IF
THE UNIT IS ACCIDENTALLY SUP-
P L I E D W I T H T H E L I N E S
DISCONNECTED, IT IS NOT ONLY
A S E R I O U S R I S K T O Y O U R
SAFETY BUT ALSO CAUSES PER-
MANENT DAMAGE TO THE AIR
CONDITIONER.
TRENNUNG DES VERBIN-
DUNGSCHLAUCHANSCHLUSSES
Für eine Wanddurchführung (Ø 50 bis
60 mm) kann der Verbindungsschlauch
am Innenteil getrennt werden. Der
Verbindungsschlauch besteht aus
folgenden trennbaren Teilen:
•
Elektroverbindungsleitung für den
Ventilatormotor im Außenteil;
•
Schlauch von der Pumpe zum
Verflüssiger im Außenteil;
•
Zwei sich automatisch schließende
und öffnende Kältemittelverbindungs
leitungen.
HINWEIS:
DIE TRENNUNG DER
FUNKTIONSLEITUNG DARF NUR
VON EINEM FACHMANN
DURCHGERFÜHRT WERDEN. VOR
DEM TRENNEN DER
FUNKTIONSLEITUNG NETZ-
STECKER AUS DER STECKDOSE
ZIEHEN. GERÄT NICHT IM
GETRENNTEN ZUSTAND
BETREIBEN. DIE ZWEI
SCHNELLANSCHLÜSSE DES
V E R B I N D U N G S S C H L A U C H E S
MÜSSEN ABSOLUT SAUBER
GEHALTEN WERDEN. AUS DIESEM
GRUNDE SIND SIE VOR DER
DURCHFÜHRUNG DURCH ÖFFNUN-
GEN IMMER MIT DEN DAZUGE-
HÖRIGEN KAPPEN ABZUDECKEN.
VERSCHMUTZTE SCHNELLANSCH-
LÜSSE KÖNNEN ZU EINER MANGE-
LHAFTEN DICHTIGKEIT UND SOMIT
ZUM VERLUST VON KÄLTEMIT-
TELGAS FÜHREN.
WICHTIG:
BEI NICHT ANGESCHLOSSENEN
LEITUNGEN IST DAS KLIMAGERÄT
NIEMALS DURCH EINSTECKEN DES
STECKERS IN DIE STECKDOSE AN
DAS STROMNETZ
ANZUSCHLIESSEN. WÜRDE DAS
GERÄT VERSEHENTLICH BEI
U N A N G E S C H L O S S E N E N
LEITUNGEN ANGESCHALTET
WERDEN, SO WÄRE IHRE
PERSÖNLICHE SICHERHEIT STARK
GEFÄHRDET UND DAS GERÄT
UNERSETZLICH BESCHÄDIGT.
INSTRUCCIONES PARA LA DESCO-
NEXION Y CONEXION DE LA LINEA
FLEXIBLE
En el caso de instalación de pared (Ø
de 50 a 60 mm), la línea flexible puede
estar separada de la unidad interna.
Dicha línea está compuesta por los
siguientes elementos que pueden
desconectarse:
•
cable de conexión eléctrica para
el motor del ventilador de la unidad
externa;
•
tubo de goma entre la bomba y el
condensador de la unidad externa;
•
2 líneas de conexión para el refri-
gerador, que se abren y cierran
automáticamente.
OBSERVACIONES:
QUITAR EL ENCHUFE DE
ALIMENTACIÓN ELÉCTRICA ANTES
DE COMENZAR LA OPERACIÓN DE
DESCONEXIÓN DE LA LÍNEA FLEXI-
BLE. LA OPERACIONES DE
CONEXIÓN Y DESCONEXIÓN DE LA
LÍNEA FLEXIBLE TIENEN QUE SER
REALIZADAS POR PERSONAL ES-
PECIALIZADO. LOS DOS EMPALMES
RÁPIDOS DE LA LÍNEA FLEXIBLE
TIENEN QUE SER MANTENIDOS EN
ESTADO DE ABSOLUTA LIMPIEZA.
POR ESTE MOTIVO, CUANDO SE
HACEN PASAR A TRAVÉS DE UNA
ABERTURA, ES NECESSARIO
PROTEGERLOS CON LOS TAPONES
ESPECIALES QUE SE ENTREGAN
DE SERIE. SI LOS EMPALMES
RÁPIDOS ESTÁN SUCIOS PUEDEN
CAUSAR UNA MALA ESTANQUEI-
DAD CON LA CONSIGUIENTE
PÉRDIDA DEL GAS DE
REFRIGERACIÓN.
IMPORTANTE:
CON LAS LÍNEAS DESCONECTA-
DAS, EL ACONDICIONAR NO TIENE
QUE ESTAR ALIMENTADO ELÉCTRI-
CAMENTE NUNCA, ES DECIR NO
TIENE QUE ESTAR ENCHUFADO. SI,
POR DESCUIDO, LO ENCENDIERA
CON LAS LÍNEAS
DESCONECTADAS, PONDRÍA EN
PELIGRO SU PROPIA SEGURIDAD
Y ADEMÁS DAÑARÍA IRREPARABLE-
MENTE EL APARATO.
Summary of Contents for NovEcos Split 11
Page 27: ...27...
Page 28: ...COD 273107B Edizione 1G...