


13
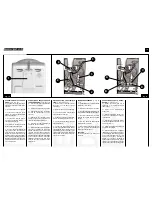
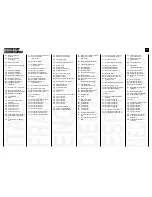
Fig. 9
1
2
IMPOSTAZIONE DELL'ORARIO
ESATTO
Ruotare il programmatore (fig. 9-1)
in senso orario ponendo l'indice cen-
trale in corrispondenza dell'ora cor-
rente.
IMPOSTAZIONE DELL'ORARIO
DI FUNZIONAMENTO
Spostare verso il centro del program-
matore i tastini blu in corrisponden-
za delle ore della giornata in cui vo-
lete che il climatizzatore funzioni.
Portare quindi il selettore (fig. 9-2)
nella posizione centrale indicata con
l'orologio.
TRASPORTO DEL
CLIMATIZZATORE
Deve avvenire in posizione vertica-
le.
In caso di trasporto in posizione oriz-
zontale attendere almeno un’ora pri-
ma di riavviarlo.
Prima di effettuare il trasporto scari-
care completamente l’acqua di con-
densa aprendo il tappo (fig. 1 - 5).
Avvertenza:
Trasporto del climatizzatore su pa-
vimenti delicati:
-
scaricare completamente l'acqua
di condensa aprendo il tappo (fig. 1 -
5);
-
facendo leva sulle ruote poste-
riori spostare il climatizzatore solle-
vando le ruote anteriori.
PROGRAMMATION DE L’HEURE
EXACTE
Tournez le programmateur (fig. 9-1)
dans le sens des aiguilles d’une montre
en plaçant l’index central en
correspondance de l’heure en cours.
PROGRAMMATION DE L’HEURE
DE FONCTIONNEMENT
Déplacez vers le centre du
programmateur, les touches bleues en
correspondance des heures de la
journée pendant lesquelles vous
désirez le fonctionnement du
climatiseur.
Tournez ensuite le sélecteur (fig. 9-2)
dans la position centrale indiquée par
l’horloge.
TRANSPORT DU CLIMATISEUR
Il doit se faire en position verticale.
Dans le cas de transport en position
horizontale, attendre au moins une
heure avant de le mettre en marche.
Avant d’effectuer le transport, vidanger
complètement la condensation en
enlevant le bouchon (Fig. 1 - 5).
Recommandation:
Déplacement du climatiseur sur sols
délicats:
-
évacuer complètement l’eau de
condensation en retirant le bouchon
prévu à cet effet (fig. 1 - 5);
-
en faisant levier sur les roues
postérieures, déplacer le climatiseur en
soulevant les roues antérieures.
SETTING THE RIGHT TIME
Tur n the programmer (fig. 9-1)
clockwise, placing the centre hand on
the current time.
SETTING OPERATING TIME
Move the small blue keys towards the
centre of the programmer, to the hours
during the day when you want the
conditioner to work.
Now move selector (fig. 9-2) round to
the central position, indicated with the
clock.
HOW TO TRANSPORT THE
CONDITIONER
The conditioner must be kept upright
during transport.
If it is transported in a horizontal position,
wait at least one hour before starting it.
Prior to transport, always open the plug
(fig. 1 - 5) and drain all the condensation.
Caution:
To move the air conditioner over fragile
flooring:
-
drain all the condensation water
by opening the plug (fig. 1 - 5);
-
by levering on the rear wheels, lift
the front wheels and move the air
conditioner.
VORGABE DER GENAUEN UHRZEIT
Den Programmierer (Abb. 9-1) im
Uhrzeigersinn drehen, so daß der
mittlere Zeiger auf die aktuelle Uhrzeit
gerichtet ist.
VORGABE DER BETRIEBSZEIT
Die blauen Tasten gegen die Mitte des
Programmierers stellen, so daß sie auf
die Tageszeit zeigen, in der das
Klimagerät funktionieren soll.
Anschließend den Wahlschalter (Abb.
9-2) in die mittige Position, die durch
die Uhr gekennzeichnet ist, stellen.
TRANSPORT DER KLIMAANLAGE
Die Klimaanlage muß in aufrechter
Stellung transportiert werden.
Wird sie in liegender Stellung
transportiert, muß vor dem ersten
Einschalten mindestens eine Stunde
abgewartet werden.
Vor dem Transpor t erst das
Kondenswasser vollständig ablassen.
Dazu den Stöpsel entfernen (Abb. 1 - 5).
Hinweis:
Transpor t des Klimagerätes auf
empfindlichen Fußböden:
-
den Stopfen öffnen und das
Kondenswasser völlig ablaufen lassen
(Abb. 1 - 5);
-
durch Aufstützen auf die
Hinterräder die Vorderräder anheben
und das Klimagerät fortbewegen.
PROGRAMACION DEL HORARIO
EXACTO
Giren el programador (fig. 9-1) en
sentido horario colocando el indicador
central en coincidencia con la hora vi-
gente.
PROGRAMACION DEL HORARIO
DE FUNCIONAMIENTO
Desplacen hacia el centro del
programador todas las pequeñas
teclas azules en coincidencia con las
horas del día en las que desean que
funcione el climatizador.
Seguidamente coloquen el selector
(fig. 9-2) en la posición central indicada
con el reloj.
TRANSPORTE DEL CLIMATIZADOR
Hay que realizar el transporte en
posición vertical.
En caso de transporte en posición
horizontal esperar al menos una hora
antes de ponerlo en marcha.
Antes de efectuar el transporte vaciar com-
pletamente el agua de la condensación
abriendo la tapa (fig. 1 - 5).
Advertencia:
Transporte del climatizador sobre
pavimentos delicados:
-
Abrir el tapón para descargar
completamente el agua de
condensación (fig. 1 - 5).
-
Haciendo palanca en las ruedas
traseras, desplazar el climatizador
levantando las ruedas delanteras.
INSTELLING VAN DE JUISTE TIJD
Draai de programmakiezer (fig. 9-1)
naar rechts en zet het middelste teken
op de huidige tijd.
INSTELLING VAN DE
WERKINGSTIJD
Draai de programmakiezer naar het
midden zodat de blauwe tekentjes op
de uren van de dag staan waarop u de
airconditioner wilt laten functioneren. Zet
daarna de keuzeschakelaar (fig. 9-2) op
de middelste stand waar een klok op
staat.
TRANSPORT VAN DE
AIRCONDITIONER
De airconditioner moet rechtop
verplaatst worden.
Als de airconditioner liggend verplaatst
wordt dan moet u minimaal één uur
wachten voordat u de airconditioner
in werking kunt stellen.
Alvorens de airconditioner te gaan
verplaatsen moet u het condenswater
eerst helemaal weg laten lopen door
de dop (fig. 1 - 5) open te draaien.
Waarschuwing:
Transport van de airconditioner op
kwetsbare vloeren:
-
laat het condenswater er volledig
uit stromen door de dop open te
draaien (fig. 1 - 5);
-
duw om de airconditioner te
verplaatsen op de achterwielen en til
de voorwielen op.
Summary of Contents for NovEcos Split 11
Page 27: ...27...
Page 28: ...COD 273107B Edizione 1G...