Oce CS172 FK-502 User Manual Download Page 266

10

Registering/Settings

10-30

CS172

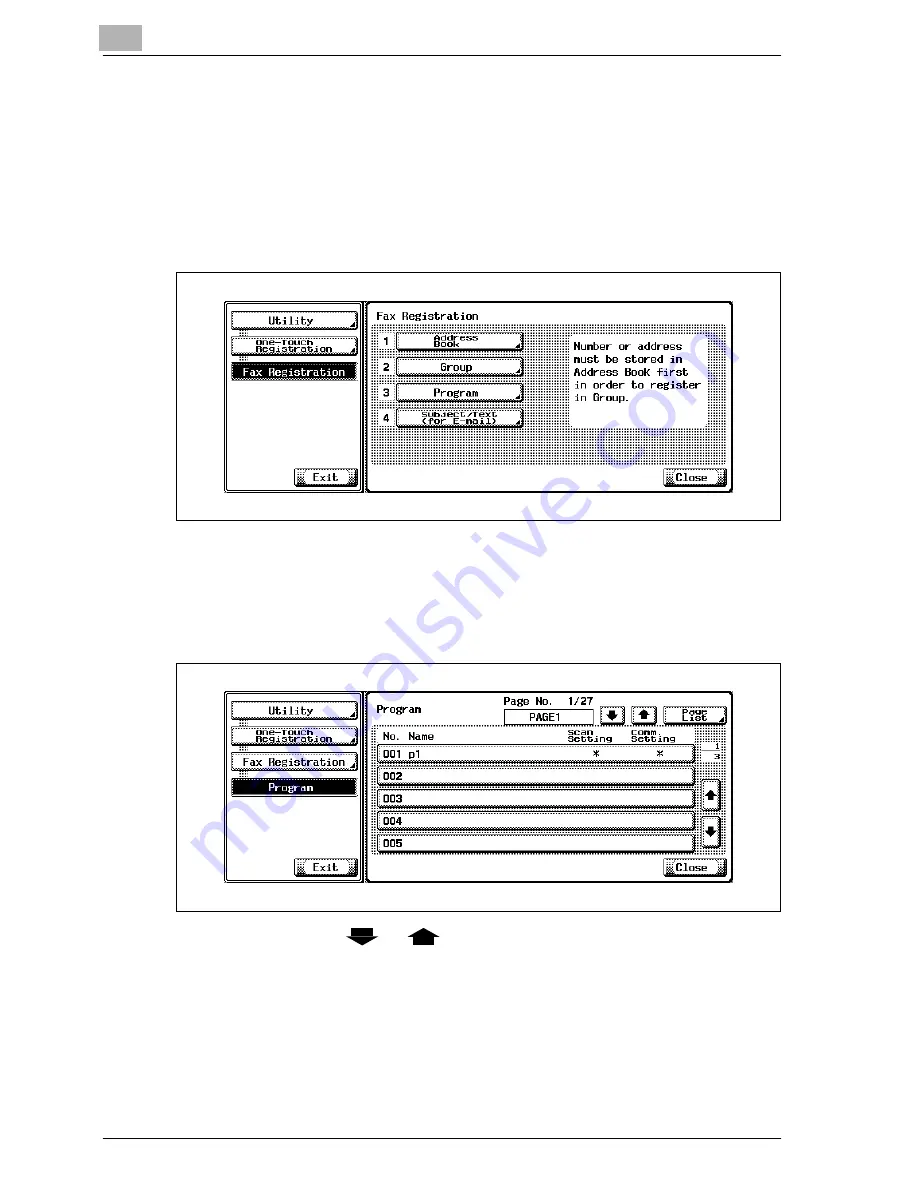
Deleting the program

The procedure for deleting the Program is as follows.

1

See "Displaying the fax registration screen" on page 10-3, to display 
the Fax Registration screen.

2

Press [Program].

In the Utility Mode, it is also possible to enter a number displayed 
in the key through the keypad for selection. In the case of 
[Program], enter the "3" on the keypad.

3

Select the Program you want to delete and then press [Delete].

If you press 

 or 

 in the left-hand side of [Page List], you can 

change the page to display. 15 every destination per page of 
destination are displayed.

If you press [Page List], you can specify the display of a Program 
list per page.

If you press arbitrary key in the Page List screen, you can change 
the page name it is displayed.

Summary of Contents for CS172 FK-502

Page 1: ...Oc CS172 FK 502 User Manual Facsimile Operations...

Page 2: ...B V makes no representation or warranties with respect to the contents hereof and specifically disclaims any implied warranties of merchantability or fitness for any particular purpose Further Oc Tech...

Page 3: ...ing document pages of mixed sizes in a single operation 1 14 Specify the binding style of a two sided document 1 15 Sending a fax when it receives a polling command from the recipient 1 15 Sending a f...

Page 4: ...2 1 Restriction matter 2 3 2 2 Control panel 2 4 2 3 First use settings 2 7 Must set items 2 7 Header information 2 7 Telephone line settings 2 7 2 4 Useful functions 2 8 Address book 2 8 Program 2 12...

Page 5: ...mode check screen 3 20 3 4 Selecting one destination 3 22 Selecting one destination 3 22 Keypad 3 22 Program 3 23 Address book 3 24 Direct input 3 27 Selecting multiple destinations 3 29 To confirm d...

Page 6: ...3 57 To name 3 57 To name is set to ON 3 58 To name is set to OFF 3 58 4 Reception 4 1 Reception mode 4 3 Auto reception fax only mode 4 3 Manual reception telephone only mode 4 3 4 2 Auto reception f...

Page 7: ...l 7 8 7 4 Bind position 7 10 7 5 Frame erase transmission 7 13 7 6 Background adjustment 7 16 7 7 Sharpness 7 19 7 8 Scan size 7 22 7 9 Header setting 7 25 7 10 Specify the file type 7 28 7 11 Passwor...

Page 8: ...13 Printing a document in the bulletin board user box 9 15 10 Registering Settings 10 1 Displaying the fax registration screen 10 3 10 2 Registering the address book 10 5 Registering the fax number f...

Page 9: ...elay user box 10 57 Scheme of relayed transmission to multiple stations 10 60 10 9 Setting the memory RX user box 10 61 11 Utility mode 11 1 Utility mode screen 11 3 Entering user setting 11 3 Exiting...

Page 10: ...RX 11 46 Setting up Memory RX 11 47 Closed Network RX 11 49 Setting up closed network area reception 11 50 Forward TX setting 11 52 Setting up fax transfer Forward TX setting 11 52 Incomplete TX hold...

Page 11: ...cation report 12 20 12 9 Reservation polling TX report 12 22 12 10 Broadcast reserved report 12 24 12 11 An address polling Rx reserved report 12 26 12 12 Sequence polling RX reservation report 12 28...

Page 12: ...nistrator 13 11 Logging on to administrator mode 13 13 13 3 Address book 13 15 To register new destinations 13 15 Editing abbreviated destinations 13 18 Deleting the address book 13 19 13 4 Group 13 2...

Page 13: ...CS172 Contents 11 14 Appendix 14 1 Number of stored pages to memory 14 3 14 2 Entering text 14 4 To type text 14 6 List of available characters 14 6 14 3 Fax terms 14 7 14 4 Index 14 12...

Page 14: ...Contents 12 CS172...

Page 15: ...1 Introduction...

Page 16: ......

Page 17: ...heir optimum condition For correct operation also read the User manual Copy Operations before starting operation Acknowledgement Adobe Adobe Logo Acrobat Acrobat Logo PostScript and PostScript Logo ar...

Page 18: ...s les dispositifs n excede pas 5 For U S A FCC PART 68 REQUIREMENTS This equipment complies with Part 68 of the FCC rules and the requirements adopted by the ACTA On the cover of this equipment is a l...

Page 19: ...ation where you purchased this equipment If the equipment is causing harm to the telephone network the telephone company may request that you disconnect the equipment until the problem is resolved Con...

Page 20: ...ng when this equipment is connected to the same line as other equipment may give rise to bell tinkle or noise and may also cause a false answer condition Should such problems occur the user should not...

Page 21: ...ved in accordance with Council Decision 1999 5 EC for pan European single terminal connection to the public switched telephone network PSTN However due to differences between the individual PSTNs prov...

Page 22: ...ing started fax Sending Perform the following basic procedure to send a fax 1 Press Fax on the control panel to start the fax mode 2 Set the functions as necessary Fax screen Scan Setting screen Appli...

Page 23: ...umber of the destination If you make an incorrect entry press Del to clear your entry Press C clear to clear the whole entry 4 Place the original on the machine For details see Placing the original on...

Page 24: ...e whether all pages of the fax have been received Detail For details see Number of originals on page 3 47 Send a fax at a specified time This function allows you to specify the time to start sending a...

Page 25: ...d upon a sheet of original being read Detail For details see Memory transmissions and quick memory TX on page 3 45 Sending faxes to a foreign country You can employ a lower transmission rate if you se...

Page 26: ...ands sometimes created when transmitting a document bound in the form of book You can also set the width of marginal erasure according to your preference Detail For details see Frame erase transmissio...

Page 27: ...Send a fax in original size select mode You can send a fax by designating the paper size for the document to be sent It is useful if you want to send only a portion of the original Detail For details...

Page 28: ...ages of mixed sizes because the facsimile recognizes each size and sends pages properly when the mixed original feature is used Detail For details see Mixed original on page 7 8 Transmitted and reprod...

Page 29: ...ppropriately by determining right to left or top to bottom Detail For details see Bind position on page 7 10 Sending a fax when it receives a polling command from the recipient You can send a fax that...

Page 30: ...isabled to shorten the transmission time Detail For details see ECM OFF on page 7 40 Polling specified document You can store documents that you want to poll in the bulletin board of the hard disk for...

Page 31: ...ble because of restrictions on the Private Branch Exchange PBX Detail For details see V 34 OFF on page 7 43 Relay fax You can send a fax to a recipient via an intermediate relay station Detail For det...

Page 32: ...ion with specific person Detail For details see Confidential communication F code TX on page 7 34 Sending a fax protected with a password You can send a fax protected with a password if the closed com...

Page 33: ...the background color of the original is adjusted Detail For details see Background adjustment on page 7 16 To be sent with the edge of the character made clear Transmission can be made after adjustmen...

Page 34: ...s see Direct input on page 3 27 To be saved in the box An original that has been read can be saved in the box created in the internal hard disk Furthermore files saved in the box can be transmitted by...

Page 35: ...prevent injuries and to ensure safe use of the machine 7 CAUTION Failure to observe instructions highlighted in this manner may result in slight injuries or property damage Observe all cautions in or...

Page 36: ...hine 2 Reminder Text highlighted in this manner contains information that should be reminded Detail Text highlighted in this manner contains references for more detailed information Special text marki...

Page 37: ...the first value always refers to the width of the paper shown as Y in the illustration and the second to the length shown as X Paper orientation Lengthwise w If the width Y of the paper is shorter th...

Page 38: ...to E Mail Scan to FTP and Scan to SMB User manual Box operations This manual contains details on operating procedures for using the boxes Refer to this user manual for details on operating procedures...

Page 39: ...25 User manual Print operations This manual contains details on operating procedures using the standard built in printer controller For details on the printing functions refer to user manual PDF file...

Page 40: ...1 Introduction 1 26 CS172...

Page 41: ...2 Before use...

Page 42: ......

Page 43: ...e facsimile communication may be subject to the following constraints The transmission speed is restricted Communication by the Super G3 is not available There may occur once in a while communication...

Page 44: ...cess key If user authentication or account track settings have been applied press this key after entering the user name and password for user authentication or the ac count name and password for accou...

Page 45: ...t begin 13 Main Power indicator Lights up in green when the machine is turned on with the main power switch 14 Data indicator Lights up at the time of transmission or reception of fax and when any doc...

Page 46: ...orce and never use a hard or pointed object to make a selection in the touch panel When the screen instructing you to call your service representative appears and copying is no longer possible a malfu...

Page 47: ...lowing items Detail For details see Telephone line settings on page 11 37 Item Description Sender Name Set the name of this machine The name is a string of up to 30 characters The name can contain wit...

Page 48: ...ons for the method to use the Web Connection If the Name and Search Character are registered when registering the Address Book for the Address Book an address can be specified using a reference charac...

Page 49: ...al Registering the fax number E Mail Registering the E Mail address This machine can specify an E Mail address as a fax destination If it has been registered This feature is convenient when transmitti...

Page 50: ...acter see page 14 4 The name can be a string of up to 24 characters 8 Enter the destination When Abbr Dial is selected in the Step 5 Enter the fax number to the destination by the keypad When E Mail i...

Page 51: ...among Main etc 10 Press Line Setting if necessary to select Overseas TX ECM OFF or V 34 OFF and then press OK When E Mail or User Box is selected in the Step 5 There is no Line Setting 11 Press OK Reg...

Page 52: ...ations for the method to use the Web Connection You can register the Scan Setting and Comm Setting functions For details see Registering the program on page 10 25 This section describes procedures for...

Page 53: ...tination to select the destination When registering a destination that has been already registered select Select From Address Book to enter it through either Abbr Dial User Box Group or E Mail and the...

Page 54: ...on method of the Boxes see User manual Box Operation 8 Press Close and then press OK To stop registering the Program press Cancel The list of Program is displayed When proceeding with the registration...

Page 55: ...to display the keyboard screen in which the E Mail address is entered 6 No of Dest The number of destinations to which transmission has been set is displayed 7 Memory The remaining amount of memory to...

Page 56: ...er TX or Polling RX is set 14 Destination Indicator The destination set is displayed 15 Sub Area The description according to the operations being set on the right side is displayed For the operation...

Page 57: ...word are to be entered Entering the necessary information in the screen displayed shows the normal screen For particulars of the department name and the user name contact your administrator When the u...

Page 58: ...r Box in the hard disk Documents saved in the box can be printed with this machine or imported into the computer on the network In this section a general description is given of the fax reception by m...

Page 59: ...en the specified box is specified as a place into which documents received are stored in the PC fax RX feature and when the TSI User Box Setting is specified the documents received are saved in the bo...

Page 60: ...cure Print User Box see User manual Print Operations Annotation User Box Used when transmitting document data which was saved in the scan mode with the attached Date Time or Page Number through the ne...

Page 61: ...cation pass word by which documents are stored for relay and delivery Registrations can be made at the Interme diate Relay Station Up to 5 registrations are availa ble Detail For details of the Relay...

Page 62: ...l User Box or Relay User Box regardless of the setting of the PC FAX RX fea ture When the sub address is different from a number for each box or the password of the F code is different from a communic...

Page 63: ...x Follow the setting in Incorrect User Box No Entry of Utility Mode 3 In the case of the Confidential RX or Relay Request RX When the sub address of the F code is representing a number for the Confide...

Page 64: ...cuments to or from various locations at the same time with two lines When the Fax Multi Line is installed you should keep the following facts in mind No external telephone cannot be connected to the L...

Page 65: ...ment to various locations at the same time with two lines to assign different telephone companies to each line or to send or receive a fax while you are sending or receiving a fax Refer to Set the mul...

Page 66: ...g a line only for receiving You can set Line 2 additional line only to receive If such is the case Line 1 is only used to send This is useful if you want to specify one line only for sending and the o...

Page 67: ...e only for sending As a result only the Line 1 is used for receiving This is useful for sending or receiving separately Detail Refer to Set the multi lines setting on page 11 74 for more information L...

Page 68: ...2 Before use 2 28 CS172...

Page 69: ...3 Transmission...

Page 70: ......

Page 71: ...ation of the Scan function see User manual Network Scanner Operations Although the explanation here covers the procedure for sending a one sided document using the basic procedure various functions ar...

Page 72: ...Text Density Standard Simplex Duplex Single sided Resolution Fine For details see Setting transmission conditions on page 3 12 For details see Opening the scan setting screen and comm setting screen o...

Page 73: ...destination you want to cancel once again Press RESET to clear the whole entry For details see Registering the address book on page 10 5 and Registering the program on page 10 25 When Manual Destinati...

Page 74: ...d transmission starts The following screen will appear if the TX Result Report Check screen is programmed to appear If you want to print the TX Report press Yes To interrupt transmission press STOP Wh...

Page 75: ...scanned automatically In addition two sided originals can be sent 1 Close the ADF 2 Align the originals starting with the first page 3 Place the originals in the ADF with the side to be scanned facing...

Page 76: ...n glass Use the platen glass for originals that cannot be placed in the ADF such as a book or thick thin originals 1 Open the ADF 2 Place the original FACE DOWN in the left rear corner aligning the ed...

Page 77: ...fax screen 2 Select a destination 3 Set the desired functions as necessary 4 Place the original on the platen glass Press Scan Setting Separate Scan OK and then press Start 5 Place the next original o...

Page 78: ...nel to open the fax screen 2 Select a destination 3 Set the desired functions as necessary 4 Place the original on the platen glass Press Scan Setting Separate Scan OK and then press Start Document pl...

Page 79: ...Transmission 3 CS172 3 11 6 Press Finish The Document reading mode is canceled 7 Press Start Transmission begins...

Page 80: ...hen Scan Setting is pressed on the fax screen These can be used to set transmission conditions according to the type of original to be sent Detail The condition for transmission cannot be set in units...

Page 81: ...d neutral tints of the pictures turn black without being reproduced Text Photo Press this when scanning originals containing both text and pho tographs half tone Select this mode in either case when b...

Page 82: ...ime of purchase Density seting Description Light Press to scan originals so that they are lighter than the density de tected with Standard Std Press to scan originals at a density that is between Dark...

Page 83: ...to the type of original There are 3 types Single sided is set at the time of purchase Simplex Duplex setting Description Single sided Press this when scanning one sided originals Double sided Press th...

Page 84: ...for transmission When Ultra Fine or Super Fine has been selected and the receiving machine is not equipped with the resolution originals are sent at a resolution corresponding to the reception capabil...

Page 85: ...d by using Mode Check on the control panel 1 Press Fax on the control panel 2 Press Mode Check on the control panel 3 Press a key of setting you want to confirm 4 Confirm the settings The four kinds o...

Page 86: ...tails of the Scan Setting screen see Opening the scan setting screen and comm setting screen on page 7 3 Pressing Fwd to display the next screen pressing Back to display the previous screen Communicat...

Page 87: ...ss and Text When no setting is made in From an E Mail address that has been set in Administrator Registration in the Utility Mode is put in it For details of Administrator Registration see User manual...

Page 88: ...trol panel 3 Press Destination 4 Select destination that you want to register in Address Book and then press Details 5 Press Save in Address Book When the destination has been already registered Save...

Page 89: ...hen press OK 7 Press Name to enter the registration name and then press OK 8 When there is no trouble found with the entries press Yes When canceling the registration press No 9 Press Close three time...

Page 90: ...irect Input Keypad 1 Enter the fax number of the destination where the fax is to be sent Numbers containing up to 38 digits can be entered Press Del on the fax screen if a mistake has been made in ent...

Page 91: ...splay the next or previous screen The destination that has been specified is displayed in the Broadcast Destinations 3 Press Start Transmission begins 2 Note When the Comm Setting function is set in t...

Page 92: ...d as an address Jobs saved in the box can be transmitted later or can be used with the Route function Network distribution function 0 Refer to Fax transmission from public user box personal user box o...

Page 93: ...or more Destination can be specified A search is made when the characters at the beginning coincide each other Searching in Detail Search Press Detail Search Press Name fax Number or E Mail and enter...

Page 94: ...search will be displayed For more information of the LDAP search see User manual Network Scanner Operations 3 Press the key of the destination name to which you want to send the fax An alphabet shown...

Page 95: ...For more information of the registration of the box See User manual Box Operations 0 When Manual Destination Input in Security Setting of the Utility Mode is set to Restrict Direct Input is not displ...

Page 96: ...dialing A is displayed on the screen Abbr Dial Enter the Abbreviated dialing number up to 2 000 from 0001 to 2000 through the keypad and specify the destination registered in the Address Book On the s...

Page 97: ...destinations as necessary to which you want to send a message See Selecting one destination on page 3 22 In case of keypad or Direct Input When entering through the keypad or Direct Input the next des...

Page 98: ...s Mode Check 2 Press Destination 3 Confirm destinations 4 To delete a destination select the destinations to be deleted in the list and then press Del Pressing Details displays the detail information...

Page 99: ...from the latest 5 of the fax jobs which have been transmitted 1 Press Direct Input and then press Recently Dialed Up to the five newest facsimile numbers which were dialed are displayed 2 Select the...

Page 100: ...es are sent of if the images on the originals are especially detailed When this happens transmit the document by selecting Quick Memory TX you can select the Quick Memory TX by clearing Memory TX in t...

Page 101: ...estination again If a facsimile cannot be sent due to a busy signal from the receiving machine or for some other reason the machine redials the number after a predetermined amount of time has elapsed...

Page 102: ...de even when redialed a screen is displayed in which you can check that the job was not successfully completed 2 Press OK To delete a job of failed transmission press the Job List and delete that job...

Page 103: ...er Box can be redialed manually 0 To use the Fax Retransmit function Incomplete TX Hold should have been set to ON in the Function Setting in the Utility Mode Refer to Incomplete TX hold on page 11 55...

Page 104: ...il When the Fax Retransmit function is used the Check Destination screen is not displayed even if the Destination Check Display Function is kept ON After the retransmission the job is automatically de...

Page 105: ...s Fax on the control panel to display the fax screen 2 Press Next Job Reservation 3 Place the original For details see Placing originals on the platen glass on page 3 8 To delete a reserved transmissi...

Page 106: ...s necessary See Setting transmission conditions on page 3 12 for setting functions on the fax screen See Application functions overview on page 7 5 for setting functions on the fax Application screen...

Page 107: ...ed on the Job List screen Canceling communication in progress When communication is in progress transmission can be canceled with the procedure described below 1 Press Job List on the fax screen 2 Pre...

Page 108: ...list of current jobs can be displayed for each line on the Current Jobs screen of Fax TX To display the list of Current Jobs of the Line 1 Press L1 or to display the list of Current Jobs of the Line...

Page 109: ...ress Timer Jobs or Active Jobs Pressing or displays the previous or next screen When the optional Fax Multi Line has been installed a list of current jobs can be displayed for each line on the Current...

Page 110: ...ts Pressing Job List in the fax screen allows you to check the results of transmission 1 Press Job List on the control panel 2 Press Print Fax TX or RX User Box 3 Press Job History When no Fax Multi L...

Page 111: ...or each line on the Current Jobs screen of Fax TX To display the list of Current Jobs of the Line 1 Press L1 or to display the list of Current Jobs of the Line 2 Press L2 In case of broadcast Broadcas...

Page 112: ...date and hour when the document has been received are displayed of Pgs The number of documents that have been received is displayed Result Job Complete Deleted by User Deleted Due To Error Released S...

Page 113: ...n the images on the originals are sent at high resolution memory overflow may occur The machine is automatically set to Memory TX when any of the following procedures is performed Quick Memory TX is s...

Page 114: ...one destination on page 3 22 7 Set the original document For details see Placing the original on the machine on page 3 7 8 Press Start The FK 502 reads the document and stores it in memory as a reser...

Page 115: ...ages transmitted will be printed in the form of P page number Total page number If the total page number you designate is not equal to the number of pages actually read the total page number you have...

Page 116: ...gistered and you return to the fax screen 8 Set other functions if necessary See Setting transmission conditions on page 3 12 for setting functions on the fax screen See Opening the scan setting scree...

Page 117: ...ansmission see Canceling transmission on page 3 39 If the destination is not ready to receive your call will be redialed For information about redialing see Recently dialed on page 3 31 If transmissio...

Page 118: ...X is selected automatically You can specify the timer on time in the range of up to 24 hours The date cannot be specified You specify the time in minutes and hours 0 Up to 21 Timer TX that are made up...

Page 119: ...x screen 7 Set other functions if necessary See Setting transmission conditions on page 3 12 for information about setting functions in the fax screen See Opening the scan setting screen and comm sett...

Page 120: ...ansmission see Canceling transmission on page 3 39 If the destination is not ready to receive your call will be redialed For information about redialing see Recently dialed on page 3 31 If transmissio...

Page 121: ...eas telephone numbers including the country code can be registered using the functions of Program and Address Book For details see Registering the address book on page 10 5 0 Functions incompatible Po...

Page 122: ...You return to the Comm Setting screen 7 Press OK Overseas TX is selected and you return to the fax screen 8 Set other functions if necessary See Setting transmission conditions on page 3 12 for infor...

Page 123: ...he overseas telephone call service company contact the telephone company Overseas telephone numbers can be registered using Address Book For details see Registering the address book on page 10 5 11 Pr...

Page 124: ...on is set in Administrator Setting Fax Setting Header Information of the Utility mode Two or more sender names can be registered For details see Header information on page 11 31 Set to outside body te...

Page 125: ...34 for information about setting To name It is possible to make a setting to decide if the address is printed on Header Position When To Name is turned on the Sender Name and the address are printed W...

Page 126: ...72 To name is set to ON To name is set to OFF Detail For details of To Name see Header Footer position on page 11 34 From MFP01 To 123456789 05 25 2006 13 23 138 P 001 001 From MFP01 987654321 05 25 2...

Page 127: ...4 Reception...

Page 128: ......

Page 129: ...set when using a telephone line designated for Fax use only Detail For details see Auto reception fax only mode on page 4 3 Manual reception telephone only mode Set the FK 502 to this mode when an ex...

Page 130: ...ssage area Detail When the RX Display is set to OFF the message is not displayed This mode is activated when Receive mode is set to Auto RX in Telephone line settings of Utility Mode Detail Refer to T...

Page 131: ...ing for procedure of manual reception 1 Press Off Hook when the external telephone rings 2 Make sure that RX is highlighted If a document is present in the ADF or the platen glass RX will not be highl...

Page 132: ...ay Detail If the external telephone continues to ring Receive mode Auto Man may be set to Manual RX in Telephone Line Settings of Utility Mode This must be set to Auto RX to receive documents automati...

Page 133: ...ument is printed when you solve the problem such as a paper jam Memory substitute reception will not work if the memory is full Transferring the jobs after memory substitute reception Jobs received by...

Page 134: ...r the address directly press Direct Input To specify an address from the Address Book press Select from Address Book Refer to p 3 24 and p 3 27 for more information on Select from Address Book and Dir...

Page 135: ...to record it at an equimultiple rate the document is recorded in at an equimultiple rate regardless of the paper size of the received document Recording after reducing at the minimum reduction rate W...

Page 136: ...per size is determined taking into account the width and length of the received document and the fax is recorded on paper of that size If papers of appropriate size are not set on the paper tray the d...

Page 137: ...e machine body Width of the re ceived docu ment Reception in formation re cording position Length of the received document A4 OFF or Inside Body Text 0 150 151 305 306 390 391 or more Outside Body Tex...

Page 138: ...Fax Pages is set to ON in the Utility Mode the facsimile looks for paper to record the document on more than one paper Width of the re ceived docu ment Reception in formation re cording position Lengt...

Page 139: ...5 v 8 5 e 11w 8 5 e 11 v 8 5 e 14 w 11 e 17 w 5 5 e 8 5 w 8 5 e 11 v 8 5 e 11 w 11 e 17 w A3 w A5 v A4 w A4 v B4 w B4 w A5 w A4 v A4 w A3 w 8 5 e 14 w 8 5 e 11 w 8 5 e 14 w 8 5 e 14 w 8 5 e 11 w 8 5 e...

Page 140: ...e 8 5 v 8 5 e 11 w 8 5 e 11 v 8 5 e 14 w 11 e 17 w Paper order from top to bottom 5 5 e 8 5 v 8 5 e 11 w 8 5 e 11 v 8 5 e 14 w 11 e 17 w 5 5 e 8 5 w A4 w 8 5 e 11 w 11 e 17 w A3 w A5 v 8 5 e 14 w A4 v...

Page 141: ...on function Refer to the User manual Copy Operations for more detailed information If the required paper size is only set in the manual insertion tray the document is printed on the paper fed from the...

Page 142: ...X Print is set to other than Auto The setting in the Tray Selection for RX Print takes precedence Recording at full scale A received document is recorded on the same size of paper at full scale when M...

Page 143: ...size of paper Recorded after be ing reduced to fit in the specified size of paper Long original longer than the Standard size The page division re cording OFF Recorded at full scale to fit in the larg...

Page 144: ...4 Reception 4 18 CS172 Detail When Duplex Print RX is set a record can be made on the screen for paper See Telephone line settings on page 11 37 for more information...

Page 145: ...ption information date time receiving number page number will be recorded in the received document Set to inside body text Set to outside body text Set to OFF Detail See Header Footer position on page...

Page 146: ...4 Reception 4 20 CS172...

Page 147: ...5 Troubleshooting...

Page 148: ......

Page 149: ...of the destination being called correct Are program dialing or abbreviated dialing num bers registered correctly Using program dialing or abbreviated dialing there may be an error in registration of t...

Page 150: ...for the procedure for correcting paper jams Is the machine out of toner No mail can be received if the toner has exhausted Re place the toner bottle immediately Refer to the User man ual Copy Operatio...

Page 151: ...ng Hasn t the Memory RX been set When the Memory RX is set print the document received by following the procedure given below 1 Press Box on the control panel 2 Press System User Box 3 Press Memory RX...

Page 152: ...epresentative Error Message Corrective Action Busy Although the set number of redials were attempted the receiving machine was busy Resend after confirming the status of the re ceiving machine No Answ...

Page 153: ...our service representative by phone 7 CAUTION Risk of serious accident To prevent the risk of serious accident perform the following when the call for service screen is displayed and the facsimile is...

Page 154: ...5 Troubleshooting 5 8 CS172...

Page 155: ...6 Specifications...

Page 156: ......

Page 157: ...t mm e 3 85 line mm Communications are performed at any of the above scanning line densities according to the capabilities of the destination machine Baud rate 2400 4800 7200 9600 12000 14400 16800 19...

Page 158: ...6 Specifications 6 4 CS172...

Page 159: ...7 Transmission applications...

Page 160: ......

Page 161: ...Overseas TX because these function are turned on or off when their keys are pressed You can combine more than one function however you cannot select functions that are not compatible with a function p...

Page 162: ...n allows you to display the screen for the application setting 4 Conduct either of the following operations When the dedicated screen is displayed Set a function in the screen displayed and then press...

Page 163: ...Setting screen or the Comm Setting screen Cancel Returns to the former screen OK This is pressed when returning to the fax screen OFF Release the setting that has been set and return to the preceding...

Page 164: ...be transmitted It is convenient when you intend to transmit part of a page or pages page 7 22 Header Setting 1 When transmitting jobs by fax specify a method to attach the Header Information for each...

Page 165: ...e Setting Overseas TX A lower baud rate will be employed page 3 53 ECM OFF Error Correction Mode ECM can be disabled page 7 40 V 34 OFF When the V 34 protocol can not be used due to restrictions of ex...

Page 166: ...neously Original size takes priority 0 Functions incompatible Quick Memory TX Number of Originals Bind Position Polling RX Normal Polling RX Bulletin 1 Press Fax on the control panel to view the fax s...

Page 167: ...tting screen 7 Designate the destination See Selecting one destination on page 3 22 for designating the destination 8 Set the original document See Placing the original on the machine on page 3 7 for...

Page 168: ...t to be read appropriately by binding right to left or top to bottom 0 Specifications The ADF must be used The platen glass cannot be used for transmission in Top bottom correction mode 0 Functions in...

Page 169: ...if necessary See Setting transmission conditions on page 3 12 for information about setting functions in the fax screen See Application functions overview on page 7 5 for information about setting fu...

Page 170: ...l transmission see Canceling transmission on page 3 39 If the destination is not ready to receive your call will be redialed For information about redialing see Recently dialed on page 3 31 If transmi...

Page 171: ...e ADF left open Frame erasure transmission prevents reproduction of dark bands 0 Specifications Memory TX is selected automatically You can use both Platen glass and ADF The width of erasure can be se...

Page 172: ...ess Scan Setting and then press Application 3 Press Frame Erase 4 Select Top Left Right or Bottom and determine the width of erasure with the keypad or To release the setting press OFF 5 Press OK The...

Page 173: ...on page 3 22 for designating the destination 10 Set the original document See Placing the original on the machine on page 3 7 for information about setting the document 11 Press Start The FK 502 reads...

Page 174: ...base sheet of the original may turn black with the colors read On such an occasion like this a message can be sent after adjusting the density in the background color of the original 0 Specifications...

Page 175: ...s OK The Application screen will be restored 6 Press OK The Scan Setting screen will be restored 7 Press OK The fax screen will be restored 8 Set other functions if necessary See Setting transmission...

Page 176: ...reserved document before transmission starts Detail To cancel transmission see Canceling transmission on page 3 39 If the destination is not ready to receive your call will be redialed For information...

Page 177: ...etting the Sharpness to allows the characters to be adjusted clearly And setting it to allows them to be adjusted so that they have a smooth impression 0 Specifications Both of the platen glass and th...

Page 178: ...See Setting transmission conditions on page 3 12 for information about setting functions in the fax screen See Application functions overview on page 7 5 for information about setting functions in th...

Page 179: ...l transmission see Canceling transmission on page 3 39 If the destination is not ready to receive your call will be redialed For information about redialing see Recently dialed on page 3 31 If transmi...

Page 180: ...accommodate the image being transmitted the original image will be reduced to fit the paper size This feature gives you the option to print a portion of the image with no reduction 0 Specifications M...

Page 181: ...layed 2 Press Scan Setting and then press Application 3 Press Scan Size 4 Press the key representing the size of the document to transmit To release the setting press Cancel 5 Press OK The Application...

Page 182: ...on page 3 22 for designating the destination 10 Set the original document See Placing the original on the machine on page 3 7 for information about setting the document 11 Press Start The FK 502 reads...

Page 183: ...r Information as the Header in the Utility Mode Set the method to attach the Header Information in the Header Footer Position in the Utility Mode Detail Header Setting cannot be selected depending on...

Page 184: ...f the Header Information is set to OFF by changing the Header Setting to ON from the Fax screen Header Information is added to the Outside Body Text 5 When you want to change the name of a sender it c...

Page 185: ...on page 3 22 for designating the destination 10 Set the original document See Placing the original on the machine on page 3 7 for information about setting the document 11 Press Start The FK 502 reads...

Page 186: ...ecify the File Type of images that have been read when the E Mail or Box is specified for the destination 1 Press Fax on the control panel to view the fax screen if it is not already displayed 2 Press...

Page 187: ...8 Set other functions if necessary See Setting transmission conditions on page 3 12 for information about setting functions in the fax screen See Application functions overview on page 7 5 for inform...

Page 188: ...7 Transmission applications 7 30 CS172 Detail To cancel transmission see Canceling transmission on page 3 39 If transmission fails refer to Cannot send messages on page 5 3...

Page 189: ...e same password as the Closed Network RX password 0 Specification The use of this function is available only when the machine on the other end is provided with the Closed Network RX Password Transmiss...

Page 190: ...ns if necessary See Setting transmission conditions on page 3 12 for information about setting functions in the fax screen See Application functions overview on page 7 5 for information about setting...

Page 191: ...l transmission see Canceling transmission on page 3 39 If the destination is not ready to receive your call will be redialed For information about redialing see Recently dialed on page 3 31 If transmi...

Page 192: ...following sections describe the procedures for Confidential transmission 0 Specifications Confidential transmission requires that the destination receiving the transmission has a Restricted access bo...

Page 193: ...ith keypad if necessary SUB Address and Password can be numbers of up to 20 digits When communicating with the FK 502 input 9 digits or less for the Box No and 8 digits or less for the Password The re...

Page 194: ...ion functions overview on page 7 5 for information about setting functions in the fax Application screen 8 Designate the destination See Selecting one destination on page 3 22 for information about de...

Page 195: ...1 43 By setting the Relay Print of the Function ON OFF Setting to ON at the intermediate relay station a document relayed after the relay distribution is printed Refer to p 11 43 for more information...

Page 196: ...2 Press Comm Setting 3 Press F Code TX 4 Enter the Relay Box No of the relay station sub address in the Sub Address and the relay password of the relay station in the Password box from the keypad SUB...

Page 197: ...on functions overview on page 7 5 for information about setting functions in the fax Application screen 8 Designate the relay station See Selecting one destination on page 3 22 for information about d...

Page 198: ...ree of errors Thus communication can be made free from disturbances due to line noises etc The FK 502 employs ECM for transmission unless you disable it 0 Specifications If there are many line disturb...

Page 199: ...creen will be restored 8 Set other functions if necessary See Setting transmission conditions on page 3 12 for information about setting functions in the fax screen See Application functions overview...

Page 200: ...l transmission see Canceling transmission on page 3 39 If the destination is not ready to receive your call will be redialed For information about redialing see Recently dialed on page 3 31 If transmi...

Page 201: ...nding on line conditions In such a case we recommend that you transmit by selecting V 34 OFF to set the super G3 mode off The V 34 mode will be resumed automatically on completion of transmission 0 Fu...

Page 202: ...lication functions overview on page 7 5 for information about setting functions in the fax Application screen 9 Designate the destination See Selecting one destination on page 3 22 for information abo...

Page 203: ...printed to check Detail Refer to the User manual Box Operations for the Route function from the box 1 Press Box on the control panel 2 Select Public User Box tab or Personal User Box tab and select a...

Page 204: ...er Box press Move Copy and specify a Box to move or copy to To print only the first page of a job press Proof Print 5 To transmit a job in the box by fax press the Fax TX tab select the job and press...

Page 205: ...cations 7 CS172 7 47 6 To distribute a job in the box through the network press Route tab select the job and press Route Refer to the User manual Box Operations for the Route function 7 Press Close to...

Page 206: ...with each other This is a function to prevent incorrect transmission Detail You can set sending after the check of destination when registering the Address Book For Check Destination the contents set...

Page 207: ...Designate the destination See Selecting one destination on page 3 22 for information about designating the destination 9 Set the original document See Placing the original on the machine on page 3 7 f...

Page 208: ...he Function ON OFF Setting Refer to page 11 43 for more information on the setting of the Destination Check Display function 1 Press Fax on the control panel to view the fax screen if it is not alread...

Page 209: ...t to RX only no line can be specified Refer to page 11 74 for more information on the Multi Lines Setting 1 Press Fax on the control panel to view the fax screen if it is not already displayed 2 Press...

Page 210: ...tion functions overview on page 7 5 for information about setting functions in the fax Application screen 8 Designate the destination See Selecting one destination on page 3 22 for information about d...

Page 211: ...8 Useful functions for reception...

Page 212: ......

Page 213: ...tial reception The following sections describe the procedures for printing the document received in a Confidential User Box and deleting the document held in a Confidential User Box Specifications If...

Page 214: ...Box on the control panel 2 Select the Public User Box tab and then select a box specified as Confidential User Box 3 When the password for access to the box is set enter the password in the screen di...

Page 215: ...rol panel 2 Select the Public User Box tab and then select a box specified as Confidential User Box 3 When the password for access to the box is set enter the password in the screen displayed and pres...

Page 216: ...see Memory RX on page 11 46 Printing a document held in memory Perform the following procedure to print the document received and held in memory 1 Press Box on the control panel to view the Box scree...

Page 217: ...7 Detail When you want to display the next or previous screen press or To interrupt operation press Close before pressing Print Pressing Proof Print lets the first page in the selected file be printed...

Page 218: ...ress Memory RX User Box 3 Enter the password and press OK To interrupt operation press Cancel If you press C clear the information you have entered will be deleted 4 Select the received document using...

Page 219: ...n information When Duplex Print RX is set to ON When Duplex Print RX is set to ON in transmission reception mode setting of the Utility Mode documents are printed on both sides of the paper For detail...

Page 220: ...8 Useful functions for reception 8 10 CS172...

Page 221: ...9 Polling...

Page 222: ......

Page 223: ...tin Polling TX which accumulates document to Bulletin Board User Box The description below assumes use of the polled transmission which uses the Polling TX User Box Detail To use the Bulletin board op...

Page 224: ...l panel to view the fax screen if it is not already displayed 2 Press Comm Setting 3 Press Polling TX 4 Press Normal To release the setting press OFF 5 Press OK The Comm Setting screen will be restore...

Page 225: ...ormation about setting functions in the Fax Application Menu 8 Set the original document See Placing the original on the machine on page 3 7 for information about setting the document 9 Press Start Th...

Page 226: ...the Polling TX User Box can be printed 1 Press Box on the control panel and press System User Box tab 2 Press Polling TX User Box 3 Press Print and then press Start To delete a document press Delete T...

Page 227: ...ed with the other party machine Refer to Sequence polling RX reservation report on page 12 28 and Sequence polling reception report on page 12 18 for information on the Sequential Polling Reception Re...

Page 228: ...l panel to view the fax screen if it is not already displayed 2 Press Comm Setting 3 Press Polling RX 4 Press Normal 5 Press OK To release the setting press OFF The Comm Setting screen will be restore...

Page 229: ...ination Two or more destinations can be designated 8 Press Start Your FK 502 starts to receive the document s set for transmission on the destination s or kept reserved for polled transmission Detail...

Page 230: ...board see the User manual Box Operations Perform the following procedure to write a document on a Bulletin board Write a document to the bulletin board 0 Specifications The Bulletin boards must be def...

Page 231: ...Polling 9 CS172 9 11 1 Press Fax on the control panel to view the fax screen if it is not already displayed 2 Press Comm Setting 3 Press Polling TX 4 Press Bulletin...

Page 232: ...s if necessary See Setting transmission conditions on page 3 12 for information about setting functions in the fax screen See Application functions overview on page 7 5 for information about setting f...

Page 233: ...tination fax You can receive by polling the document placed in a bulletin board of a destination Perform the following procedure for this purpose 1 Press Fax on the control panel to view the fax scree...

Page 234: ...you press C clear all Bulletin board Nos will be deleted 6 Press OK To release the setting press OFF The Comm Setting screen will be restored 7 Press OK The fax screen will be restored 8 Select a dest...

Page 235: ...g a document in the bulletin board user box Documents in the Bulletin Board User Box can be printed 1 Press Box on the control panel and press System User Box tab 2 Press Bulletin Board User Box 3 Sel...

Page 236: ...9 Polling 9 16 CS172 4 Press Print and then press Start To delete a document press Delete To print the first page only press Proof Print 5 Press Close to close the screen...

Page 237: ...10 Registering Settings...

Page 238: ......

Page 239: ...Touch Registration In the Utility Mode it is also possible to enter a number displayed in the key through the keypad for selection In the case of One Touch Registration enter the 1 on the keypad When...

Page 240: ...10 Registering Settings 10 4 CS172 3 Press Fax Fax Registration screen appears...

Page 241: ...racter The fax number Abbr Dial the E Mail or the Box can be registered This section describes the procedures of registering the Address Book changing the Address Book and deleting the Address Book th...

Page 242: ...the address book is as follows 1 See Displaying the fax registration screen on page 10 3 to display the Fax Registration screen 2 Press Address Book In the Utility Mode it is also possible to enter a...

Page 243: ...ling pulse telephone line press Tone to select push button tone mode This is used when using a fax information service and so forth when Tone is selected A T is displayed on the screen Pause Press Pau...

Page 244: ...e screen 7 To change the Search Character press Index and then re register the Search Character Press the Search key of the Search Character you want to register from among Main etc For a destination...

Page 245: ...ile format is the TIFF or PDF format The procedure for registering the E Mail for the Address Book is as follows 1 See Displaying the fax registration screen on page 10 3 to display the Fax Registrati...

Page 246: ...displayed 6 Press E Mail Address 7 Enter the E Mail address in the screen displayed and then press OK Moves the cursor to the left Moves the cursor to the right Delete Characters on the position of th...

Page 247: ...ecify the Search Character and select Main at the same time This allows you to display it at the first place in the selection of the Address Book A character at the head of the Name is automatically s...

Page 248: ...ge is the TIFF format The procedure for registering the Box for the Address Book is as follows 1 See Displaying the fax registration screen on page 10 3 to display the Fax Registration screen 2 Press...

Page 249: ...172 10 13 4 Press New 5 Press Name and then enter the name of Address Book For the operation of the entering character see page 14 4 The name can be up to 24 characters In No an unused number is displ...

Page 250: ...h Character you want to register from among Main etc For a destination to which a message is sent frequently specify the Search Character and select Main at the same time This allows you to display it...

Page 251: ...lay the Fax Registration screen 2 Press Address Book In the Utility Mode it is also possible to enter a number displayed in the key through the keypad for selection In the case of Address Book enter t...

Page 252: ...gistering Settings 10 16 CS172 6 Confirm the information you have changed and press OK To stop changing Press Cancel When proceeding with the change go to Step 5 7 Press Close 8 Press Exit on the sub...

Page 253: ...m the Group and the Program 1 See Displaying the fax registration screen on page 10 3 to display the Fax Registration screen 2 Press Address Book In the Utility Mode it is also possible to enter a num...

Page 254: ...egistering Settings 10 18 CS172 5 Press Yes in the delete confirmation screen displayed To stop deleting Press No When proceeding with the deleting go to Step 4 6 Press Close 7 Press Exit on the sub a...

Page 255: ...n page 10 5 Each Group can have a Group name The explanation here is given of the operation to register the Address Book and the Group name in the Group the operation to change the Group that has been...

Page 256: ...ation screen 2 Press Group In the Utility Mode it is also possible to enter a number displayed in the key through the keypad for selection In the case of Group enter the 2 on the keypad 3 Press New Wh...

Page 257: ...aracter see page 14 4 The name can be up to 24 characters Unregistered No is displayed in the No field 5 Press Destination Up to 500 Address Book can be registered for each Group 6 Select a category i...

Page 258: ...mber Destinations that have been numbered in the order of the registration are displayed every 100 Press the number key that is conformity with the number of the Address Book registered to display the...

Page 259: ...e to enter a number displayed in the key through the keypad for selection In the case of Group enter the 2 on the keypad 3 Select the Group you want to change and then press Edit Pressing or allows yo...

Page 260: ...de it is also possible to enter a number displayed in the key through the keypad for selection In the case of Group enter the 2 on the keypad 3 Select the Group you want to delete and then press Delet...

Page 261: ...400 001 to 400 can be registered including the Program of other functions of this machine Each Program can have a Program name The explanation here is given of the operation to register the Program an...

Page 262: ...mber displayed in the key through the keypad for selection In the case of Program enter the 3 on the keypad 3 Select the Program you want to register and then press Edit Display of Scan Setting and Co...

Page 263: ...It is a destination for scanner 4 Press Name enter the name of Program For the operation of the entering character see page 14 4 The name can be up to 24 characters 5 Press Destination 6 Press Select...

Page 264: ...you to scrawl the key of the number to be displayed Press OK In the case of Direct Input being pressed Enter a destination for setting in the following procedure Press Abbr Dial User Box or E Mail Ent...

Page 265: ...Mail Notification can be set When E Mail Notification is set to ON after completion of the job the end of the job can be confirmed by sending an E Mail to the destination of E Mail Notification For d...

Page 266: ...isplayed in the key through the keypad for selection In the case of Program enter the 3 on the keypad 3 Select the Program you want to delete and then press Delete If you press or in the left hand sid...

Page 267: ...the case of the destination for scanner it is displayed as It is a destination for scanner You can confirm the settings by selecting the Program and pressing Check Setting 4 Press Yes in the delete c...

Page 268: ...ect of E Mail can be registered to 10 and the Text of E Mail can be registered to 10 Registering the subject of the e mail The procedure for registering the Subject of the E Mail is as follows 1 See D...

Page 269: ...Registering Settings 10 CS172 10 33 3 Press Subject 4 Press New 5 Press Subject The entry of up to 64 characters is available for Subject of Subject Text for E mail In No an unused number is displayed...

Page 270: ...OK For the operation of the entering character see page 14 4 7 Press OK To stop registering press Cancel Registration is performed and the registered destination is displayed on a list 8 Press Close...

Page 271: ...follows 1 See Displaying the fax registration screen on page 10 3 to display the Fax Registration screen 2 Press Subject Text for E mail In the Utility Mode it is also possible to enter a number displ...

Page 272: ...m the settings by selecting the Subject and pressing Details 5 Press Subject 6 Change the Subject in the screen displayed and then press OK For the operation of the entering character see page 14 4 7...

Page 273: ...follows 1 See Displaying the fax registration screen on page 10 3 to display the Fax Registration screen 2 Press Subject Text for E mail In the Utility Mode it is also possible to enter a number displ...

Page 274: ...u to change the page to be displayed You can confirm the settings by selecting the Subject and pressing Details 5 Press Yes in the delete confirmation screen displayed To stop deleting Press No The Su...

Page 275: ...The procedure for setting the default of the Subject of the E Mail is as follows 1 See Displaying the fax registration screen on page 10 3 to display the Fax Registration screen 2 Press Subject Text f...

Page 276: ...10 Registering Settings 10 40 CS172 4 Select the Subject you want to default and then press Set as Default 5 Press Close 6 Press Exit on the sub area...

Page 277: ...s follows 1 See Displaying the fax registration screen on page 10 3 to display the Fax Registration screen 2 Press Subject Text for E mail In the Utility Mode it is also possible to enter a number dis...

Page 278: ...ber is displayed 6 Enter the Text in the screen displayed and then press OK For the operation of the entering character see page 14 4 7 Press OK To stop registering press Cancel Registration is perfor...

Page 279: ...ollows 1 See Displaying the fax registration screen on page 10 3 to display the Fax Registration screen 2 Press Subject Text for E mail In the Utility Mode it is also possible to enter a number displa...

Page 280: ...confirm the settings by selecting the Text and pressing Details 5 Press Text 6 Change the Text in the screen displayed and then press OK For the operation of the entering character see page 14 4 7 Pre...

Page 281: ...ollows 1 See Displaying the fax registration screen on page 10 3 to display the Fax Registration screen 2 Press Subject Text for E mail In the Utility Mode it is also possible to enter a number displa...

Page 282: ...ou to change the page to be displayed You can confirm the settings by selecting the Subject and pressing Details 5 Press Yes in the delete confirmation screen displayed To stop deleting Press No The T...

Page 283: ...he procedure for setting the default of the Text of the E Mail is as follows 1 See Displaying the fax registration screen on page 10 3 to display the Fax Registration screen 2 Press Subject Text for E...

Page 284: ...10 Registering Settings 10 48 CS172 4 Select the Text you want to default and then press Set as Default 5 Press Close 6 Press Exit on the sub area...

Page 285: ...lain how to setup a Confidential RX F Code RX User Box Detail Notify the transmitter of the User Box No and communication password which you have set Refer to p 7 34 for the operation of the confident...

Page 286: ...10 Registering Settings 10 50 CS172 3 Press User Box 4 Press Public Personal User Box 5 Press New...

Page 287: ...e User manual Box Operations 7 Press Fwd The registration screen 2 2 appears 8 Select the time period you wish to keep the document in the Confidential RX User Box 9 Press ON to activate Confidential...

Page 288: ...assword which you have set 11 Press OK 12 Press Close The registration is complete 13 Press Exit on the sub area Scheme of the confidential communication In the confidential communication each fax ope...

Page 289: ...rd User Box Up to 10 Bulletin Board User Boxes can be registerd Detail Notify the fax side receiving the Bulletin board polling of the setting Refer to p 9 10 for the operation of the bulletin Bulleti...

Page 290: ...10 Registering Settings 10 54 CS172 3 Press User Box 4 Press Bulletin Board User Box 5 Press New...

Page 291: ...information about the Type see User manual Box Operations 7 Press Fwd The registration screen 2 2 appears 8 Select the time period you wish to keep the document in the Bulletin Board User Box For mor...

Page 292: ...e Bulletin Board User Boxes Scheme of transmission reception by polling with bulletin board Originating station Sends information by polling from a bulletin board Receiving station Receives the docume...

Page 293: ...station side transmitting the document of this setting To use the Relay RX the terminating station should be registered as Group in advance Refer to p 11 43 for the setting of the Relay RX Refer to p...

Page 294: ...10 Registering Settings 10 58 CS172 3 Press User Box 4 Press Relay User Box 5 Press New...

Page 295: ...lay TX Password The Name can be up to 20 characters By pressing the Relay Dest Groups which have been set in advance can be specified Relay TX Password can contain any number between 0 and 9 and 7 Pre...

Page 296: ...e p 11 43 Originating station Issues a relay request Intermediate Relay station Transmits the same information to multiple stations Terminating stations Receives the informa tion This originates a tra...

Page 297: ...61 10 9 Setting the memory RX user box When Memory RX is set as ON by the Utility Mode a receiving document is saved in the Memory RX User Box Detail For the printing method of Memory RX User Box refe...

Page 298: ...10 Registering Settings 10 62 CS172...

Page 299: ...11 Utility mode...

Page 300: ......

Page 301: ...ded that a specific person be authorized as Utility Mode to prevent confusion The procedures for entering in and exiting the Utility Mode and setting fax functions are described below Entering user se...

Page 302: ...and press Utility Counter on the control panel 2 Press Administrator Setting 3 Enter the password and press OK Detail The password for the administrator can be changed in Security Setting The administ...

Page 303: ...Utility mode 11 CS172 11 5 Exiting from administrator setting 1 Press Exit on the sub area...

Page 304: ...Set the default of the destination column in the fax screen Program Group Ad dress Book Direct Input Default Program Set the default of the Program Temporary One Touch PAGE1 PAGE27 Address Book Defau...

Page 305: ...ions is prohibited page 11 29 Item Description Available value Fax Current Setting Before entering the Utility Mode each of the items that have been set on the touch panel is registered as the default...

Page 306: ...he Fax ID registered is printed on the docu ment received by the other party as a sender information The fax number of the machine is normally en tered Up to 20 characters with 0 to 9 space and used S...

Page 307: ...lls are made with an external telephone connect ed or when the remote reception function is employed Auto RX Manual RX Number of RX Call Rings Set the number of receptions Set the number of the pseud...

Page 308: ...n no priority size is set a record is made in the near est size When the fixing of each size is set A record is made only in the size set Auto Select Fixed Size Priority Size Print Paper Size 1 2 Set...

Page 309: ...g data only when the sender s password is valid ON OFF Set a password in 4 digits Forward TX Set ting The Fax transfer is the function used to transfer the received data to a certain sta tion determin...

Page 310: ...your FK 502 is connected to PBX line When PBX connection mode is set at ON this parameter determines the outside line access code The external line access code is the pre fix attached to the telephone...

Page 311: ...omm 100 Daily When you set the output of Activity Report to Daily or 100 Daily you can also set the time to output the report TX Report ON If TX Fails OFF Sequential TX Report ON OFF Timer Reserva tio...

Page 312: ...he pseudo ring back tone frequency after the ar rival until receiving is start ed 0 15 2 times Line Monitor Sound To hear the sound on the line from the speaker at the time of transmission with the Li...

Page 313: ...g Security Details Restrict Fax TX Disable the functions for fax transmission page 11 83 Item Description Available value Restrict Fax TX All the functions for the fax trans mission are disabled so th...

Page 314: ...pad for selection In the case of Display Setting enter 2 through the numeric keypad Item Description Available value Default Tab Set the default of the destination column in the fax screen Program Gro...

Page 315: ...tility mode 11 CS172 11 17 3 Press Fax Basic Screen Default Setting 4 Select the item you wish to set To close the Utility Mode screen press Exit in the sub area 5 Select the parameter you wish to set...

Page 316: ...11 Utility mode 11 18 CS172 6 Press Close The value of the parameter is changed 7 Press Exit on the sub area...

Page 317: ...ome items may not be displayed depending on the optional settings In the Utility Mode it is also possible to enter a number displayed in the key through the keypad for selection In the case of Display...

Page 318: ...1 Utility mode 11 20 CS172 3 Press Fax Active Screen 4 Select Transmission Display or Receipt Display To close the Utility Mode screen press Exit in the sub area 5 Select the parameter you wish to set...

Page 319: ...Utility mode 11 CS172 11 21 6 Press Close The value of the parameter is changed 7 Press Exit on the sub area...

Page 320: ...Press Initial Setting Some items may not be displayed depending on the optional settings In the Utility Mode it is also possible to enter a number displayed in the key through the keypad for selection...

Page 321: ...Utility mode 11 CS172 11 23 3 Press Factory Default and then press OK When you want to stop the setting press Cancel 4 Press Close The value of the parameter is changed 5 Press Exit on the sub area...

Page 322: ...be displayed depending on the optional settings In the Utility Mode it is also possible to enter a number displayed in the key through the keypad for selection In the case of System Setting enter 1 t...

Page 323: ...Utility mode 11 CS172 11 25 3 Press Power Save Setting 4 Press Entering Power Save Mode Fax 5 Select the parameter you wish to set...

Page 324: ...11 Utility mode 11 26 CS172 6 Press Close The value of the parameter is changed 7 Press Exit on the sub area...

Page 325: ...g on page 11 4 2 Press System Setting Some items may not be displayed depending on the optional settings In the Utility Mode it is also possible to enter a number displayed in the key through the keyp...

Page 326: ...ng is started after all documents are received Page Print Printing is made each time a page of document is received When the Duplex Print RX is set to the ON the print is made after receiving the data...

Page 327: ...page 11 4 2 Press System Setting Some items may not be displayed depending on the optional settings In the Utility Mode it is also possible to enter a number displayed in the key through the keypad fo...

Page 328: ...11 Utility mode 11 30 CS172 4 Press Restrict Operation Setting 5 Press Restrict Fax Broadcasting and select ON 6 Press Close The value of the parameter is changed 7 Press Exit on the sub area...

Page 329: ...case of Fax Setting enter 8 through the numeric keypad Item Description Available value Sender Name The name registered is printed on the docu ment received by the other party as a sender information...

Page 330: ...the Sender fax number by using keypad Space or Represents Space Represents a space Moves the cursor to the left Moves the cursor to the right Delete Characters on the position of the cursor are delet...

Page 331: ...r the name of a sender that you want to register and press OK The registration of up to 20 names of senders is available The name of a sender that has been registered can be selected from the Scan Set...

Page 332: ...tion in which the sender in formation is printed Inside Body Text The sender information will be printed inside the area corresponding to the document Outside Body Text The sender information will be...

Page 333: ...ay not be displayed depending on the optional settings In the Utility Mode it is also possible to enter a number displayed in the key through the keypad for selection In the case of Fax Setting enter...

Page 334: ...ou wish to set To close the Utility Mode screen press Exit in the sub area The displays are different depending on the country 5 Select the parameter you wish to set 6 Press Close The value of the par...

Page 335: ...n And set to Manual RX when a lot of telephone calls are made with an external telephone connect ed or when the remote reception function is employed Auto RX Manual RX Number of RX Call Rings Set the...

Page 336: ...s also possible to enter a number displayed in the key through the keypad for selection In the case of Fax Setting enter 8 through the numeric keypad 3 Press Telephone Line Setting 4 Select the item y...

Page 337: ...e parameter you wish to set To change Line Monitor Sound Volume press Line Monitor Sound Volume and then Lower or Higher to set the level and finally press OK 6 Press Close The value of the parameter...

Page 338: ...xing of each size is set A record is made only in the size set Auto Select Fixed Size Priority Size Print Paper Size 1 2 Set the paper size on which the document re ceived is printed The default varie...

Page 339: ...ing on page 11 4 2 Press Fax Setting Some items may not be displayed depending on the optional settings In the Utility Mode it is also possible to enter a number displayed in the key through the keypa...

Page 340: ...em you wish to set Use or to go to the next or previous screen To close the Utility Mode screen press Exit in the sub area 5 Select the parameter you wish to set 6 Press Close The value of the paramet...

Page 341: ...multiple stations are disabled For details of relayed communica tion see Relay transmission re quest F code TX on page 7 37 ON OFF Relay RX Broadcast the document received from the originating station...

Page 342: ...from administrator setting on page 11 5 2 Press Fax Setting Some items may not be displayed depending on the optional settings In the Utility Mode it is also possible to enter a number displayed in t...

Page 343: ...nction ON OFF Setting If any function of Memory RX Forward TX Setting Fax RX Setting or TSI User Box Setting is ON other items are not displayed 5 Select the item you wish to set To close the Utility...

Page 344: ...d within 8 digits that is used while in the print indicates factory default setting Detail Setting the Memory RX to ON makes it impossible to select the Fax RX Setting the TSI User Box Setting and the...

Page 345: ...trator setting on page 11 5 2 Press Fax Setting Some items may not be displayed depending on the optional settings In the Utility Mode it is also possible to enter a number displayed in the key throug...

Page 346: ...digits needed to print out the document received The password is a number of up to 8 digits If you press C clear the information you have entered will be deleted When you want to stop the setting pre...

Page 347: ...e sender s password is valid The FK 502 checks if the sender s password is equal to that defined for your FK 502 If the two passwords are different or the sender does not provide a password a communic...

Page 348: ...th the Password Transmission function 1 Open the Administrator Setting screen See Entering administrator setting on page 11 4 2 Press Fax Setting Some items may not be displayed depending on the optio...

Page 349: ...x with the password needed to print out the document received The password is a number of up to 4 digits If you press C clear the information you have entered will be deleted To exit press Cancel 6 Pr...

Page 350: ...Setting Setting up fax transfer Forward TX setting 1 Open the Administrator Setting screen See Entering administrator setting on page 11 4 2 Press Fax Setting Some items may not be displayed dependin...

Page 351: ...ess Function Setting 4 Press Forward TX Setting 5 Select Forward Print or Forward Print If TX Fails OFF The received document is not transferred Forward Print The received document is transferred and...

Page 352: ...Dest box You can use Tone Pause and See Selecting one destination on page 3 22 By pressing Select from Address Book you can specify the transfer destination from the registered Address Book By pressin...

Page 353: ...See Entering administrator setting on page 11 4 2 Press Fax Setting Some items may not be displayed depending on the optional settings In the Utility Mode it is also possible to enter a number display...

Page 354: ...1 Utility mode 11 56 CS172 3 Press Function Setting 4 Press Incomplete TX Hold 5 Turn the Incomplete TX Hold to ON and specify the Incomplete TX Hold Time When you want to stop the setting press Cance...

Page 355: ...Utility mode 11 CS172 11 57 6 Press OK and then Close The setting is changed and you return to the Utility Mode screen 7 Press Exit on the sub area...

Page 356: ...default setting 1000 2000 Sender Original Hard disk Item Description Available value Receive into User Box The PC FAX RX feature offers a proce dure for saving files containing received faxes in Boxes...

Page 357: ...IFF format at Fixed Box or Specified Box 1 Open the Administrator Setting screen See Entering administrator setting on page 11 4 2 Press Fax Setting Some items may not be displayed depending on the op...

Page 358: ...red in the specified box 6 For Receiving Box Destination select a box into which a document received by the PC FAX RX feature is stored Memory RX User Box a received file is sent to Memory RX User Box...

Page 359: ...t up whether or not to set the Password by Communication Password When setting to ON enter the Communication Password 8 digits or less 9 Press OK and then press Close The setting is changed and you re...

Page 360: ...re the TSI reception is to be allocated Transmit the document received with the FAX ID TSI of the transmitter to the destination prepared for each transmitter Box E Mail FTP SMB Detail When the delive...

Page 361: ...the distribution is made to the E mail FTP SMB Item Description Available value TSI User Box Set ting This is a function to allocate received originals according to the TSI information of faxes receiv...

Page 362: ...ing administrator setting on page 11 4 2 Press Fax Setting Some items may not be displayed depending on the optional settings In the Utility Mode it is also possible to enter a number displayed in the...

Page 363: ...information is received by Action when TSI User Box is not set Automatically Print Prints the received document Memory RX User Box Saves the received document in the Memory RX User Box 7 In Receive P...

Page 364: ...p to 128 boxes Use or to go to the next or previous screen 10 Use numeric keypad SPACE or to input FAX ID in Sender TSI box Inputs Space Inputs a space Moves the cursor to left Moves the cursor to rig...

Page 365: ...and specify the distribution box You can enter the box No in the range of 1 to 999999999 The distribution of faxes received to the Confidential User Box is not available 12 Press OK and then press Clo...

Page 366: ...ode it is also possible to enter a number displayed in the key through the keypad for selection In the case of Fax Setting enter 8 through the numeric keypad Item Description Available value PBX CN Mo...

Page 367: ...ode Set 5 Use the keypad to enter the Outside Line code If you press C clear the information you have entered will be deleted When you want to stop the setting press Cancel 6 Press OK and then press C...

Page 368: ...Every 100 Comm 100 Daily When you set the output of Activity Report to Daily or 100 Daily you can also set the time to output the report TX Report ON If TX Fails OFF Sequential TX Report ON OFF Timer...

Page 369: ...g ON in TX Result Report Check the TX Report will be printed if YES is selected The report will not be printed if NO is selected 1 Open the Administrator Setting screen See Entering administrator sett...

Page 370: ...de 11 72 CS172 3 Press Report Settings 4 Select the report you wish to set Use or to go to the next or previous screen To close the Utility Mode screen press Exit in the sub area 5 Select the item you...

Page 371: ...Utility mode 11 CS172 11 73 6 Press Close The value of the parameter is changed 7 Press Exit on the sub area...

Page 372: ...age 11 4 2 Press Fax Setting Some items may not be displayed depending on the optional settings Item Description Available value Telephone Line Set ting Dialing Method Set the dialing method for the L...

Page 373: ...ossible to enter a number displayed in the key through the keypad for selection In the case of Fax Setting enter 8 through the numeric keypad 3 Press Multi Lines Setting 4 Press Telephone Line Setting...

Page 374: ...11 Utility mode 11 76 CS172 5 Select the item you wish to set 6 Select the parameter you wish to set 7 Press Close The value of the parameter is changed 8 Press Exit on the sub area...

Page 375: ...Fax Setting Some items may not be displayed depending on the optional settings In the Utility Mode it is also possible to enter a number displayed in the key through the keypad for selection In the ca...

Page 376: ...ss Function Setting To close the Utility Mode screen press Exit in the sub area 5 Select the item you wish to set 6 Select the parameter you wish to set 7 Press Close The value of the parameter is cha...

Page 377: ...x Setting Some items may not be displayed depending on the optional settings In the Utility Mode it is also possible to enter a number displayed in the key through the keypad for selection In the case...

Page 378: ...11 80 CS172 4 Press Multi Lines Setting To close the Utility Mode screen press Exit in the sub area 5 Select the parameter you wish to set 6 Press OK The value of the parameter is changed 7 Press Exit...

Page 379: ...the optional settings In the Utility Mode it is also possible to enter a number displayed in the key through the keypad for selection In the case of Fax Setting enter 8 through the numeric keypad 3 P...

Page 380: ...using keypad Space or Represents Space Represents a space Moves the cursor to the left Moves the cursor to the right Delete Characters on the position of the cursor are deleted one by one When the cur...

Page 381: ...the Administrator Setting screen See Entering administrator setting on page 11 4 2 Press Security Setting Some items may not be displayed depending on the optional settings In the Utility Mode it is...

Page 382: ...11 Utility mode 11 84 CS172 3 Press Security Details 4 Press To close the Utility Mode screen press Exit in the sub area 5 Press Restrict Fax TX...

Page 383: ...Utility mode 11 CS172 11 85 6 Select the parameter you wish to set 7 Press Close The value of the parameter is changed 8 Press Exit on the sub area...

Page 384: ...11 Utility mode 11 86 CS172...

Page 385: ...12 Explanation of reports and lists...

Page 386: ......

Page 387: ...ails in the Administrator Set ting of the Utility Mode the result of the polling transmission is printed out automatically Polling RX report If the TX Report is set to ON or If TX Fails in the Adminis...

Page 388: ...ng of the Utility Mode the result of bulletin board transmission is printed out automatically Relay TX result report If the Relay TX Result Report is set to ON in the Administrator Set ting of the Uti...

Page 389: ...vity Report being printed out automatically either the transmission record transmission report only reception record reception report only or a record of both transmissions and receptions Activity Rep...

Page 390: ...ed a list of current jobs can be displayed for each line on the Current Jobs screen of Fax TX To display the list of Current Jobs of the Line 1 Press L1 or to display the list of Current Jobs of the l...

Page 391: ...s Add paper according to the message The actual reports may be different from the reports in this manual Item Description No Serial numbers are assigned to each transmission and reception Destination...

Page 392: ...Cont Shown when an error has occurred and the FK 502 has switched to error page redialing No Ans Shown when the destination being called did not answer Busy Shown when unable to complete communica ti...

Page 393: ...Explanation of reports and lists 12 CS172 12 9 Detail Some items may not be indicated depending on the optional settings...

Page 394: ...TX Report at Report Settings of Utility Mode For details see Report settings on page 11 70 The actual reports may be different from the reports in this manual Item Description Destination The followin...

Page 395: ...wn when the destination being called did not answer Busy Shown when unable to complete communica tion due to the line being busy M Full Memory full is shown when the FAX file memory became full during...

Page 396: ...at Report Settings of Utility Mode For details see Report settings on page 11 70 The actual reports may be different from the reports in this manual Item Description Destination The following is shown...

Page 397: ...wn when the destination being called did not answer Busy Shown when unable to complete communica tion due to the line being busy M Full Memory full is shown when the FAX file memory became full during...

Page 398: ...The communication start time is shown Time Time required for a communication is shown Prints No of pages which has been sent is shown Result OK Shown when communication ended normally S OK Shown when...

Page 399: ...uit L2 Sub Circuit TMR Timer communication POL Polling ORG Original size set FME Frame Erase MIX Mixed size original CALL Telephone CSRC CS Remote Care FWD FORWARD PC PC Fax BND Bind Position SP Speci...

Page 400: ...Result Report For details see Report settings on page 11 70 The actual reports may be different from the reports in this manual Item Description Destination The following is shown A destination name...

Page 401: ...wn when the destination being called did not answer Busy Shown when unable to complete communica tion due to the line being busy M Full Memory full is shown when the FAX file memory became full during...

Page 402: ...ettings of Utility Mode For details see Report settings on page 11 70 The actual reports may be different from the reports in this manual Item Description Destination The following is shown Destinatio...

Page 403: ...wn when the destination being called did not answer Busy Shown when unable to complete communica tion due to the line being busy M Full Memory full is shown when the FAX file memory became full during...

Page 404: ...lity Mode For details see Report settings on page 11 70 The actual reports may be different from the reports in this manual Item Description Destination The following is shown Destination name when de...

Page 405: ...uit L2 Sub Circuit TMR Timer communication POL Polling ORG Original size set FME Frame Erase MIX Mixed size original CALL Telephone CSRC CS Remote Care FWD FORWARD PC PC Fax BND Bind Position SP Speci...

Page 406: ...out can be set to ON or OFF with Timer Reservation TX Report at Report Settings of Utility Mode For details see Report settings on page 11 70 The actual reports may be different from the reports in th...

Page 407: ...uit L2 Sub Circuit TMR Timer communication POL Polling ORG Original size set FME Frame Erase MIX Mixed size original CALL Telephone CSRC CS Remote Care FWD FORWARD PC PC Fax BND Bind Position SP Speci...

Page 408: ...tility Mode For details see Report settings on page 11 70 The actual reports may be different from the reports in this manual Item Description Destination The following is shown Destination name when...

Page 409: ...uit L2 Sub Circuit TMR Timer communication POL Polling ORG Original size set FME Frame Erase MIX Mixed size original CALL Telephone CSRC CS Remote Care FWD FORWARD PC PC Fax BND Bind Position SP Speci...

Page 410: ...FF with Timer Reservation TX Report at Report Settings of Utility Mode For details see Report settings on page 11 70 The actual reports may be different from the reports in this manual Item Descriptio...

Page 411: ...uit L2 Sub Circuit TMR Timer communication POL Polling ORG Original size set FME Frame Erase MIX Mixed size original CALL Telephone CSRC CS Remote Care FWD FORWARD PC PC Fax BND Bind Position SP Speci...

Page 412: ...r OFF with Timer Reservation TX Report at Report Settings of Utility Mode For details see Report settings on page 11 70 The actual reports may be different from the reports in this manual Item Descrip...

Page 413: ...uit L2 Sub Circuit TMR Timer communication POL Polling ORG Original size set FME Frame Erase MIX Mixed size original CALL Telephone CSRC CS Remote Care FWD FORWARD PC PC Fax BND Bind Position SP Speci...

Page 414: ...ation Start Time The time at which communication started Time The required time for the communication is shown Prints The number of pages transmitted Result OK Shown when communication ended normally...

Page 415: ...uit L2 Sub Circuit TMR Timer communication POL Polling ORG Original size set FME Frame Erase MIX Mixed size original CALL Telephone CSRC CS Remote Care FWD FORWARD PC PC Fax BND Bind Position SP Speci...

Page 416: ...Report at Report Settings of Utility Mode For details see Report settings on page 11 70 The actual reports may be different from the reports in this manual Item Description Destination The following...

Page 417: ...wn when the destination being called did not answer Busy Shown when unable to complete communica tion due to the line being busy M Full Memory full is shown when the FAX file memory became full during...

Page 418: ...lay TX Result Report at Report Settings of Utility Mode For details see Report settings on page 11 70 The actual reports may be different from the reports in this manual Item Description Destination T...

Page 419: ...wn when the destination being called did not answer Busy Shown when unable to complete communica tion due to the line being busy M Full Memory full is shown when the FAX file memory became full during...

Page 420: ...of Utility Mode For details see Report settings on page 11 70 The actual reports may be different from the reports in this manual Item Description Destination The following is shown Destination name w...

Page 421: ...wn when the destination being called did not answer Busy Shown when unable to complete communica tion due to the line being busy M Full Memory full is shown when the FAX file memory became full during...

Page 422: ...70 The actual reports may be different from the reports in this manual Item Description Destination The following is shown Destination name when destination name is registered in abbreviat ed dialing...

Page 423: ...the administrator can be changed in Security Setting The administrator should have a responsibility for the management of the password 4 Press One Touch Registration In the Utility Mode it is also pos...

Page 424: ...gistration No and select E Mail User Box or Fax for Destination Type The specification can be made up to 100 Pressing moves the cursor to the left and pressing moves it to the right When deleting char...

Page 425: ...t lashes in red On an occasion like this Start cannot be pressed The actual reports may be different from the reports in this manual Item Description No Abbreviated dialing number Name Registration na...

Page 426: ...for the administrator can be changed in Security Setting The administrator should have a responsibility for the management of the password 4 Press One Touch Registration In the Utility Mode it is also...

Page 427: ...be made up to 20 Pressing moves the cursor to the left and pressing moves it to the right When deleting characters entered press C clear on the control panel 8 Press Print 9 Select tray to print 10 P...

Page 428: ...The actual reports may be different from the reports in this manual Item Description No Registration group number Name Registration group name Addr No Abbreviated dialing numbers registered for the g...

Page 429: ...the administrator can be changed in Security Setting The administrator should have a responsibility for the management of the password 4 Press One Touch Registration In the Utility Mode it is also pos...

Page 430: ...ecify E Mail FTP SMB User Box or Fax The specification can be made up to 50 Pressing moves the cursor to the left and pressing moves it to the right When deleting characters entered press C clear on t...

Page 431: ...w to see the program list The actual reports may be different from the reports in this manual Item Description No Registration program number Name Registration name Address Book Address Book number It...

Page 432: ...d and press OK The password for the administrator can be changed in Security Setting The administrator should have a responsibility for the management of the password 4 Press One Touch Registration In...

Page 433: ...ists 12 CS172 12 49 7 Select tray to print 8 Press Start The E Mail Subject Title List is printed out Detail When no necessary paper is set in the paper tray Start flashes in red On an occasion like t...

Page 434: ...S172 How to see the subject text list List name Item Description Title List No Registration number Subject Subject registered for the Subject Text for E Mail Text List No Registration number Text Text...

Page 435: ...and press OK The password for the administrator can be changed in Security Setting The administrator should have a responsibility for the management of the password 4 Press Fax Setting Some items may...

Page 436: ...s and lists 12 52 CS172 6 Select tray to print 7 Press Start The Fax Settings List is printed out Detail When no necessary paper is set in the paper tray Start flashes in red On an occasion like this...

Page 437: ...tion of reports and lists 12 CS172 12 53 How to see the fax setting list The actual reports may be different from the reports in this manual Item Description Item Item of Utility Mode Setting Setting...

Page 438: ...12 Explanation of reports and lists 12 54 CS172 The actual reports may be different from the reports in this manual...

Page 439: ...ts 12 CS172 12 55 Relay list The actual reports may be different from the reports in this manual Item Description No The Box number of the Relay User Box Group No Group No as relay distribution destin...

Page 440: ...l Bulletin list The actual reports may be different from the reports in this manual Item Description No Box number registered with confidential bulletin board Name Registered name Password Confidentia...

Page 441: ...der TSI RX box The actual reports may be different from the reports in this manual Item Description No The registration number of the Sender TSI RX Sender TSI The registered sender information Forward...

Page 442: ...12 Explanation of reports and lists 12 58 CS172...

Page 443: ...13 Web Connection...

Page 444: ......

Page 445: ...se the Web Connection for the FAX functions is explained Address Book Group Program Confidential RX User Box Public User Box Bulletin Board User Box Polling TX User Box Memory RX User Box Relay User B...

Page 446: ...key http IP_address_of_the_machine e g When IP Address of the machine is 192 168 1 20 http 192 168 1 20 If user authentication is enabled a page for entering the user name and password appears before...

Page 447: ...on are displayed 5 Help The page specified in Online Manual URL is dis played For details refer to the User manual Print Operations 6 Updating the display By clicking this button display on the screen...

Page 448: ...again In addition since the machine s control panel remains locked and cannot be used the machine must be restarted In order to avoid this problem disable the cache The menus and commands may vary dep...

Page 449: ...med it is necessary to log off first then log on again To log off 1 Click Logout at the upper left of the window When logged on a timeout occurs and you will automatically be logged off if no operatio...

Page 450: ...13 Web Connection 13 8 CS172 The user is logged off and the Login page appears...

Page 451: ...e are two procedures for logging on to User mode one for a registered user and one for a public user If user authentication is not performed log on as a public user 1 In the Login page select Public U...

Page 452: ...13 Web Connection 13 10 CS172 2 Click Login The User mode page appears...

Page 453: ...with a specific user name 0 Click the icon to the right of the User Name box and then select a user name from the list 0 For specifying the box administrator settings refer to User manual Box Operati...

Page 454: ...13 Web Connection 13 12 CS172 2 Click Login The User mode page appears...

Page 455: ...Administrator mode 0 When logged on to Administrator mode the control panel of this machine is locked and cannot be used 0 Depending on the status of the machine you may not be able to log on to Admi...

Page 456: ...13 Web Connection 13 14 CS172 2 Type in the password for the machine s administrator and then click OK The Administrator mode page appears...

Page 457: ...can be registered for the fax scanning functions The Scan tab appears only when registrations by users are permitted To register new destinations 1 Click Scan tab and then select Address Book 2 Click...

Page 458: ...13 Web Connection 13 16 CS172 4 Enter the settings and click Apply 5 Click OK Registration is performed...

Page 459: ...999 Click and then select the box number from the list When Abbr Dial is selected Name Enter the name of the destination up to 24 characters Index Select the search word for searching destinations Des...

Page 460: ...d destinations 1 Click Scan tab and then select Address Book 2 Click of the address you want to change 3 A setting edit page appears and the settings can be changed The items are the same as those use...

Page 461: ...Web Connection 13 CS172 13 19 Deleting the address book 1 Click Scan tab and then select Address Book 2 Click of the address you want to delete...

Page 462: ...13 Web Connection 13 20 CS172 3 To delete click the OK 4 Click OK An address is deleted...

Page 463: ...13 21 13 4 Group Multiple destinations registered in the Address Book can be registered as a group To register group 1 Click the Scan tab and then click Group 2 Click New Registration 3 Select Store...

Page 464: ...13 22 CS172 4 Enter the Name 5 For each transmission mode select the destinations Select the send mode Click 6 Select the desired destinations to be registered to the group from the Address Book List...

Page 465: ...Web Connection 13 CS172 13 23 7 Click OK Registration is performed...

Page 466: ...Connection 13 24 CS172 13 5 Program registration Transmission conditions and an address can be registered as a Program To register program 1 Click the Scan tab and then click Program 2 Click New Regis...

Page 467: ...Web Connection 13 CS172 13 25 3 Select the transmission mode and then click Next...

Page 468: ...13 Web Connection 13 26 CS172 4 Enter the Settings and click Apply...

Page 469: ...file format Simplex Duplex Select Single Sided Double Sided or Cover 2 Sided Original Type Select the quality of the original such as text or photo Density Adjust the density Background Removal Adjus...

Page 470: ...n Not Specified was selected the default title is used Click to check the contents Text Specify the text Not Specified 1 to 10 Click to check the contents Simplex Duplex Select Single Sided Double Sid...

Page 471: ...ded Double Sided or Cover 2 Sided Original Type Select the quality of the original such as text or photo Density Adjust the density Background Removal Adjust the background darkness Scan Size Select t...

Page 472: ...Background Removal Adjust the background darkness Scan Size Select the original size Auto or Standard Size Feed Direction Specify the direction in which the paper is output E Mail Notification The upl...

Page 473: ...background darkness Scan Size Select the original size Auto or Standard Size Feed Direction Specify the direction in which the paper is output Timer TX Specify whether to enable the timer transmissio...

Page 474: ...registered and the Box can be opened to check the contents from the Web Connection Detail For more information about User Box refer to User manual Box Operations To register confidential RX user box 1...

Page 475: ...to search the box Main Set up so as to be displayed by pressing Main in the search characters User Box Type When the Authentication Account Track is ON select the box type from Public or Personal Docu...

Page 476: ...13 Web Connection 13 34 CS172 To open confidential RX user box 1 Click the Box tab and then select Open User Box 2 Select Public User Box and then click Next...

Page 477: ...Web Connection 13 CS172 13 35 3 Enter the User Box No of the box to display and enter the User Box Password if required and click OK 4 Confirm the contents in the box...

Page 478: ...on User Box Setting Edit the contents in the box Delete User Box Delete the box Display the detailed information of the document Download the document Delete the document Change the name of the docume...

Page 479: ...stered and the Box can be opened to check the contents from the Web Connection Detail For more information about User Box refer to User manual Box Operations To register bulletin board user box 1 Clic...

Page 480: ...User Box Name Up to 20 characters User Box Password Enter the User Box Password to open the box Retype User Box Password Enter again to confirm the box password User Box Type When the Authentication...

Page 481: ...Web Connection 13 CS172 13 39 To open bulletin board user box 1 Click the Box tab and then select Open User Box 2 Select Bulletin Board User Box and then click Next...

Page 482: ...13 Web Connection 13 40 CS172 3 Enter the User Box No of the box to display and enter the User Box Password if required and click OK 4 Confirm the contents in the box...

Page 483: ...Web Connection 13 CS172 13 41 Item Description User Box Setting Edit the contents in the box Delete User Box Delete the box Display the detailed information of the document Delete the document...

Page 484: ...stered and the Box can be opened to check the contents from the Web Connection Detail For more information about User Box refer to User manual Box Operations To register relay user box 1 Click the Box...

Page 485: ...ription User Box No Enter the User Box Number User Box Name Enter the User Box Name Up to 20 characters Relay Dest Click and specify the Group to be a terminating sta tion Relay TX Password Enter the...

Page 486: ...13 Web Connection 13 44 CS172 To open relay user box 1 Click the Box tab and then select Open User Box 2 Select Relay User Box and then click Next...

Page 487: ...Web Connection 13 CS172 13 45 3 Enter the User Box No of the box to display and enter the Relay TX Password and click OK 4 Click User Box Settig...

Page 488: ...6 To change the Relay TX Password turn the Relay TX Password is changed check box to ON enter the Current Relay TX Password and enter the New Relay TX Password 7 To confirm enter the new password agai...

Page 489: ...er Box can be opened to check the contents from the Web Connection Detail For more information about User Box refer to User manual Box Operations To open polling TX user box 1 Click the Box tab and th...

Page 490: ...13 Web Connection 13 48 CS172 3 Confirm the contents in the box Item Description Display the detailed information of the document Delete the document...

Page 491: ...er Box can be opened to check the contents from the Web Connection Detail For more information about User Box refer to User manual Box Operations To open memory RX user box 1 Click the Box tab and the...

Page 492: ...13 Web Connection 13 50 CS172 3 Enter the password and then click OK 4 Confirm the contents in the box...

Page 493: ...Web Connection 13 CS172 13 51 Item Description Display the detailed information of the document Download the document Delete the document...

Page 494: ...13 Web Connection 13 52 CS172...

Page 495: ...14 Appendix...

Page 496: ......

Page 497: ...000 Oc standard originals in an A4 size sheet with 700 words that are saved and received in each mode Copy Printer Scan Box and Fax at fine resolution Number of stored pages may differ depending on t...

Page 498: ...he keyboard that appears in the touch panel for typing in the names of registered accounts and custom paper sizes The keypad can also be used to type in numbers Any of the following keyboards may appe...

Page 499: ...Appendix 14 CS172 14 5 The following procedure describes how to type using E Mail address input screen...

Page 500: ...eypad The entered characters appear in the text box 2 Note To cancel the entered text touch Cancel To clear all entered text press the C clear key Detail To change a character in the entered text touc...

Page 501: ...dition of the documents such as the destination transmission time memory transmit or resolution is same bps An abbreviation for bit per second It is the unit of data transmission and represents the am...

Page 502: ...or read with the ADF left open G G3 One of the fax communication modes standardized by ITU T There are G3 and G4 in the communication mode G3 is the most used communication mode now Group To group mu...

Page 503: ...rations O Original size set The function to designate the paper size for the document to be sent Normally when the paper size loaded at the destination is too small to accommodate the image being tran...

Page 504: ...smission during com munication or printing Resolution The higher resolution is the longer it takes to transmit Se lect the appropriate resolution Restored Transmis sion The function to select document...

Page 505: ...poor even if it is in your country It trans mits in noise resistant 7 200 bps or 4 800 bps Transmission time The time to send a fax The higher resolution is the longer it takes to transmit U Upside do...

Page 506: ...ting 3 18 Confidential communication 7 34 Confidential RX report 12 30 Confidential Bulletin List 12 56 Contrast dial 2 5 Control panel 2 4 Copy 2 4 Crosswise 1 23 D Data 2 5 Density 3 14 Destination...

Page 507: ...5 6 No of dest 2 15 Number of originals 3 48 7 6 O OFF 7 5 Off hook 2 15 OK 7 5 Original image type 3 13 Outside line 11 68 Overseas TX 3 53 7 7 P Page indicator 2 15 Page list 2 15 Password TX 7 6 7...

Page 508: ...Sender TSI RX box 12 57 Sender fax no 2 7 Sender name 2 7 Sequence polling reception report 12 18 Sequence polling RX reservation report 12 26 12 28 Sharpness 7 6 7 19 Simplex Duplex 3 15 Specified bo...

Page 509: ...sufficient background information O Yes O No Is the format of this manual convenient in size readability and arrangement page layout chapter order etc O Yes O No Could you find the information you wer...

Page 510: ...sheet is completed by If you prefer to remain unknown please do fill in your occupation Name Occupation Company Phone Address City Country Please return this sheet to Oc Technologies B V For the atten...

Page 511: ...o SP 04578 000 Brasil http www oce brasil com br Oc Canada Inc 4711 Yonge Street Suite 1100 Toronto Ontario M2N 6K8 Canada http www oce ca Oc Office Equipment Beijing Co Ltd Xu Mu Cheng Chaoyang Distr...

Page 512: ...dana Superiore 2 B 20063 Cernusco sul Naviglio MI Italia http www oce it Oc Japan Corporation 3 25 1 Nishi Shinbashi Minato Ku Tokyo 105 0003 Japan http www ocejapan co jp Oc Belgium S A Rue Astrid 2...

Page 513: ...nia 2128 South Africa Oc Espa a SA Business Park Mas Blau Osona 2 08820 El Prat de Llobregat Barcelona Spain http www oce es Oc Svenska AB Sollentunav gen 84 191 27 Sollentuna Sweden http www oce se O...

Page 514: ...of local Oc organisations for information about the Wide Format Printing Systems and the Production Printing Systems can be different from the addresses above Refer to the web site http www oce com fo...

Reviews: