22
E
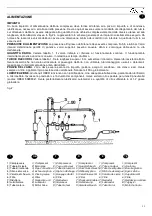
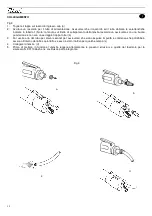
MONTAJE DE LAS HERRAMIENTAS DE ROSCADO
(fig.5)
Los cabezales de roscado OBER se suministran con el mandril portacasquillos con cambio rápido; para montar las
herramientas hay que meter el macho en su casquillo correspondiente y apretar el pasador D.
MONTAJE DEL CASQUILLO PORTAMACHOS
(fig.5)
Acoplar casquillo y terraja en el mandril tal como indica la flecha, haciendo deslizar axialmente la manopla del mandril, tal
como indica la flecha, y soltarla.
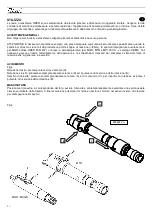
SUSTITUCION DEL MANDRIL
(fig.6)
Aflojar la tuerca a lado del mandril. Introducir, entre la corona y el mandril, la llave de cuña. Dar un golpe de mazo
sobre la llave para extraer el mandril del eje. Montar el mandril asegurando el acoplamiento mandril-eje, limpiando las
superficies con atención. Ajustar la tuerca.
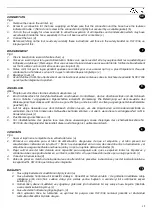
KILAVUZ ALETLER
İ
N
İ
N
MONTE ED
İ
LMES
İ
(
ş
ekil 5)
OBER kılavuz ba
ş
lıkları hızlı de
ğ
i
ş
tirme kelepçe tutma kavramaları ile birlikte teslim edilmektedir. Monte etmek için
kılavuzu (1), ilgili kelepçeye (2) bastırın. Kılavuz, kavrama somununa (P) basılırken çekilerek de de
ğ
i
ş
tirilebilir.
KILAVUZ TUTMA KELEPÇELERININ MONTE EDILMESI
(
ş
ekil 5)
Kutu ve kılavuzu torna kafası ba
ş
ının eksen boyunca yer alaca
ğ
ı - okla gösterilen
ş
ekilde - ve daha sonra bırakılaca
ğ
ı
ş
ekilde torna kafasına (3) ba
ğ
layın (sökmek için torna kafası ba
ş
ını aynı
ş
ekilde çalı
ş
tırın ve kelepçeyi ters yönde çevirin.
TORNA KAFASININ DE
ĞİŞ
T
İ
R
İ
LMES
İ
(
ş
ekil 6)
Torna kafasının yan tarafındaki tespit pimini gev
ş
etin. Uygun anahtarı kullanarak kafa ile torna kafası arasında sabitleyin.
Anahtara çekiç ile vurarak torna kafasını çıkarın. Torna kafasını takın ve yüzeyleri dikkatlice temizleyerek mil ile uygun
ş
ekilde ba
ğ
landı
ğ
ından emin olun. Tespit pimini sıkın.
I
DIFFICOLTÀ DI AVVIAMENTO.
Qualora l'utensile collegato alla rete aria, non si avvii, verificare che la leva di
alimentazione non sia bloccata, introdurre alcune gocce di nafta nel raccordo di alimentazione aria e tentare nuovamente
l'avviamento. Se il motore non girasse ancora, staccare l'alimentazione e tentare di sbloccarlo nuovamente ruotando
manualmente il mandrino.
CALI DI POTENZA.
Controllare che il foro d'ingresso aria
non sia occluso e che l'aria sia adeguatamente lubrificata
.
Pulire il silenziatore allo scarico lavandolo con nafta. Si raccomanda di non rimuovere tale silenziatore: ciò porterebbe a
prestazioni lievemente più elevate, ma contemporaneamente ad un aumento della rumorosità oltre i livelli previsti.
!
ATTENZIONE:
INTERROMPERE SEMPRE L'ALIMENTAZIONE DELL'ARIA COMPRESSA PRIMA DI ESEGUIRE
SULL'UTENSILE OPERAZIONI DIVERSE DA QUELLA DI MASCHIATURA.
GB
PROBLEMS IN STARTING
. If the tool connected to the compressed air supply should not turn on, make sure the supply
lever is not blocked, place a few drops of naphtha in the connection to the air supply and try once again to start the tool. If
the motor is still not running, disconnect it from the pneumatic supply and try to release it by turning the chuck by hand.
DECREASED POWER
. Make sure the air inlet is not obstructed and that the air is properly lubricated. Clean the exhaust
silencer with naphtha. Do not remove the silencer: this would result in a slightly higher performance, but at the same time
it would increase noise beyond the foreseen levels.
!
ATTENTION
: ALWAYS INTERRUPT THE SUPPLY OF COMPRESSED AIR BEFORE USING THE TOOL FOR
OTHER OPERATIONS RATHER THAN TAPPING.
Summary of Contents for MGR33-55-77
Page 4: ......

