15
CONNECTION
GB
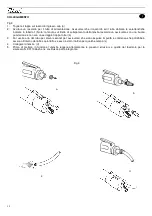
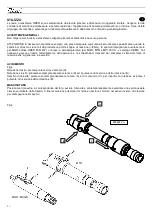
Fig.3
1. Remove the cap on the air inlet. (a)
2. Screw in a connection for the hose supplying air. Make sure that the connection and the hose have the features
indicated in table 1 (Note: do not screw in the connection too tightly but secure it by a suitable gasket).(b)
3. Turn on the air supply for a few seconds to allow the expulsion of all impurities and condensation which may have
accumulated inside the hose, especially if it has not been used for some time.(c)
4. Connect the tool. (d)
5. Before switching on the tool, read very carefully these instructions and those in the safety booklet no. 9011036, an
integral part of this.
BRANCHEMENT
F
Fig.3
1. Otez le bouchon du raccord d'entrée d'air.( a)
2. Vissez un raccord pour le tuyau d'alimentation. Veillez à ce que le raccord et le tuyau présentent les caractéristiques
indiquées au tableau 1 (Remarque: Pour vous assurer de la résistance au niveau du filet de l’orifice de branchement
sur l'outil, utilisez un bon joint et ne serrez pas trop fort) (b).
3. Faites sortir l'air par le tuyau pendant quelques secondes pour vous assurer qu'il n'y a plus d'impureté ni d'eau de
condensation à l'intérieur, surtout s'il n'a pas fonctionné depuis longtemps.( c)
4. Branchez l'outil.(d)
5. Avant d’utiliser l’outil, lire attentivement ces instructions et celles contenues dans la brochure de sécurité N. 9011036
qui est partie intégrante du produit.
ANSCHLUSS
D
Abb.3
1. Pfropfen am Anschluss für die Luftzufuhr abnehmen. (a)
2. Ein Anschlussstück für den Zufuhrschlauch anschrauben. Kontrollieren, ob das Anschlussstück und der Schlauch
den in Tabelle 1 angegebenen Eigenschaften entspricht (Anmerkung: Die Befestigung auf dem Gewinde des
Werkzeuganschlussstückes wird durch eine gute Dichtung und eine nicht zu streng angezogene Schlauchklemme
gesichert).(b)
3. Luft für einige Sekunden aus dem Schlauch strömen lassen, um alle Unreinheiten und Kondensrückstände zu
vermeiden, die sich im Inneren des Schlauches befinden könnten, vor allem, wenn dieser seit längerer Zeit nicht in
Verwendung war. (c)
4. Das Werkzeug anschliessen. .(d)
5. Vor inbetriebnahme des gerates lese man diese anweisungen, sowie diejenigen der sicherheitsbroschüre Nr.
9011036, die integrierender bestandteil dieser ausführungen ist, aufmerksam durch.
E
CONEXIÓN
Fig.3
1. Sacar el tapón en el empalme de la entrada del aire. (a)
2. Enroscar un empalme para el tubo de alimentación. Asegurarse de que el empalme y el tubo posean las
características indicadas en la tabla nº 1 (Nota: la estanqueidad en la rosca de conexión entre la herramienta y el
empalme se asegura mediante una buena junta y no por un apriete demasiado fuerte).(b)
3. Dejar salir el aire del tubo durante unos segundos para asegurarse de que se expulsen todas las impurezas y
condensaciones que podría haber en su interior, sobre todo, si ha permanecido inactivo por un largo periodo. (c)
4. Conectar la herramienta.(d)
5. Antes de poner en marcha la herramienta lea con attención las presentes instrucciones y las del fasciculo relativo a
la seguridad N. 9011036 que forma parte integrante.
BA
Ğ
LANTI
1. Hava giri
ş
beslemesi konektörünün fi
ş
ini çıkarın (a)
2. Hava besleme hortumuna bir konektör vidalayın. Konektör ve hortumun tablo 1 de gösterilen özelliklere sahip
oldu
ğ
una emin olun (Not: sadece vidayı çok sıkmak yerine, ba
ğ
lantı ü zerinde iyi bir sızdırmazlık keçesi
kullanın). (b)
3. Hortumdaki yabancı maddeleri ve yo
ğ
u
ş
mayı gidermek için hortumdan bir kaç saniye hava bo
ş
altın (özellikle
uzun süredir kullanılmıyorsa). (c)
4. Hava besleme hortumunu giri
ş
e ba
ğ
layın. (d)
5. Aleti açmadan önce bu talimatları ve ayrılmaz bir parçası olan 9011036 numaralı güvenlik el kitabındaki
talimatları dikkatli bir biçimde okuyun.
Summary of Contents for MGR33-55-77
Page 4: ......

