background image

IPE card replacement procedures


105

Meridian SL-100 SE Commercial Systems Card Replacement Procedures MSL15

NT5D11

in an IPE

 (continued)

7

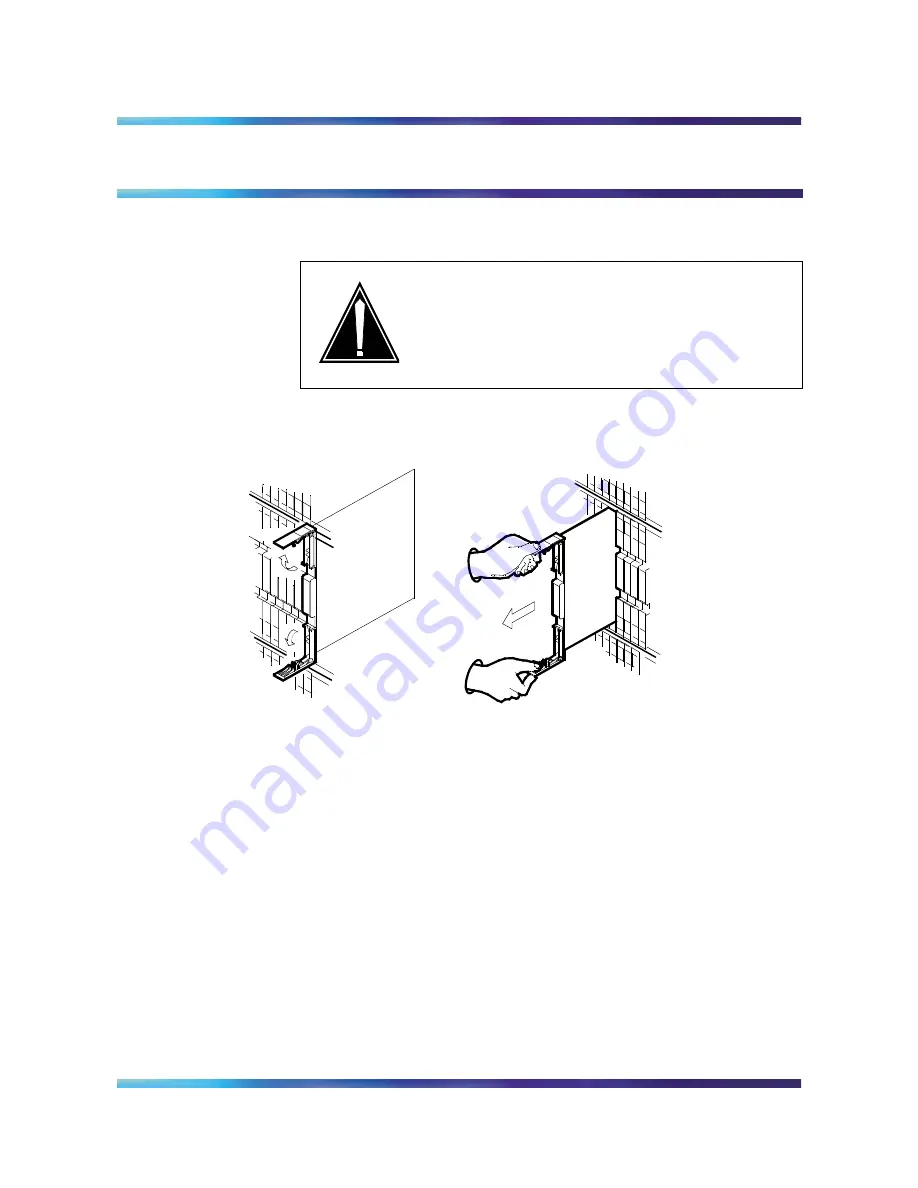
Open the locking levers on the card to be replaced and gently 
pull the card towards you until it clears the shelf.

8

Ensure that the replacement card has the same PEC, including 
suffix, as the card you just removed.

9

Configure the DIP switches on the replacement card as 
appropriate for your environment according to the settings 
shown in Tables  through  in the “Card settings” section of this 
chapter. 

10

Open the locking levers on the replacement card. Align the card 
with the slots in the shelf and gently slide the card into the shelf.

CAUTION

Equipment damage

When inserting or removing a card, do not 
apply direct pressure to the components or 
force the cards into the slots.

Summary of Contents for Meridian SL-100 SE

Page 1: ...555 4031 547 Meridian SL 100 SE Commercial Systems Card Replacement Procedures MSL15 Standard 12 02 July 2002...

Page 2: ......

Page 3: ...ed herein confidential and shall protect same in whole or in part from disclosure and dissemination to third parties and use same for evaluation operation and maintenance purposes only Changes or modi...

Page 4: ......

Page 5: ...releases July 2002 Version 12 02 Standard MSL15 This version represents an upissue of the standard release of this document This version uses new colored templates May 2001 Version 12 01 MSL15 Standar...

Page 6: ...vi Publication history 555 4031 547 Standard 12 02 July 2002...

Page 7: ...17 Common procedures 17 Action 17 FSP card replacement procedures 31 Purpose 31 Recording card replacement activities 31 Explanatory and context setting information 31 Summary flowchart 31 Step actio...

Page 8: ...ctivities 118 Explanatory and context setting information 118 Summary flowchart 118 Step action instructions 118 121 Application 121 Action 121 129 Application 129 Action 129 139 Application 139 Actio...

Page 9: ...n SL 100 SE Commercial Systems Card Replacement Procedures MSL15 Action 273 283 Application 283 Action 283 295 Application 295 Action 296 305 Application 305 Action 306 321 Application 321 323 Applica...

Page 10: ...x Contents 555 4031 547 Standard 12 02 July 2002...

Page 11: ...A DMS 100 Card Replacement Procedures 297 8001 547 Disregard the signaling point SP Traffic Operation Position System TOPS and SuperNode Data Manager SDM information as it does not apply to the Meridi...

Page 12: ...specific maintenance manual for these procedures These manuals are numbered in the 297 8yyy 550 series Some procedures in this book may also refer to the Alarm and Performance Monitoring Procedures Me...

Page 13: ...are shown in uppercase letters BSY CTRL DANGER Risk of electrocution Do not open the front panel of the inverter unless fuses F1 F2 and F3 have been removed The inverter contains high voltage lines Un...

Page 14: ...CTRL ctrl_no The letters or numbers that the variable represents must be entered Each variable is explained in a list that follows the command string Responses Responses correspond to the MAP display...

Page 15: ...eason for the replacement Explanatory and context setting information In each procedure the section titled Application identifies the card PECs including suffixes and the shelves or frames to which th...

Page 16: ...peat a sequence The successful completion of a step in a sequence may depend on previous steps therefore always perform the steps in the order specified While following the step action instructions yo...

Page 17: ...controller DTCI shelf as listed in the following table Common procedures None Action The following flowchart is only a summary of the procedure To replace the card use the instructions in the step ac...

Page 18: ...18 XPM card replacement procedures 555 4031 547 Standard 12 02 July 2002 NTAX78AA in a DTCI shelf continued Summary of card replacement procedure for NTAX78AA card in a DTCl shelf...

Page 19: ...marizes the procedure Use the instructions in the procedure that follows this flowchart to perform the procedure Determine DTC status Switch activity Busy the DTC Replace the card Load the DTC Passed...

Page 20: ...he PM type DTCI DTC7 pm_no is the PM identification number 0 to 999 Example of a MAP terminal display input MAPCI MTC PM POST DTCI 0 Example of a MAP terminal response 2 Check the status of the PM 3 D...

Page 21: ...switch of activity by typing YES and pressing the Enter key Example of a MAP terminal response 6 Busy the inactive unit of the PM that contains the card by typing BSY UNIT unit_no and pressing the Ent...

Page 22: ...ame product engineering code PEC including suffix as the card being removed At the DTCl 8 Locate the NTAX78AA card in slot 14 on the appropriate shelf DANGER Static electricity damage Wear a wrist str...

Page 23: ...container 11 Ensure that the replacement card has the same PEC including suffix as the card just removed 12 Open the locking levers on the replacement card Align the card with the slots in the shelf a...

Page 24: ...ock the card a Using your fingers or thumbs push on the upper and lower edges of the faceplate to ensure that the card is fully seated in the shelf b Close the locking levers At the MAP terminal 14 Pe...

Page 25: ...the locations and PECs including suffixes of the cards on the card list 18 Perform the appropriate procedure in Card Replacement Procedures then return to step 32 in this procedure 19 Access the disk...

Page 26: ...volume and look for the DTCI load file by typing LISTFL disk_volume_name and pressing the Enter key where disk is the name of the SLM disk S00D or S01D volume_name is the volume that contains the PM...

Page 27: ...the backup tape onto the appropriate SLM tape drive unit At the MAP terminal 26 Insert the tape by typing INSERTTAPE device_name and pressing the Enter key where device_name is S00T if you are working...

Page 28: ...e DTCI load file name 29 Confirm that the file copied to the disk by typing LISTFL disk_volume_name and pressing the Enter key where disk is the name of the SLM disk S00D or S01D volume_name is the vo...

Page 29: ...he reason is different from the first time LOADPM failed step 16 failed and the reason is the same as the first time LOADPM failed step 37 failed and you have not replaced all the cards listed in step...

Page 30: ...t_no and pressing the Enter key 36 Return to the maintenance procedure that sent you to this procedure and continue as directed 37 For further assistance contact the personnel responsible for the next...

Page 31: ...reason for the replacement Explanatory and context setting information In each procedure the section titled Application identifies the card PECs including suffixes and the shelves or frames to which...

Page 32: ...peat a sequence The successful completion of a step in a sequence may depend on previous steps therefore always perform the steps in the order specified While following the step action instructions yo...

Page 33: ...uffix and shelf or frame for the card you want to replace refer to the Index for a list of cards shelves and frames documented in this card replacement NTP Common procedures None Action The following...

Page 34: ...lacing an NT0X91 in a Meridian Cabinet Line Module At your current location 1 Obtain a replacement card Ensure that the replacement card has the same PEC including suffix as the card being removed Thi...

Page 35: ...NT6X36 in slot CD1 3 Unscrew the slotted nut on the right hand side of the FSP 4 Open the FSP DANGER Risk of electrocution Some of the terminals inside the frame supervisory panel have an electrical p...

Page 36: ...ard 7 Close the FSP 8 Tighten the slotted nut on the FSP 9 For further assistance contact the personnel responsible for the next level of support 10 You have completed this procedure CAUTION Loss of s...

Page 37: ...fer to the Index for a list of cards shelves and frames documented in this card replacement NTP Common procedures Manually busying Series II PM and CPM C side links is referenced in this procedure Act...

Page 38: ...NT0X91 in Meridian Cabinet Trunk Module ISDN This flowchart summarizes the procedure Use the instructions in the procedure that follows this flowchart to perform the procedure Post the PMs Busy the un...

Page 39: ...containing the alarm and control card to be replaced DANGER Risk of electrocution Some of the terminals inside the frame supervisory panel have an electrical potential of 48 V dc Remove all jewelry b...

Page 40: ...edures 555 4031 547 Standard 12 02 July 2002 NT0X91 in Meridian Cabinet Trunk Module ISDN continued If Alarm and control card Do Slot NT0X91AA CD1 NT0X91AE CD2 Card holder NT0X91AA card in slot CD1 NT...

Page 41: ...vel of the MAP display by typing MAPCI MTC PM and press the Enter key 6 Post the PM by typing POST pm_type pm_no and press the Enter key where pm_type is the type of PM LTC I DTC I pm_no is the number...

Page 42: ...C side links in this document Complete the procedure and return to this point 10 Post the PM by typing POST pm_type pm_no and press the Enter key where pm_type is the type of PM LTC I DTC I pm_no is t...

Page 43: ...ut on the left hand side of the FSP 15 Open the FSP 16 Remove the card 17 Insert the replacement alarm and control card 18 Close the FSP 19 Tighten the slotted nut on the FSP 20 Slide power converter...

Page 44: ...The Converter Fail lights go off At the MAP terminal 24 RTS the C side links for the PM unit you just busied using the procedure Manually busying Series II PM and CPM C side links in this document Co...

Page 45: ...NT0X91 in Meridian Cabinet Trunk Module ISDN end unit_no is the unit of PM 0 or 1 28 Return to the maintenance procedure that sent you to this procedure and continue as directed 29 For further assist...

Page 46: ...46 FSP card replacement procedures 555 4031 547 Standard 12 02 July 2002...

Page 47: ...or the card you want to replace refer to the Index for a list of cards shelves and frames documented in this card replacement NTP Common procedures There are no common procedures referenced in this pr...

Page 48: ...continued Summary of replacing an NT0X91 in Meridian Cabinet Remote Unit This flowchart summarizes the procedure Use the instructions in the procedure that follows this flowchart to perform the proce...

Page 49: ...and control card to be replaced DANGER Risk of electrocution Some of the terminals inside the frame supervisory panel have an electrical potential of 48 V dc Remove all jewelry before replacing a car...

Page 50: ...n SL 100 SE Commercial Systems Card Replacement Procedures MSL15 NT0X91 in Meridian Cabinet Remote Unit continued If Alarm and control card Do Slot NT0X91AA CD3 NT0X91AE CD2 Card holder NT0X91AA card...

Page 51: ...acing At the MAP terminal 5 Access the PM level of the MAP display by typing MAPCI MTC PM and press the Enter key 6 Post the PM by typing POST pm_type pm_no and press the Enter key where pm_type is ES...

Page 52: ...and press the Enter key where pm_type is LCM pm_key is the site name frame number and unit number for the LCM 11 Manually busy the PM by typing BSY PM and press the Enter key At the shelf 12 Power do...

Page 53: ...replacement alarm and control card 18 Close the FSP 19 Tighten the slotted nut on the FSP 20 Slide power converter back into position Push down on the handles to lock into place 21 The next action de...

Page 54: ...service by typing RTS PM and press the Enter key where unit_no is the unit of PM 0 or 1 26 Post the PM by typing PM POST pm_type pm_no and press the Enter key where pm_type is the RMM pm_no is the nu...

Page 55: ...with the RLCM 30 Load the PM by typing LOADPM and press the Enter key 31 Return the PM to service by typing RTS and press the Enter key 32 Return to the maintenance procedure that sent you to this pro...

Page 56: ...56 FSP card replacement procedures 555 4031 547 Standard 12 02 July 2002...

Page 57: ...me for the card you want to replace refer to the Index for a list of cards shelves and frames documented in this card replacement NTP Common procedures There are no common procedures referenced in thi...

Page 58: ...lacing an NT0X91AA in Meridian Cabinet Remote Unit At your current location 1 Obtain a replacement card Ensure that the replacement card has the same PEC including suffix as the card being removed Thi...

Page 59: ...s inside the frame supervisory panel have an electrical potential of 48V dc Remove all jewelry before replacing a card in the FSP Do not touch any terminal in the FSP If Alarm and control card Do Slot...

Page 60: ...in Meridian Cabinet Remote Unit end Remove the NT0X91 card from its slot 6 Insert the replacement card 7 Close the FSP 8 Tighten the slotted nut on the FSP 9 For further assistance contact the personn...

Page 61: ...frame for the card you want to replace refer to the Index for a list of cards shelves and frames documented in this card replacement NTP Common procedures There are no common procedures referenced in...

Page 62: ...eplacing an NT0X91AA in Meridian Cabinet Remote Module S At your current location 1 Obtain a replacement card Ensure that the replacement card has the same PEC including suffix as the card being remov...

Page 63: ...he frame supervisory panel have an electrical potential of 48V dc Remove all jewelry before replacing a card in the FSP Do not touch any terminal in the FSP If Alarm and control card Do Slot NT0X91AA...

Page 64: ...Meridian Cabinet Remote Module S end Remove the NT0X91 card from its slot 6 Insert the replacement card 7 Close the FSP 8 Tighten the slotted nut on the FSP 9 For further assistance contact the perso...

Page 65: ...or frame for the card you want to replace refer to the Index for a list of cards shelves and frames documented in this card replacement NTP Common procedures There are no common procedures referenced...

Page 66: ...nued Summary of replacing an NT0X91AE in Meridian Cabinet Remote Module S This flowchart summarizes the procedure Use the instructions in the procedure that follows this flowchart to perform the proce...

Page 67: ...control card to be replaced DANGER Risk of electrocution Some of the terminals inside the frame supervisory panel have an electrical potential of 48 V dc Remove all jewelry before replacing a card in...

Page 68: ...g MAPCI MTC PM and press the Enter key 6 Post the PM by typing POST pm_type pm_no and press the Enter key where pm_type is the type of PM RCC2 pm_no is the number of the PM number of RCC in table RCCI...

Page 69: ...own the power converters associated with the card you are replacing The power converter for this cabinet is NTMX72AB usually found in slot 1 or 26 Lift up the handles on the power converter card and s...

Page 70: ...and simultaneously flip the circuit breaker associated with the shelf to the ON position up The Converter Fail lights go off If your power converter has the power reset switch pull the power converte...

Page 71: ...er and press the Enter key where unit_number is the unit that was busied out 25 Return the PM to service by typing RTS UNIT unit_number and press the Enter key where unit_number is the unit that was b...

Page 72: ...72 FSP card replacement procedures 555 4031 547 Standard 12 02 July 2002...

Page 73: ...ler card NT8D02 digital line card NT8D03 analog line card NT8D09 analog message waiting line card NT8D22 extended system monitor XSM NT8D37 IPE card cage For each card replacement task you will find a...

Page 74: ...preview what you will be doing and to prepare For example if you see that the instructions will involve another office you will know to advise that office before you begin the step action instructions...

Page 75: ...the XSM at the rear of the pedestal The following flowchart is a summary of this procedure Use the instructions in the step action table that follows the flowchart to perform the procedure Procedure t...

Page 76: ...procedure Use the instructions in the procedure that follows this flowchart to perform the procedure Replace card with one having identical PEC Y N Obtain further assistance in replacing this card Di...

Page 77: ...t group 2 Obtain a replacement card Ensure that the replacement card has the same product equipment code PEC including suffix as the card to be removed At the IPE pedestal base 3 Put on a wrist strap...

Page 78: ...flashes three times The XSM runs internal power up diagnostics 11 Connect cables to the replacement card 12 Replace the grill on the rear of the pedestal base 13 Send any faulty cards for repair accor...

Page 79: ...15 NT8D22 in an IPE module end 15 Obtain further assistance in replacing this card by contacting the personnel responsible for a higher level of support 16 You have completed this procedure Return to...

Page 80: ...80 IPE card replacement procedures 555 4031 547 Standard 12 02 July 2002...

Page 81: ...ication Use this procedure to replace the NT8D37 card in an Intelligent Peripheral Equipment IPE The following flowchart is a summary of this procedure Use the instructions in the step action table th...

Page 82: ...the instructions in the procedure that follows this flowchart to perform the procedure Turn off module power supply Remove all line cards from the module Disconnect cables plug and wires Remove the m...

Page 83: ...directed to this procedure by your maintenance support group At the MAP terminal 2 Set the MAP terminal to the peripheral module PM level by typing the following string MAPCI MTC PM POST IPE ipec_no s...

Page 84: ...9 10 11 Disp 12 13 Status 14 IPML 15 PES 16 17 18 CM MS IOD Net PM Lns Trks Ext CCS RExByp 1CkEr 16PSLK 3ESA 1 RSC 3 GC C C PM PM SysB ManB Offl CBsyISTb InSv 0 5 2 0 5 42 CAUTION Static discharge may...

Page 85: ...each side Set the cover aside Tag and disconnect all cables from the backplane to the interior of the I O assembly Remove the power plug cover by turning the screws on each side Set the cover aside Ta...

Page 86: ...ws 17 Return all cards to their slots and reconnect all cables to faceplate connectors 18 Turn on power to the module power supply by setting the power supply switch to ON up 19 Return the IPE to serv...

Page 87: ...rd use the instructions in the step action procedure that follows the flowchart Procedure to replace NT8D02 NT8D03 and NT8D09 cards in an IPE PEC Suffixes Name NT8D02 AA EB digital line card DLC NT8D0...

Page 88: ...d replacement procedures 88 Meridian SL 100 SE Commercial Systems Card Replacement Procedures MSL15 Line cards in an IPE module continued Summary of card replacement procedures for line cards in an IP...

Page 89: ...owchart to perform the procedure At MAP PM level post the IPE shelf Busy the IPE line card Replace card with one having identical PEC Y Obtain further assistance in replacing this card Return the IPE...

Page 90: ...ng suffix as the card to be removed Note If the new IPE card does not have a PEC identical to the one replaced make sure PEC is datafilled in the IPECARDS table before returning the card to service At...

Page 91: ...ing string MAPCI MTC PM POST IPE ipec_no shelf_no where ipec_no is the number of the IPE column 0 127 shelf_no is the number of the IPE shelf 0 3 Example of a MAP response CM MS IOD Net PM Lns Trks Ex...

Page 92: ...datafilled in the IPECARDS table before returning the card to service 6 Busy the IPE line card by typing the following string BSY CARD slot_no and pressing the Enter key where slot_no is the slot numb...

Page 93: ...g levers on the card to be replaced and gently pull the card towards you until it clears the shelf CAUTION Static discharge may cause damage to circuit packs Put on a wrist strap and connect it to the...

Page 94: ...just removed 11 Set the switch settings on the card to match those of the card you are replacing 12 Open the locking levers on the replacement card Align the card with the slots in the shelf and gent...

Page 95: ...r of the IPE line card 0 15 17 Send any faulty cards for repair according to local procedure 18 Record the following items in office records date the card was replaced serial number of the card sympto...

Page 96: ...96 IPE card replacement procedures 555 4031 547 Standard 12 02 July 2002...

Page 97: ...the cards in the shelves or frames identified in the following table Action The following flowchart is only a summary of the procedure To replace the card use the instructions in the step action proc...

Page 98: ...98 IPE card replacement procedures 555 4031 547 Standard 12 02 July 2002 NT5D11 in an IPE continued Summary of card replacement procedure for NT5D11 card in an IPE...

Page 99: ...n the procedure that follows this flowchart to perform the procedure Configure DIP switches on the replacement card Return to original procedure Remove and replace the faulty card Return card to servi...

Page 100: ...shown in Tables through in the Card settings section of this chapter on page 105 of this procedure They are located in the upper right hand corner of the card Note Switch 7 is not used and should be l...

Page 101: ...ff On Off 11 On Off On On 12 On On Off Off 13 On On Off On 14 On On On Off 15 On On On On IPE shelf addresses Sheet 2 of 2 IPE shelf address Switch 6 position Switch 5 position Switch 4 position Switc...

Page 102: ...ing to the HMI Yes No On Off 8 HMI master Yes master No slave On Off Settings for DIP switch 2 Sheet 2 of 2 Switch position Characteristic Selection Switch setting CPE or CSU distance settings Distanc...

Page 103: ...e PEC including suffix as the card to be removed At the MAP terminal 3 Set the MAP terminal to the peripheral module PM level by typing the following string MAPCI MTC PM POST IPE ipec_no shelf_no and...

Page 104: ...appropriate shelf CAUTION The BSY command takes subscribers out of service Removing an in service line card takes all subscribers on that line card out of service If the failure is severe replace the...

Page 105: ...ncluding suffix as the card you just removed 9 Configure the DIP switches on the replacement card as appropriate for your environment according to the settings shown in Tables through in the Card sett...

Page 106: ...f the faceplate to ensure that the card is fully seated in the shelf 12 Close the locking levers Note If the new IPE card does not have a PEC identical to the one replaced make sure PEC is datafilled...

Page 107: ...aulty cards for repair according to local procedure 15 Record the following items in office records date the card was replaced serial number of the card symptoms that prompted replacement of the card...

Page 108: ...108 IPE card replacement procedures 555 4031 547 Standard 12 02 July 2002...

Page 109: ...d use the instructions in the step action procedure that follows the flowchart Procedure to replace NT6D40 NT6D42 and NT7D07 cards in an IPE PEC Suffixes Name NT6D40 AD BA peripheral equipment power s...

Page 110: ...110 IPE card replacement procedures 555 4031 547 Standard 12 02 July 2002 System cards in an IPE module continued Summary of card replacement procedure for system cards in an IPE shelf...

Page 111: ...front of the Power card and Ring Generator if installed Post and busy IPE for subject card to be replaced Return IPE to service end of procedure OFF down Remove defective card If replacing Power Card...

Page 112: ...ot necessary to specify the end time when scheduling Once the start day and time have been specified the Optivity Telephony Manager for Meridian SL 100 will continue sequential downloads until all des...

Page 113: ...usy the posted IPE by typing the following string BSY PM and pressing the Enter key CM MS IOD Net PM Lns Trks Ext APPL CCS RExByp 1CkEr 16PSLK 3ESA 1 RSC 3 GC C C PM 0 Quit 2 Post_ 3 4 5 6 7 8 9 10 11...

Page 114: ...card to OFF down 7 Locate the card to be removed on the appropriate shelf 8 CAUTION Static discharge may cause damage to circuit packs Put on a wrist strap and connect it to the frame of the IPE befo...

Page 115: ...card has the same PEC including suffix as the card you just removed 10 If replacing the Power Supply or Ring Generator set the switch on the card to OFF down 11 Open the locking levers on the replace...

Page 116: ...PE matches table IPEINV Specify the current IPE and open the IPE load utility Verify the bootable load matches table IPEINV 18 If replacing an NT7D07BA or spare if no bootable load exists in the IPE d...

Page 117: ...2X11 in an MCRM S RMM NT2X57 in an MCRM S RMM NT2X59 in an MCRM S RMM NT2X77 in an MCRM S RMM NT2X90 in an MCRM S RMM NT3X04 in an MCRM S RMM NT3X09 in an MCRM S RMM NT6X69 in an MCRM S RCC2 NT6X74 in...

Page 118: ...mmon procedures section lists common procedures that you may be asked to perform as you follow the step action instructions Go to these common procedures only when directed to do so Summary flowchart...

Page 119: ...his happens you will be told when to return to the original instructions and to which point in those instructions you should go The step action instructions provide the command syntax and machine outp...

Page 120: ...120 MCRM S card replacement procedures 555 4031 547 Standard 12 02 July 2002...

Page 121: ...for NT0X10 card positions in the MCRM S RMM Action The following flowchart is only a summary of the procedure To replace the card use the instructions in the step action procedure that follows the flo...

Page 122: ...re for NT0X10 card in an MCRM S RMM This flowchart summarizes the procedure Use the instructions in the procedure that follows this flowchart to perform the procedure Busy the RMM Y N At MAP PM level...

Page 123: ...tain a replacement card Ensure that the replacement card has the same product engineering code PEC including suffix as the card being removed At the MAP terminal 3 Set the MAP terminal to the peripher...

Page 124: ...emoved on the appropriate shelf as shown in the following figures CM MS IOD Net PM Lns Trks Ext CCS PM 0 Quit 2 Post_ 3 4 11 Disp_ 16 17 18 SysB ManB OffL CBsy ISTb InSv RMM 13 14 QueryPM 15 0 0 0 0 0...

Page 125: ...pull the card towards you until it clears the shelf 8 Ensure that the replacement card has the same PEC including suffix as the card you just removed 9 Set the switch settings on the card to match th...

Page 126: ...Align the card with the slots in the shelf and gently slide the card into the shelf 11 Using your fingers or thumbs push on the upper and lower edges of the faceplate to ensure that the card is fully...

Page 127: ...cedure 19 Record the following items in office records date the card was replaced serial number of the card symptoms that prompted replacement of the card Go to Step 22 20 Return to the alarm clearing...

Page 128: ...an SL 100 SE Commercial Systems Card Replacement Procedures MSL15 NT0X10 in an MCRM S RMM end 22 You have completed this procedure Return to the maintenance procedure that directed you to this card re...

Page 129: ...lowing figure for NT2X06 card positions in the Meridian Cabinet Remote Module Second series MCRM S RMM Action The following flowchart is only a summary of the procedure To replace the card use the ins...

Page 130: ...NT2X06 card in an MCRM S RMM This flowchart summarizes the procedure Use the instructions in the procedure that follows this flowchart to perform the procedure Busy the RMM Y N At MAP PM level post t...

Page 131: ...tain a replacement card Ensure that the replacement card has the same product engineering code PEC including suffix as the card to be removed At the MAP terminal 3 Set the MAP terminal to the peripher...

Page 132: ...position Both the converter FAIL LED and FRAME FAIL lamp on the Frame Supervisory Panel FSP turn ON An audible alarm may sound If an alarm does sound silence it by typing the following string at the M...

Page 133: ...until it clears the shelf 9 Ensure that the replacement card has the same PEC including suffix as the card you just removed 10 Open the locking levers on the replacement card Align the card with the...

Page 134: ...e where to proceed 14 Ensure that the converter NT2X06 is inserted A major audible alarm may sound This alarm is silenced when power is restored to the converter 15 Set the POWER switch to the ON posi...

Page 135: ...tion to determine where to proceed 21 Use the following information to determine where to proceed 22 List the loadfile in the directory by entering the following string DSKUT LISTVOL D000volume_name a...

Page 136: ...LV S01D and pressing the Enter key LF S01Dvolume_name and pressing the Enter key where volume_name is the name of the disk_volume Go to Step 24 24 Leave the disk utility by entering the following stri...

Page 137: ...the alarm clearing procedure or other procedure you were following that directed you to this procedure If necessary go to the point where a faulty card list was produced identify the next faulty card...

Page 138: ...138 MCRM S card replacement procedures 555 4031 547 Standard 12 02 July 2002...

Page 139: ...e See the following figure for NT2X09 card positions in the Meridian Cabinet Remote Module Second series MCRM S RMM Action The following flowchart is only a summary of the procedure To replace the car...

Page 140: ...a NT2X09 card in an MCRM S RMM This flowchart summarizes the procedure Use the instructions in the procedure that follows this flowchart to perform the procedure Busy the RMM Y N At MAP PM level post...

Page 141: ...ain a replacement card Ensure that the replacement card has the same product engineering code PEC including suffix as the card to be removed At the MAP terminal 3 Set the MAP terminal to the periphera...

Page 142: ...tion Both the converter FAIL LED and FRAME FAIL lamp on the Frame Supervisory Panel FSP turn ON An audible alarm may sound If an alarm does CM MS IOD Net PM Lns Trks Ext CCS PM 0 Quit 2 Post_ 3 4 11 D...

Page 143: ...sil and pressing the Enter key 7 Locate the card to be removed on the appropriate shelf as shown in the following figures 8 Open the locking levers on the card to be replaced and gently pull the card...

Page 144: ...ent card has the same PEC including suffix as the card you just removed 10 Open the locking levers on the replacement card Align the card with the slots in the shelf and gently slide the card into the...

Page 145: ...to the ON position 16 Use the following information to determine where to proceed 17 Press and hold the RESET button for one second Both the converter FAIL LED and FRAME FAIL lamp on the FSP go OFF G...

Page 146: ...the following string DSKUT LISTVOL D000volume_name All or DSKUT LISTVOL D010volume_name all and pressing the Enter key where volume_name is the name of the disk volume Local operating company policy d...

Page 147: ...tring QUIT and pressing the Enter key At the MAP terminal 25 Test the RMM by typing the following string TST and pressing the Enter key 26 Use the following information to determine where to proceed 2...

Page 148: ...re or other procedure you were following that directed you to this procedure If necessary go to the point where a faulty card list was produced identify the next faulty card on the list and go to the...

Page 149: ...149 MCRM S card replacement procedures 555 4031 547 Standard 12 02 July 2002...

Page 150: ...150 MCRM S card replacement procedures 555 4031 547 Standard 12 02 July 2002...

Page 151: ...NT2X10 card positions in the Meridian Cabinet Remote Module Second series MCRM S Remote Maintenance Module RMM Procedure to replace NT2X10AA and NT2X10BA in a MCRM S RMM PEC Suffixes Card name Shelf...

Page 152: ...s 555 4031 547 Standard 12 02 July 2002 NT2X10 in an MCRM S RMM continued Action The following flowchart is only a summary of the procedure To replace the card use the instructions in the step action...

Page 153: ...e for an NT2X10 card in an MCRM S RMM This flowchart summarizes the procedure Use the instructions in the procedure that follows this flowchart to perform the procedure Busy the RMM Y N At MAP PM leve...

Page 154: ...ain a replacement card Ensure that the replacement card has the same product engineering code PEC including suffix as the card to be removed At the MAP terminal 3 Set the MAP terminal to the periphera...

Page 155: ...emoved on the appropriate shelf as shown in the following figures CM MS IOD Net PM Lns Trks Ext CCS PM 0 Quit 2 Post_ 3 4 11 Disp_ 16 17 18 SysB ManB OffL CBsy ISTb InSv RMM 13 14 QueryPM 15 0 0 0 0 1...

Page 156: ...u until it clears the shelf 8 Ensure that the replacement card has the same PEC including suffix as the card you just removed 9 Open the locking levers on the replacement card Align the card with the...

Page 157: ...S RMM continued 10 Using your fingers or thumbs push on the upper and lower edges of the faceplate to ensure that the card is fully seated in the shelf 11 Close the locking levers 12 Use the following...

Page 158: ...cedure 18 Record the following items in office records date the card was replaced serial number of the card symptoms that prompted replacement of the card Go to Step 21 19 Return to the alarm clearing...

Page 159: ...an SL 100 SE Commercial Systems Card Replacement Procedures MSL15 NT2X10 in an MCRM S RMM end 21 You have completed this procedure Return to the maintenance procedure that directed you to this card re...

Page 160: ...160 MCRM S card replacement procedures 555 4031 547 Standard 12 02 July 2002...

Page 161: ...figure for NT2X11 card positions in the Meridian Cabinet Remote Module Second series MCRM S RMM Procedure to replace cards NT2X11AD and NT2X11BA in a MCRM S RMM PEC Suffixes Card name Shelf frame name...

Page 162: ...action procedure that follows the flowchart Summary of card replacement procedure for an NT2X11 card in an MCRM S RMM This flowchart summarizes the procedure Use the instructions in the procedure tha...

Page 163: ...tain a replacement card Ensure that the replacement card has the same product engineering code PEC including suffix as the card to be removed At the MAP terminal 3 Set the MAP terminal to the peripher...

Page 164: ...emoved on the appropriate shelf as shown in the following figures CM MS IOD Net PM Lns Trks Ext CCS PM 0 Quit 2 Post_ 3 4 11 Disp_ 16 17 18 SysB ManB OffL CBsy ISTb InSv RMM 13 14 QueryPM 15 0 0 0 0 1...

Page 165: ...u until it clears the shelf 8 Ensure that the replacement card has the same PEC including suffix as the card you just removed 9 Open the locking levers on the replacement card Align the card with the...

Page 166: ...S RMM continued 10 Using your fingers or thumbs push on the upper and lower edges of the faceplate to ensure that the card is fully seated in the shelf 11 Close the locking levers 12 Use the following...

Page 167: ...cedure 18 Record the following items in office records date the card was replaced serial number of the card symptoms that prompted replacement of the card Go to Step 21 19 Return to the alarm clearing...

Page 168: ...an SL 100 SE Commercial Systems Card Replacement Procedures MSL15 NT2X11 in an MCRM S RMM end 21 You have completed this procedure Return to the maintenance procedure that directed you to this card re...

Page 169: ...ions in the Meridian Cabinet Remote Module Second series MCRM S RMM Action The following flowchart is only a summary of the procedure To replace the card use the instructions in the step action proced...

Page 170: ...location 1 Proceed only if you have been directed to this card replacement procedure from a step in a maintenance procedure are using This flowchart summarizes the procedure Use the instructions in th...

Page 171: ...erminal 3 Set the MAP terminal to the peripheral module PM level and post the RMM by typing the following string MAPCI MTC PM POST RMM rmm_no and pressing the Enter key where rmm_no is the number of t...

Page 172: ...owing figures CM MS IOD Net PM Lns Trks Ext CCS PM 0 Quit 2 Post_ 3 4 11 Disp_ 16 17 18 SysB ManB OffL CBsy ISTb InSv RMM 13 14 QueryPM 15 0 0 0 0 130 RMM 12 Next 10 1 4 5 Trnsl 6 Tst 7 Bsy 8 Rts 9 Of...

Page 173: ...u until it clears the shelf 8 Ensure that the replacement card has the same PEC including suffix as the card you just removed 9 Open the locking levers on the replacement card Align the card with the...

Page 174: ...S RMM continued 10 Using your fingers or thumbs push on the upper and lower edges of the faceplate to ensure that the card is fully seated in the shelf 11 Close the locking levers 12 Use the following...

Page 175: ...cedure 18 Record the following items in office records date the card was replaced serial number of the card symptoms that prompted replacement of the card Go to Step 21 19 Return to the alarm clearing...

Page 176: ...an SL 100 SE Commercial Systems Card Replacement Procedures MSL15 NT3X09 in an MCRM S RMM end 21 You have completed this procedure Return to the maintenance procedure that directed you to this card re...

Page 177: ...llowing figure for NT6X69 card positions in the Meridian Cabinet Remote Module Second series MCRM S RMM Action The following flowchart is only a summary of the procedure To replace the card use the in...

Page 178: ...card replacement procedures 178 Meridian SL 100 SE Commercial Systems Card Replacement Procedures MSL15 NT6X69 in an MCRM S RCC2 continued Summary of card replacement procedure for NT6X69 card in MCRM...

Page 179: ...he instructions in the procedure that follows this flowchart to perform the procedure N Y Y N Verify card is from inactive unit Manually busy inactive unit Remove and replace faulty card Test inactive...

Page 180: ...acement card Ensure that the replacement card has the same product engineering code PEC including suffix as the card to be removed At the MAP terminal 3 Set the MAP terminal to the peripheral module P...

Page 181: ...ty SWACT to the inactive unit by typing the following string SWACT and pressing the Enter key Answer the prompt by typing YES At the RCC2 shelf 7 Put a sign on the active unit bearing the words Active...

Page 182: ...ere rcc2_unit_no is the number of the inactive RCC2 unit to be busied 0 or 1 At the RCC2 shelf 9 Put on a wrist strap 10 Locate the card to be removed on the appropriate shelf as shown in the followin...

Page 183: ...u until it clears the shelf 12 Ensure that the replacement card has the same PEC including suffix as the card you just removed 13 Open the locking levers on the replacement card Align the card with th...

Page 184: ...at the 6X69 card in slot 08 if working in unit 0 or in slot 20 if working in unit 1 17 Reseat the 6X69 card in slot 08 if working in unit 0 or in slot 20 if working in unit 1 At the MAP terminal 18 Us...

Page 185: ...the card was replaced serial number of the card symptoms that prompted replacement of the card Go to Step 27 25 Return to the alarm clearing procedure or other procedure you were following that direct...

Page 186: ...card replacement procedures 186 Meridian SL 100 SE Commercial Systems Card Replacement Procedures MSL15 NT6X69 in an MCRM S RCC2 end directed you to this card replacement procedure and continue as di...

Page 187: ...187 MCRM S card replacement procedures 555 4031 547 Standard 12 02 July 2002...

Page 188: ...188 MCRM S card replacement procedures 555 4031 547 Standard 12 02 July 2002...

Page 189: ...the following figure for NT6X74 card positions in the Meridian Cabinet Remote Module Second series MCRM S RMM Action The following flowchart is only a summary of the procedure To replace the card use...

Page 190: ...re Use the instructions in the procedure that follows this flowchart to perform the procedure Y N Y N End of procedure Post all trunks in the RMM Busy all trunks in the RMM At PM level busy the RMM sh...

Page 191: ...replacement card has the same product engineering code PEC including suffix as the card to be removed At the MAP terminal 3 Set the MAP terminal to the peripheral module PM level by typing the follow...

Page 192: ...IOD Net PM Lns Trks Ext CCS PM 0 Quit 2 Post_ 3 4 11 Disp_ 16 17 18 SysB ManB OffL CBsy ISTb InSv RMM 13 14 QueryPM 15 0 0 0 130 RMM 12 Next 2 3 10 1 1 4 5 Trnsl 6 Tst 7 Bsy 8 Rts 9 Offl 10 LoadPM 0...

Page 193: ...s on the card to be replaced and gently pull the card towards you until it clears the shelf 9 Ensure that the replacement card has the same PEC including suffix as the card you just removed CAUTION Im...

Page 194: ...levers on the replacement card Align the card with the slots in the shelf and gently slide the card into the shelf 11 Using your fingers or thumbs push on the upper and lower edges of the faceplate t...

Page 195: ...where volume_name is the name of the disk volume Local operating company policy determines on which disk D000 or D010 the loadfile is to be placed Proceed to Step 18 17 List the loadfile in the direct...

Page 196: ...runks in the RMM to service by typing the following strings trks ttp post tm rmm rmm_no and pressing the Enter key bsy all rts all and pressing the Enter key where rmm_no is the number of the RMM in w...

Page 197: ...e point where a faulty card list was produced identify the next faulty card on the list and go to the appropriate card replacement procedure for that card in this manual 26 Obtain further assistance i...

Page 198: ...198 MCRM S card replacement procedures 555 4031 547 Standard 12 02 July 2002...

Page 199: ...for NT6X78 card positions in the Meridian Cabinet Remote Module Second series MCRM S RMM Action The following flowchart is only a summary of the procedure To replace the card use the instructions in...

Page 200: ...d replacement procedures 200 Meridian SL 100 SE Commercial Systems Card Replacement Procedures MSL15 NT6X78 in an MCRM S RCC2 continued Summary of card replacement procedure for a NT6X78 card in an MC...

Page 201: ...zes the procedure Use the instructions in the procedure that follows this flowchart to perform the procedure Y N N Contact next level of support RTS passed Locate faulty cards Busy CMR card Remove and...

Page 202: ...the same product engineering code PEC including suffix as the card to be removed At the MAP terminal 3 Access the peripheral module PM level and find out which RCC2 is ISTb by typing the following str...

Page 203: ...m Resource CMR card At the RCC2 frame 6 Put on a wrist strap 7 Locate the card to be removed on the appropriate shelf as shown in the following figures CAUTION Static electricity damage Before removin...

Page 204: ...nd gently pull the card towards you until it clears the shelf 9 Ensure that the replacement card has the same PEC including suffix as the card you just removed 10 Open the locking levers on the replac...

Page 205: ...fingers or thumbs push on the upper and lower edges of the faceplate to ensure that the card is fully seated in the shelf 12 Close the locking levers 13 Load the CMR card by typing the following stri...

Page 206: ...e unit_no is the number of the unit containing the faulty CMR card 17 Use the following information to determine where to proceed 18 Return the CMR card to service by typing the following string RTS U...

Page 207: ...r other procedure you were following that directed you to this procedure If necessary go to the point where a faulty card list was produced identify the next faulty card on the list and go to the appr...

Page 208: ...208 MCRM S card replacement procedures 555 4031 547 Standard 12 02 July 2002...

Page 209: ...llowing figure for NT6X87 card positions in the Meridian Cabinet Remote Module Second series MCRM S RMM Action The following flowchart is only a summary of the procedure To replace the card use the in...

Page 210: ...n NT6X87 card in an MCRM S LCME This flowchart summarizes the procedure Use the instructions in the procedure that follows this flowchart to perform the procedure Y N End of procedure Post LEN associa...

Page 211: ...uct engineering code PEC including suffix as the card to be removed At the MAP terminal 3 Post the line equipment number LEN of the card to be replaced by typing the following string MAPCI MTC LTP POS...

Page 212: ...15 NT6X87 in an MCRM S LCME continued CM MS IOD Net PM Lns Trks Ext CCS 0 Quit 2 Post_ 3 4 RMM Post DELQ BUSYQ PREFIX LCC PTY STA F S LTA TE RESULT CKT TYPE FL HOST 00 0 03 03 4931082 MBSY 5 BSY 6 RTS...

Page 213: ...ION Card damage transport Take these precautions to protect the circuit cards from electrical and mechanical damage while transporting cards When handling a circuit card not in and Electrostatic Disch...

Page 214: ...eleasing the grip of your right hand 11 Ensure that a card shroud and line card extractor are available Card shrouds are required for inserting or removing cards in line drawers Two sizes are availabl...

Page 215: ...hand 17 Pull the extractor away from the drawer and the card will unplug from its socket on the drawer backplane 18 Continue pulling the card with the extractor until the card is clear of the shroud 1...

Page 216: ...lowing string RTS and pressing the Enter key 29 Use the following information to determine where to proceed 30 Send any faulty cards for repair according to local procedure 31 Record the following ite...

Page 217: ...faulty card on the list and go to the appropriate card replacement procedure for that card in this manual 33 Obtain further assistance in replacing this card by contacting the personnel responsible fo...

Page 218: ...218 MCRM S card replacement procedures 555 4031 547 Standard 12 02 July 2002...

Page 219: ...92 card positions in the Meridian Cabinet Remote Module Second series MCRM S RMM Action The following flowchart is only a summary of the procedure To replace the card use the instructions in the step...

Page 220: ...rd replacement procedures 220 Meridian SL 100 SE Commercial Systems Card Replacement Procedures MSL15 NT6X92 in an MCRM S RCC2 continued Summary of card replacement procedure for NT6X92 card in an MCR...

Page 221: ...dure that follows this flowchart to perform the procedure Y Y N N Locate faulty card Verify card is from inactive unit Post LEN associated with card Manually busy inactive unit Remove and replace faul...

Page 222: ...ce support group 2 Obtain a replacement card Ensure that the replacement card has the same product engineering code PEC including suffix as the card to be removed At the MAP terminal 3 Ensure the peri...

Page 223: ...e following string SWACT and pressing the Enter key Answer the prompt by typing YES At the RCC2 shelf 7 Put a sign on the ACTIVE unit bearing the words Active unit Do not touch CM MS IOD Net PM Lns Tr...

Page 224: ...ing the Enter key where rcc2_unit_no is the number of the inactive RCC2 unit 0 or 1 to be busied At the RMM shelf 9 Put on a wrist strap 10 Locate the card to be removed on the appropriate shelf as sh...

Page 225: ...u until it clears the shelf 12 Ensure that the replacement card has the same PEC including suffix as the card you just removed 13 Open the locking levers on the replacement card Align the card with th...

Page 226: ...elf 15 Close the locking levers 16 Use the following information to determine where to proceed At the MAP terminal 17 Return the inactive RCC2 unit to service by typing the following string RTS UNIT r...

Page 227: ...ocedure you were following that directed you to this procedure If necessary go to the point where a faulty card list was produced identify the next faulty card on the list and go to the appropriate ca...

Page 228: ...228 MCRM S card replacement procedures 555 4031 547 Standard 12 02 July 2002...

Page 229: ...ollowing figure for NTBX01 card positions in the Meridian Cabinet Remote Module Second series MCRM S RMM Action The following flowchart is only a summary of the procedure To replace the card use the i...

Page 230: ...rd replacement procedures 230 Meridian SL 100 SE Commercial Systems Card Replacement Procedures MSL15 NTBX01 in an MCRM S RCC2 continued Summary card replacement procedure for an NTBX01 card in an MCR...

Page 231: ...he procedure that follows this flowchart to perform the procedure N Y Y N Locate faulty card Verify card is from inactive unit Manually busy inactive unit Remove and replace faulty card Test inactive...

Page 232: ...ntenance support group 2 Obtain a replacement card Ensure that the replacement card has the same product engineering code PEC including suffix as the card to be removed At the MAP terminal 3 Ensure th...

Page 233: ...ive unit by typing the following string SWACT and pressing the Enter key At the RCC2 shelf 7 Put a sign on the ACTIVE unit bearing the words Active unit Do not touch CM MS IOD Net PM Lns Trks Ext CCS...

Page 234: ...ere rcc2_unit_no is the number of the inactive RCC2 unit to be busied 0 or 1 At the RCC2 shelf 9 Put on a wrist strap 10 Locate the card to be removed on the appropriate shelf as shown in the followin...

Page 235: ...u until it clears the shelf 12 Ensure that the replacement card has the same PEC including suffix as the card you just removed 13 Open the locking levers on the replacement card Align the card with th...

Page 236: ...ing levers 16 Use the following information to determine where to proceed At the MAP terminal 17 After replacing the faulty card load the inactive RCC2 unit by typing the following string LOADPM UNIT...

Page 237: ...the Enter key where rcc2_unit_no is the number of the RCC2 unit tested in Step 19 22 Use the following information to determine where to proceed 23 Send any faulty cards for repair according to local...

Page 238: ...appropriate card replacement procedure for that card in this manual 26 Obtain further assistance in replacing this card by contacting the personnel responsible for a higher level of support 27 You ha...

Page 239: ...lowing figure for NTBX02 card positions in the Meridian Cabinet Remote Module Second series MCRM S RMM Procedure to replace NTBX02 cards in a MCRM S EXT or a MCRM S RCC2 PEC Suffixes Card name Shelf f...

Page 240: ...5 4031 547 Standard 12 02 July 2002 NTBX02 in an MCRM S EXT or RCC2 continued Action The following flowchart is only a summary of the procedure To replace the card use the instructions in the step act...

Page 241: ...cement procedures 241 Meridian SL 100 SE Commercial Systems Card Replacement Procedures MSL15 NTBX02 in an MCRM S EXT or RCC2 continued Summary of card replacement procedure for an NTBX02 card in an M...

Page 242: ...he procedure Use the instructions in the procedure that follows this flowchart to perform the procedure N Y Locate faulty card Verify card is from inactive unit Manually busy inactive unit Remove and...

Page 243: ...ce support group 2 Obtain a replacement card Ensure that the replacement card has the same product engineering code PEC including suffix as the card to be removed At the MAP terminal 3 Set the MAP ter...

Page 244: ...of the MAP terminal by typing the following string DCH and pressing the Enter key where rcc2_unit_no is the number of the RCC2 unit 0 or 1 with the faulty DCHcard Example of a MAP response CM MS IOD N...

Page 245: ...state and pressing the Enter key where dch_card_state is either Central Side Busy CBsy System Busy SysB or In Service Trouble ISTb The example in Step 5shows the DCH card as being CBsy Example of a MA...

Page 246: ...ing string dskut listvol d000 or d010 volume_name all and pressing the Enter key where volume_name is the PM volume name that identifies the PM load 10 Compare the information in Step 8 with the infor...

Page 247: ...e appropriate shelf as shown in the following figures 14 CAUTION Static electricity damage Before removing any cards put on a wrist strap and connect it to the wrist strap grounding point on the left...

Page 248: ...clears the shelf 15 Ensure that the replacement card has the same PEC including suffix as the card you just removed 16 Open the locking levers on the replacement card Align the card with the slots in...

Page 249: ...determine where to proceed 20 Load the inactive RCC2 unit by typing the following string LOADPM and pressing the Enter key 21 Use the following information to determine where to proceed 22 Return the...

Page 250: ...g string querypm flt and pressing the Enter key Example of a MAP response 26 Use the following information to determine where to proceed If RTS Do passed Step 24 failed Step 30 CM MS IOD Net PM Lns Tr...

Page 251: ...clearing procedure or other procedure you were following that directed you to this procedure If necessary go to the point where a faulty card list was produced identify the next faulty card on the lis...

Page 252: ...252 MCRM S card replacement procedures 555 4031 547 Standard 12 02 July 2002...

Page 253: ...following figure for NTMX72 card positions in the Meridian Cabinet Remote Module Second series MCRM S RMM Action The following flowchart is only a summary of the procedure To replace the card use the...

Page 254: ...rd replacement procedures 254 Meridian SL 100 SE Commercial Systems Card Replacement Procedures MSL15 NTMX72 in an MCRM S RCC2 continued Summary card replacement procedure for an NTMX72 card in an MCR...

Page 255: ...instructions in the procedure that follows this flowchart to perform the procedure Y N Y N Test inactive unit Test passed Return inactive unit to service RTS passed End of procedure Verify card is fro...

Page 256: ...lacement card has the same product engineering code PEC including suffix as the card to be removed At the MAP terminal 3 Set the MAP terminal to the peripheral module PM level and post the RCC2 by typ...

Page 257: ...ct type the following command SWACT and pressing the Enter key Answer the prompt by typing YES At the RCC2 shelf 7 Put a sign on the active unit bearing the words Active unit Do not touch CM MS IOD Ne...

Page 258: ...9 Put on a wrist strap 10 Power down the NTMX72 power converter by setting the power switch to the OFF position Note The NTMX72 card is located in slot 01 for unit 0 and in slot 26 for unit 1 11 Locat...

Page 259: ...u until it clears the shelf 13 Ensure that the replacement card has the same PEC including suffix as the card you just removed 14 Open the locking levers on the replacement card Align the card with th...

Page 260: ...ges of the faceplate to ensure that the card is fully seated in the shelf 16 Close the locking levers 17 Power up the INACTIVE RCC2 unit as follows Ensure that the power converter NTMX72 is inserted A...

Page 261: ...nit 0 or 1 19 Use the following information to determine where to proceed 20 Use the following information to determine where to proceed 21 Test the inactive unit by typing the following string TST UN...

Page 262: ...the card symptoms that prompted replacement of the card Go to Step 29 27 Return to the alarm clearing procedure or other procedure you were following that directed you to this procedure If necessary...

Page 263: ...the following figure for NTMX73 card positions in the Meridian Cabinet Remote Module Second series MCRM S RMM Action The following flowchart is only a summary of the procedure To replace the card use...

Page 264: ...rd replacement procedures 264 Meridian SL 100 SE Commercial Systems Card Replacement Procedures MSL15 NTMX73 in an MCRM S RCC2 continued Summary card replacement procedure for an NTMX73 card in an MCR...

Page 265: ...follows this flowchart to perform the procedure Locate faulty card Y N Y N Test inactive unit Test passed Return inactive unit to service RTS passed End of procedure Verify card is from inactive unit...

Page 266: ...neering code PEC including suffix as the card to be removed At the MAP terminal 3 Set the MAP terminal to the peripheral module PM level and post the RCC2 by typing the following string MAPCI MTC PM P...

Page 267: ...key Answer the prompt by typing YES where rcc_unit_no is the number of the unit 0 or 1 on which activity is to be switched When both units are in service proceed to step 7 At the RCC2 shelf 7 Put a si...

Page 268: ...levers on the card to be replaced and gently pull the card towards you until it clears the shelf CAUTION Static electricity damage Before removing any cards put on a wrist strap and connect it to the...

Page 269: ...ued 12 Ensure that the replacement card has the same PEC including suffix as the card you just removed 13 Set the S1 switch to IC U1 Operations Mode on the replacement card 14 Open the locking levers...

Page 270: ...mbs push on the upper and lower edges of the faceplate to ensure that the card is fully seated in the shelf 16 Close the locking levers At the MAP terminal 17 Load the INACTIVE RCC2 unit by typing the...

Page 271: ...ST UNIT unit_no and pressing the Enter key where unit_no is the number of the faulty RCC2 unit 21 Use the following information to determine where to proceed 22 Return the inactive RCC2 unit to servic...

Page 272: ...e appropriate card replacement procedure for that card in this manual 25 Obtain further assistance in replacing this card by contacting the personnel responsible for a higher level of support 26 Remov...

Page 273: ...llowing figure for NTMX74 card positions in the Meridian Cabinet Remote Module Second series MCRM S RMM Action The following flowchart is only a summary of the procedure To replace the card use the in...

Page 274: ...d replacement procedures 274 Meridian SL 100 SE Commercial Systems Card Replacement Procedures MSL15 NTMX74 in an MCRM S RCC2 continued Summary of card replacement procedure for an NTMX74 card in an M...

Page 275: ...he procedure that follows this flowchart to perform the procedure N Y Y N Locate faulty card Verify card is from inactive unit Manually busy inactive unit Remove and replace faulty card Test inactive...

Page 276: ...edure by your maintenance support group 2 Obtain a replacement card Ensure that the replacement card has the same product engineering code PEC including suffix as the card to be removed At the MAP ter...

Page 277: ...WACT and pressing the Enter key Answer the prompt by typing YES At the RCC2 shelf 6 Put a sign on the active unit bearing the words Active unit Do not touch CM MS IOD Net PM Lns Trks Ext CCS PM 0 Quit...

Page 278: ...er key where rcc2_unit_no is the number of the inactive RCC2 unit 0 or 1 At the RCC2 shelf 8 Put on a wrist strap 9 Locate the card to be removed on the appropriate shelf as shown in the following fig...

Page 279: ...u until it clears the shelf 11 Ensure that the replacement card has the same PEC including suffix as the card you just removed 12 Open the locking levers on the replacement card Align the card with th...

Page 280: ...Close the locking levers 15 Use the following information to determine where to proceed At the MAP terminal 16 Load the inactive RCC2 unit by typing the following string LOADPM and pressing the Enter...

Page 281: ...ir according to local procedure 24 Record the following items in office records date the card was replaced serial number of the card symptoms that prompted replacement of the card Go to Step 27 25 Ret...

Page 282: ...an SL 100 SE Commercial Systems Card Replacement Procedures MSL15 NTMX74 in an MCRM S RCC2 end 27 You have completed this procedure Return to the maintenance procedure that directed you to this card r...

Page 283: ...following figure for NTMX77 card positions in the Meridian Cabinet Remote Module Second series MCRM S RMM Action The following flowchart is only a summary of the procedure To replace the card use the...

Page 284: ...d replacement procedures 284 Meridian SL 100 SE Commercial Systems Card Replacement Procedures MSL15 NTMX77 in an MCRM S RCC2 continued Summary of card replacement procedure for an NTMX77 card in an M...

Page 285: ...ions in the procedure that follows this flowchart to perform the procedure N Y Y N Locate faulty card Verify card is from inactive unit Manually busy inactive unit Remove faulty card Load PM Return to...

Page 286: ...rocedure by your maintenance support group 2 Obtain a replacement card Ensure that the replacement card has the same product engineering code PEC including suffix as the card to be removed At the MAP...

Page 287: ...WACT and pressing the Enter key Answer the prompt by typing YES At the RCC2 shelf 6 Put a sign on the active unit bearing the words Active unit Do not touch CM MS IOD Net PM Lns Trks Ext CCS PM 0 Quit...

Page 288: ...Unseat the MX73 card in slot 11 if working in unit 0 or in slot 17 if working in unit 1 Unseat the MX75 card in slot 10 if working in unit 0 or in slot 18 if working in unit 1 11 Locate the card to be...

Page 289: ...lears the shelf 13 Ensure that the replacement card has the same PEC including suffix as the card you just removed 14 CAUTION Ensure proper switch setting During maintenance or upgrade activity the sw...

Page 290: ...he S1 switch to CPM on the replacement card 15 Open the locking levers on the replacement card Align the card with the slots in the shelf and gently slide the card into the shelf 16 Using your fingers...

Page 291: ...arm may sound This alarm is silenced when power is restored to the converter Set POWER switch to the ON position 20 Use the following information to determine where to proceed 21 Press and hold the RE...

Page 292: ...rmine where to proceed 25 Use the following information to determine where to proceed 26 Test the inactive unit by typing the following string TST UNIT rcc2_unit_no and pressing the Enter key where rc...

Page 293: ...ptoms that prompted replacement of the card Go to Step 35 33 Return to the alarm clearing procedure or other procedure you were following that directed you to this procedure If necessary go to the poi...

Page 294: ...294 MCRM S card replacement procedures 555 4031 547 Standard 12 02 July 2002...

Page 295: ...in the shelves or frames identified in the following table See the following figure for NTMX79 card positions in the Meridian Cabinet Remote Module Second series MCRM S RMM Procedure to replace NTMX7...

Page 296: ...s 555 4031 547 Standard 12 02 July 2002 NTMX79 in an MCRM S EXT continued Action The following flowchart is only a summary of the procedure To replace the card use the instructions in the step action...

Page 297: ...rd replacement procedures 297 Meridian SL 100 SE Commercial Systems Card Replacement Procedures MSL15 NTMX79 in an MCRM S EXT continued Summary of card replacement procedure for an NTMX79 card in an M...

Page 298: ...the instructions in the procedure that follows this flowchart to perform the procedure N Y Y N Locate faulty card RTS passed Verify card is from inactive unit Contact next level of support Manually bu...

Page 299: ...d Ensure that the replacement card has the same product engineering code PEC including suffix as the card to be removed At the MAP terminal 3 Set the MAP terminal to the peripheral module PM level and...

Page 300: ...rminal 7 Busy the inactive PM unit by typing the following string bsy unit unit_no and pressing the Enter key where unit_no is the number of the faulty RCC2 unit At the RCC2 shelf 8 Put on a wrist str...

Page 301: ...card towards you until it clears the shelf 12 Ensure that the replacement card has the same PEC including suffix as the card you just removed 13 Open the locking levers on the replacement card Align...

Page 302: ...gers or thumbs push on the upper and lower edges of the faceplate to ensure that the card is fully seated in the shelf 15 Close the locking levers At the MAP terminal 16 Load the inactive RCC2 unit by...

Page 303: ...lowing string TST UNIT unit_no and pressing the Enter key where unit_no is the number of the inactive EXT unit 20 Use the following information to determine where to proceed 21 Return the INACTIVE RCC...

Page 304: ...o Step 28 26 Return to the alarm clearing procedure or other procedure you were following that directed you to this procedure If necessary go to the point where a faulty card list was produced identif...

Page 305: ...for NTMX81 card positions in the Meridian Cabinet Remote Module Second series MCRM S RMM Procedure to replace NTMX81 cards in a MCRM S EXT or MCRM S RCC2 PEC Suffixes Card name Shelf frame name NTMX8...

Page 306: ...5 4031 547 Standard 12 02 July 2002 NTMX81 in an MCRM S EXT or RCC2 continued Action The following flowchart is only a summary of the procedure To replace the card use the instructions in the step act...

Page 307: ...cement procedures 307 Meridian SL 100 SE Commercial Systems Card Replacement Procedures MSL15 NTMX81 in an MCRM S EXT or RCC2 continued Summary of card replacement procedure for an NTMX81 card in an M...

Page 308: ...tions in the procedure that follows this flowchart to perform the procedure N Y Y N Locate faulty card End of procedure Contact next level of support Return to card list Verify card from inactive unit...

Page 309: ...aintenance support group 2 Obtain a replacement card Ensure that the replacement card has the same product engineering code PEC including suffix as the card to be removed At the MAP terminal 3 Set the...

Page 310: ...t the EXT shelf or RCC2 shelf 6 Put a sign on the active unit bearing the words Active unit Do not touch 7 Display the C side links associated with the DS 1 card by typing the following string trnsl c...

Page 311: ...to proceed 9 Display the P side links associated with the DS 1 card by typing the following string trnslP and pressing the Enter key Example of a MAP response LINK 0 LTC 0 0 CAP MS STATUS OK MSGCOND O...

Page 312: ...e inactive RCC2 unit 0 or 1 12 Post the host PM by typing the following string POST host_pm host_pm_no and pressing the Enter key Allow 15 minutes for messaging to clear between the CC and the RCC2 wh...

Page 313: ...ping the following string bsy link link_no and pressing the Enter key where link_no is the number of the links associated with the faulty MX81 card from Step 9 Note Each NTMX81 card has two links asso...

Page 314: ...the card to be replaced and gently pull the card towards you until it clears the shelf CAUTION Static electricity damage Before removing any cards put on a wrist strap and connect it to the wrist stra...

Page 315: ...et the DS 1 transmitter equalization switches according to the following information 19 Open the locking levers on the replacement card Align the card with the slots in the shelf and gently slide the...

Page 316: ...elf 21 Close the locking levers 22 Use the following information to determine where to proceed At the MAP terminal 23 Return all busied network links to service by typing the following string RTS LINK...

Page 317: ...rcc2_no and pressing the Enter key where rcc2_unit_no is the number of the RCC2 unit associated with the faulty card 27 Return the INACTIVE RCC2 unit to service by typing the following string RTS UNI...

Page 318: ...it_no is the number of the inactive EXT unit 32 Use the following information to determine where to proceed 33 Send any faulty cards for repair according to local procedure 34 Record the following ite...

Page 319: ...the appropriate card replacement procedure for that card in this manual 36 Obtain further assistance in replacing this card by contacting the personnel responsible for a higher level of support 37 You...

Page 320: ...320 MCRM S card replacement procedures 555 4031 547 Standard 12 02 July 2002...

Page 321: ...g table Since it is a filler card a procedure to replace the NTMX83 card in a Meridian Cabinet Remote Module Second series MCRM S Extension EXT shelf or Remote Cluster Controller 2 RCC2 is not necessa...

Page 322: ...322 MCRM S card replacement procedures 555 4031 547 Standard 12 02 July 2002...

Page 323: ...dure to replace the cards in the shelves or frames identified in the following table See the following figure for NTMX87 card positions in the Meridian Cabinet Remote Module Second series MCRM S RMM P...

Page 324: ...s only a summary of the procedure To replace the card use the instructions in the step action procedure that follows the flowchart 0 4 1 4 EXT Shelf RCC2 Shelf 1 2 1 6 0 6 Note RCC2 positions 09 12 14...

Page 325: ...procedures 325 Meridian SL 100 SE Commercial Systems Card Replacement Procedures MSL15 NTMX87 in an MCRM S EXT or RCC2 shelf continued Summary of card replacement procedure for an NTMX87 card in an M...

Page 326: ...ns in the procedure that follows this flowchart to perform the procedure N Y Y N RTS passed Locate faulty card Verify card is from active unit Manually busy inactive unit End of procedure Remove and r...

Page 327: ...procedure by your maintenance support group 2 Obtain a replacement card Ensure that the replacement card has the same product engineering code PEC including suffix as the card to be removed At the MA...

Page 328: ...SWACT and pressing the Enter key Answer the prompt by typing YES At the EXT shelf RCE shelf 6 Put a sign on the active unit bearing the words Active unit Do not touch CM MS IOD Net PM Lns Trks Ext CC...

Page 329: ...mple of a MAP response 8 Use the following information to determine where to proceed 9 Display the P side links associated with the DS 1 card by typing the following string trnslP and pressing the Ent...

Page 330: ...the inactive RCC2 unit 0 or 1 12 Post the host PM by typing the following string POST host_pm host_pm_no and pressing the Enter key Allow 15 minutes for messaging to clear between the CC and the RCC2...

Page 331: ...ntroller with ISDN a line trunk controller or a line trunkcontroller with ISDN Example of a MAP response At the MAP terminal 13 Manual busy the links connected to the faulty card by typing the followi...

Page 332: ...manually busied Possible link number pairs are as follows 0 1 2 3 4 5 or 6 7 At the EXT or RCC2 shelf 14 Put on a wrist strap 15 Locate the card to be removed on the appropriate shelf as shown in the...

Page 333: ...ull the card towards you until it clears the shelf 17 Ensure that the replacement card has the same PEC including suffix as the card you just removed 18 Open the locking levers on the replacement card...

Page 334: ...shelf 20 Close the locking levers 21 Use the following information to determine where to proceed At the MAP terminal 22 Return all busied network links to service by typing the following string RTS L...

Page 335: ...ber of the RCC2 unit associated with the faulty card 25 Return the inactive RCC2 unit to service by typing the following string RTS UNIT rcc2_unit_no and pressing the Enter key where rcc2_unit_no is t...

Page 336: ...ted replacement of the card 31 Return to the alarm clearing procedure or other procedure you were following that directed you to this procedure If necessary go to the point where a faulty card list wa...

Page 337: ......

Page 338: ...a Class A digital device pursuant to Part 15 of the FCC Rules and the radio interference regulations of the Canadian Department of Communications These limits are designed to provide reasonable protec...

Reviews:

Related manuals for Meridian SL-100 SE