background image

Wireless ADSL2+ Modem Router DG834Gv5 User Manual

Managing Your Network

4-12

v1.0, March 2010

Enabling Remote Management

Using the Remote Management screen, you can allow a user or users on the Internet to configure, 
upgrade, and check the status of your modem router.

Configuring Remote Management

1.

Log in to the modem router at its default LAN address of 

http://192.168.0.1

 with its default 

user name of 

admin

 default password of 

password

, or using whatever user name, password 

and LAN address you have chosen for the modem router.

2.

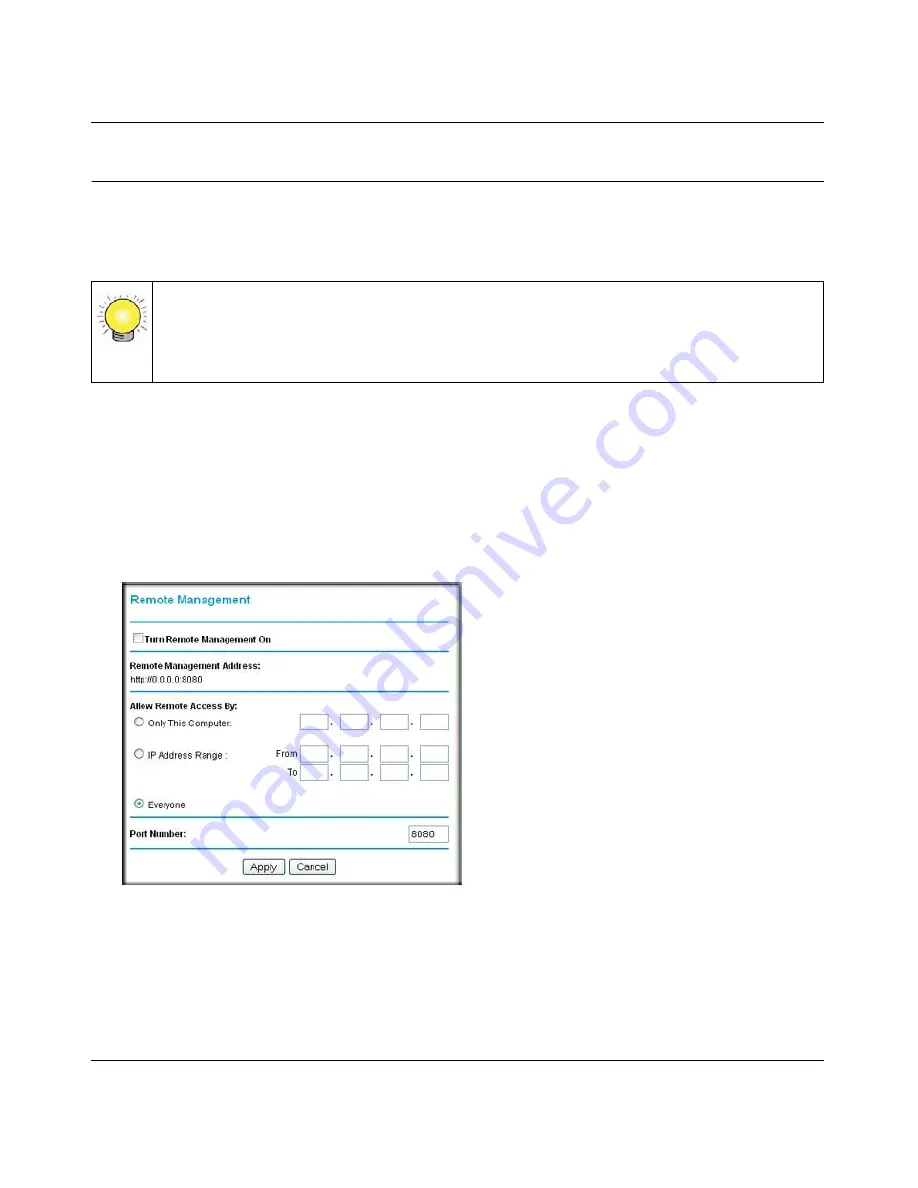
Under the Advanced heading of the main menu, select Remote Management to display the 
Remote Management screen:

3.

Select the 

Turn Remote Management On

 check box.

4.

Specify which external addresses will be allowed to access the modem router’s remote 
management.

For security, restrict access to as few external IP addresses as practical:

Tip: 

Be sure to change the modem router default password to a very secure password. 

The ideal password should contain no dictionary words from any language, and 
should be a mixture of letters (both upper-case and lower-case), numbers, and 
symbols. Your password can be up to 30 characters.

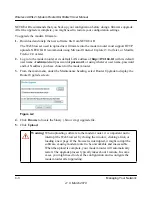
Figure 4-9

Summary of Contents for DG834G v5

Page 1: ...202 10363 02 March 2010 v1 0 NETGEAR Inc 350 East Plumeria Drive San Jose CA 95134 USA Wireless ADSL2 Modem Router DG834Gv5 User Manual...

Page 2: ...f the following measures Reorient or relocate the receiving antenna Increase the separation between the equipment and receiver Connect the equipment into an outlet on a circuit different from that to...

Page 3: ...equisitos esenciales y cualesquiera otras disposiciones aplicables o exigibles de la Directiva 1999 5 CE Greek NETGEAR Inc 54 Mbps Wireless ADSL2 Modem Router DG834Gv5 1999 5 Fran ais French Par la pr...

Page 4: ...information equipment to be used in a residential area or an adjacent area thereto and conforms to the standards set by the Voluntary Control Council for Interference by Data Processing Equipment and...

Page 5: ...to the Internet and a Web browser such as Internet Explorer or Mozilla Firefox are required Product and Publication Details Model Number DG834G v5 Publication Date March 2010 Product Family Modem Rou...

Page 6: ...P Settings 1 6 Changing Your ADSL Settings 1 10 How the Internet Connection Works 1 11 Chapter 2 Configuring Your Wireless Network and Security Settings Planning Your Wireless Network 2 1 Wireless Pla...

Page 7: ...all Services 3 12 Scheduling Firewall Services 3 13 Chapter 4 Managing Your Network Backing Up Restoring or Erasing Your Settings 4 1 Backing Up the Configuration to a File 4 1 Restoring the Configura...

Page 8: ...Configuring the Client to Gateway VPN Tunnel on the DG834G v5 6 6 Step 2 Configuring the NETGEAR ProSafe VPN Client on the Remote PC 6 10 Setting Up a Gateway to Gateway VPN Configuration 6 18 VPN Tu...

Page 9: ...Configuration Profile B 1 Step By Step Configuration B 2 DG834G v5 with FQDN to FVL328 B 6 Configuration Profile B 6 Step By Step Configuration B 7 Configuration Summary Telecommuter Example B 11 Set...

Page 10: ...his manual uses the following typographical conventions Formats This manual uses the following formats to highlight special messages Italic Emphasis books CDs file and server names extensions Bold Use...

Page 11: ...int PDF files The Acrobat reader is available on the Adobe website at http www adobe com Revision History Product Version 54 Mbps Wireless ADSL2 Modem Router DG834Gv5 Manual Publication Date March 201...

Page 12: ...izard to Set Up Your Router Logging In to the Modem Router Using the Setup Wizard to Auto Detect Your Internet Connection Viewing or Manually Configuring Your ISP Settings Changing Your ADSL Settings...

Page 13: ...If you cannot locate this information you can ask your ISP to provide it Using the Smart Wizard to Set Up Your Router For first time installation of your modem router refer to the NETGEAR Router Setup...

Page 14: ...168 0 1 in the address field of an Internet browser This login window opens 2 Enter adminC for the user name and password for the password both in lower case letters 3 Click OK You will be logged in t...

Page 15: ...p Wizard prompts you to select your country and language 1 Select your Country and Language It is important to specify the location where the modem router will operate so that the Internet connection...

Page 16: ...ection type The Setup Wizard detects your ISP configuration Depending on the type of connection you are prompted to enter your ISP settings as shown in the following table Figure 1 4 Figure 1 5 Table...

Page 17: ...re required to perform the function of translating an Internet name such as www netgear com to a numeric IP address For a fixed IP address configuration you must obtain DNS server addresses from your...

Page 18: ...s 1 Log in to the modem router as described in Logging In to the Modem Router 2 Select Basic Settings to display the Basic Settings screen The fields on the Basic Settings screen depend on whether or...

Page 19: ...oubleshooting Note When your Internet connection is working you will no longer need to launch the ISP s login program on your computer to access the Internet When you start an Internet application you...

Page 20: ...ally NAT is enabled Disable This disables NAT but leaves the firewall active Disable NAT only if you are sure that you do not require it When NAT is disabled only standard routing is performed by this...

Page 21: ...If your ISP provided you with a multiplexing method or VPI VCI number then enter the setting 1 From the main menu select ADSL Settings 2 In the Multiplexing Method drop down list select LLC based or V...

Page 22: ...puters requires access It is not necessary to run a dialer or login application such as dial up networking or Enternet to connect log in or disconnect The modem router performs these functions automat...

Page 23: ...Wireless Station Access on page 2 16 Restricting Access by MAC Address on page 2 17 Planning Your Wireless Network For compliance and compatibility between similar products in your area the operating...

Page 24: ...WPA or WPA 2 capable and that they support WPS configuration See Using Push N Connect WPS to Configure Your Wireless Network on page 2 10 Wireless Placement and Range Guidelines The range of your wir...

Page 25: ...equipment The ADSL2 Modem Wireless Router provides highly effective security features which are covered in detail in this chapter Deploy the security features appropriate to your needs There are sever...

Page 26: ...e Controlling Wireless Station Access on page 2 16 For more information about wireless technology see the link to the online document in Wireless Communications in Appendix C Manually Configuring Your...

Page 27: ...other settings unchanged 5 To save your changes click Apply 6 Configure and test your computers for wireless connectivity After testing your wireless connectivity select a security method see Configur...

Page 28: ...f they can operate in 802 11b mode Wireless Access Point Enable Wireless Access Point Selected by default this setting enables the wireless radio which allows the modem router to work as a wireless ac...

Page 29: ...ryption See Configuring WEP WPA PSK WiFi Protected Access Pre Shared Key Allow only computers configured with WPA to connect to the modem router See Configuring WPA WPA2 or WPA WPA2 WPA2 PSK Wi Fi Pro...

Page 30: ...s to display the Wireless Settings screen 3 In the Security Options section select the WEP Wired Equivalent Privacy radio button 4 Select the Authentication Type Automatic Open System or Shared Key Th...

Page 31: ...mbination of 0 9 a f or A F 7 Select which of the four keys will be the default Data transmissions are always encrypted using the default key The other keys can be used only to decrypt received data T...

Page 32: ...ver Primary Radius Server IP Address The IP address of the Radius server The default is 0 0 0 0 Radius Port Port number of the Radius server The default is 1812 Shared Key This is shared between the w...

Page 33: ...owing section Using a WPS Button to Add a WPS Client Entering a PIN For information about using the PIN method see Using PIN Entry to Add a WPS Client on page 2 13 Using a WPS Button to Add a WPS Clie...

Page 34: ...keep these wireless settings unless you change them or you clear the Keep Existing Wireless Settings check box select Advanced Wireless Settings to go to the WPS Settings screen 6 Note the new SSID an...

Page 35: ...e if other WPS enabled devices are added later To use a PIN to add a WPS client 1 Log in to the modem router at its default LAN address of http 192 168 0 1 with its default user name of admin and defa...

Page 36: ...Viewing Attached Devices on page 4 8 For non WPS clients you cannot use the WPS setup procedures to add them to the wireless network You must record and then manually enter your security settings see...

Page 37: ...ity method and passphrase 4 For the WPS devices that you want to connect follow the procedure Using a WPS Button to Add a WPS Client on page 2 11 or Using PIN Entry to Add a WPS Client on page 2 13 Th...

Page 38: ...less access to your network Turning off wireless connectivity completely You can completely turn off the wireless portion of the modem router For example if you use your notebook computer to wirelessl...

Page 39: ...router at its default LAN address of http 192 168 0 1 with its default user name of admin and default password of password or using whatever user name password and LAN address you have chosen for the...

Page 40: ...he Device Name table select its radio button to capture its MAC address Use the Add button to enter the MAC address of the device to be added The MAC address can usually be found on the bottom of the...

Page 41: ...s to change the modem router password and the amount of time for the administrator s login time out NETGEAR recommends that you change this password to a more secure password The ideal password should...

Page 42: ...ty To change the login time out period 1 In the Set Password screen type a number in the Administrator login times out field The suggested default value is 5 minutes 2 Click Apply to save your changes...

Page 43: ...ss from your LAN to Internet locations or services that you specify as off limits Denial of service DoS protection Detects and thwarts denial of service DoS attacks such as Ping of Death SYN flood LAN...

Page 44: ...een Always Turn on keyword blocking all the time independent of the setting in the Schedule screen 4 Enter a keyword or domain in the Keyword field click Add Keyword and then click Apply Some examples...

Page 45: ...specific resources Outbound rules LAN to WAN determine what outside resources local users can have access to The default inbound and outbound rules of the modem router are Inbound Block all access fr...

Page 46: ...cal computers However by defining an inbound rule you can make a local server for example a Web server or game server visible and available to the Internet The rule tells the modem router to direct in...

Page 47: ...nal services or applications that do not already appear Action Select when you want this type of traffic to be handled You can block or allow always or you can choose to block or allow according to th...

Page 48: ...d this use the Reserved IP address feature in the LAN IP menu to keep the computer s IP address constant Local computers must access the local server using the computer s local LAN address 192 168 0 1...

Page 49: ...dled You can block or allow always or you can block or allow according to the schedule defined in the Schedule screen LAN users This setting determine which packets are covered by the rule based on th...

Page 50: ...rules might be important in determining the disposition of a packet The Move button allows you to relocate a defined rule to a new position in the table Services Services are functions performed by s...

Page 51: ...min default password of password or using whatever password and LAN address you have chosen for the modem router 2 Under the Content Filtering heading select Services to display the Services screen To...

Page 52: ...sword of password or using whatever password and LAN address you have chosen for the modem router 2 On the main menu select Schedule to display the Schedule screen 3 Select your time zone This setting...

Page 53: ...0 1 with its default user name of admin default password of password or using whatever password and LAN address you have chosen for the modem router 2 On the main menu select the Schedule The Schedule...

Page 54: ...actory default settings The procedures below explain how to do these tasks Backing Up the Configuration to a File 1 Log in to the modem router at its default LAN address of http 192 168 0 1 with its d...

Page 55: ...to erase its configuration settings and restore the modem router to the factory default settings To erase the configuration 1 Under the Maintenance heading on the main menu select Backup Settings 2 C...

Page 56: ...name of admin default password of password or using whatever user name password and LAN address you have chosen for the modem router 3 From the main menu under the Maintenance heading select Router U...

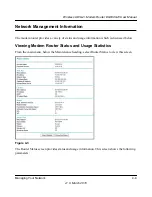
Page 57: ...ter provides a variety of status and usage information which is discussed below Viewing Modem Router Status and Usage Statistics From the main menu below the Maintenance heading select Router Status t...

Page 58: ...Server DNS The DNS server IP addresses used by the modem router These addresses are usually obtained dynamically from the ISP LAN Port MAC Address The Ethernet MAC address used by the local LAN port...

Page 59: ...Connect WPS to Configure Your Wireless Network on page 2 10 Name SSID The service set ID also known as the wireless network name Region The country where the unit is set up for use Channel The curren...

Page 60: ...et or clear Tx B s The average egress line utilization for this port Rx B s The average ingress line utilization for this port Up Time The time elapsed since the last power cycle or reset ADSL Link Do...

Page 61: ...click the Refresh button Viewing Selecting and Saving Logged Information The modem router logs security related events such as denied incoming service requests hacker probes and administrator logins...

Page 62: ...recorded Description or action The type of event and what action was taken if any Source IP The IP address of the initiating device for this log entry Source port and interface The service port number...

Page 63: ...48 39 NETGEAR activated This entry indicates a power up or reboot with initial time entry Tue 2002 05 21 18 55 00 Administrator login successful IP 192 168 0 2 Thu 2002 05 21 18 56 58 Administrator lo...

Page 64: ...ed the ping packet always goes through the VPN if the VPN tunnel is enabled and working Perform a DNS lookup to test if an Internet name resolves to an IP address to verify that the DNS server configu...

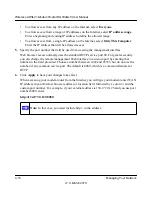
Page 65: ...LAN address you have chosen for the modem router 2 Under the Advanced heading of the main menu select Remote Management to display the Remote Management screen 3 Select the Turn Remote Management On...

Page 66: ...s normally uses the standard HTTP service port 80 For greater security you can change the remote management Web interface to a custom port by entering that number in the field provided Choose a number...

Page 67: ...ur WAN Setup Configuring Your LAN IP Settings Using the Modem Router as a DHCP Server Configuring Dynamic DNS Using Static Routes Configuring Universal Plug and Play UPnP These features are discussed...

Page 68: ...connect manually using the screen accessed from the Connection Status button on the Router Status screen If you have an Always on connection this setting has no effect Enable PPPOE RELAY If this chec...

Page 69: ...fault DMZ server 1 Go to the WAN Setup screen as described in the previous section 2 Select the Default DMZ Server check box 3 Type the IP address for that server 4 Click Apply to save your changes Re...

Page 70: ...nge for use in private networks and should be suitable in most applications If your network has a requirement to use a different IP addressing scheme you can make those changes in this screen To view...

Page 71: ...roadcasting method of the RIP packets that the modem router sends It recognizes both formats when receiving By default this is RIP 1 RIP 1 is universally supported It is adequate for most networks unl...

Page 72: ...heck box on the LAN IP Setup screen Otherwise leave it selected Specify the pool of IP addresses to be assigned by filling in the Starting IP Address and Ending IP Address fields These addresses shoul...

Page 73: ...router s LAN subnet such as 192 168 0 x 3 Type the MAC address of the computer or server 4 Click Apply to enter the reserved address into the table To edit or delete a reserved address entry 1 Click...

Page 74: ...rovider and obtain an account with them After you have configured your account information in the modem router whenever your ISP assigned IP address changes your modem router will automatically contac...

Page 75: ...e modem router has adequate routing information after it has been configured for Internet access and you do not need to configure additional static routes You must configure static routes only for unu...

Page 76: ...192 168 0 100 In the Metric field a value of 1 will work since the ISDN router is on the LAN This represents the number of routers between your network and the destination This is a direct connection...

Page 77: ...ay IP Address This must be a router on the same LAN segment as the modem router Metric Type a number between 2 and 15 This represents the number of routers between your network and the destination Usu...

Page 78: ...reshness of the device status but can significantly reduce network traffic Advertisement Time To Live The time to live for the advertisement is measured in hops steps for each UPnP packet sent A hop i...

Page 79: ...l Policy Setting Up a Client to Gateway VPN Configuration on page 6 5 provides the steps needed to configure a VPN tunnel between a remote PC and a network gateway using the VPN Wizard and the NETGEAR...

Page 80: ...t See Setting Up a Client to Gateway VPN Configuration on page 6 5 to set up this configuration Gateway to Gateway VPN Tunnels Gateway to Gateway VPN Tunnels provide secure access between networks suc...

Page 81: ...e two VPN endpoints When planning your VPN you must make a few choices first Will the local end be any device on the LAN a portion of the local network as defined by a subnet or by a range of IP addre...

Page 82: ...ection see Using Manual Policy to Configure VPN Tunnels on page 6 42 What level of IPSec VPN encryption will you use DES The Data Encryption Standard DES processes input data that is 64 bits wide encr...

Page 83: ...ll the authentication and key parameters You have more control over the process however the process is more complex and there are more opportunities for errors or configuration mismatches between your...

Page 84: ...in Table 6 2 on page 6 4 If you have special requirements not covered by these VPNC recommended parameters refer to Setting Up VPN Tunnels in Special Circumstances on page 6 32 to set up the VPN tunn...

Page 85: ...screen displays 2 Click Next to proceed Fill in the Connection Name and the pre shared key fields Select the radio button for the type of target end point and then click Next to proceed VPN Endpoint L...

Page 86: ...10 The Summary screen displays To view the VPNC recommended authentication and encryption settings used by the VPN Wizard click the here link You can click Back to return to the Summary screen Tip The...

Page 87: ...onfiguration procedure The VPN Policies screen displays showing that the new tunnel is enabled To view or modify the tunnel settings select the radio button next to the tunnel entry and click Edit Fig...

Page 88: ...he option to install either the VPN adapter or the IPSec component or both The VPN adapter is not necessary If you do not have a modem or dial up adapter installed in your PC you might see the warning...

Page 89: ...Subnet In this example type 192 168 3 1 as the network address of the DG834G v5 Mask Enter 255 255 255 0 as the LAN Subnet Mask of the DG834G v5 Protocol Select All to allow all traffic through the V...

Page 90: ...he Network Security Policy list expand the new connection by double clicking its name or clicking the symbol My Identity and Security Policy subheadings appear below the connection name b Click the Se...

Page 91: ...r this address in the Internal Network IP Address field Otherwise leave this field empty d In the Internet Interface section of the screen select the adapter that you use to access the Internet If you...

Page 92: ...Policy Editor window expand the Security Policy heading by double clicking its name or clicking the symbol b Expand the Authentication subheading by double clicking its name or clicking the symbol Th...

Page 93: ...e d Select the Encapsulation Protocol ESP check box e In the Encrypt Alg drop down list select the type of encryption that is configured for the Encryption Protocol in the DG834G v5 in Table 6 3 on pa...

Page 94: ...tablish an Internet connection from the PC b On the Windows taskbar click the Start button and then click Run c Type ping t 192 168 3 1 and then click OK This causes a continuous ping to be sent to th...

Page 95: ...n Monitor screen for this connection is shown in the following figure In this example you can see these settings The DG834G v5 has a GW Address public IP WAN address of 22 23 24 25 The DG834G v5 has a...

Page 96: ...igure a gateway to gateway VPN tunnel using the VPN Wizard Note While your PC is connected to a remote LAN through a VPN you might not have normal Internet access If this is the case you must close th...

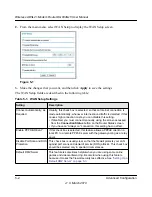
Page 97: ...Manual Keys Main Perfect Forward Secrecy Enabled or Disabled Disabled Encryption Protocol DES or 3DES 3DES Authentication Protocol MD5 or SHA 1 SHA 1 Diffie Hellman DH Group Group 1 or Group 2 Group...

Page 98: ...tp 192 168 0 1 with its default user name of admin and password of password Select VPN Wizard on the main menu The VPN Wizard screen displays 2 Click Next to proceed and the Step 1 of 3 screen display...

Page 99: ...s 4 Fill in the IP address or FQDN for the target VPN endpoint WAN connection and then click Next The Step 3 of 3 screen displays 5 Fill in the IP Address and Subnet Mask fields for the target endpoin...

Page 100: ...Networking v1 0 March 2010 The VPN Wizard Summary screen displays To view the VPNC recommended authentication and encryption settings used by the VPN Wizard click the here link see Figure 6 24 You ca...

Page 101: ...PN gateway for example 14 15 16 17 LAN IP settings of the remote VPN gateway IP Address for example 192 168 0 1 Subnet Mask for example 255 255 255 0 Preshared Key for example 12345678 8 Use the VPN S...

Page 102: ...DG834G v5 main menu select VPN Status The VPN Status Log screen displays b Click the VPN Status button to get the Current VPN Tunnels SAs screen c Click Connect for the VPN tunnel you want to activate...

Page 103: ...l by pinging the remote endpoint Start using the VPN tunnel Using the VPN Status Page to Activate a VPN Tunnel To use the VPN Status screen to activate a VPN tunnel 1 Log in to the modem router 2 On t...

Page 104: ...gateway to gateway Client to gateway configuration To check the VPN connection you can initiate a request from the remote PC to the DG834G v5 s network by using the Connect option in the NETGEAR ProS...

Page 105: ...hed you can open a browser on the PC and enter the LAN IP address of the remote DG834G v5 After a short wait you should see the login screen of the modem router unless another PC already has the DG834...

Page 106: ...to go to a URL whose IP address or range is covered by the policy for that VPN tunnel Verifying the Status of a VPN Tunnel To use the VPN Status screen to determine the status of a VPN tunnel 1 Log i...

Page 107: ...h active VPN tunnel SPI Each SA has a unique SPI Security Parameter Index for traffic in each direction For manual key exchange the SPI is specified in the policy definition For automatic key exchange...

Page 108: ...een to Deactivate a VPN Tunnel To use the VPN Policies screen to deactivate a VPN tunnel 1 Log in to the modem router 2 On the main menu select VPN Policies to display the VPN Policies screen 3 In the...

Page 109: ...2 On the main menu select VPN Policies to display the VPN Policies screen 3 Click VPN Status The Current VPN Tunnels SAs screen displays 4 Click Drop for the VPN tunnel that you want to deactivate De...

Page 110: ...and automatically generate the encryption keys Manual Policy For a manual keying setup in which you must specify each phase of the connection see Using Manual Policy to Configure VPN Tunnels on page 6...

Page 111: ...how to access them The most common configuration scenarios will use IKE to manage the authentication and encryption keys The IKE protocol performs negotiations between the two VPN endpoints to automa...

Page 112: ...r if that is not possible that it is quickly re established when disconnected select this check box The ping IP address must be associated with the remote endpoint The remote LAN address must be used...

Page 113: ...nections are allowed but outgoing connections are blocked Initiator and Responder Both incoming and outgoing connections are allowed Exchange Mode Ensure that the remote VPN endpoint is set to use Mai...

Page 114: ...ult 160 bits slower but more secure This is the default Pre shared key The key must be entered both here and on the remote VPN Gateway SA Life Time This determines the time interval before the SA Secu...

Page 115: ...Worksheet Connection Name GtoG Pre Shared Key 12345678 Secure Association Main Mode or Manual Keys Main Perfect Forward Secrecy Enabled or Disabled Disabled Encryption Protocol DES or 3DES 3DES Authen...

Page 116: ...Wireless ADSL2 Modem Router DG834Gv5 User Manual 6 38 Virtual Private Networking v1 0 March 2010 2 On the main menu select VPN Policies to display the VPN Policies screen Figure 6 42...

Page 117: ...Wireless ADSL2 Modem Router DG834Gv5 User Manual Virtual Private Networking 6 39 v1 0 March 2010 3 Click Add Auto Policy The VPN Auto Policy screen displays Figure 6 43...

Page 118: ...int Address Data 22 23 24 25 Local LAN Use the default settings Remote LAN IP Address Select Subnet address from the drop down list Start IP Address 192 168 3 1 Subnet Mask 255 255 255 0 IKE Direction...

Page 119: ...5 0 Pre shared Key for example 12345678 7 Use the VPN Status screen to activate the VPN tunnel a From the main menu select VPN Status to display the VPN Status Log screen Then click VPN Status to disp...

Page 120: ...ternative to IKE you may use manual keying in which you must specify each phase of the connection A manual VPN policy requires all settings for the VPN tunnel to be manually input at each end both VPN...

Page 121: ...namic IP policies but only one such policy can be enabled at a time Otherwise select an option IP address or domain name and enter the address of the remote VPN endpoint to which you want to connect L...

Page 122: ...tion ESP Encapsulating Security Payload provides security for the payload data sent through the VPN tunnel SPI Enter the required Security Policy Indexes SPIs Each policy must have unique SPIs These s...

Page 123: ...ing the ISP Connection on page 7 3 I want to clear the configuration and start over again Go to Restoring the Default Configuration and Password on page 7 8 Basic Functioning After you turn on power t...

Page 124: ...uter s configuration to factory defaults This sets the router s IP address to 192 168 0 1 This procedure is explained in Restoring the Default Configuration and Password on page 7 8 If the error persi...

Page 125: ...correct login information The factory default login name is admin and the password is password Make sure that Caps Lock is off when entering this information If the router does not save changes you ha...

Page 126: ...s are connected correctly you should be able to connect all your telephones If disconnecting telephones does not result in a solid green DSL LED there may be a problem with your wiring If the telephon...

Page 127: ...address from the ISP the problem might be one of the following Your ISP might require a multiplexing method or virtual path identifier or virtual channel identifier parameter Verify with your ISP the...

Page 128: ...es from the Internet Your computer might not recognize any DNS server addresses A DNS server is a host on the Internet that translates Internet names such as www addresses to numeric IP addresses Typi...

Page 129: ...le ping 192 168 0 1 3 Click OK You should see a message like this one Pinging IP address with 32 bytes of data If the path is working you see this message Reply from IP address bytes 32 time NN ms TTL...

Page 130: ...t the network address of your PC the portion of the IP address specified by the netmask is different from the network address of the remote device Check that your cable or DSL modem is connected and f...

Page 131: ...s on the Internet Each entry in the log is stamped with the date and time of day Problems with the date and time function can include the following Date shown is January 1 2000 Cause The router has no...

Page 132: ...ralia 240V AC 50 Hz input Europe 230V AC 50 Hz input Japan 100V AC 50 60 Hz input All regions output 12 V DC 1 0A output Physical Specifications Dimensions 6 9 x 4 7 x 1 1 175 mm x 119 mm x 28 mm Weig...

Page 133: ...ing and configuration mechanics defined by the VPN Consortium Gather all the necessary information before you begin the configuration process Verify that the firmware is up to date and that you have a...

Page 134: ...to use appropriate network addresses for the environment The LAN addresses used in this example are as follows a Enter toFVL328 for the connection name b Enter 22 23 24 25 for the remote WAN s IP add...

Page 135: ...ter DG834Gv5 User Manual NETGEAR VPN Configuration B 3 v1 0 March 2010 Figure B 2 toFVL328 10 5 6 1 172 23 9 1 toFVL328 22 23 24 25 10 10 5 6 172 23 9 Click VPN Policies under the Advanced VPN heading...

Page 136: ...nfiguration on page 6 18 being certain to use appropriate network addresses for the environment a Enter toDG834 for the connection name b Enter 14 15 16 17 for the remote WAN s IP address c Enter the...

Page 137: ...k from a PC attached to the DG834G v5 a Open the command prompt Start Run cmd b Type ping 172 23 9 1 Figure B 4 Figure B 5 Note The pings might fail the first time If this happens try the pings a seco...

Page 138: ...guration in this section follows the addressing and configuration mechanics defined by the VPN Consortium Gather all the necessary information before you begin the configuration process Verify that th...

Page 139: ...com ngDDNS ngddns iego net In this example Gateway A is configured using an example FQDN provided by a DDNS Service provider In this case we established the hostname dg834g dyndns org for Gateway A us...

Page 140: ...ount and hostname settings and then click Apply Select the Use a Dynamic DNS Service check box In the Host Name field type dg834g dyndns org In the User Name field enter the account user name In the P...

Page 141: ...namic DNS Setup screen b Select the DynDNS org radio button The Dynamic DNS screen displays c Configure the appropriate account and host name settings and then click Apply In the Host and Domain Name...

Page 142: ...L328 for the connection name b Enter fvl328 dyndns org for the remote WAN s IP address c Enter the following IP Address 172 23 9 1 Subnet Mask 255 255 255 0 5 Configure the FVL328 as in the gateway to...

Page 143: ...formation before you begin the configuration process Verify whether the firmware is up to date all of the addresses that will be necessary and all of the parameters that need to be set on both sides A...

Page 144: ...ring the NETGEAR ProSafe VPN Client on the Remote PC at the Telecommuter s Home Office configures the NETGEAR ProSafe VPN Client endpoint Step 1 Configuring the Client to Gateway VPN Tunnel on the VPN...

Page 145: ...834G com in this example fromDG834G in the example Dynamic IP address Subnet address Single address 192 168 0 1 in this example 255 255 255 0 192 168 2 3 in this example IKE Keep Alive is optional mus...

Page 146: ...N client program installed that supports IPSec in this case study the NETGEAR VPN ProSafe Client is used Go to the NETGEAR website http www netgear com for information about how to purchase the NETGEA...

Page 147: ...te a VPN Connection b From the Edit menu of the Security Policy Editor click Add and then click Connection A New Connection listing appears in the list of policies Rename the new connection so that it...

Page 148: ...rop down list to allow all traffic through the VPN tunnel h Select the Connect using Secure Gateway Tunnel check box i Select Domain Name in the ID Type drop down list and enter fromDG834G com in this...

Page 149: ...c Select the Main Mode radio button in the Select Phase 1 Negotiation Mode group 4 Configure the VPN client identity In this step you provide information about the remote VPN client PC You must provi...

Page 150: ...ter toDG834G com in this example Select Disabled in the Virtual Adapter drop down list d In the Internet Interface section select Intel PRO 100VE Network Connection in this example your Ethernet adapt...

Page 151: ...e symbol b Expand the Authentication subheading by double clicking its name or clicking the symbol Then select Proposal 1 below Authentication c In the Authentication Method field select Pre Shared Ke...

Page 152: ...x e In the Encrypt Alg drop down list select the type of encryption In this example use Triple DES f In the Hash Alg drop down list select SHA 1 g In the Encapsulation drop down list select Tunnel h L...

Page 153: ...lick the system tray icon to open the popup menu b Select Connect to open the My Connections list c Select toDG834G The modem router reports the results of the attempt to connect Once the connection i...

Page 154: ...ce open Monitoring the VPN Tunnel Telecommuter Example Viewing the PC Client s Connection Monitor and Log Viewer To view information on the progress and status of the VPN client connection open the Lo...

Page 155: ...n the connection is successful the SA changes to the yellow key symbol Viewing the VPN Router s VPN Status and Log Information To view information about the status of the VPN client connection open th...

Page 156: ...AR VPN Configuration v1 0 March 2010 1 On the modem router main menu select Router Status and then click the VPN Status button The VPN Status Log screen for a connection is shown below 2 To view the V...

Page 157: ...working and TCP IP Addressing http documentation netgear com reference enu tcpip index htm Wireless Communications http documentation netgear com reference enu wireless index htm Preparing a Computer...

Reviews: